1. ข้อมูลด้านความปลอดภัย
Please read and understand all safety information before operating this multimeter. Failure to follow these instructions may result in electric shock, fire, or personal injury.
- ตรวจสอบให้แน่ใจเสมอว่ามัลติมิเตอร์อยู่ในสภาพใช้งานได้ดีและไม่มีความเสียหายก่อนใช้งาน
- ไม่ต้องสมัครวอลุ่มtage or current that exceeds the maximum specified limits for the multimeter. This model supports up to 600V and 10A.
- ใช้ความระมัดระวังเมื่อทำงานกับ voltages สูงกว่า 30V AC RMS, 42V peak หรือ 60V DC ปริมาตรเหล่านี้tagอาจทำให้เกิดอันตรายจากการช็อตได้
- Always connect the common (COM) test lead first, then the live test lead. Disconnect the live test lead first, then the common test lead.
- Ensure the test leads are properly seated in the correct input jacks for the measurement being performed.
- Do not use the multimeter if the test leads are damaged or if the meter casing เปิดอยู่
- Replace fuses with specified types and ratings only. This device features double safety protection with 500mA/600V and 10A/600V fuses.
- ควรหลีกเลี่ยงการใช้มัลติมิเตอร์ในสภาพแวดล้อมที่เปียกชื้นหรือขณะเกิดพายุฝนฟ้าคะนอง
- ระหว่างการวัด ให้วางนิ้วมือไว้ด้านหลังที่ครอบนิ้วบนหัววัดทดสอบ
โอเวอร์โวลtage Category III 600V Safety Standards:
This multimeter is designed to meet CAT III 600V safety standards, providing enhanced protection against transient overvoltages in fixed installations.

Image: Internal circuit board of the DEASOMIYE T21D multimeter, highlighting the dual fuses (500mA/600V and 10A/600V) that provide anti-burn and overload protection across all ranges.
2. สินค้าหมดview
The DEASOMIYE T21D is an auto-ranging digital multimeter designed for accurate and reliable electrical measurements. It features a 6000-count True RMS display and a wide range of functions suitable for DIYers, homeowners, handymen, and electricians.

Image: The DEASOMIYE T21D Digital Multimeter, shown with its orange and black casing, large LCD display, function knob, input jacks, and included accessories such as test leads, AAA batteries, and spare safety tubes.
2.1 คุณสมบัติหลัก
- อัตโนมัติ: เลือกช่วงการวัดที่ถูกต้องโดยอัตโนมัติ
- RMS ที่แท้จริง: ให้ค่าการวัดที่แม่นยำสำหรับรูปคลื่นกระแสสลับที่ไม่เป็นรูปคลื่นไซน์
- แสดงผล 6000 นับ: High-resolution digital display for precise measurements.
- แบบไม่สัมผัส Voltagการตรวจจับ e (NCV): ตรวจจับปริมาณไฟฟ้ากระแสสลับได้อย่างปลอดภัยtagอีโดยไม่ต้องมีการสัมผัสโดยตรง
- มัลติฟังก์ชัน: วัดปริมาตร AC/DCtage, AC/DC Current, Resistance, Continuity, Frequency, Capacitance, Diode, Temperature, and Duty Cycle.
- การป้องกันความปลอดภัย: โอเวอร์โวลtage Category III 600V, anti-burn with double ceramic fuses.
- การออกแบบที่เป็นมิตรต่อผู้ใช้: Large LCD screen with backlight, data hold, support stand, test leads holder, and flashlight.
- โครงสร้างทนทาน: Wrapped with a sturdy, non-slip silicone protective cover.

Image: A visual representation of the DEASOMIYE T21D's multi-function capabilities, including AC/DC voltage, AC/DC current, automatic shutdown, frequency, flashlight, diode, continuity buzzer, resistance, NCV detection, duty cycle, temperature measurement, and capacitance.
2.2 ส่วนประกอบและจอแสดงผล

Image: A detailed diagram labeling the key components of the DEASOMIYE T21D multimeter, including the NCV sensing area, LED display, FUNC/HZ function selection button, NCV indicator, Hold button, Function knob, COM input socket, VΩmA input socket, and 10A input socket.
- จอแสดงผล LED: แสดงค่าการวัด หน่วย และตัวบ่งชี้ฟังก์ชัน
- ปุ่มฟังก์ชั่น: Used to select the desired measurement mode.
- FUNC/HZ Button: Toggles between functions within a mode (e.g., AC/DC, Frequency/Duty Cycle).
- ปุ่มถือ: หยุดการอ่านค่าปัจจุบันบนจอแสดงผล
- ปุ่มแบ็คไลท์: Activates the display backlight for improved visibility in low light.
- ปุ่มไฟฉาย: Turns on the built-in flashlight.
- พื้นที่ตรวจวัด NCV: ตรวจจับปริมาตรแบบไม่สัมผัสtage.
- แจ็คอินพุต:
- คอม: สายวัดทั่วไปสำหรับการวัดทั้งหมด (สายวัดสีดำ)
- วีΩmA: อินพุตสำหรับ voltage, resistance, capacitance, frequency, diode, continuity, and milliampere current (red test lead).
- 10 ก: Input for high current measurements up to 10A (red test lead).
2.3 รายการบรรจุภัณฑ์

Image: The complete packing list for the DEASOMIYE T21D Digital Multimeter, including the multimeter unit, test leads, 3 AAA batteries, thermocouple, safety tubes, and user manual.
ในแพ็คเกจประกอบด้วย:
- 1x DEASOMIYE T21D Electrical Multimeter
- 1x Probe Test Leads (Red and Black)
- 1x Thermocouple (for temperature measurement)
- 2x Safety Tubes (spare fuses)
- แบตเตอรี่ AAA 3 ก้อน
- 1x คู่มือผู้ใช้
3. การตั้งค่า
3.1 การติดตั้งแบตเตอรี่
- ตรวจสอบให้แน่ใจว่ามัลติมิเตอร์ปิดอยู่
- ค้นหาช่องใส่แบตเตอรี่ที่ด้านหลังของมัลติมิเตอร์
- ใช้ไขควงเปิดฝาช่องใส่แบตเตอรี่
- Insert three (3) AAA batteries, observing the correct polarity (+/-) as indicated inside the compartment.
- ใส่ฝาปิดช่องใส่แบตเตอรี่และขันให้แน่นด้วยสกรู

Image: The back of the DEASOMIYE T21D multimeter, illustrating the durable case, integrated support stand, test leads holder, and the battery compartment for AAA batteries.
3.2 การเชื่อมต่อสายทดสอบ
- ใส่สายวัดทดสอบสีดำลงใน คอม แจ็คอินพุต (ทั่วไป)
- สำหรับการวัดส่วนใหญ่ (ปริมาตร)tage, resistance, capacitance, frequency, diode, continuity, and milliampere current), insert the red test lead into the VΩmA แจ็คอินพุต
- สำหรับการวัดกระแสไฟฟ้าสูง (สูงสุด 10A) ให้เสียบสายวัดสีแดงเข้าไปในช่อง 10เอ แจ็คอินพุต
สำคัญ:
- Always ensure test leads are securely connected before taking measurements.
- Never connect test leads to the wrong input jacks, especially when measuring current, as this can damage the multimeter or blow a fuse.
4. คู่มือการใช้งาน
The DEASOMIYE T21D features an auto-ranging function, simplifying operation by automatically selecting the appropriate measurement range for most functions.

Image: The DEASOMIYE T21D multimeter with a close-up of its automatic range turntable design, indicating that it's easy to use for AC/DC readings without manual range switching.
4.1 ขั้นตอนการวัดพื้นฐาน
- Turn the function knob to the desired measurement mode.
- Connect the test leads to the appropriate input jacks (COM and VΩmA or 10A).
- เชื่อมต่อหัววัดทดสอบเข้ากับวงจรหรือชิ้นส่วนที่ต้องการทดสอบ
- อ่านค่าการวัดจากหน้าจอ LCD
- Disconnect the test probes from the circuit, then remove the test leads from the multimeter.
- Turn the function knob to the OFF position when finished.
4.2 ฟังก์ชันการวัดเฉพาะ
4.2.1 โวลต์ AC/DCtagอีการวัด
- หมุนปุ่มฟังก์ชั่นไปที่ V~ (AC เล่มtagจ) หรือ V- (DC เล่มtage) position. The multimeter will auto-range.
- เชื่อมต่อสายวัดสีดำเข้ากับแจ็ค COM และสายวัดสีแดงเข้ากับแจ็ค VΩmA
- Connect the test probes in parallel across the circuit or component to measure voltage.

Image: The DEASOMIYE T21D multimeter demonstrating AC voltage measurement on a power strip (displaying 223.5V AC) and DC voltage measurement on a 9V battery (displaying 9.253V DC).
4.2.2 การวัดกระแสไฟฟ้ากระแสสลับ/กระแสตรง
- หมุนปุ่มฟังก์ชั่นไปที่ ม๊า~ (กระแสไฟฟ้าสลับ) หรือ ม- (DC Current) position. For higher currents, use the 10A position.
- Connect the black test lead to the COM jack. Connect the red test lead to the VΩmA jack for mA measurements or the 10A jack for A measurements.
- สำคัญ: Connect the multimeter in series with the circuit to measure current. Never connect it in parallel across a voltagแหล่งจ่ายไฟเมื่ออยู่ในโหมดกระแสไฟฟ้า
4.2.3 การวัดค่าความต้านทาน (โอห์ม)
- หมุนปุ่มฟังก์ชั่นไปที่ Ω ตำแหน่ง.
- Connect the black test lead to COM and the red test lead to VΩmA.
- Ensure the circuit is de-energized before measuring resistance. Connect the probes across the component.
4.2.4 การทดสอบความต่อเนื่อง (-)
- หมุนปุ่มฟังก์ชั่นไปที่ Ω position and press the FUNC/HZ button until the continuity symbol (-) ปรากฏขึ้น
- Connect the black test lead to COM and the red test lead to VΩmA.
- Connect the probes across the circuit or component. A continuous beep indicates a low-resistance path (continuity).
4.2.5 การทดสอบไดโอด (|)
- หมุนปุ่มฟังก์ชั่นไปที่ Ω position and press the FUNC/HZ button until the diode symbol (|) ปรากฏขึ้น
- Connect the black test lead to COM and the red test lead to VΩmA.
- Connect the probes across the diode. The display will show the forward voltage drop. สลับขั้วโพรบ; การอ่านค่าวงจรเปิดแสดงว่าไดโอดทำงานได้ดี
4.2.6 Capacitance Measurement (C)
- หมุนปุ่มฟังก์ชั่นไปที่ C ตำแหน่ง.
- Connect the black test lead to COM and the red test lead to VΩmA.
- Ensure the capacitor is fully discharged before testing. Connect the probes across the capacitor.
4.2.7 ความถี่ (เฮิร์ตซ์) และรอบการทำงาน (%)
- หมุนปุ่มฟังก์ชั่นไปที่ เฮิร์ตซ์% ตำแหน่ง.
- Connect the black test lead to COM and the red test lead to VΩmA.
- Connect the probes to the signal source. Press FUNC/HZ to toggle between Frequency (Hz) and Duty Cycle (%).
4.2.8 การวัดอุณหภูมิ (°C/°F)
- หมุนปุ่มฟังก์ชั่นไปที่ ° C / ° F ตำแหน่ง.
- Insert the thermocouple into the VΩmA and COM jacks, observing polarity.
- Place the thermocouple tip on or near the object whose temperature is to be measured. Press FUNC/HZ to switch between Celsius and Fahrenheit.

Image: The DEASOMIYE T21D multimeter displaying a temperature reading (26.08°C) while a thermocouple, connected to the meter, is immersed in a glass of water.
4.2.9 ไม่สัมผัส Voltagการตรวจจับ e (NCV)
- หมุนปุ่มฟังก์ชั่นไปที่ เอ็นซีวี ตำแหน่ง.
- Move the NCV sensing area (top of the multimeter) close to a live AC voltage source (e.g., an outlet or insulated wire).
- The multimeter will emit an audible beep and the NCV indicator will light up, with increasing frequency as it gets closer to the voltagแหล่งที่มา
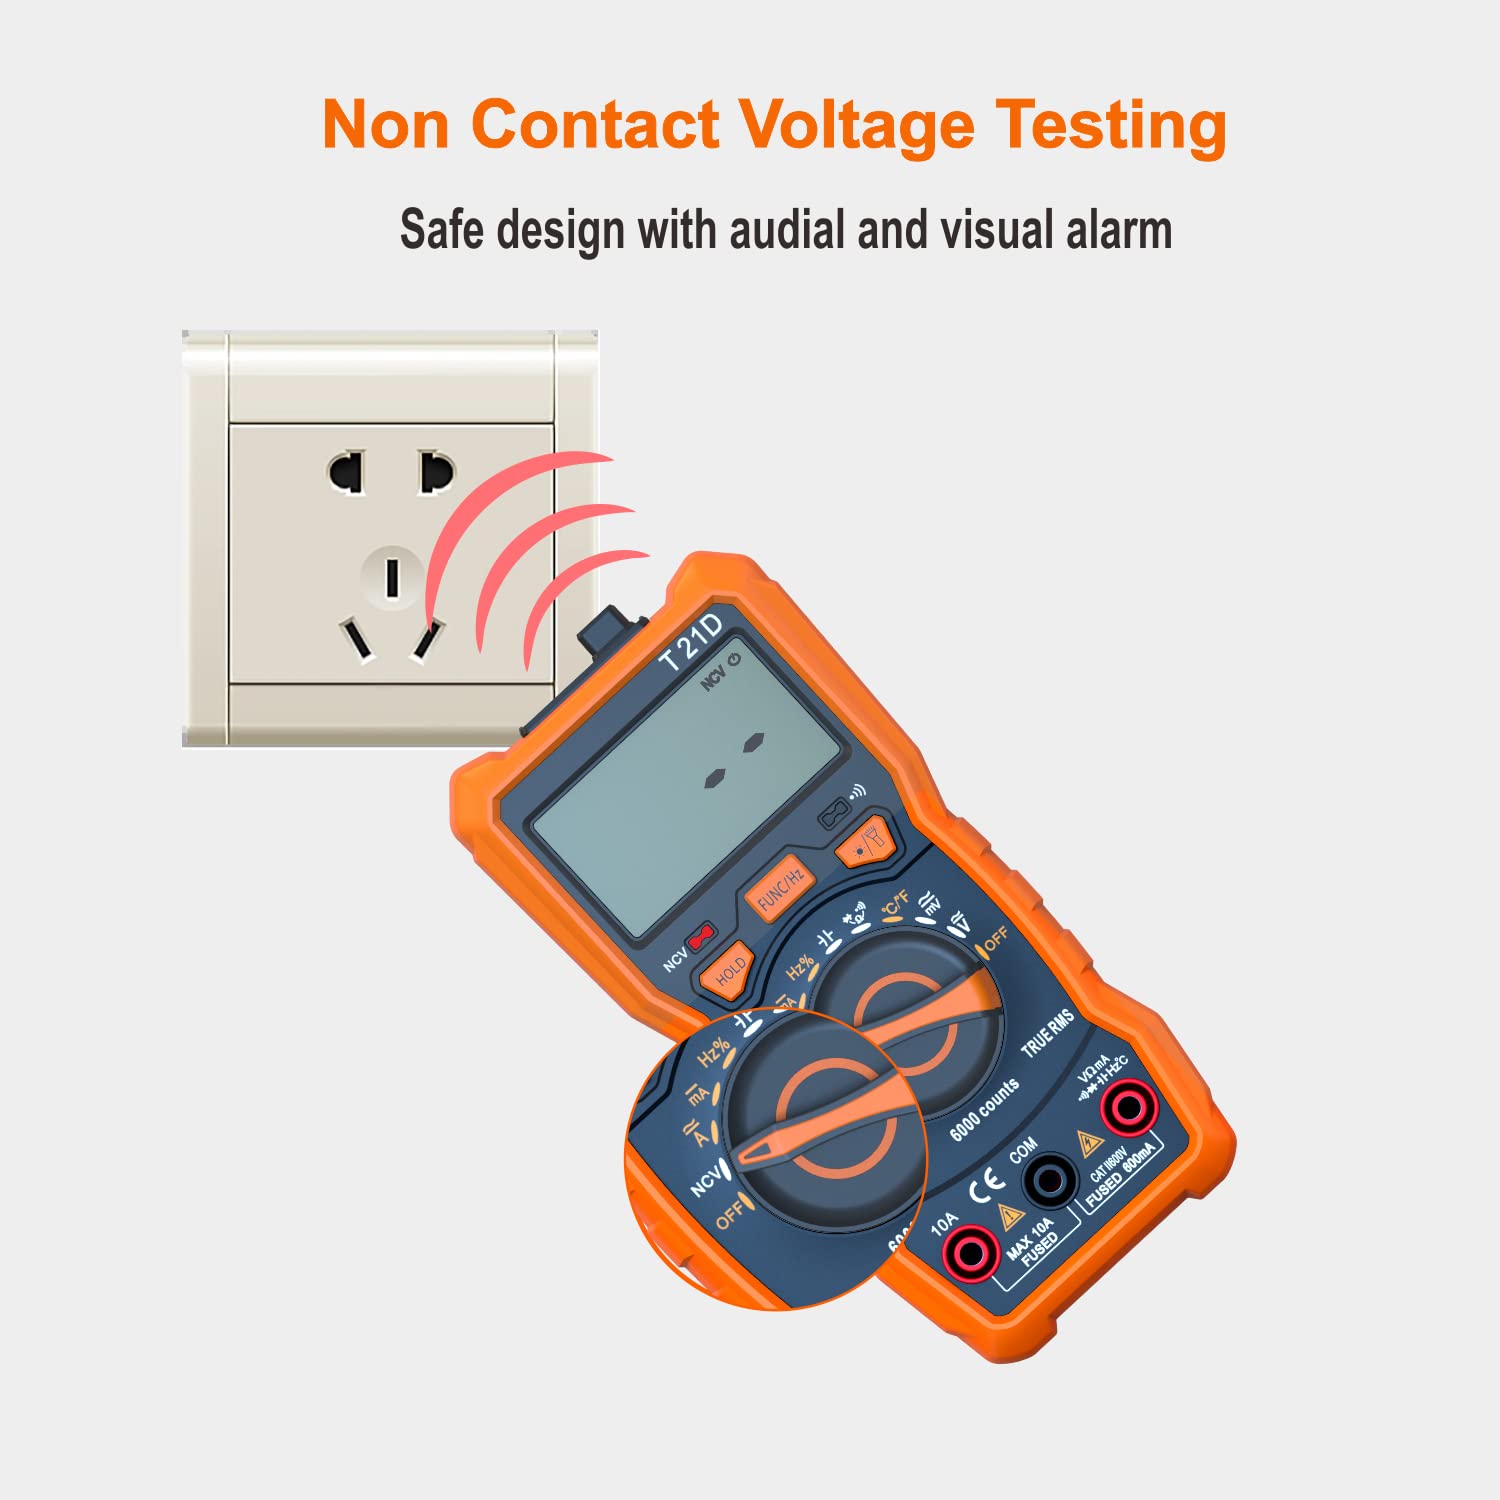
Image: The DEASOMIYE T21D multimeter detecting non-contact voltage near an electrical outlet, indicated by red arcs representing the detection field and the NCV symbol on the display.
4.3 ฟังก์ชั่นพิเศษ
4.3.1 การเก็บข้อมูล
กดปุ่ม ถือ ปุ่มนี้ใช้สำหรับหยุดการแสดงค่าปัจจุบันบนหน้าจอ กดอีกครั้งเพื่อยกเลิกการหยุดแสดงค่า
4.3.2 แสงพื้นหลัง
Press the backlight button (often combined with the flashlight button) to turn on the display backlight. This improves visibility in dimly lit areas. Press again to turn off.

Image: The DEASOMIYE T21D multimeter with its LCD display illuminated by a backlight, showing a clear reading in a low-light setting.
4.3.3 ไฟฉาย
Press the flashlight button (often combined with the backlight button) to activate the built-in flashlight. This helps illuminate the work area. Press again to turn off.

Image: The DEASOMIYE T21D multimeter with its integrated flashlight turned on, illuminating a dark electrical panel, demonstrating its utility in low-light conditions.
5. การบำรุงรักษา
Proper maintenance ensures the longevity and accuracy of your DEASOMIYE T21D multimeter.
5.1 การทำความสะอาด
- เช็ดมิเตอร์asinจีกับโฆษณาamp ผ้าและผงซักฟอกอ่อน ห้ามใช้สารกัดกร่อนหรือตัวทำละลาย
- Keep the display clean and free from dust.
5.2 การเปลี่ยนแบตเตอรี่
When the battery indicator appears on the display, replace the batteries promptly to ensure accurate readings. Refer to Section 3.1 for battery installation instructions.
5.3 การเปลี่ยนฟิวส์
If the multimeter fails to measure current or shows an 'OL' (Overload) reading when measuring current, the fuse may be blown. This multimeter uses two fuses:
- F1: 500mA/600V fast-acting fuse for the VΩmA input.
- F2: ฟิวส์แบบตัดไฟเร็ว 10A/600V สำหรับอินพุต 10A
ในการเปลี่ยนฟิวส์:
- ตรวจสอบให้แน่ใจว่ามัลติมิเตอร์ปิดอยู่และถอดสายวัดทั้งหมดออกแล้ว
- Open the battery compartment cover on the back of the multimeter.
- Carefully remove the old fuse(s).
- Replace with new fuses of the exact specified type and rating. Using incorrect fuses can compromise safety and damage the meter.
- ปิดฝาช่องใส่แบตเตอรี่ให้แน่น

Image: The DEASOMIYE T21D multimeter with test leads connected to an electrical panel, illustrating its intelligent double protection feature with built-in 500mA/600V and 10A/600V explosion-proof fuse tubes for enhanced safety and reliability.
6 การแก้ไขปัญหา
If you encounter issues with your DEASOMIYE T21D multimeter, refer to the following common troubleshooting tips:
- ไม่มีจอแสดงผล/จอแสดงผลจาง: Check battery installation and replace batteries if low.
- 'OL' (Overload) Reading: The measured value exceeds the selected range (if not in auto-ranging) or the maximum input limit. Ensure the correct function and input jacks are selected. For current measurements, a blown fuse may be indicated.
- การอ่านไม่ถูกต้อง:
- ตรวจสอบให้แน่ใจว่าสายวัดทดสอบเสียบแน่นสนิทและไม่มีความเสียหาย
- Verify the correct function mode is selected for the measurement.
- Check for proper connection to the circuit (series for current, parallel for voltagจ).
- สำหรับการตรวจสอบความต้านทาน/ความต่อเนื่อง ให้แน่ใจว่าวงจรไม่มีกระแสไฟฟ้าไหลผ่าน
- ไม่มีเสียงบี๊บต่อเนื่อง: Check if the continuity function is active (continuity symbol on display). Ensure good contact with the circuit.
- NCV ตรวจไม่พบ: Ensure the NCV function is selected and the sensing area is close enough to a live AC voltagแหล่งที่มา
หากปัญหายังคงมีอยู่ โปรดติดต่อฝ่ายสนับสนุนลูกค้าเพื่อขอความช่วยเหลือ
7. ข้อมูลจำเพาะ
| พารามิเตอร์ | ค่า |
|---|---|
| หมายเลขรุ่น | T21D |
| แสดง | 6000 เคานต์, True RMS |
| กระแสสลับ/กระแสตรง โวลtage | สูงถึง 600V |
| กระแสไฟ AC/DC | สูงสุด 10A |
| ความต้านทาน | ใช่ |
| ความจุ | ใช่ |
| ความถี่ | ใช่ |
| อุณหภูมิ | Yes (-20°C to 1000°C / -4°F to 1832°F) |
| การทดสอบ Diode | ใช่ |
| การทดสอบความต่อเนื่อง | ใช่ |
| NCV (Non-Contact Vol .)tage) | ใช่ |
| รอบการทำงาน | ใช่ |
| แหล่งพลังงาน | แบตเตอรี่ AAA 3 ก้อน (รวมอยู่ด้วย) |
| ระดับความปลอดภัย | กสท.600 XNUMXV |
| ขนาดสินค้า | 2.68 x 5.51 x 1.69 นิ้ว |
| น้ำหนักสินค้า | 10.58 ออนซ์ (300 กรัม) |
| สี | ส้มและดำ |

Image: A visual comparison showing the DEASOMIYE T21D's 6000-count display offering a more accurate and higher resolution reading compared to a standard 2000-count display.
8. การรับประกันและการสนับสนุน
DEASOMIYE provides a 30-day manufacturer's guarantee for this product. Additionally, lifetime customer support is available to assist with any questions or issues you may encounter.
For support, please contact DEASOMIYE customer service. You can typically find contact information on the product packaging or the official DEASOMIYE webเว็บไซต์.