1. บทนำ
This manual provides detailed instructions for the installation, operation, and maintenance of the TK-803R 8-Port KVM USB/PS2 Rack Mount Switch. The TK-803R is designed to allow control of up to eight computers from a single console (keyboard, monitor, and mouse), optimizing space and efficiency in server rooms or data centers.
โปรดอ่านคู่มือนี้อย่างละเอียดก่อนการติดตั้งและการใช้งาน เพื่อให้มั่นใจได้ถึงการใช้งานที่ถูกต้องและป้องกันความเสียหายต่อตัวเครื่องหรืออุปกรณ์ที่เชื่อมต่อ
2. สินค้าหมดview
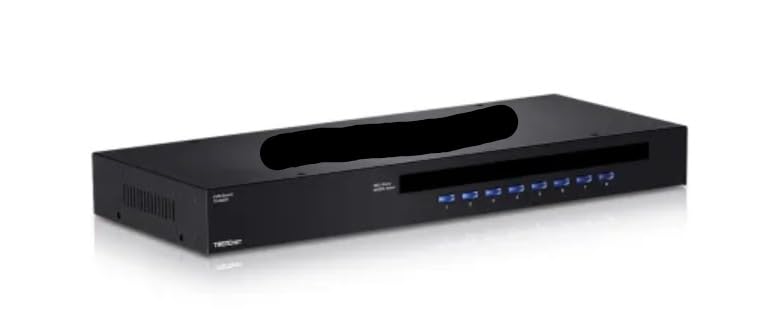
รูปที่ 1: ด้านหน้า view of the TK-803R KVM Switch. This image shows the sleek, black rack-mountable unit with its front panel, featuring a series of blue LED indicators and buttons for each of the 8 ports, along with the brand logo and model number.
2.1 คุณสมบัติหลัก
- 8 x Ports: Manage up to 8 computers from a single KVM setup.
- USB/PS2 Compatibility: Supports both USB and PS2 peripherals for flexibility.
- การออกแบบติดตั้งบนแร็ค: Saves space in server racks and data center environments.
- การสลับปุ่มลัด: Easily switch between connected systems via keyboard shortcuts.
- โซลูชันประหยัดพื้นที่: Ideal for multi-server management with minimal equipment.
- แข็งแรงและทนทาน: Designed for long-term use in professional environments.
3. การตั้งค่าและการติดตั้ง
Follow these steps to properly set up your TK-803R KVM Switch:
- ปิดอุปกรณ์ทั้งหมด: Before connecting any cables, ensure all computers and the KVM switch are powered off.
- เชื่อมต่ออุปกรณ์ต่อพ่วงคอนโซล:
- Connect your USB or PS/2 keyboard to the designated keyboard port on the KVM switch.
- Connect your USB or PS/2 mouse to the designated mouse port on the KVM switch.
- Connect your monitor to the VGA/HDMI/DVI (depending on model) video output port on the KVM switch.
- เชื่อมต่อคอมพิวเตอร์เข้ากับ KVM: For each computer you wish to connect:
- Connect a KVM cable (not included, typically) from the computer's video output, USB port, and PS/2 ports (if applicable) to the corresponding input ports on the KVM switch (Port 1, Port 2, etc.).
- Ensure secure connections for all video, keyboard, and mouse cables.
- เชื่อมต่อพลังงาน: Connect the provided power adapter to the KVM switch's power input and then to a power outlet.
- เปิดอุปกรณ์: First, power on the KVM switch. Then, power on all connected computers. The KVM switch should automatically detect the active computer or default to Port 1.
- การติดตั้งบนแร็ค (ทางเลือก): If rack mounting, secure the KVM switch to a standard 19-inch rack using the included mounting brackets and screws.
4. คู่มือการใช้งาน
The TK-803R KVM switch allows you to easily switch control between connected computers using front panel buttons or hotkey commands.
4.1 วิธีการสลับใช้งาน
- ปุ่มที่แผงด้านหน้า: Press the corresponding port button (1-8) on the front panel of the KVM switch to switch to the desired computer. The LED indicator for the active port will illuminate.
- การสลับปุ่มลัด: Use keyboard hotkey combinations to switch between computers without needing to reach the KVM switch.
- Switch to Specific Port: กด ล็อคการเลื่อน + ล็อคการเลื่อน + 1 (หรือ 2, 3, etc., up to 8) to switch directly to a specific port.
- โหมดสแกนอัตโนมัติ: กด ล็อคการเลื่อน + ล็อคการเลื่อน + S to activate auto scan mode, which cycles through all connected computers. Press any key to stop scanning.
- Hotkey Beep On/Off: กด ล็อคการเลื่อน + ล็อคการเลื่อน + B to toggle the hotkey beep sound.
Note: Hotkey combinations may vary slightly. Refer to the specific KVM model's detailed hotkey list if available.
5. การบำรุงรักษา
To ensure the longevity and optimal performance of your TK-803R KVM Switch, follow these simple maintenance guidelines:
- การทำความสะอาด: Use a soft, dry cloth to clean the exterior of the KVM switch. Do not use liquid or aerosol cleaners, as they may damage the unit.
- การระบายอากาศ : Ensure adequate airflow around the KVM switch, especially if rack-mounted. Do not block ventilation openings.
- การจัดการสายเคเบิล: Keep cables organized and free from kinks or excessive bends to prevent signal degradation or damage.
- สภาพแวดล้อม : Operate the KVM switch within its specified temperature and humidity ranges (refer to specifications). Avoid extreme temperatures or dusty environments.
6 การแก้ไขปัญหา
If you encounter issues with your TK-803R KVM Switch, refer to the following common problems and solutions:
| ปัญหา | สาเหตุที่เป็นไปได้ | สารละลาย |
|---|---|---|
| No video display. | Loose video cable connection; incorrect video resolution; KVM not powered on. | Check all video cable connections. Ensure the KVM switch is powered on. Try adjusting the display resolution on the connected computer. |
| แป้นพิมพ์หรือเมาส์ไม่ตอบสนอง | Loose USB/PS2 cable connection; KVM not powered on; incompatible peripheral. | Verify USB/PS2 cable connections. Ensure the KVM switch is powered on. Try a different keyboard/mouse to rule out peripheral issues. |
| Cannot switch between computers. | Incorrect hotkey sequence; KVM frozen; computer not active. | Ensure correct hotkey sequence is used. Try using the front panel buttons. Power cycle the KVM switch. Ensure the target computer is powered on and active. |
| การเชื่อมต่อไม่ต่อเนื่อง | Faulty cables; power fluctuations; KVM overheating. | Replace KVM cables if suspected faulty. Ensure stable power supply. Check for adequate ventilation around the KVM switch. |
หากปัญหายังคงมีอยู่หลังจากลองวิธีแก้ไขเหล่านี้แล้ว โปรดติดต่อฝ่ายสนับสนุนลูกค้า
7. ข้อมูลจำเพาะ
Below are the technical specifications for the TK-803R KVM Switch:
| คุณลักษณะ | ค่า |
|---|---|
| แบบอย่าง | TK-803R |
| จำนวนพอร์ต | 8 |
| ความเข้ากันได้ | ยูเอสบี, PS/2 |
| โหมดการทำงาน | คู่มือ |
| คะแนนปัจจุบัน | 1.5 Amps |
| ปฏิบัติการฉบับที่tage | 5 โวลต์ |
| ประเภทการติดต่อ | เครื่องจักรกล |
| ประเภทขั้วต่อ | ยูเอสบี, PS/2 |
| วัสดุติดต่อ | เหล็กอัลลอยด์ |
| ผู้ผลิต | เทรนด์เน็ต |
| วันที่พร้อมใช้งานครั้งแรก | 2 เมษายน 2025 |
8. การรับประกันและการสนับสนุน
This product is manufactured by TRENDNET. For specific warranty information, please refer to the warranty card included with your product or visit the official TRENDNET webไซต์ โปรดเก็บใบเสร็จรับเงินไว้เป็นหลักฐานการซื้อสำหรับการเรียกร้องการรับประกัน
For technical support, troubleshooting assistance beyond this manual, or to inquire about replacement parts, please contact TRENDNET customer support through their official channels. Contact information can typically be found on the manufacturer's webบรรจุภัณฑ์ไซต์หรือผลิตภัณฑ์
แหล่งข้อมูลออนไลน์: For the latest drivers, firmware updates, and additional support documentation, please visit the manufacturer's official webเว็บไซต์.