1. บทนำ
This manual provides detailed instructions for the ATTACK SHARK X68PRO HE Mechanical Wireless Gaming Keyboard and the ATTACK SHARK X3 Wireless Gaming Mouse Combo. Please read this manual carefully before using the products to ensure proper functionality and to maximize your gaming experience.
2. สินค้าหมดview
2.1 ATTACK SHARK X68PRO HE Keyboard
The X68PRO HE is a 60% layout mechanical gaming keyboard featuring Hall Effect magnetic switches, an 8000Hz polling rate, and multi-mode connectivity. It is designed for high-performance gaming with adjustable actuation and rapid trigger capabilities.

Image: ATTACK SHARK X68PRO HE Keyboard. This image displays the keyboard's overall design, highlighting its BT/2.4G/Wired 3 modes connection, magnetic switches, 0.01mm RT accuracy, DKS support, full RGB backlit, PBT keycaps, MAC/WIN compatibility, and web driver. Dimensions are shown as 12.80 inches length, 4.645 inches width, 1.57 inches height, and a weight of 0.78 KG.
คุณสมบัติหลัก:
- อัตราการสำรวจ 8000Hz: Ensures ultra-low 0.125ms latency in wired mode for instant keystroke registration.
- สวิตช์แม่เหล็กแบบเอฟเฟกต์ฮอลล์: Self-developed switches with adjustable actuation from 0.1mm to 3.4mm, offering 0.01mm sensitivity.
- ทริกเกอร์อย่างรวดเร็ว: Eliminates debounce delay, allowing keys to reset instantly for faster, more precise movements.
- Dual-Action Key Function: Assign two different actions to a single key based on pressure.
- รูปแบบกะทัดรัด 60%: Space-saving design with an aircraft-grade anodized aluminum frame.
- การเชื่อมต่อ: Supports Bluetooth, 2.4GHz wireless, and wired (USB-C) connections.
- ไฟแบ็คไลท์ RGB: Full RGB with multiple lighting effects.
- คีย์แคป PBT: Durable, side-engraved PBT keycaps.
- Web ไดรเวอร์: Customizable settings via a dedicated web คนขับรถ

Image: Keyboard highlighting 8000Hz Polling Rate. This image emphasizes the keyboard's lightning-fast response with an 8000Hz polling rate in wired mode and ultra-low 0.125ms latency.

Image: Linear Magnetic Switch. This image provides a close-up of the linear magnetic switch, detailing its specifications: Total Travel 3.8±0.3mm, Operation Force 40±5gf, Initial Magnetic Flux 95±15GS, Bottom Magnetic Flux 580±50GS, and a Lifespan of 100 Million clicks.

Image: Gasket Structure. This diagram illustrates the internal gasket structure of the keyboard, showing components such as side engraving PBT keycaps, thick rubber top case, ATTACK SHARK magnetic switch, aluminum alloy plate, PORON foam, PCB positioning board, custom silicone mold, and thick rubber bottom case.
2.2 ATTACK SHARK X3 Mouse
The X3 is an ultra-lightweight wireless gaming mouse equipped with a Pixart PAW3395 optical sensor and Kailh GM8.0 switches. It offers tri-mode connectivity and high DPI settings for precise control.

Image: ATTACK SHARK X3 Mouse. This image presents the X3 mouse in red, along with its USB receiver, highlighting its ultra-lightweight design, tri-mode connectivity, PixArt PAW 3395 sensor, up to 26000 DPI, and Kailh GM 8.0 switches.
คุณสมบัติหลัก:
- เซ็นเซอร์ Pixart PAW3395: Flagship optical sensor with 6-level adjustable DPI (800/1600/2400/3200/5000/26000), 650 IPS tracking speed, 1000Hz response speed, and 50G acceleration.
- Kailh GM8.0 Switches: High-end micro switches with an 80 million click lifespan, providing crisp clicks and fast rebound.
- TTC Encoder: Scroll wheel encoder for precise positioning.
- การออกแบบน้ำหนักเบามาก: Weighs approximately 49g for effortless action.
- การเชื่อมต่อสามโหมด: Supports 2.4GHz wireless, Bluetooth 5.0, and wired (USB-C) connections.

Image: Kailh GM 8.0 Switches & TTC Encoder. This image shows a cutaway view of the mouse, highlighting the Kailh GM 8.0 switches with an 80 million click lifespan and the TTC encoder for well-defined scroll steps, designed to eliminate unintended double clicks.

Image: Ultra-Light Design. This image illustrates the lightweight nature of the X3 mouse, stating it weighs only 49±4g (1.72oz).
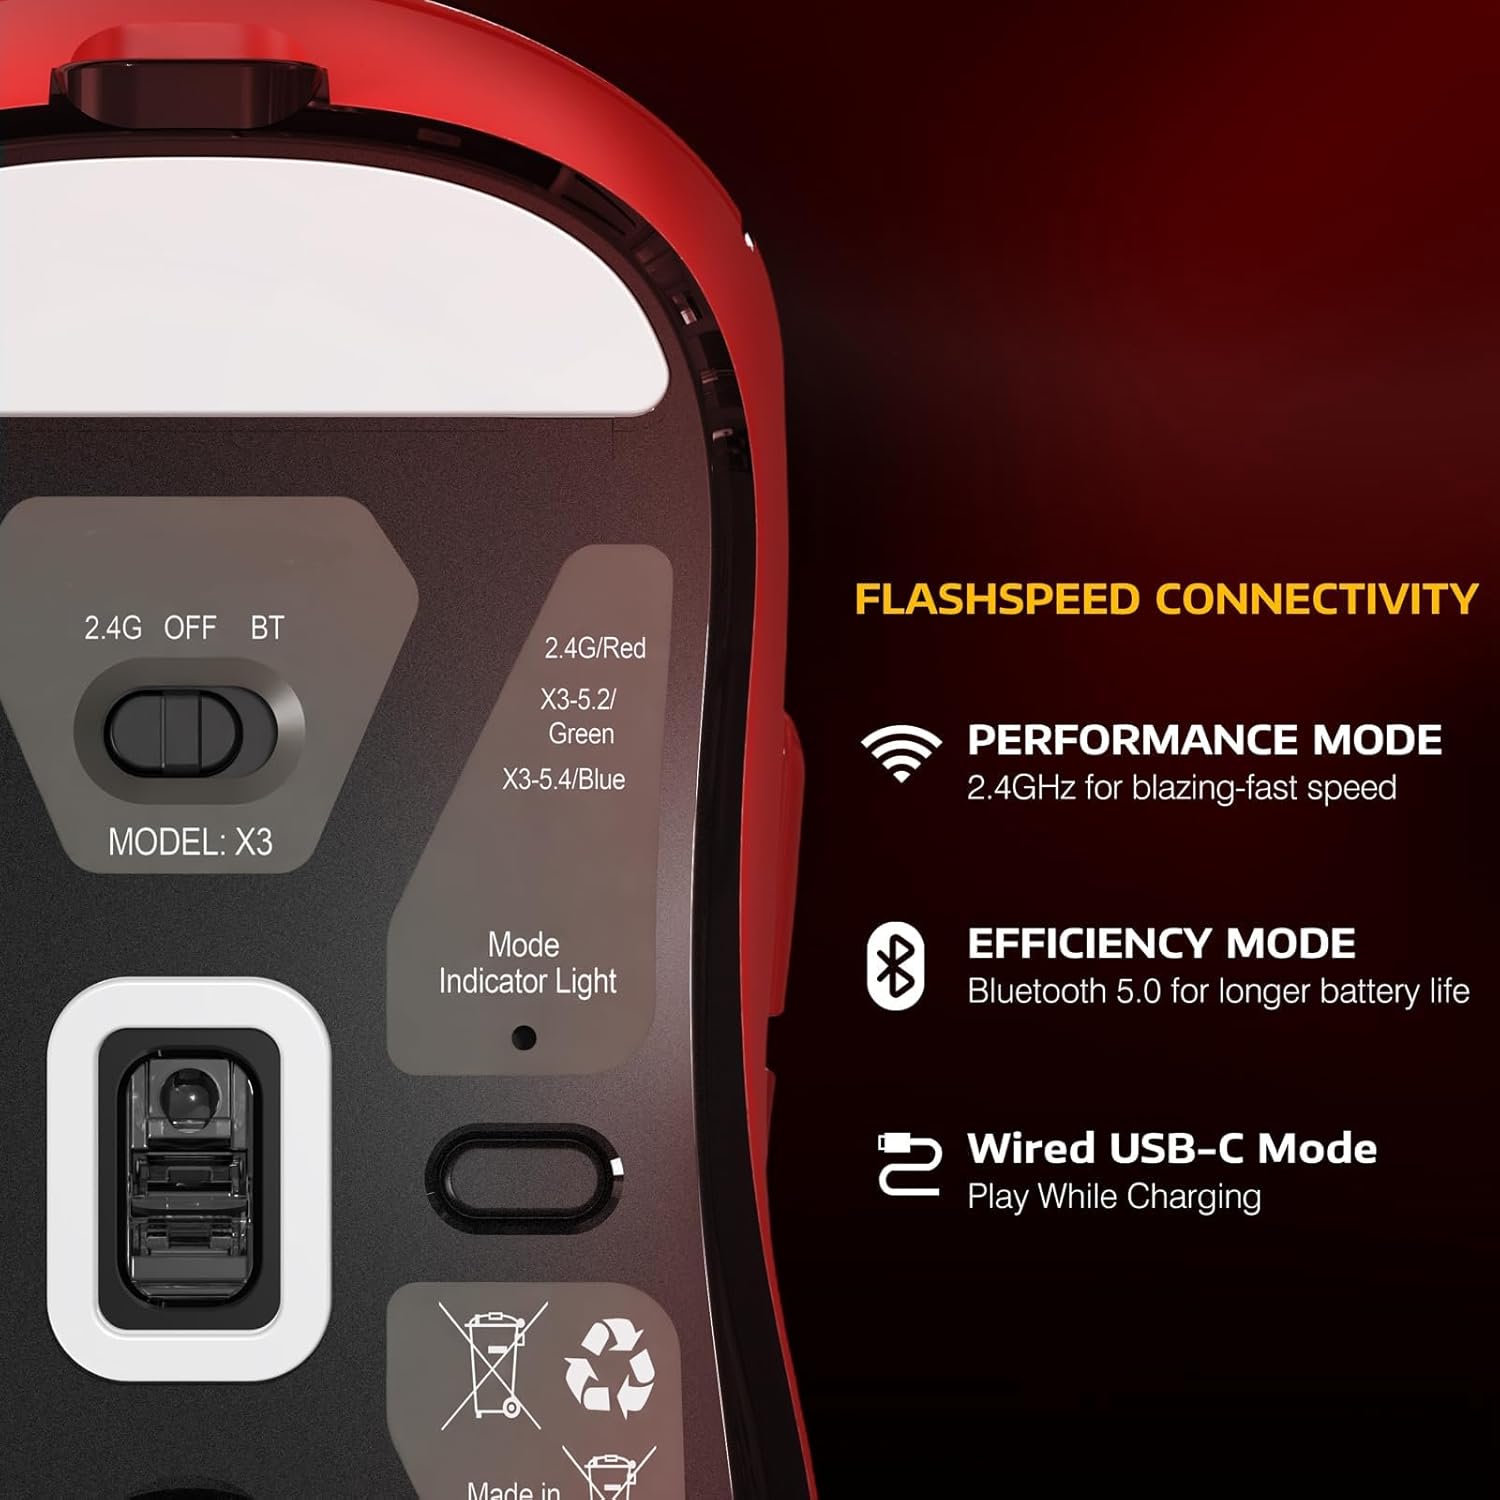
Image: Flashspeed Connectivity. This image shows the bottom of the X3 mouse, detailing its connectivity options: a switch for 2.4G, OFF, and BT modes, and a mode indicator light. It also describes Performance Mode (2.4GHz for blazing-fast speed), Efficiency Mode (Bluetooth 5.0 for longer battery life), and Wired USB-C Mode (play while charging).
3. คำแนะนำในการตั้งค่า
3.1 Connecting the Keyboard (X68PRO HE)
- โหมดสาย: เชื่อมต่อสาย USB-C ที่ให้มากับแป้นพิมพ์เข้ากับพอร์ต USB ที่ว่างอยู่บนคอมพิวเตอร์ของคุณ แป้นพิมพ์จะถูกตรวจพบโดยอัตโนมัติ
- โหมดไร้สาย 2.4GHz:
- ค้นหาตัวรับ USB 2.4GHz
- เสียบตัวรับสัญญาณเข้ากับพอร์ต USB ที่มีอยู่ในคอมพิวเตอร์ของคุณ
- On the keyboard, switch the mode selector to '2.4G'. The keyboard should connect automatically.
- โหมดบลูทู ธ :
- เปลี่ยนตัวเลือกโหมดของแป้นพิมพ์ไปที่ 'บลูทูธ'
- บนคอมพิวเตอร์หรืออุปกรณ์ของคุณ เปิดใช้งานบลูทูธและค้นหาอุปกรณ์ใหม่
- Select 'ATTACK SHARK X68PRO HE' from the list of available devices to pair.
3.2 Connecting the Mouse (X3)
- โหมดสาย: Connect the provided USB-C cable from the mouse to an available USB port on your computer. The mouse will function immediately and charge simultaneously.
- โหมดไร้สาย 2.4GHz:
- Locate the 2.4GHz USB receiver (usually stored in a compartment on the mouse's underside).
- เสียบตัวรับสัญญาณเข้ากับพอร์ต USB ที่มีอยู่ในคอมพิวเตอร์ของคุณ
- On the mouse's underside, switch the mode selector to '2.4G'. The mouse should connect automatically.
- โหมดบลูทู ธ :
- On the mouse's underside, switch the mode selector to 'BT'.
- บนคอมพิวเตอร์หรืออุปกรณ์ของคุณ เปิดใช้งานบลูทูธและค้นหาอุปกรณ์ใหม่
- เลือก 'ATTACK SHARK X3' จากรายการอุปกรณ์ที่พร้อมจับคู่
3.3 การติดตั้งไดรเวอร์
For advanced customization of both the keyboard and mouse, download the official web driver from the ATTACK SHARK website. This driver allows for actuation adjustment, key remapping, macro creation, and RGB lighting control.
4. คู่มือการใช้งาน
4.1 Keyboard Operation (X68PRO HE)
- การปรับการทำงาน: ใช้ web driver software to precisely adjust the actuation point of each magnetic switch from 0.1mm to 3.4mm with 0.01mm sensitivity.
- ทริกเกอร์อย่างรวดเร็ว: This feature is enabled and configured via the web driver. It allows keys to register a reset immediately upon release, without needing to return to the full up position.
- Dual-Action Key Function: Configure this feature through the web driver. Assign a primary action for a light press and a secondary action for a deeper press on the same key.
- การควบคุมแสง RGB: Adjust lighting effects, brightness, and color patterns using the web driver or specific keyboard shortcuts (refer to the driver software for default key combinations).
- การสลับโหมด: Use the physical switch on the keyboard to toggle between Wired, 2.4G, and Bluetooth modes.
- MAC/WIN Compatibility: The keyboard supports both operating systems. Use the web driver to switch layouts or specific key functions if needed.
4.2 Mouse Operation (X3)
- การปรับ DPI: The mouse features 6 adjustable DPI levels (800/1600/2400/3200/5000/26000). Use the dedicated DPI button (usually located behind the scroll wheel) to cycle through these settings. The current DPI level may be indicated by an LED color or pattern.
- การสลับโหมด: Use the physical switch on the underside of the mouse to select between 2.4G, OFF, and Bluetooth modes.
- การชาร์จ: Connect the mouse to your computer using the USB-C cable to charge. The mouse can be used in wired mode while charging.
- ไฟแสดงสถานะแบตเตอรี่: The mouse typically has an LED indicator that shows battery status (e.g., blinking for low battery, solid for charging, off for full charge).
5. การบำรุงรักษา
- การทำความสะอาด: Use a soft, dry cloth to wipe down the keyboard and mouse. For deeper cleaning, use a cotton swab lightly dampเคลือบด้วยไอโซโพรพิลแอลกอฮอล์สำหรับบริเวณที่เข้าถึงยาก หลีกเลี่ยงความชื้นมากเกินไป
- การถอดฝาครอบปุ่ม (คีย์บอร์ด): Keycaps can be carefully removed using a keycap puller for cleaning or replacement. Be gentle to avoid damaging the switches.
- การดูแลแบตเตอรี่ For wireless devices, avoid fully discharging the battery frequently. Charge regularly. If storing for an extended period, charge the battery to about 50% to prolong its lifespan.
- พื้นที่จัดเก็บ: เก็บอุปกรณ์ไว้ในที่แห้งและเย็น หลีกเลี่ยงแสงแดดโดยตรงและอุณหภูมิที่สูงหรือต่ำเกินไป
6 การแก้ไขปัญหา
6.1 การแก้ไขปัญหาคีย์บอร์ด
- แป้นพิมพ์ไม่ตอบสนอง:
- Ensure the keyboard is charged if in wireless mode.
- Check the mode switch (Wired/2.4G/BT) is set correctly.
- สำหรับระบบ 2.4G โปรดตรวจสอบให้แน่ใจว่าได้เสียบตัวรับสัญญาณ USB เข้ากับปลั๊กอย่างแน่นหนาแล้ว
- For Bluetooth, ensure it's paired correctly and your device's Bluetooth is active. Try re-pairing.
- Try connecting in wired mode to rule out wireless issues.
- คีย์ไม่ลงทะเบียนหรือพิมพ์ซ้ำ:
- ตรวจสอบเศษขยะที่อยู่ใต้ปุ่มคีย์แคป
- If using Rapid Trigger, ensure settings in the web driver are appropriate for your use.
- Consider resetting keyboard settings via the web คนขับรถ
- แสง RGB ไม่ทำงาน:
- Ensure lighting is enabled in the web คนขับรถ
- ตรวจสอบการตั้งค่าความสว่าง
6.2 Mouse Troubleshooting
- Mouse not moving or erratic cursor:
- Ensure the mouse is charged if in wireless mode.
- Check the mode switch (2.4G/BT) is set correctly.
- สำหรับระบบ 2.4G โปรดตรวจสอบให้แน่ใจว่าได้เสียบตัวรับสัญญาณ USB เข้ากับปลั๊กอย่างแน่นหนาแล้ว
- For Bluetooth, ensure it's paired correctly and your device's Bluetooth is active. Try re-pairing.
- ทำความสะอาดเซ็นเซอร์ออปติคัลที่อยู่ใต้เมาส์
- Try connecting in wired mode.
- DPI ไม่เปลี่ยนแปลง:
- ตรวจสอบให้แน่ใจว่าปุ่ม DPI ทำงานอยู่
- Check if any software is overriding DPI settings.
- ปัญหาการเชื่อมต่อ:
- Ensure the mouse is within range of the receiver/Bluetooth device.
- หลีกเลี่ยงการรบกวนจากอุปกรณ์ไร้สายอื่น ๆ
7. ข้อมูลจำเพาะ
7.1 ATTACK SHARK X68PRO HE Keyboard
- อัตราการสำรวจความคิดเห็น: 8000Hz (โหมดใช้สาย)
- ความหน่วง: 0.125มิลลิวินาที
- สวิตช์: สวิตช์แม่เหล็กแบบฮอลล์เอฟเฟกต์
- การปรับการทำงาน: 0.1mm - 3.4mm (0.01mm sensitivity)
- เค้าโครง: 60%
- วัสดุกรอบ: อะลูมิเนียมชุบอะโนไดซ์เกรดอากาศยาน
- คีย์แคป: Side-Engraved PBT
- การเชื่อมต่อ: บลูทูธ, ระบบไร้สาย 2.4GHz, การเชื่อมต่อแบบมีสาย USB-C
- การแบ็คไลท์: ฟูล RGB
- ความเข้ากันได้ของระบบปฏิบัติการ: วินโดวส์, แมคโอเอส
- ขนาด : ประมาณ 12.80 x 4.645 x 1.57 นิ้ว
- น้ำหนัก: Approximately 0.78 KG
7.2 ATTACK SHARK X3 Mouse
- เซ็นเซอร์: เซ็นเซอร์แสง Pixart PAW3395
- จุดต่อนิ้ว: 800/1600/2400/3200/5000/26000 (Adjustable)
- ติดตามความเร็ว: 650 IPS
- ความเร็วในการตอบสนอง: 1000เฮิรตซ์
- ความเร่ง: 50จี
- สวิตช์: Kailh GM8.0 Micro Switches (80 Million Clicks Lifespan)
- ตัวเข้ารหัส: ตัวเข้ารหัสล้อเลื่อน TTC
- น้ำหนัก: ประมาณ 49กรัม
- การเชื่อมต่อ: บลูทูธ 5.0, ไร้สาย 2.4GHz, USB-C แบบมีสาย
- ความเข้ากันได้ของระบบปฏิบัติการ: วินโดวส์, แมคโอเอส, ลินุกซ์
8. การรับประกันและการสนับสนุน
ATTACK SHARK products typically come with a limited manufacturer's warranty. Please refer to the warranty card included with your product or visit the official ATTACK SHARK website for detailed warranty terms and conditions. For technical support, driver downloads, or further assistance, please visit the ATTACK SHARK support page or contact their customer service.
เป็นทางการ Webเว็บไซต์: www.attackshark.com (อดีตample link โปรดตรวจสอบความถูกต้อง webงาน)