1. บทนำ
ขอบคุณสำหรับการซื้อasing the Generic 17L Glass Air Fryer Oven, Model GV012. This appliance is designed to provide a versatile and efficient way to prepare a variety of meals with less oil. Featuring a transparent glass basket and intuitive controls, it offers a convenient cooking experience. Please read this manual thoroughly before operating the appliance to ensure safe and optimal use.
2. มาตรการป้องกันที่สำคัญ
เมื่อใช้เครื่องใช้ไฟฟ้า ควรปฏิบัติตามข้อควรระวังด้านความปลอดภัยขั้นพื้นฐานเสมอ เพื่อลดความเสี่ยงจากไฟไหม้ ไฟฟ้าช็อต และการบาดเจ็บ อ่านคำแนะนำทั้งหมดอย่างละเอียด
- อย่าสัมผัสพื้นผิวที่ร้อน ใช้ที่จับหรือลูกบิด
- เพื่อป้องกันไฟฟ้าช็อต ห้ามจุ่มสายไฟ ปลั๊ก หรือตัวเครื่องหลักลงในน้ำหรือของเหลวอื่นๆ
- จำเป็นต้องมีการดูแลอย่างใกล้ชิดเมื่อมีเด็กหรือใช้งานเครื่องใช้ไฟฟ้าใดๆ ใกล้เด็ก
- ถอดปลั๊กออกเมื่อไม่ได้ใช้งานและก่อนทำความสะอาด ปล่อยให้เย็นลงก่อนใส่หรือถอดชิ้นส่วน
- ห้ามใช้งานเครื่องใช้ไฟฟ้าที่มีสายไฟหรือปลั๊กชำรุด หรือหลังจากที่เครื่องใช้ไฟฟ้าทำงานผิดปกติหรือได้รับความเสียหายในลักษณะใดๆ
- การใช้อุปกรณ์เสริมที่ไม่แนะนำโดยผู้ผลิตเครื่องใช้ไฟฟ้าอาจทำให้เกิดการบาดเจ็บได้
- ห้ามใช้กลางแจ้ง
- อย่าให้สายไฟห้อยออกจากขอบโต๊ะหรือเคาน์เตอร์ หรือสัมผัสพื้นผิวที่ร้อน
- ห้ามวางบนหรือใกล้เตาแก๊สหรือเตาไฟฟ้าที่ร้อน หรือในเตาอบที่อุ่น
- ต้องใช้ความระมัดระวังเป็นพิเศษเมื่อเคลื่อนย้ายเครื่องใช้ไฟฟ้าที่มีน้ำมันร้อนหรือของเหลวร้อนอื่นๆ
- เสียบปลั๊กเข้ากับเครื่องก่อนเสมอ จากนั้นเสียบสายไฟเข้ากับเต้ารับที่ผนัง หากต้องการยกเลิกการเชื่อมต่อ ให้เปิดส่วนควบคุมใดๆ ที่ "ปิด" จากนั้นถอดปลั๊กออกจากเต้ารับที่ผนัง
- ห้ามใช้เครื่องใช้ไฟฟ้าเพื่อวัตถุประสงค์อื่นนอกเหนือจากที่กำหนดไว้
- Ensure the glass basket is properly seated before operation.
- The appliance features a child-safe auto-lock mechanism that stops operation when the lid is opened.
3. ส่วนประกอบผลิตภัณฑ์
The Generic 17L Glass Air Fryer Oven comes with the following components:
- Main Unit (with control panel and heating element)
- Borosilicate Glass Basket (12L capacity)
- Capacity Expansion Ring (for 17L capacity)
- ตู้แร็คสูง
- แร็คต่ำ
- Fetch Clip (Tongs)

ภาพที่ 3.1: จบแล้วview of the Generic 17L Glass Air Fryer Oven and its accessories. The main unit sits atop the clear glass bowl, with a high rack, low rack, expansion ring, and fetch clip displayed below.
4. ข้อมูลจำเพาะ
| คุณสมบัติ | รายละเอียด |
|---|---|
| ชื่อรุ่น | GV012 (GAF121) |
| วัสดุ | Borosilicate Glass, PC, Food-grade Metal |
| สี | White + Clear |
| วิธีการให้ความร้อน | 360° Vertical Heating, TurboHeat Pro Circulation Technology |
| ช่วงอุณหภูมิ | 60-250℃ / 140-482℉ |
| เล่มที่tage | 110V / 60HZ (US Standard) |
| พลัง | 1200วัตต์ |
| ความจุ | 12L (standard), 17L (with expansion ring) |
| ความยาวสายไฟ | 1เมตร/3.28ฟุต |
| Product Dimensions (L*H) | 37 * 42 ซม. / 14.6 * 16.5 นิ้ว |
| วิธีการควบคุม | Dual Knobs (Time & Temperature) |
| ส่วนประกอบที่ปลอดภัยสำหรับเครื่องล้างจาน | Yes (Glass Basket, Racks, Fetch Clip) |
5. การตั้งค่า
5.1 การแกะกล่อง
- นำส่วนประกอบทั้งหมดออกจากบรรจุภัณฑ์อย่างระมัดระวัง
- ถอดวัสดุบรรจุภัณฑ์ สติกเกอร์ หรือฉลากทั้งหมดออก
- เก็บรักษาบรรจุภัณฑ์ไว้เพื่อการจัดเก็บหรือขนส่งในอนาคต
5.2 การทำความสะอาดเบื้องต้น
Before first use, clean all parts that will come into contact with food:
- Wash the glass basket, high rack, low rack, and fetch clip with warm, soapy water. Rinse thoroughly and dry completely.
- เช็ดภายนอกตัวเครื่องหลักด้วยผ้าamp ผ้า. อย่าจุ่มตัวเครื่องลงในน้ำ
5.3 การประกอบ
- Place the glass basket securely on a stable, heat-resistant surface.
- If using the 17L capacity, place the capacity expansion ring on top of the glass basket before placing the main unit.
- Carefully place the main unit (with the heating element and control panel) onto the glass basket or expansion ring, ensuring it is seated properly.
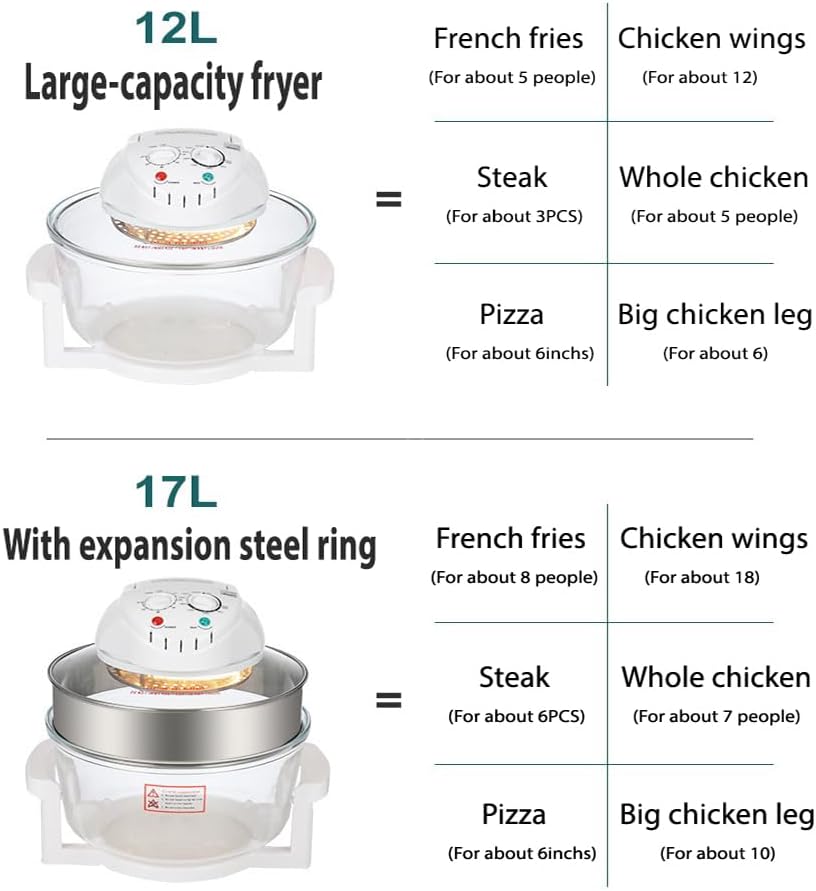
Image 5.1: Illustration demonstrating the standard 12L capacity of the glass air fryer and how to increase it to 17L by adding the expansion steel ring. Examples of food quantities for each capacity are also shown.
6. คู่มือการใช้งาน
6.1 แผงควบคุมโอเวอร์view
The air fryer features a simple control panel with two rotary knobs for setting time and temperature, along with indicator lights.

ภาพที่ 6.1: รายละเอียด view of the control panel, highlighting the time setting knob (up to 60 minutes) and the temperature setting knob (ranging from 125°C to 250°C or 140°F to 482°F). Power and Heat indicator lights are also visible.
6.2 การเตรียมความพร้อมก่อนปรุงอาหาร
- Place food directly into the glass basket or on one of the racks. Do not overfill.
- Ensure the main unit is securely placed on the glass basket.
- Plug the power cord into a standard 110V / 60HZ electrical outlet.
6.3 การตั้งค่าเวลาและอุณหภูมิ
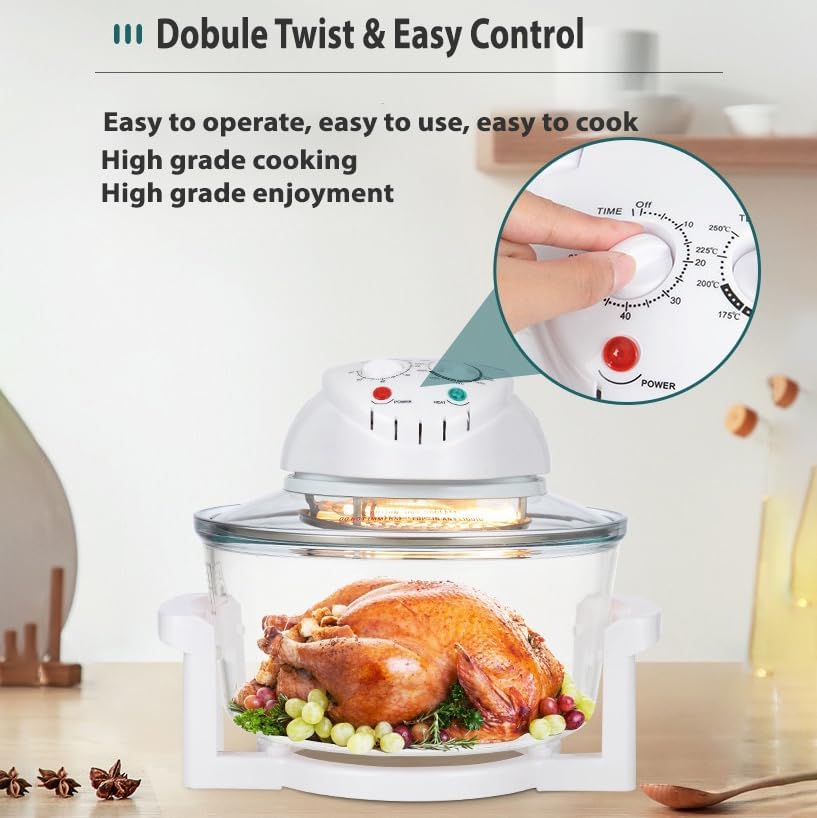
Image 6.2: A user's hand demonstrates adjusting the dual knobs on the control panel to set the desired cooking time and temperature for precise meal preparation.
- การควบคุมอุณหภูมิ: Rotate the temperature knob to select the desired cooking temperature (60-250℃ / 140-482℉).
- การควบคุมเวลา: Rotate the time knob to set the cooking duration (up to 60 minutes). The appliance will begin heating once both settings are selected.
- The Power and Heat indicator lights will illuminate during operation.
6.4 ฟังก์ชั่นการทำอาหาร
The 12-in-1 smart cooking functions allow for versatile meal preparation:
- แอร์ฟราย: Ideal for crispy foods like fries, chicken wings, and vegetables.
- อบ: เหมาะสำหรับเค้ก มัฟฟิน และเบเกอรี่อื่นๆ
- คายน้ำ: Use lower temperatures (125-250°F) for dehydrating fruits and vegetables.
- อุ่นร้อน: Warm up leftovers efficiently.
The transparent glass basket allows for easy monitoring of the cooking process without opening the lid.
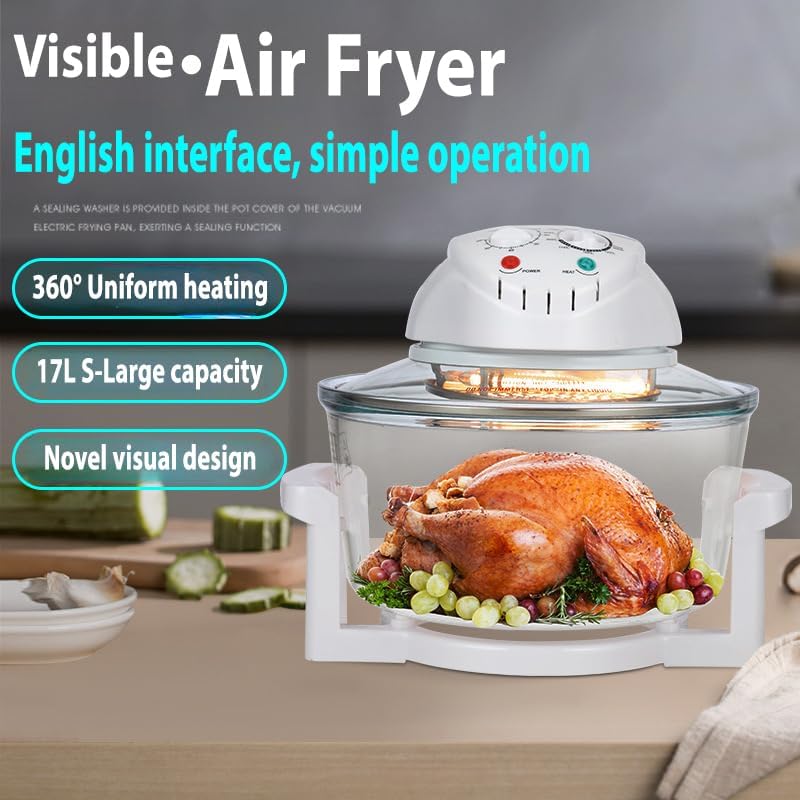
Image 6.3: The air fryer in use, showcasing a whole chicken being cooked within the transparent glass basket. This image emphasizes the 360° uniform heating and the visual monitoring capability.
6.5 หลังการปรุงอาหาร
- Once the timer reaches zero, the appliance will automatically turn off.
- Carefully lift the main unit using its handles. The child-safe auto-lock will stop operation when the lid is opened.
- Use the fetch clip to safely remove cooked food from the hot glass basket.
- Unplug the appliance from the wall outlet and allow it to cool completely before cleaning.
7. การทำความสะอาดและการบำรุงรักษา
การทำความสะอาดอย่างสม่ำเสมอจะช่วยให้หม้อทอดไร้น้ำมันทำงานได้อย่างมีประสิทธิภาพสูงสุดและยืดอายุการใช้งาน
7.1 Cleaning the Glass Basket and Accessories
- The borosilicate glass basket, high rack, low rack, and fetch clip are dishwasher safe.
- Alternatively, wash them with warm, soapy water using a non-abrasive sponge. Rinse thoroughly and dry.
- For stubborn food residue, soak the glass basket in warm water before cleaning.
7.2 การทำความสะอาดตัวเครื่องหลัก
- Ensure the main unit is unplugged and completely cool before cleaning.
- เช็ดภายนอกตัวเครื่องหลักด้วยผ้าamp ผ้า.
- ห้ามใช้น้ำยาทำความสะอาดที่มีฤทธิ์กัดกร่อนหรือแผ่นขัดถู เพราะอาจทำให้พื้นผิวเสียหายได้
- Never immerse the main unit (heating element and control panel) in water or any other liquid.
7.3 พื้นที่จัดเก็บ
Store the cleaned and dried air fryer in a cool, dry place. Ensure all components are assembled or stored together to prevent loss.
8 การแก้ไขปัญหา
If you encounter any issues with your air fryer, please refer to the following common problems and solutions:
| ปัญหา | สาเหตุที่เป็นไปได้ | สารละลาย |
|---|---|---|
| เครื่องไม่เปิดขึ้น | Not plugged in; power outlet issue; main unit not properly seated. | Ensure the power cord is securely plugged into a working outlet. Check if the main unit is correctly placed on the glass basket. |
| อาหารปรุงไม่เท่ากัน | Overcrowding the basket; incorrect temperature/time settings. | Avoid overcrowding; cook in smaller batches. Adjust temperature and time as needed. Shake or flip food halfway through cooking. |
| มีควันขาวออกมาจากตัวเครื่อง | Grease or food residue on the heating element; cooking fatty foods. | Unplug and allow to cool. Clean the heating element area. For fatty foods, ensure proper ventilation. |
| อาหารไม่กรอบ | อาหารมีความชื้นมากเกินไป หรือใช้เวลา/อุณหภูมิในการปรุงอาหารไม่เพียงพอ | Pat food dry before cooking. Increase cooking time or temperature slightly. Ensure food is not overcrowded. |
9. การรับประกันและการสนับสนุน
For warranty information or technical support, please refer to the documentation provided at the time of purchase or contact the retailer. Keep your purchase receipt as proof of purchase.


