1. บทนำ
The Radiomaster XR1 Nano Multi-Frequency ExpressLRS Receiver is a compact and versatile receiver designed for remote control applications. It utilizes the advanced Semtech LR1121 transceiver, supporting both 2.4GHz and Sub-G 900MHz frequency bands. This receiver offers exceptional range and sensitivity, making it suitable for various builds requiring reliable link quality with ExpressLRS systems.
This manual provides detailed instructions for the setup, operation, and maintenance of your XR1 receiver to ensure optimal performance and longevity.
2. อะไรอยู่ในกล่อง

Image: Package contents including the XR1 receiver, T-Antenna, CRSF wire, and heat-shrinkable tubes.
- 1 x XR1 Nano Multi-Frequency ExpressLRS Receiver
- 1 x T Antenna (Either 2.4GHz, 900MHz, or Dual-band, depending on the selected package)
- สาย CRSF 1 เส้น
- 3 x Heat-Shrinkable Tube
- 1 x Manual Card (This document)
3. คุณสมบัติหลัก
ภาพ: เหนือview of the XR1 receiver's main features.
- การทำงานแบบดูอัลแบนด์: Supports both 2.4GHz and Sub-G 900MHz frequency bands using the Semtech LR1121 transceiver.
- ขนาดกระทัดรัด: Ultra-compact design, measuring 20mm x 13mm.
- ประสิทธิภาพสูง: Equipped with an ESP32C3 high-performance MCU.
- telemetry: Provides 100mW telemetry RF power.
- การกำหนดค่าที่ง่าย: Built-in Wi-Fi for effortless configuration and firmware updates via an intuitive WebUI
- การเชื่อมต่อแบบยืดหยุ่น: Features a secondary UART port and castled pads for easy soldering.
- ความเข้ากันได้กับ ExpressLRS: Pre-installed with ExpressLRS v3.5.1 firmware.
4. คำแนะนำในการตั้งค่า
4.1. แผนภาพการเดินสายไฟ
Connect the XR1 receiver to your flight controller or compatible device using the provided CRSF wire. Ensure correct polarity for power (5V) and ground (GND), and proper connection for RX and TX data lines.

ภาพ: รายละเอียด view of the XR1 receiver's connection pads.
- 5 โวลต์: Power input (5 Volts DC)
- จีเอ็นดี: พื้น
- เท็กซัส: Transmit data (connect to RX on flight controller)
- อาร์เอ็กซ์: Receive data (connect to TX on flight controller)
4.2. การติดตั้งเสาอากาศ
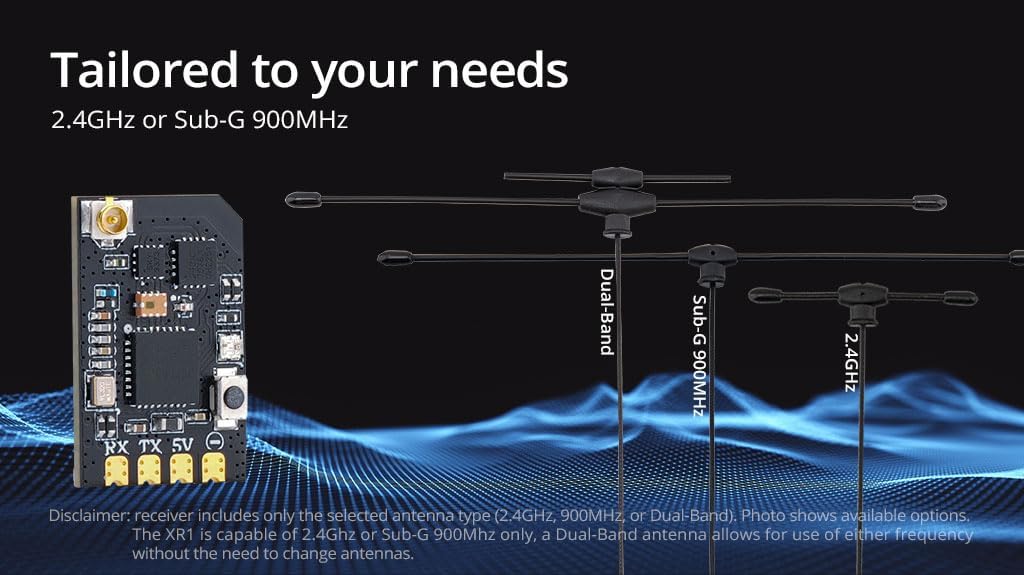
Attach the T-Antenna to the IPEX-1 connector on the receiver. Ensure the antenna is securely connected and positioned away from carbon fiber or other conductive materials for optimal signal reception.

Image: Various antenna options for the XR1 receiver.
The XR1 receiver supports 2.4GHz or Sub-G 900MHz. If you have a Dual-Band antenna, it allows for use of either frequency without needing to change antennas.
4.3. ขั้นตอนการผูกมัด
The XR1 receiver comes with ExpressLRS v3.5.1 pre-installed. To bind the receiver to your ExpressLRS transmitter:
- Power on the receiver three times, cycling power quickly between each power-on. The LED on the receiver should flash rapidly, indicating it is in binding mode.
- On your ExpressLRS compatible transmitter, navigate to the ExpressLRS LUA script or menu and select the "Bind" option.
- เมื่อเชื่อมต่อสำเร็จแล้ว ไฟ LED บนตัวรับสัญญาณจะสว่างค้าง แสดงว่าการเชื่อมต่อสำเร็จ
For detailed binding instructions specific to your transmitter, refer to your transmitter's user manual or the official ExpressLRS documentation.
4.4. Firmware Updates and Configuration (Wi-Fi)
The XR1 features built-in Wi-Fi for convenient firmware updates and configuration. To access the Webยูไอ:
- เปิดเครื่องรับ
- Connect to the Wi-Fi network broadcast by the receiver (usually named "ExpressLRS_RX" followed by a unique identifier).
- เปิด web เบราว์เซอร์และนำทางไปที่ http://10.0.0.1.
- จาก WebUI, you can update firmware, change settings, and configure your receiver.
5. คู่มือการใช้งาน
5.1. การเปิดเครื่องและการตรวจสอบเบื้องต้น
After successful setup and binding, power on your model. The receiver's LED should illuminate solid, indicating a stable connection to your transmitter. Perform a range check and verify all control surfaces respond correctly before flight.
5.2. การวัดระยะไกล
The XR1 receiver provides 100mW telemetry RF power, allowing your transmitter to receive real-time data from your model, such as RSSI (Received Signal Strength Indicator), link quality, and battery voltage (if configured). Refer to your flight controller and transmitter documentation for telemetry setup and display.
5.3. ความเข้ากันได้
The XR1 receiver is compatible with all existing Radiomaster ExpressLRS radios and modules. Ensure your transmitter module is also running a compatible ExpressLRS firmware version.

Image: Compatibility chart for Radiomaster ExpressLRS radios and modules.
6. การบำรุงรักษา
- รักษาความสะอาด: ตรวจสอบตัวรับสัญญาณเป็นประจำเพื่อดูว่ามีสิ่งสกปรก ฝุ่น หรือเศษผงหรือไม่ ใช้แปรงขนนุ่มแห้งหรือลมเป่าทำความสะอาด
- ปกป้องจากความชื้น: The XR1 is not water-resistant. Avoid exposure to moisture or extreme humidity. If exposed, ensure it is completely dry before powering on.
- การตรวจสอบเสาอากาศ: Periodically check the antenna for any damage or loose connections. A damaged antenna can significantly reduce range and signal quality.
- อัพเดตเฟิร์มแวร์: Keep the receiver's firmware updated to the latest version to benefit from performance improvements and new features. Use the Wi-Fi WebUI for updates.
7 การแก้ไขปัญหา
| ปัญหา | สาเหตุที่เป็นไปได้ | สารละลาย |
|---|---|---|
| ไฟ LED ของตัวรับไม่ติดหลังจากพยายามเชื่อมต่อ | Not successfully bound; incorrect binding procedure; incompatible firmware. | Ensure correct binding steps (power cycle 3 times). Verify transmitter and receiver are on compatible ExpressLRS firmware versions. Try binding again. |
| No control response. | Receiver not powered; incorrect wiring; binding lost; flight controller not configured. | Check power connections to the receiver. Verify RX/TX wiring to the flight controller. Re-bind the receiver. Ensure flight controller UART and receiver protocol (CRSF) are correctly configured. |
| ระยะสัญญาณต่ำหรือสูญเสียสัญญาณ | Damaged or poorly positioned antenna; interference; low RF power setting. | Inspect antenna for damage and ensure it is positioned optimally, away from carbon fiber. Check for local interference sources. Verify RF power settings on your transmitter. |
| Cannot connect to Wi-Fi for updates. | Receiver not in Wi-Fi mode; incorrect Wi-Fi password (if set); network conflict. | Ensure the receiver is powered on and broadcasting its Wi-Fi network. Try restarting the receiver. If a password was set, ensure it is correct. |
8. ข้อมูลจำเพาะ

Image: Physical dimensions of the XR1 receiver.

Image: Weight of the XR1 receiver.
| คุณสมบัติ | รายละเอียด |
|---|---|
| รายการ | XR1 Nano Multi-Frequency ExpressLRS Receiver |
| พิมพ์ | ISM2.4 or FCC915 |
| มหาเทพ | ESP32C3 |
| ชิป RF | Semtech LR1121 |
| ขั้วต่อ RF | IPEX-1 |
| เสาอากาศ | 1x T-Antenna (2.4GHz, 900MHz, or Dual-band) |
| ช่วงความถี่ | 2.4GHz หรือ Sub-G 900MHz |
| พลังเทเลเมทรี | 100มิลลิวัตต์ |
| Maximum Packet Rate | ดีเค500เฮิรตซ์ / เค1000เฮิรตซ์ |
| Minimum Packet Refresh Rate | 50เฮิรตซ์ |
| ฉบับทำงานtage | 5V |
| น้ำหนัก | 1.0g (ไม่มีเสาอากาศ) |
| ขนาด | 20มม. x 13มม. x 3มม. |
| เวอร์ชันเฟิร์มแวร์ | ExpressLRS v3.5.1 ติดตั้งไว้ล่วงหน้าแล้ว |
| เป้าหมาย FW | วิทยุ RadioMaster XR1 2.4/900RX |
| อินเทอร์เฟซบัส 1 | ซีอาร์เอสเอฟ |
| อินเทอร์เฟซบัส 2 | ยูเออาร์ที |

Image: LR1121 Receiver Frequency Compatibility Chart.
9. การสนับสนุนและการรับประกัน
For technical assistance, troubleshooting beyond this manual, or warranty inquiries, please contact Radiomaster customer support through their official webไซต์หรือผู้ค้าปลีกที่คุณซื้อผลิตภัณฑ์มา
Please retain your proof of purchase for any warranty claims. Warranty terms and conditions may vary by region and retailer.
Official Radiomaster Store: Radiomaster Store on Amazon