
1. บทนำ
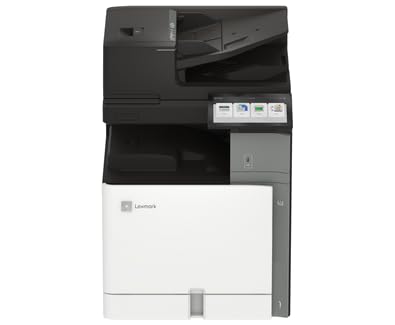
This manual provides essential information for the safe and efficient operation of your Lexmark CX962se MFP Color Laser Printer. Please read it thoroughly before using the device. The Lexmark CX962se is an A3 multifunction color laser printer designed for versatility and productivity, offering vivid prints up to 45 pages per minute, an intuitive 10-inch color touchscreen, and single-pass two-sided scanning capabilities.
2. ข้อมูลด้านความปลอดภัย
- ความปลอดภัยทางไฟฟ้า: Always connect the printer to a grounded power outlet. Do not use damaged power cords. Disconnect the power cord before cleaning or servicing.
- รังสีเลเซอร์: This product uses a laser. Use of controls or adjustments or performance of procedures other than those specified herein may result in hazardous radiation exposure.
- พื้นผิวที่ร้อน: Internal components of the printer can become hot during operation. Avoid touching areas marked with a hot surface warning.
- การระบายอากาศ : Ensure adequate space around the printer for proper ventilation to prevent overheating. Do not block ventilation openings.
- ตลับผงหมึก: Handle toner cartridges carefully. If toner comes into contact with skin or clothing, wash immediately with soap and cold water. Keep toner out of reach of children.
3. เนื้อหาบรรจุภัณฑ์
ตรวจสอบว่ามีรายการทั้งหมดอยู่ในแพ็คเกจ:
- Lexmark CX962se MFP Color Laser Printer
- สายไฟ
- Starter Toner Cartridges (Black, Cyan, Magenta, Yellow)
- คู่มือการติดตั้ง
- Software and Documentation (may be provided via download link)
4. การตั้งค่า
Follow these steps to set up your Lexmark CX962se printer:
- การแกะกล่อง: Carefully remove the printer from its packaging. Remove all protective tapes, films, and packing materials from the exterior and interior of the printer. Refer to the Setup Guide for specific locations.
- การจัดวาง: Place the printer on a stable, level surface with adequate space for ventilation and access to power and data ports.
- เชื่อมต่อพลังงาน: เชื่อมต่อสายไฟเข้ากับเครื่องพิมพ์ แล้วจึงเสียบเข้ากับเต้ารับไฟฟ้าที่มีสายดิน
- เปิดเครื่องครั้งแรก: Press the power button. Follow the on-screen instructions on the 10-inch color touchscreen to select language, region, and initial settings.
- ติดตั้งตลับหมึก: If not pre-installed, open the front cover and insert the toner cartridges into their corresponding slots until they click into place.
- การติดตั้งซอฟต์แวร์: Insert the software CD (if provided) into your computer or visit the official Lexmark support website to download the latest drivers and utilities for your operating system. Follow the on-screen instructions to complete the installation.
- เชื่อมต่อกับคอมพิวเตอร์: Connect the printer to your computer using a USB cable (not included) or configure network connectivity as per the software instructions.
5. คู่มือการใช้งาน
This section covers basic operations of your printer.
- แผงควบคุม: The 10-inch color touchscreen provides access to all printer functions. Navigate through menus by tapping icons and swiping.
- โหลดกระดาษ: Open the paper tray, adjust the paper guides to fit the paper size (up to 8.5 x 11 inch), and load up to 250 sheets of plain paper. Ensure the paper is not creased or bent.
- การพิมพ์: From your computer, open the document you wish to print. Select "Print" from the application's menu, choose the Lexmark CX962se printer, adjust settings as needed (e.g., color, duplex), and click "Print."
- คัดลอก: Place your document face-down on the scanner glass or face-up in the Automatic Document Feeder (ADF). On the printer's touchscreen, select "Copy," adjust settings like quantity, color, and duplex, then press "Start."
- การสแกน: Place your document on the scanner glass or in the ADF. On the touchscreen, select "Scan." Choose your desired scan destination (e.g., computer, network folder, email) and adjust scan settings (e.g., resolution, file type), then press "Start."
6. การบำรุงรักษา
การบำรุงรักษาอย่างสม่ำเสมอจะช่วยให้เครื่องพิมพ์ของคุณทำงานได้อย่างมีประสิทธิภาพสูงสุดและมีอายุการใช้งานยาวนานขึ้น
- Replacing Toner Cartridges: When a toner cartridge is low or empty, a message will appear on the touchscreen. Open the front cover, press the release lever for the empty cartridge, pull it out, and insert a new Lexmark genuine toner cartridge until it clicks into place. Close the cover.
- การทำความสะอาดเครื่องพิมพ์: Use a soft, lint-free cloth to wipe the exterior of the printer. For the scanner glass, use a glass cleaner applied to the cloth (not directly to the glass) to remove smudges. Periodically clean the interior of the printer as instructed in the full user guide available on the Lexmark webเว็บไซต์.
- อัพเดตเฟิร์มแวร์: Periodically check the Lexmark support website for firmware updates. Installing the latest firmware can improve performance and add new features. Follow the instructions provided with the update.
7 การแก้ไขปัญหา
หัวข้อนี้จะกล่าวถึงปัญหาทั่วไปที่คุณอาจพบเจอ
- กระดาษติด: If a paper jam occurs, the touchscreen will display instructions on how to clear it. Carefully open the indicated access points and remove any jammed paper, ensuring no torn pieces remain.
- ปัญหาคุณภาพการพิมพ์: If prints are faded, streaky, or have incorrect colors, check the toner levels. Perform a print quality diagnostic from the printer's control panel. Clean the print heads or transfer belt if recommended.
- ปัญหาการเชื่อมต่อ: Ensure the USB cable is securely connected to both the printer and the computer. If using a network connection, verify network cables are connected and IP settings are correct. Restart both the printer and the computer.
- รหัสข้อผิดพลาด: If an error code appears on the display, note the code and refer to the Lexmark support website or the comprehensive user guide for detailed solutions.
8. ข้อมูลจำเพาะ
| ยี่ห้อ | เล็กซ์มาร์ก |
| ชื่อรุ่น | CX962se (20L8250) |
| เทคโนโลยีการพิมพ์ | เลเซอร์ |
| ฟังก์ชั่น | พิมพ์ ถ่ายเอกสาร สแกน |
| ความเร็วในการพิมพ์สูงสุด (สี) | 15 หน้าต่อนาที |
| ความเร็วในการพิมพ์สูงสุด (ขาวดำ) | 35 หน้าต่อนาที |
| ปณิธาน | 600 x 600 จุดต่อนิ้ว |
| เทคโนโลยีการเชื่อมต่อ | ยูเอสบี |
| ประเภทสแกนเนอร์ | ADF (ตัวป้อนเอกสารอัตโนมัติ) |
| ความจุแผ่นสูงสุด | 250 แผ่น |
| ขนาดสื่อสูงสุด | 8.5 x 11 นิ้ว |
| ขนาดสินค้า (ลึก x กว้าง x สูง) | 29" x 43" x 31" |
| สีหมึก | ดำ, ฟ้าอมเขียว, ม่วงแดง, เหลือง |
| คุณสมบัติพิเศษ | เปิดเครื่องอัตโนมัติ |
9. การรับประกันและการสนับสนุน
Your Lexmark CX962se MFP Color Laser Printer comes with a การรับประกันแบบจำกัด. For specific terms and conditions of the warranty, please refer to the documentation included with your product or visit the official Lexmark webเว็บไซต์.
For further assistance, technical support, driver downloads, and additional documentation, please visit the official Lexmark support webเว็บไซต์ คุณยังสามารถค้นหาข้อมูลติดต่อฝ่ายบริการลูกค้าได้ที่นั่น
Lexmark Official Webเว็บไซต์: www.lexmark.com