1. บทนำ
This manual provides detailed instructions for the installation, operation, and maintenance of your DOITOOL Ultrasonic Water Level Sensor Tank Gauge Liquid Level Meter. This device is designed to monitor water levels and temperatures in outdoor tanks from the comfort of your indoor living space, offering a transmission range of up to 100 meters in open fields.
2. คุณสมบัติของผลิตภัณฑ์
- Indoor temperature display (°C/°F)
- Tank temperature display (°C/°F)
- Water level displayed on a 10-bar graph
- Records minimum and maximum indoor and tank temperatures
- Adjustable tank level alarm modes (high/low)
- Tank empty alert function
- Time display (12/24hr format)
- Time alarm mode
- Tank level updated every 30 seconds or 3 minutes
- ช่วงการส่ง: 100m (สนามเปิด)
- Tank level/depth measurement range: 0.5m to 15m
- Minimum air gap requirement: 0.5m
- Receiver unit can be wall-mounted or placed on a surface using its stand
3. เนื้อหาบรรจุภัณฑ์
- 1 x Liquid Level Meter Receiver Unit
- 1 x Ultrasonic Transmitter Unit
- คู่มือการใช้งาน (เอกสารนี้)
Note: Batteries are not included. The receiver unit typically requires 2x AA batteries, and the transmitter unit requires 6x AAA batteries.
4. ข้อมูลจำเพาะ
| ข้อมูลจำเพาะ | ค่า |
|---|---|
| Receiver Unit Dimensions | 4.13"ยาว x 3.66"กว้าง x 0.98"สูง (10.5 x 9.3 x 2.5 ซม.) |
| Receiver Unit Weight | 8 ออนซ์ |
| วัสดุ | พลาสติก |
| Tank Level/Depth Range | 0.5ม. ถึง 15ม. |
| Minimum Air Gap | 0.5ม. |
| ช่วงการส่งผ่าน | 100เมตร (พื้นที่โล่ง) |
| กำลังไฟ (ตัวรับสัญญาณ) | แบตเตอรี่ (ไม่รวม) |
| กำลัง (เครื่องส่งสัญญาณ) | แบตเตอรี่ (ไม่รวม) |
5. การตั้งค่าและการติดตั้ง
5.1 การติดตั้งแบตเตอรี่
Before installation, insert the required batteries into both the receiver and transmitter units. Ensure correct polarity.

ภาพ: หลัง view of the receiver unit, showing the battery compartment with the cover removed. This is where the receiver unit's batteries are inserted.
5.2 Transmitter Unit Installation
The transmitter unit is installed at the top of your water tank. Follow these guidelines for optimal performance:
- เสาอากาศ: Ensure the antenna is positioned for clear signal transmission.
- Balance Bubble: Use the integrated balance bubble to ensure the transmitter is level for accurate readings.
- การติดตั้ง: Secure the transmitter using screws through the designated bracket.
- ตำแหน่งเซนเซอร์: The ultrasonic sensor should have a clear path to the water surface. Ensure there is a minimum air gap of 0.5 meters (H1 height) between the sensor and the maximum water level.
- Tank Opening: The tank opening for the sensor should be at least 20cm in diameter (Ø > 20CM) to prevent interference from tank walls.
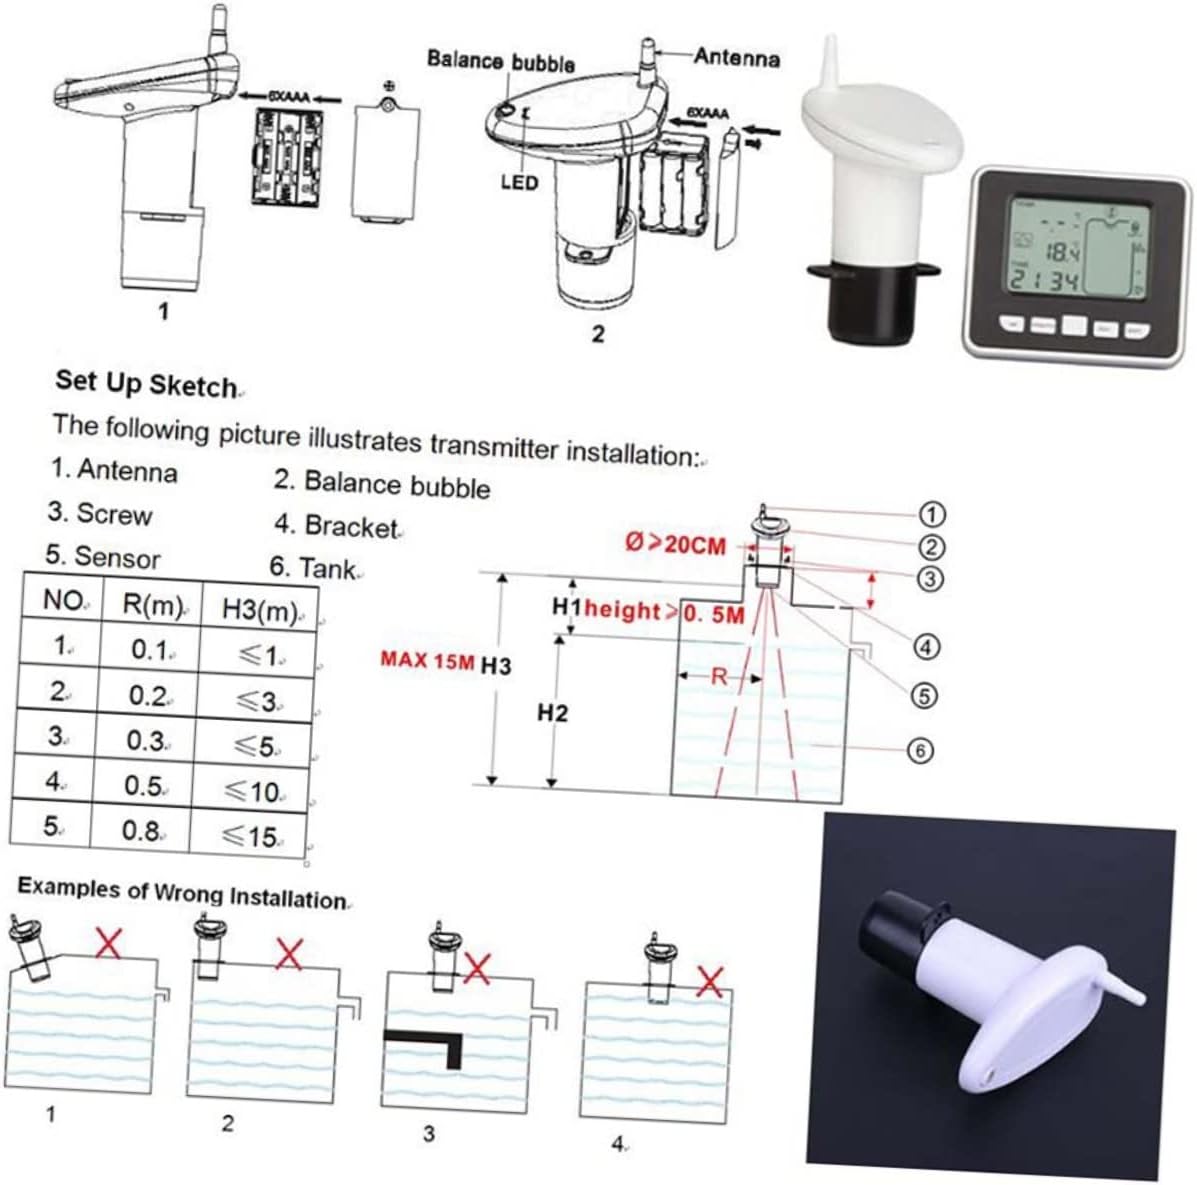
ภาพ: A detailed diagram illustrating the components of the transmitter unit (antenna, balance bubble, sensor), a setup sketch for proper installation on a tank, and visual examples of incorrect installation methods to avoid.
5.3 Receiver Unit Placement
The receiver unit can be placed indoors. It features a stand for desktop use or can be mounted on a wall using the integrated hooks. Position it in a location where the signal from the transmitter is strong and clear.
6. คู่มือการใช้งาน
The receiver unit displays various information on its screen, including indoor temperature, tank temperature, water level, and time. It features several buttons for configuration and viewไอเอ็นจีข้อมูล

ภาพ: The front of the receiver unit, showing the digital display and control buttons: 'set', '+/max/min', '-/tank', and 'alarm'.
6.1 แสดงผลเกินview
- T.ANK: Displays the water level in the tank, often represented by a 10-bar graph and a percentage.
- °C/°F: Indicates temperature units.
- อุณหภูมิในร่ม: Shows the ambient temperature where the receiver is located.
- อุณหภูมิถัง: Shows the temperature of the water in the tank.
- เวลา: แสดงเวลาปัจจุบัน
6.2 ฟังก์ชันปุ่ม
- SET: Used to enter settings mode for time, alarms, and units. Press to cycle through settings.
- +/MAX/MIN: ในโหมดปกติ กด เพื่อ view maximum and minimum recorded temperatures. In settings mode, use to increase values.
- -/TANK: In normal mode, press to switch between tank level display units (meters/feet). In settings mode, use to decrease values.
- เตือน: Used to set or activate/deactivate various alarms (e.g., high/low water level, empty tank).
6.3 การตั้งเวลาและนาฬิกาปลุก
- กดปุ่ม ชุด กดปุ่มเพื่อเข้าสู่โหมดตั้งเวลา ใช้ + or - to adjust hours and minutes. Press ชุด เพื่อยืนยันอีกครั้ง
- To set water level alarms, press the เตือน ปุ่ม. ใช้ + or - to adjust the high or low water level thresholds. Press เตือน again to confirm and activate.
- An audible alarm will sound when a set condition (e.g., tank empty, high/low level) is met.
7. การบำรุงรักษา
- การทำความสะอาด: Wipe both units with a soft, dry cloth. Do not use abrasive cleaners or immerse units in water.
- การเปลี่ยนแบตเตอรี่: Replace batteries in both units when the low battery indicator appears on the receiver display. Ensure to use fresh batteries of the correct type and size.
- Transmitter Check: Periodically check the transmitter unit for any obstructions or debris that might interfere with the ultrasonic sensor's operation. Ensure it remains level.
8 การแก้ไขปัญหา
- No Reading on Receiver:
- ตรวจสอบแบตเตอรี่ในทั้งสองเครื่อง และเปลี่ยนหากจำเป็น
- Ensure both units are within the 100m transmission range and there are no significant obstructions.
- Verify the transmitter is correctly installed and level.
- Inaccurate Water Level:
- Confirm the transmitter is level and the sensor has a clear path to the water.
- Ensure the minimum air gap of 0.5m is maintained.
- Check for debris or buildup on the sensor.
- ค่าอุณหภูมิที่วัดได้ไม่ถูกต้อง:
- Ensure the units are not exposed to direct sunlight or extreme heat sources that could affect readings.
9. ข้อมูลด้านความปลอดภัย
- อย่าพยายามถอดประกอบหรือซ่อมแซมอุปกรณ์ด้วยตนเอง โปรดติดต่อช่างผู้ชำนาญเพื่อขอรับบริการ
- เก็บอุปกรณ์ให้ห่างจากอุณหภูมิที่สูงหรือต่ำมาก แสงแดดโดยตรง และความชื้น
- ทิ้งแบตเตอรี่ตามระเบียบข้อบังคับของท้องถิ่น ห้ามทิ้งแบตเตอรี่เก่าและใหม่ปะปนกัน หรือแบตเตอรี่ต่างชนิดกัน
- อุปกรณ์นี้ไม่ใช่ของเล่น เก็บให้พ้นมือเด็ก
10. การรับประกันและการสนับสนุน
For warranty information and technical support, please refer to the retailer where you purchased the product or visit the official DOITOOL brand webไซต์นี้ โปรดเก็บหลักฐานการซื้อไว้เพื่อใช้ยืนยันการรับประกัน
You can find more information about DOITOOL products at the DOITOOL Store.