1. บทนำ
The LOKLiK Cutting Machine is a versatile tool designed for crafters to precisely cut a wide range of materials, including vinyl, paper, faux leather, and glitter cardstock. This machine is compatible with HTVRONT craft materials and offers features such as matless cutting for smart materials and integration with the LOKLiK IdeaStudio software. This manual provides essential information for the safe and effective use of your cutting machine and accompanying HTV vinyl.
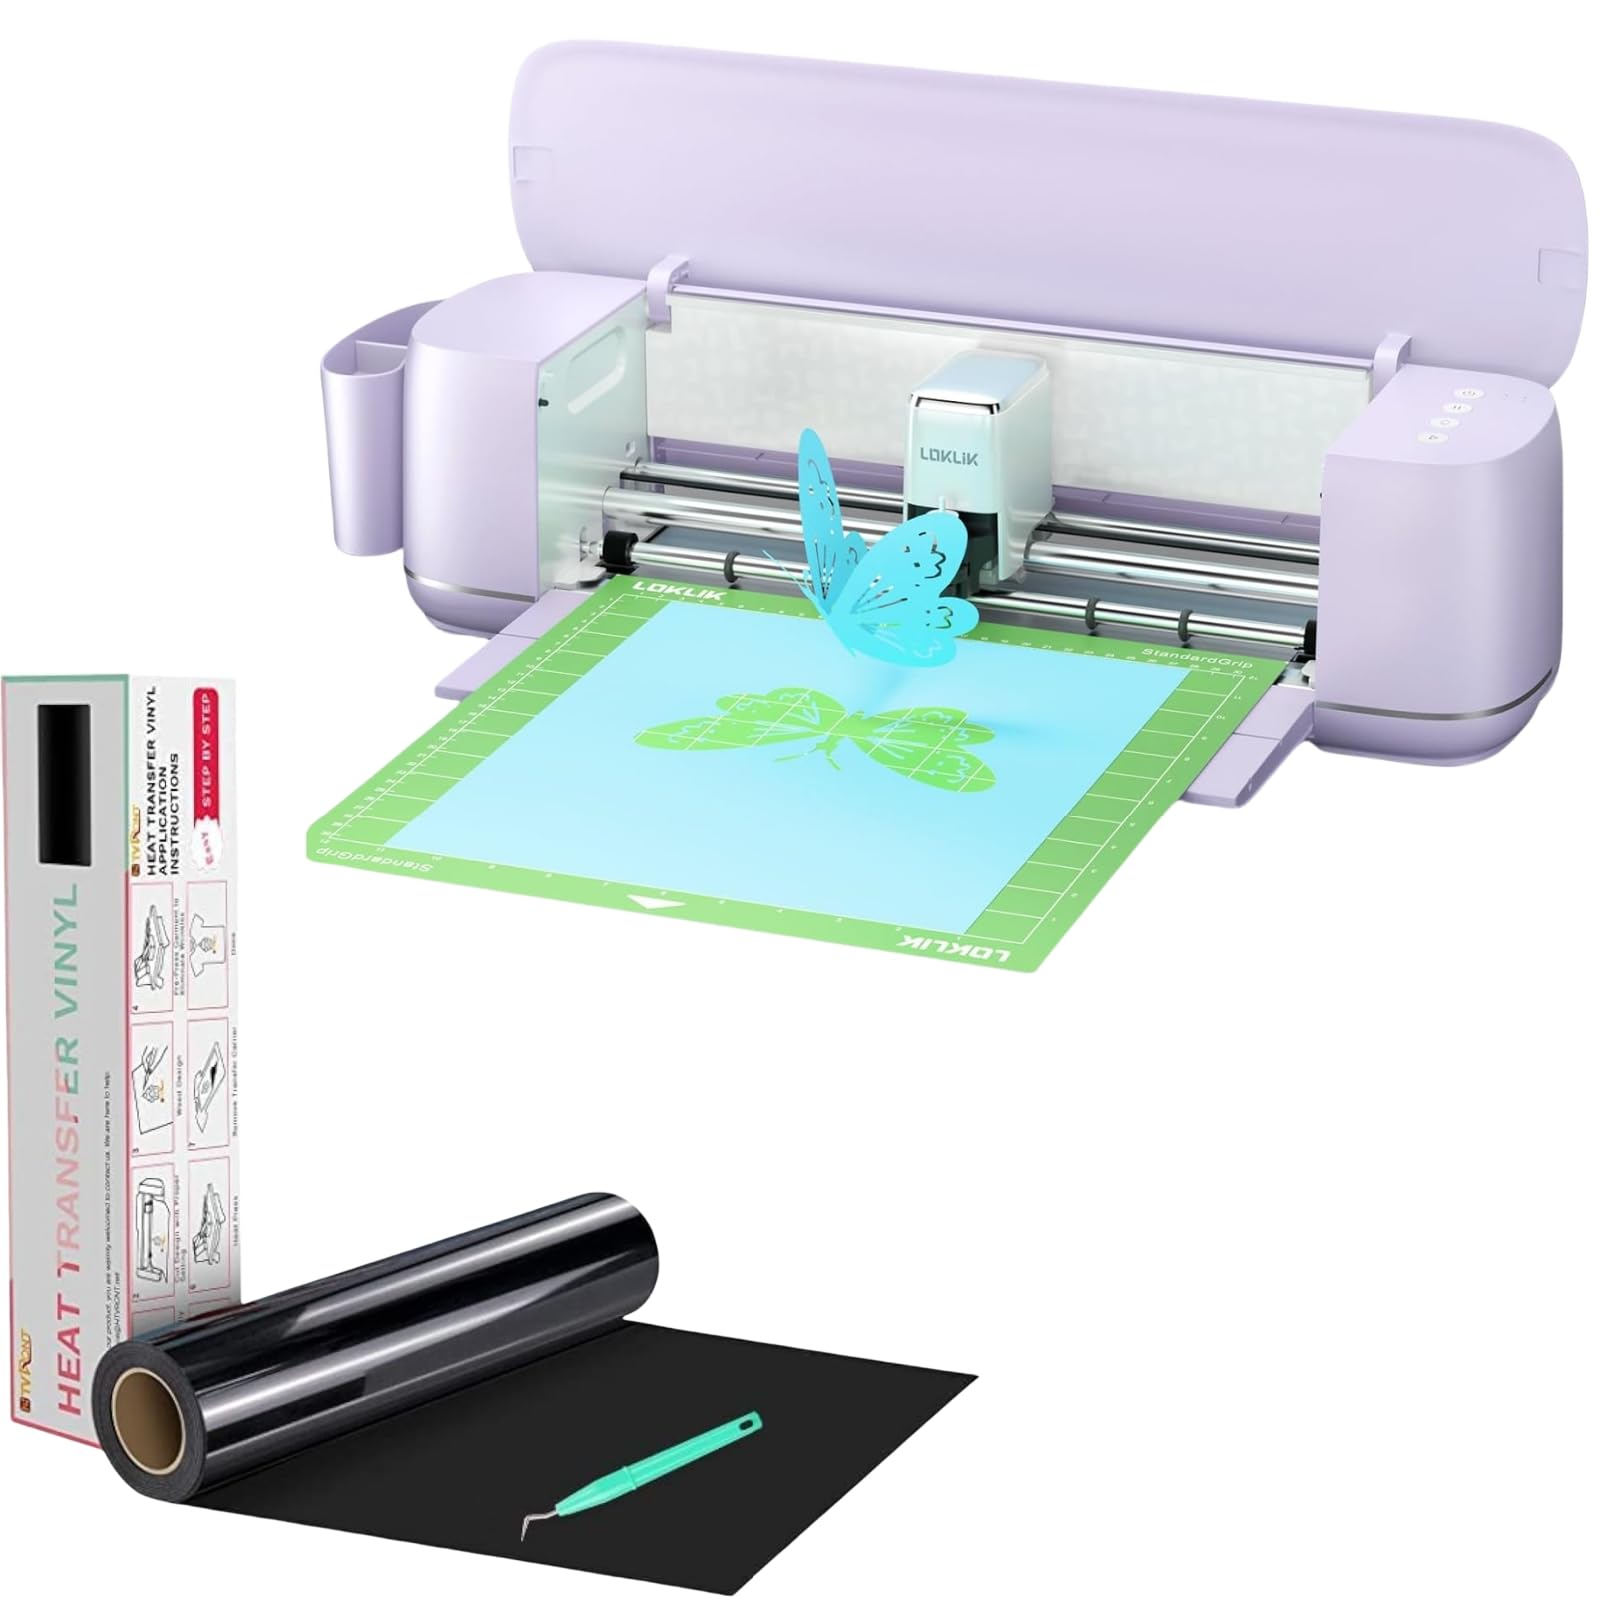
Image 1.1: The LOKLiK Cutting Machine, a compact and efficient craft cutter.
2. ข้อมูลด้านความปลอดภัย
Please read all safety instructions before operating the LOKLiK Cutting Machine to prevent injury or damage to the device.
- ควรเก็บเครื่องให้ห่างจากน้ำหรือความชื้นamp สภาพแวดล้อม
- ตรวจสอบให้แน่ใจว่าสายไฟไม่ชำรุดและเสียบเข้ากับเต้ารับไฟฟ้าที่เหมาะสมอย่างถูกต้อง
- Keep hands and loose clothing away from moving parts, especially the blade area, during operation.
- ใช้เฉพาะอุปกรณ์เสริมและชิ้นส่วนอะไหล่ที่ผ่านการรับรองเท่านั้น
- Do not attempt to disassemble or repair the machine yourself. Contact customer support for assistance.
- เก็บเครื่องไว้ในสถานที่สะอาดและแห้งเมื่อไม่ได้ใช้งาน
3. เนื้อหาบรรจุภัณฑ์
ตรวจสอบว่ามีรายการทั้งหมดอยู่ในแพ็คเกจของคุณ:
- LOKLiK Cutting Machine
- อะแดปเตอร์แปลงไฟ
- สาย USB
- Fine Cutting Tool (pre-installed or included)
- Writing/Drawing Tool
- Heat Transfer Vinyl (HTV) Roll (e.g., White HTV Rolls - 12" x 20ft)
- Free Weeding Tool
- คู่มือการใช้งาน (เอกสารนี้)
Note: Deep cutting, scoring, and foil printing tools are sold separately.
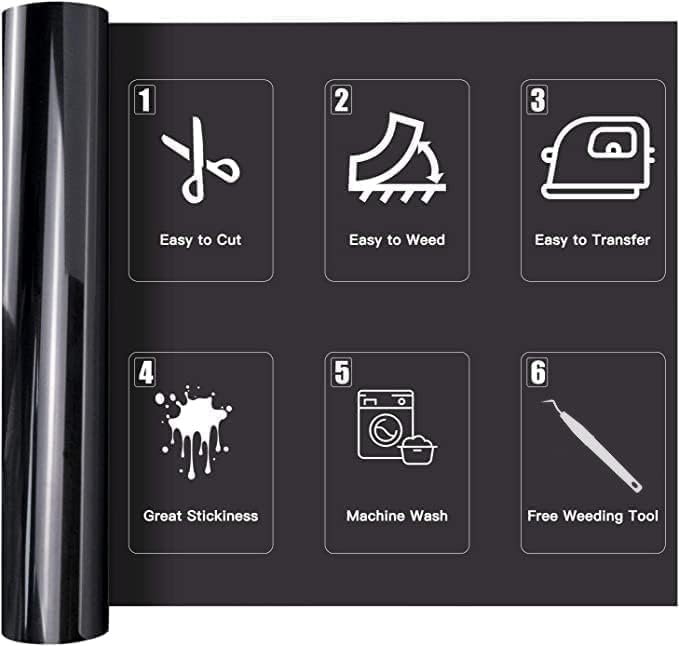
Image 3.1: An HTV vinyl roll, illustrating its key features: easy to cut, weed, and transfer, great stickiness, machine washable, and includes a free weeding tool.
4. การตั้งค่า
4.1 การแกะและการจัดวาง
- นำส่วนประกอบทั้งหมดออกจากบรรจุภัณฑ์อย่างระมัดระวัง
- Place the LOKLiK Cutting Machine on a stable, flat surface with adequate space around it for material loading and operation.
- Attach the removable storage cup to organize your work area.
4.2 การเชื่อมต่อสายไฟ
เชื่อมต่ออะแดปเตอร์แปลงไฟเข้ากับพอร์ตจ่ายไฟของเครื่อง จากนั้นเสียบปลั๊กเข้ากับเต้ารับที่ผนัง
4.3 Software Installation (LOKLiK IdeaStudio)
The LOKLiK Cutting Machine pairs with the LOKLiK IdeaStudio software. This software offers over 50,000 free designs, various creative fonts, and an AI painting feature without a subscription fee.
- Visit the official LOKLiK website to download the latest version of LOKLiK IdeaStudio.
- ทำตามคำแนะนำบนหน้าจอเพื่อติดตั้งซอฟต์แวร์ลงในคอมพิวเตอร์ของคุณ

Image 4.1: The LOKLiK IdeaStudio software interface, showing design options and connectivity features.
4.4 การเชื่อมต่อกับคอมพิวเตอร์ของคุณ
You can connect the cutting machine to your computer via Bluetooth or USB.
- การเชื่อมต่อ USB: Connect one end of the USB cable to the machine and the other end to an available USB port on your computer.
- การเชื่อมต่อบลูทู ธ : Turn on Bluetooth on your computer and the cutting machine. Follow the pairing instructions in the LOKLiK IdeaStudio software to connect wirelessly.
5. คู่มือการใช้งาน
5.1 การดำเนินงานทั่วไปview
The LOKLiK Cutting Machine supports various functions including fine cutting, writing, drawing, deep cutting, scoring, and foil printing. This section focuses on the cutting process, particularly with HTV vinyl.

Image 5.1: The LOKLiK Cutting Machine demonstrating its versatility for different craft projects and compatible tools like fine cutting, deep cutting, writing/drawing, scoring, and foil printing.
5.2 Using LOKLiK IdeaStudio Software
- Launch LOKLiK IdeaStudio on your computer.
- Select or create your design. Utilize the vast image library, creative fonts, or the AI painting feature to generate unique designs.
- Adjust the design size and placement as needed for your material.

Image 5.2: The AI-generated designs feature within LOKLiK IdeaStudio, allowing users to create custom images from text prompts.
5.3 Material Preparation (HTV Vinyl)
Proper preparation of your HTV vinyl is crucial for successful cuts and transfers.
- Identify Cutting Side: For HTV, the matte side is the cutting side, and the glossy side is the ironing side (carrier sheet). Always cut on the dull, matte side.
- ฟิล์มป้องกัน: Some HTV rolls may have a clear protective film on the glossy side. Ensure this is not confused with the carrier sheet.
- Mirror Your Design: When working with HTV, always mirror your design in the software before cutting, as it will be applied face down.

Image 5.3: Visual guide to identifying the cutting (matte) and ironing (glossy) sides of HTV vinyl, along with the protective film.

Image 5.4: Demonstrating how to identify and cut on the dull side of the HTV vinyl.
5.4 กระบวนการตัด
- วัสดุโหลด: For matless cutting, load smart materials (up to 21 ft long and 13 in wide) directly into the machine. For other materials, place them on a cutting mat (sold separately) and load the mat.
- เลือกการตั้งค่า: In LOKLiK IdeaStudio, choose the correct material type. The software will suggest appropriate blade force and speed. Refer to the table below for general guidelines for HTV:
| เครื่องจักร | ใบมีด | บังคับ | ความเร็ว | บัตรผ่าน | โหมดวัสดุ |
|---|---|---|---|---|---|
| For Cricut (Previous HTV) | มาตรฐาน | รีดติด+ | ไม่มีข้อมูล | ไม่มีข้อมูล | รีดติด+ |
| For Cricut (2021 Updated HTV) | มาตรฐาน | Iron on | ไม่มีข้อมูล | ไม่มีข้อมูล | Iron on |
| For Cameo 3 | Blade-1 | บังคับ-5 | Speed-5 | Passes-2 | เรียบ |
| For Cameo 4 | Blade-3 | บังคับ-8 | Speed-5 | Passes-2 | เรียบ |
บันทึก: If you receive 2021 updated HTV, there is a tip in the packaging to remind you.

ภาพที่ 5.5: ภาพระยะใกล้ view of the LOKLiK Cutting Machine's blade executing an intricate design with precision.

Image 5.6: The LOKLiK Cutting Machine performing a matless full-length cut for a large wall decal, showcasing its capability with smart materials up to 21 feet.
5.5 Weeding
After cutting, use the provided weeding tool to remove the excess vinyl around your design. This process is made easier by the HTV's design for simple weeding.
5.6 Heat Transfer (for HTV Vinyl)
Once weeded, your HTV design is ready for transfer.
- Preheat your heat press or iron to the recommended temperature for your specific HTV type (typically around 305°F/150°C).
- Place your garment or item on a flat, heat-resistant surface.
- Position the HTV design (carrier sheet up) onto the garment.
- Apply even pressure with your heat press or iron for the recommended time (usually 10-15 seconds).
- Allow the design to cool slightly (warm peel) or completely (cold peel) as per your HTV instructions, then carefully peel off the carrier sheet.
The HTV vinyl is sensitive to temperature and pressure, ensuring a secure bond to fabric. It is designed to withstand over 50 machine washes at 40 degrees Celsius without fading, peeling, or cracking.
6. การบำรุงรักษา
6.1 การทำความสะอาดเครื่องจักร
- Regularly wipe the exterior of the machine with a soft, dry cloth.
- Use a small brush or compressed air to clear any dust or material debris from the cutting area and rollers.
- โปรดถอดปลั๊กเครื่องออกก่อนทำความสะอาด
6.2 การเปลี่ยนใบมีด
Blades will dull over time, affecting cut quality. Replace the blade when you notice inconsistent cuts or tearing of material.
- ปิดและถอดปลั๊กเครื่อง
- Carefully remove the blade housing from the carriage.
- Following the instructions for your specific blade housing, replace the dull blade with a new one.
- Reinsert the blade housing into the carriage.
7 การแก้ไขปัญหา
If you encounter issues with your LOKLiK Cutting Machine, refer to the following common problems and solutions:
| ปัญหา | สาเหตุที่เป็นไปได้ | สารละลาย |
|---|---|---|
| เครื่องไม่เปิดเครื่อง | Loose power connection, faulty outlet | Check power cord connections. Try a different outlet. |
| Machine not connecting to software | USB cable issue, Bluetooth not paired, software glitch | Ensure USB cable is secure. Re-pair Bluetooth. Restart software and machine. Update drivers. |
| Poor cut quality (tearing, incomplete cuts) | Dull blade, incorrect blade settings, material loaded incorrectly | Replace blade. Adjust force/speed settings in software. Ensure material is loaded flat and correctly. |
| HTV not adhering to fabric | Insufficient heat or pressure, incorrect peel method | Increase heat press temperature or pressure. Ensure correct peel method (warm/cold). |
| HTV peeling/cracking after washing | Improper application, low-quality HTV | Ensure proper application technique. Use high-quality HTV like HTVRONT. |
For further assistance, please contact LOKLiK customer support.
8. ข้อมูลจำเพาะ
- แบบอย่าง: LOKLiK Cutting Machine
- ความเข้ากันได้ของวัสดุ: 0.1mm to 2mm thickness (over 100 materials including vinyl, paper, faux leather, glitter cardstock)
- Matless Cutting: Supports smart materials up to 21 ft long and 13 in wide
- Cutting Accuracy: ลงได้ถึง 0.5 มม.
- การเชื่อมต่อ: บลูทูธ, ยูเอสบี
- ซอฟต์แวร์: LOKLiK IdeaStudio (no subscription required, includes 50,000+ designs, AI painting)
- ฟังก์ชั่น: Fine cutting, writing, drawing (tools included); Deep cutting, scoring, foil printing (tools sold separately)
- การดำเนินการ: Quieter operation with upgraded step-motor system and noise reduction technology
- ASIN: B0DSZGLJVL
- วันที่เข้าใช้งานครั้งแรก: 14 มกราคม 2025
9. การรับประกันและการสนับสนุน
9.1 ข้อมูลการรับประกัน
For detailed warranty information, including coverage period and terms, please refer to the official HTVRONT webตรวจสอบเว็บไซต์หรือบัตรรับประกันที่มาพร้อมกับบรรจุภัณฑ์ของผลิตภัณฑ์ เก็บหลักฐานการซื้อไว้เพื่อใช้ในการเคลมประกัน
9.2 การสนับสนุนลูกค้า
If you require technical assistance, have questions about your product, or need to report an issue, please contact HTVRONT customer support through their official webไซต์หรือข้อมูลการติดต่อที่ระบุไว้ในเอกสารผลิตภัณฑ์ของคุณ