
Zelaclock F800
Zelaclock F800 Large Digital Wall Clock 12-inch User Manual
Comprehensive instructions for setting up, operating, and maintaining your Zelaclock F800 digital wall clock.
การแนะนำ
This manual provides detailed instructions for the Zelaclock F800 Large Digital Wall Clock. Please read thoroughly to ensure proper use and longevity of your device. This clock features a full-screen time display with large, bright numbers, adjustable brightness, ambient night lights, and remote control functionality.
มีอะไรอยู่ในกล่อง
Upon unboxing your Zelaclock F800, verify that all components are present:
- Zelaclock F800 Digital Wall Clock
- รีโมทคอนโทรล
- Power Adapter (USB cable and wall adapter)
- Mounting Hardware (pins/screws for wall mounting)
- คู่มือการใช้งาน (เอกสารนี้)
- LR44 Batteries (2 required for memory function)

รูปที่ 1: Unboxed components of the Zelaclock F800. Includes the digital clock unit, remote control, USB power cable, wall adapter, mounting pins, and user manual.
การตั้งค่า
1. การเชื่อมต่อไฟฟ้า
The Zelaclock F800 requires continuous power via the provided corded electric adapter. It is not battery operated for primary function. The included LR44 batteries are for memory backup only, ensuring settings are retained during a power outage.
- Insert the small end of the USB power cable into the DC 5V port on the back of the clock.
- Plug the USB wall adapter into a standard electrical outlet.
- หน้าจอแสดงเวลาจะสว่างขึ้นเมื่อเชื่อมต่อแหล่งจ่ายไฟสำเร็จ
รูปที่ 2: Connecting the power cable to the DC 5V input on the back of the clock. Ensure a secure connection for continuous operation.
2. Battery Installation (Memory Backup)
To retain time and settings during a power interruption, install the two LR44 batteries into the battery compartment on the back of the clock. This is for memory function only and does not power the display.

รูปที่ 3: Location of the battery compartment for LR44 memory backup batteries on the rear of the clock.
3. ตัวเลือกการติดตั้ง
The Zelaclock F800 can be wall-mounted or placed on a tabletop using its integrated folding brackets.
- ติดผนัง: Use the provided mounting hardware (pins/screws) and the keyhole slots on the back of the clock. A paper template may be included to assist with accurate placement.
- โต๊ะ: Extend the folding brackets on the back of the clock to stand it upright on any flat surface.

รูปที่ 4: หลัง view of the clock highlighting the wall hanging holes and the folding bracket for tabletop placement.
คำแนะนำการใช้งาน
The clock's functions are primarily controlled via the included remote control. Some basic settings can also be adjusted using buttons on the side of the clock.
1. การตั้งเวลาและวันที่
- Press the "Time Set" button on the remote control. The hour digits will begin to flash.
- ใช้ปุ่ม "+" และ "-" เพื่อปรับเวลา
- Press "Time Set" again to move to minutes. Use "+" and "-" to adjust minutes.
- Continue pressing "Time Set" to cycle through year, month, and date settings, adjusting each with "+" and "-".
- Press "Time Set" one last time to confirm all settings.
- The clock supports 12-hour and 24-hour display modes. Use the "12/24HR" button on the remote to switch between modes.

รูปที่ 5: The remote control allows easy adjustment of time, date, and other clock features.
2. ปรับความสว่างได้
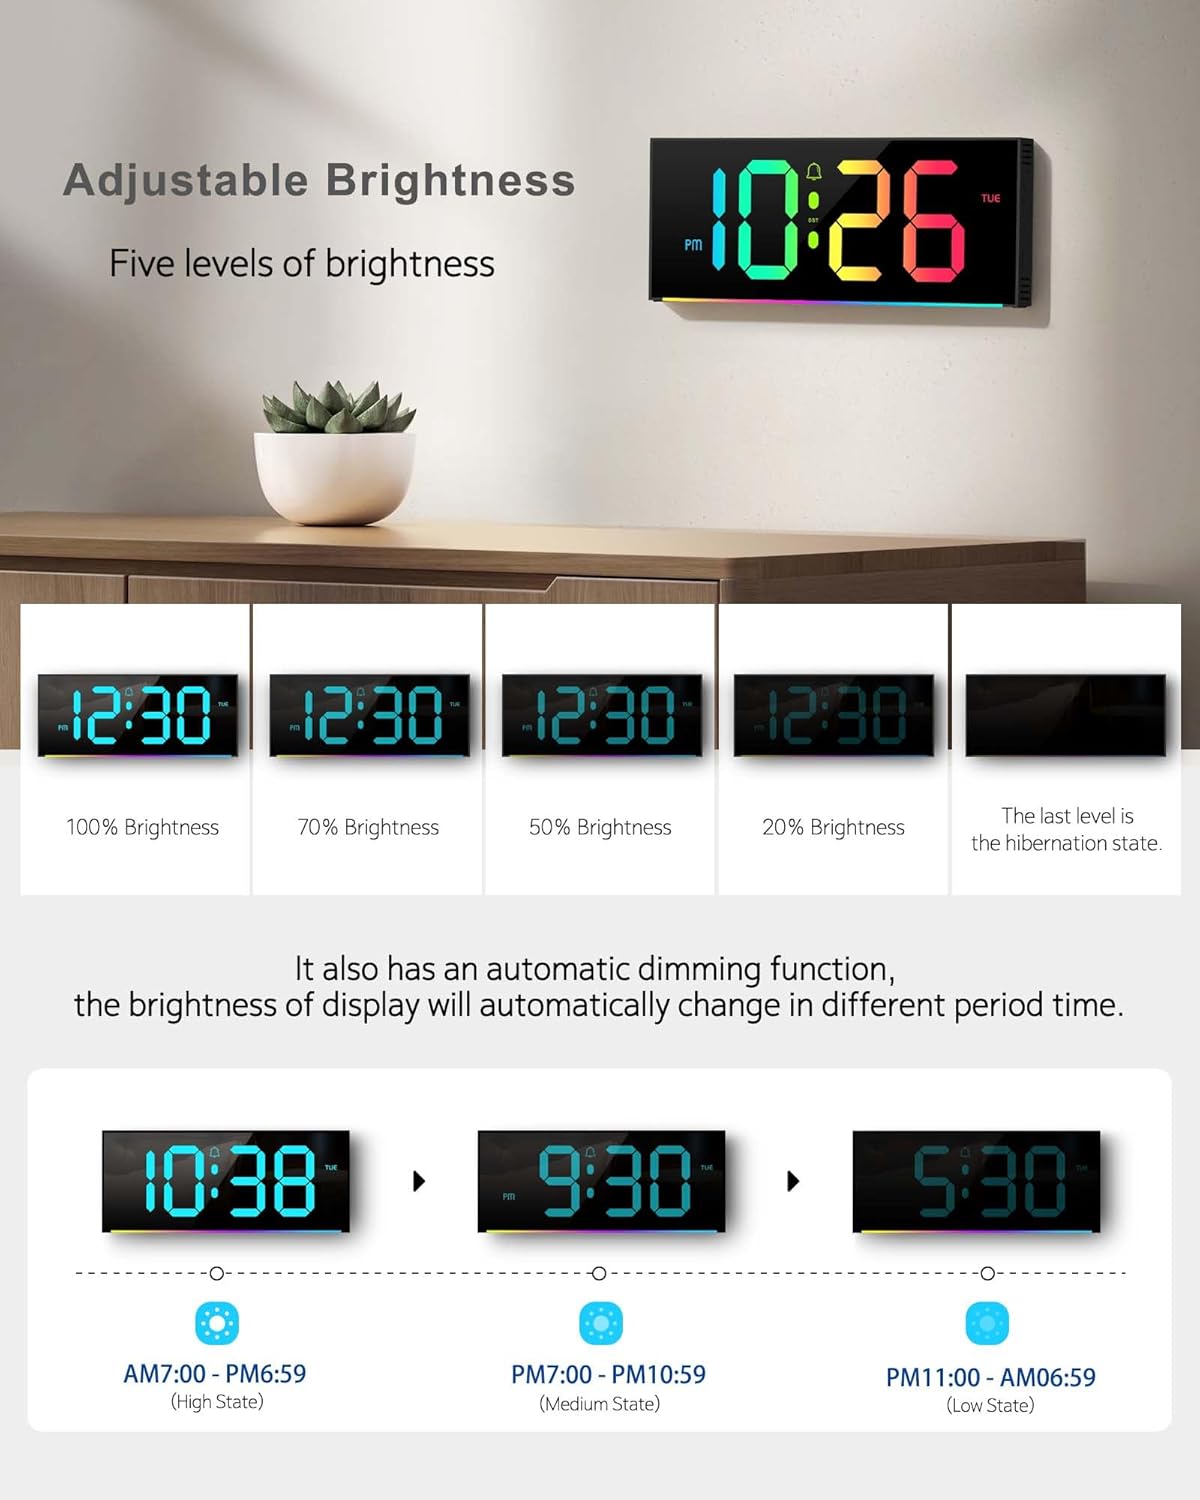
The clock offers five levels of brightness and an automatic dimming function.
- Use the "Brightness" buttons on the remote control to manually cycle through the five brightness levels.
- Activate the automatic dimming function for the clock to adjust brightness based on ambient light, ensuring it doesn't disturb sleep.

รูปที่ 6: Visual representation of the five adjustable brightness levels, including a hibernation state.
3. Display Colors
The clock features 12 RGB colors for the digital display and 14 different ambient night light colors.
- Use the "Color" button on the remote to change the color of the time digits.
- Use the "Light" button on the remote to cycle through the 14 ambient night light colors located at the bottom of the clock.

รูปที่ 7: The digital display can be customized with 12 different colors using the remote control.

รูปที่ 8: The ambient night light feature provides 14 different color options, illuminating the area around the clock.
4. เวลาออมแสง (DST)
The clock supports automatic adjustment for Daylight Saving Time. Use the "DST" button on the remote control to enable or disable this feature. When enabled, the clock will automatically adjust in March and November.
5. Time & Calendar Alternation
You can set the clock to alternate between displaying the time and the calendar. In this mode, the time will display for 10 seconds, followed by the calendar for 5 seconds, continuously cycling.
รูปที่ 9: The clock can alternate between displaying the current time and the date/calendar.
ข้อมูลจำเพาะ
| คุณสมบัติ | รายละเอียด |
|---|---|
| ยี่ห้อ | นาฬิกาเวลา |
| หมายเลขรุ่น | เอฟ800 |
| สี | สีดำ |
| ประเภทจอภาพ | ดิจิตอล |
| ขนาดสินค้า | กว้าง 4.8 นิ้ว x สูง 11.6 นิ้ว |
| น้ำหนักสินค้า | 1.23 ปอนด์ (0.56 กิโลกรัม) |
| แหล่งพลังงาน | สายไฟ |
| แบตเตอรี่สำรอง | 2 LR44 batteries required (for memory only) |
| คุณสมบัติพิเศษ | Adjustable Brightness, Alarm, Calendar Display, Large Display, Silent Clock, 12 RGB Colors, Ambient Night Light, DST |
| ประเภทการติดตั้ง | Wall Mount&Tabletop |
การแก้ไขปัญหา
- นาฬิกาไม่หมุน: Ensure the power adapter is securely plugged into both the clock and a working electrical outlet. This clock requires continuous power and is not battery-operated for display.
- การตั้งค่าจะหายไปหลังจากไฟดับtage: Verify that the two LR44 memory backup batteries are correctly installed and are not depleted.
- รีโมทคอนโทรลไม่ตอบสนอง: Check the battery in the remote control. Ensure there are no obstructions between the remote and the clock's sensor.
- Display issues (e.g., unlit segments): If parts of the digital display are not illuminating correctly, contact customer service for assistance.
การซ่อมบำรุง
To ensure the longevity and optimal performance of your Zelaclock F800, follow these simple maintenance guidelines:
- การทำความสะอาด: เช็ดหน้าจอเบาๆ และ casinก. มีลักษณะนุ่ม แห้ง หรือหยาบเล็กน้อยamp ใช้ผ้าเช็ดทำความสะอาด หลีกเลี่ยงการใช้สารทำความสะอาดที่มีฤทธิ์กัดกร่อนหรือตัวทำละลาย เพราะอาจทำให้พื้นผิวเสียหายได้
- สายไฟ: Periodically inspect the power cord for any signs of damage. If damaged, discontinue use and replace with an approved adapter.
- การเปลี่ยนแบตเตอรี่: Replace the LR44 memory backup batteries annually or if settings are no longer retained during power interruptions.
- การจัดวาง: Avoid placing the clock in direct sunlight or near heat sources, which can affect its performance and lifespan.
การรับประกันและการสนับสนุน
Zelaclock is committed to providing high-quality products and excellent customer service. Your Zelaclock F800 comes with a รับประกัน 12 เดือนโดยไม่ต้องกังวล.
If you encounter any questions or issues with your product, please contact our บริการลูกค้าตลอด 24 ชม. via the buyer-seller message system on the platform where you purchased the clock. We are dedicated to resolving any concerns and ensuring your satisfaction.
วิดีโอผลิตภัณฑ์อย่างเป็นทางการ
Zelaclock Digital Wall Clock Overview
1 วิดีโอ: An official video from Zelaclock demonstrating the features and functionality of the digital wall clock, including color changes and display options.
EASYERA Digital Wall Clock Unboxing
2 วิดีโอ: An unboxing video by a seller, showcasing the contents of the package and initial setup steps for a similar digital wall clock.
EASYERA Large Digital Wall Clock Features
3 วิดีโอ: A seller video highlighting various features of the large digital wall clock, including its display and ambient lighting.
Ask a question about this manual
Ask about setup, troubleshooting, compatibility, parts, safety, or missing instructions. Manuals+ will review the question and use this page’s manual context to help answer it.