
1. บทนำ
This manual provides detailed instructions for the setup, operation, and maintenance of your Irfora D1007 TAM Cordless Telephone. Please read this manual thoroughly before using the device to ensure proper functionality and to familiarize yourself with all features. Keep this manual for future reference.
2. เนื้อหาบรรจุภัณฑ์
ตรวจสอบว่าสินค้าทั้งหมดที่ระบุไว้ด้านล่างนี้รวมอยู่ในบรรจุภัณฑ์ของคุณแล้ว หากมีสินค้าใดสูญหายหรือเสียหาย โปรดติดต่อผู้ค้าปลีกของคุณ
- 1 x เครื่อง
- 1 x Cradle (Base Unit)
- 1 x Telephone Line Cable
- 2 x Rechargeable Batteries (400mAh, 1.2V each)
- 1 x Power Cord (US/EU Plug, as per region)
- 1 x คู่มือผู้ใช้ (ภาษาอังกฤษ)

Image: The complete package contents of the Irfora D1007 TAM Cordless Telephone, showing the handset, base unit, power adapter, telephone line cable, two rechargeable batteries, and the user manual.
3. การจัดวางและส่วนประกอบของผลิตภัณฑ์
Familiarize yourself with the various parts of your cordless telephone and base unit.
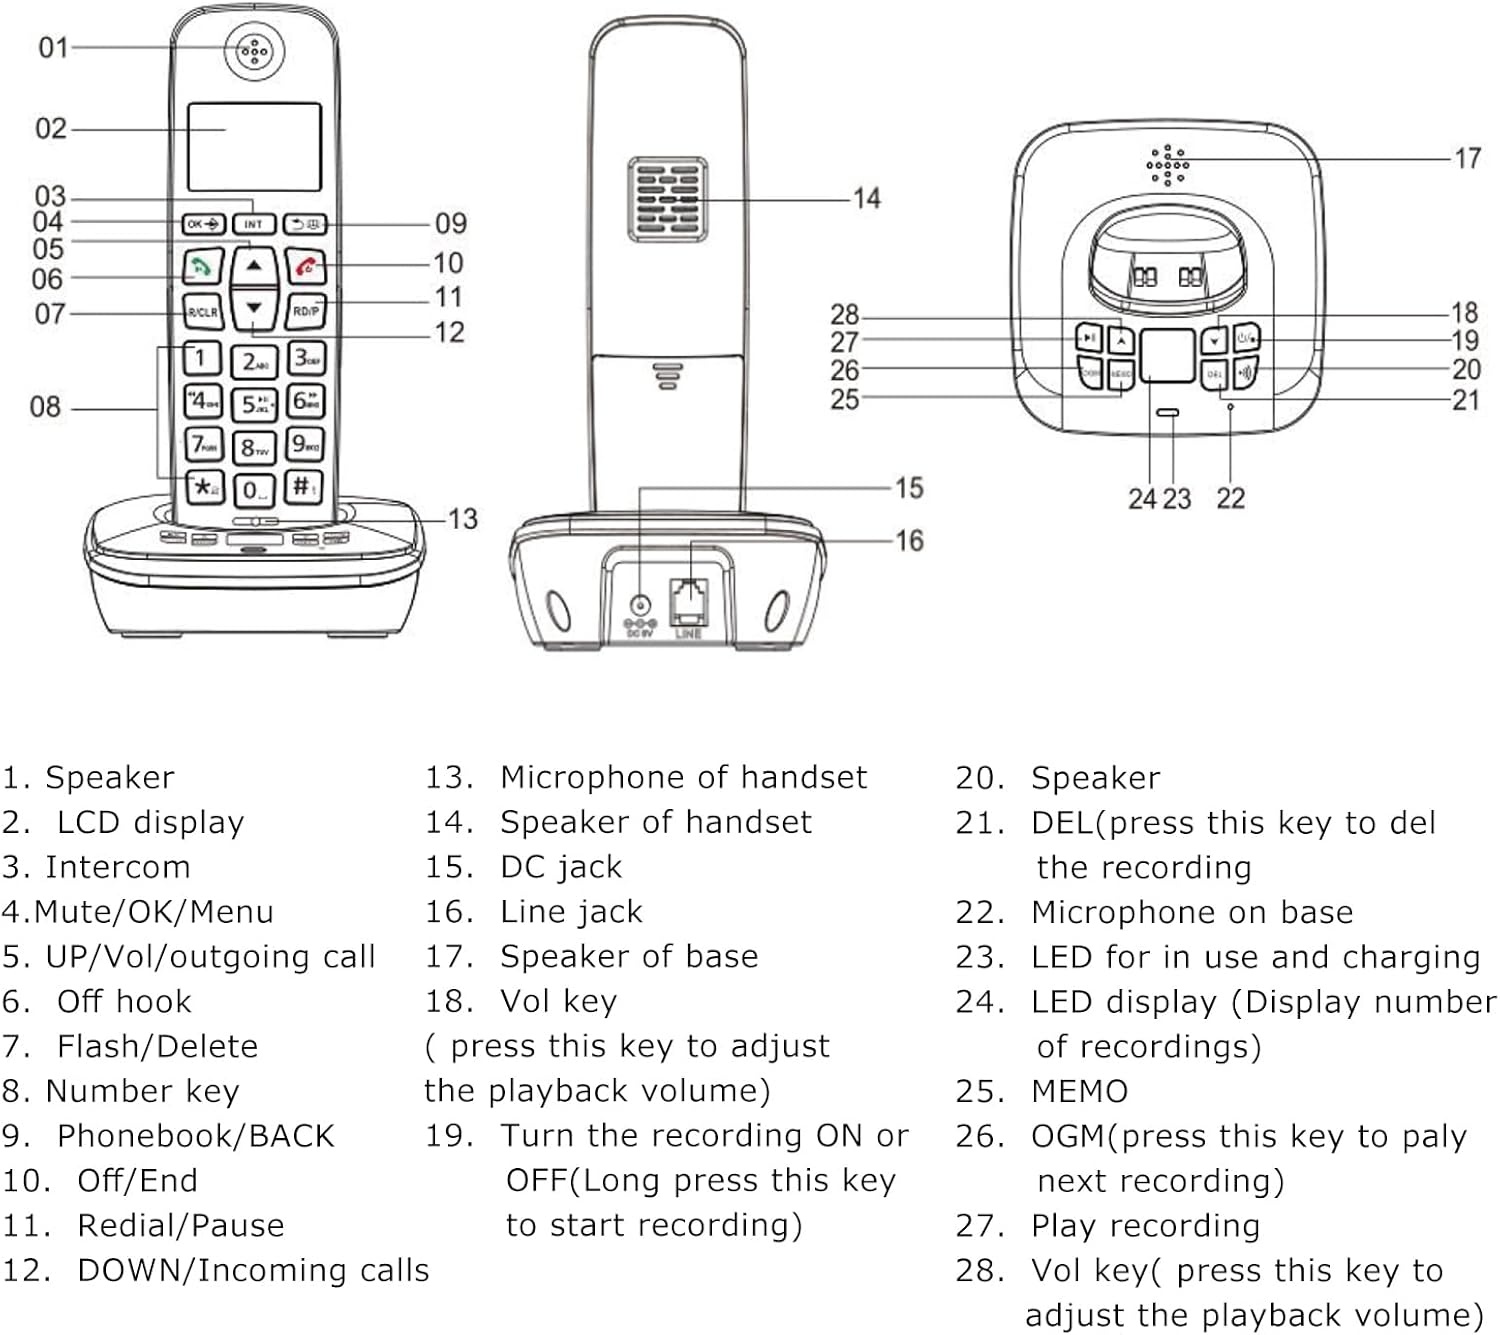
Image: A detailed diagram illustrating the handset and base unit with numbered labels pointing to specific components for easy identification.
Handset Components:
- ลำโพง
- LCD display (3 lines)
- Intercom button (INT)
- Mute/OK/Menu button
- UP/Vol/Outgoing call button
- Off hook button (Green call button)
- Flash/Delete button (R/CLR)
- Number keys (0-9, *, #)
- Phonebook/BACK button
- Off/End button (Red call button)
- Redial/Pause button (RD/P)
- DOWN/Incoming calls button
- Microphone of handset
Base Unit Components:
- Speaker of handset
- DC jack (Power input)
- Line jack (Telephone line input)
- Speaker of base
- Vol key (Volume adjustment for playback)
- Turn the recording ON or OFF (Long press to start recording)
- DEL (Press to delete the recording)
- Microphone on base
- LED for in use and charging indication
- LED display (Display number of recordings)
- ปุ่ม MEMO
- OGM (Press to play next recording)
- Play recording button
- Vol key (Press to adjust playback volume)
4. การตั้งค่า
4.1 การติดตั้งแบตเตอรี่
- เปิดฝาปิดช่องใส่แบตเตอรี่ที่ด้านหลังของโทรศัพท์
- Insert the two rechargeable batteries, ensuring correct polarity (+ and -).
- ปิดฝาช่องใส่แบตเตอรี่ให้แน่น
4.2 การเชื่อมต่อหน่วยฐาน
- Connect one end of the telephone line cable to the LINE jack on the base unit and the other end to your telephone wall socket.
- Connect the power cord to the DC jack on the base unit and plug the adapter into a power outlet.
4.3 การชาร์จเริ่มต้น
Place the handset on the base unit. For the first use, charge the handset for at least 12 hours. A full charge typically takes 10 hours. This ensures optimal battery performance and longevity.
4.4 การลงทะเบียนโทรศัพท์มือถือ
Your handset may be pre-registered. If not, or if you wish to register additional handsets (up to 5 per base unit), refer to the detailed registration steps in the full user manual. The system supports a maximum of 4 base units per handset.

ภาพ: ด้านหนึ่ง view of the base unit, highlighting the DC power input and the telephone line jack for connecting to power and the telephone network.
5. คู่มือการใช้งาน
5.1 ฟังก์ชันการโทรพื้นฐาน
- การโทร: Press the green call button, then dial the number. Alternatively, dial the number first (pre-dial) and then press the green call button.
- รับสาย: เมื่อโทรศัพท์ดัง ให้กดปุ่มโทรสีเขียว
- การวางสาย: Press the red call button or place the handset back on the base unit.
- โทรซ้ำ: Press the RD/P button to redial the last number called.
- การปรับระดับเสียง: During a call, use the UP/DOWN buttons to adjust the earpiece or hands-free volume.
- ปิดเสียง: During a call, press the Mute button to temporarily disable your microphone. Press again to unmute.

ภาพ: ภาพระยะใกล้ view of the handset's keypad, emphasizing the design of the buttons for comfortable and easy use.
5.2 Answering Machine (TAM) Functions
The base unit features a digital answering machine with up to 60 minutes of message recording capacity.
- การบันทึกข้อความขาออก (OGM): The base can record two groups of OGM. Refer to the full manual for detailed steps on recording your personalized outgoing message.
- ข้อความที่กำลังเล่น: Press the OGM button on the base unit to play recorded messages. Use the Vol keys to adjust playback volume.
- Memo Recording: The system supports memo recording up to 120 seconds.
- การลบข้อความ: Press the DEL button on the base unit to delete recordings.
- คำแนะนำเสียง: The answering machine provides voice prompts in English, Spanish, French, and German.
5.3 สมุดโทรศัพท์
Store up to 50 phone book memories, each with a maximum of 12 characters for the name and 20 digits for the number.
- การเพิ่มรายการ: ไปที่เมนูสมุดโทรศัพท์ เลือก "เพิ่มใหม่" ป้อนชื่อและหมายเลข จากนั้นบันทึก
- Searching/Dialing: Press the Phonebook button to access your stored contacts. Use the UP/DOWN buttons to scroll, then press the green call button to dial.
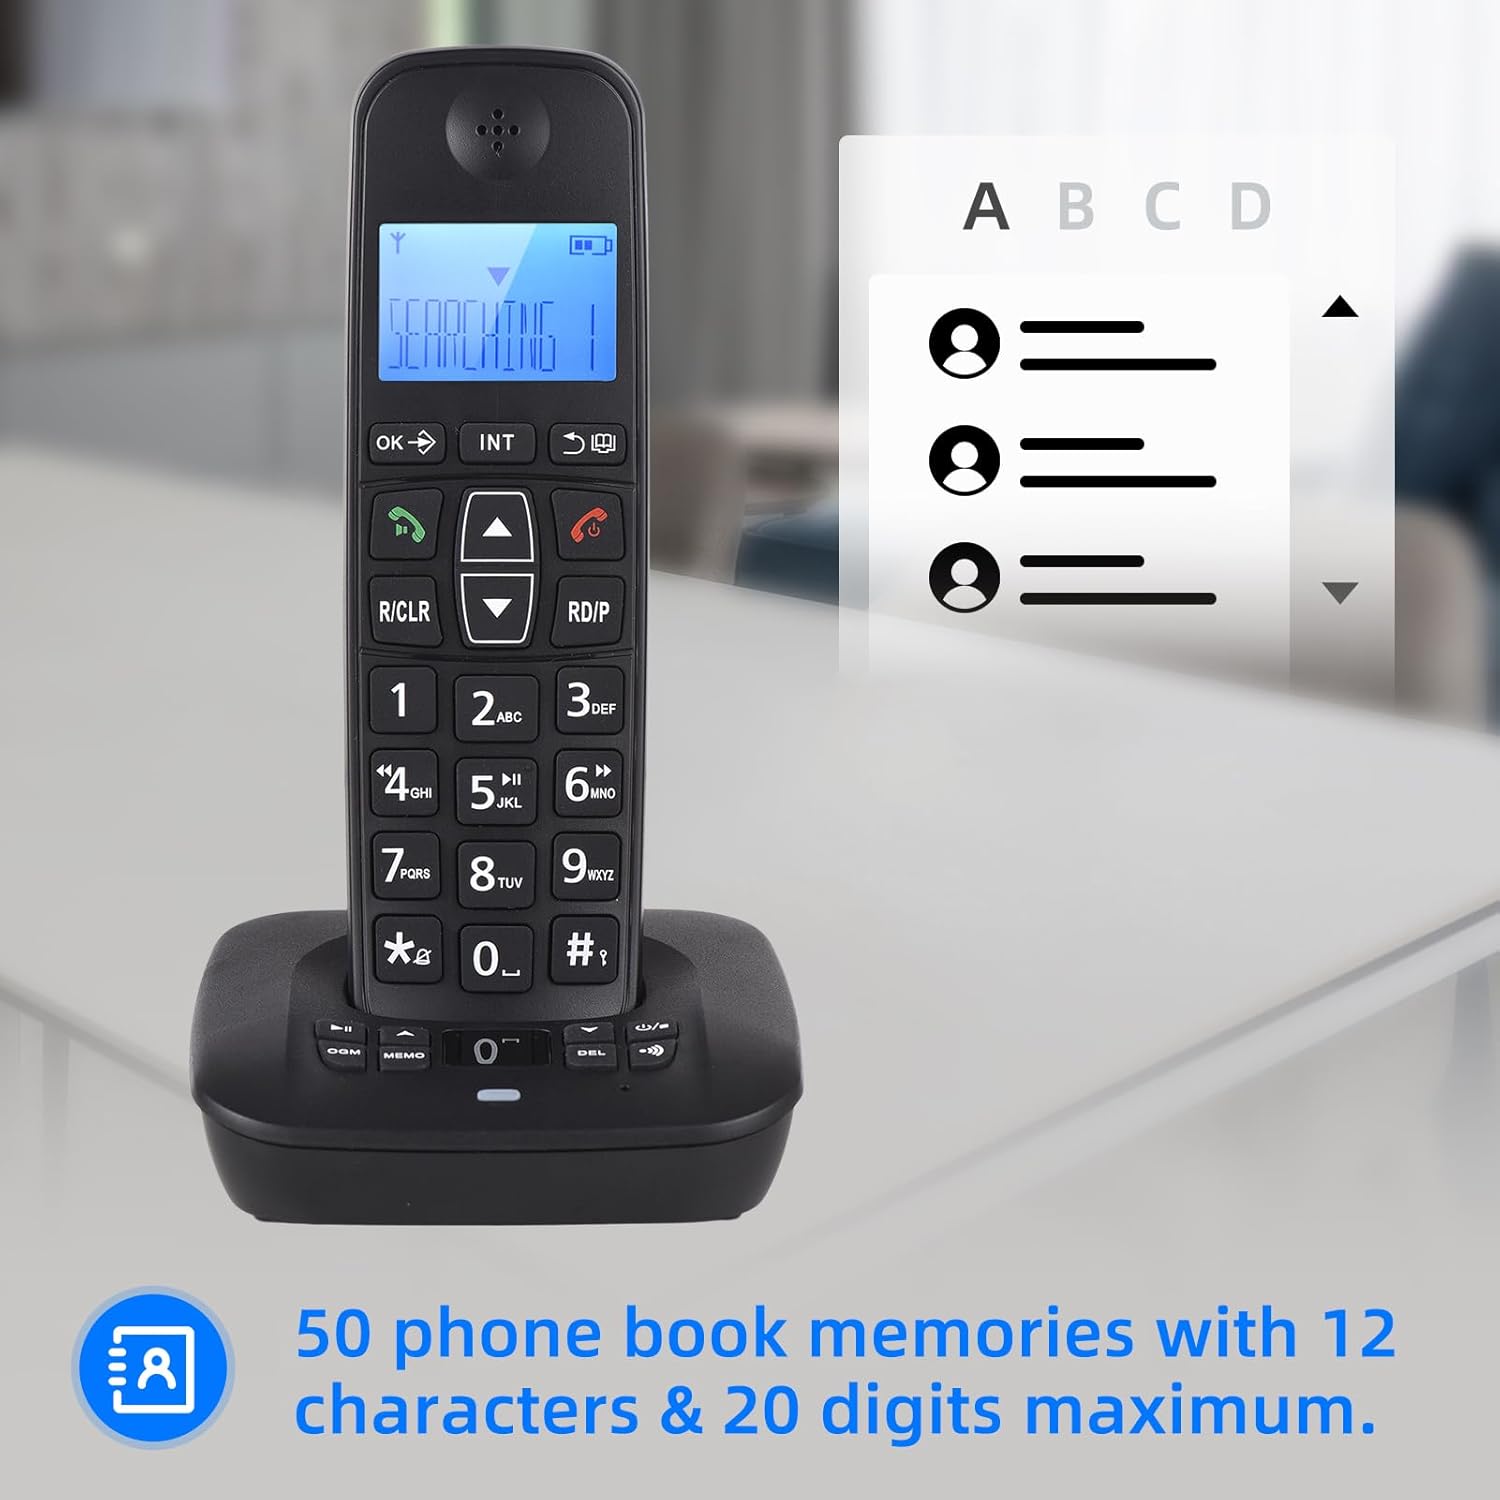
Image: The handset display showing the phonebook feature, indicating the capacity for 50 entries with space for names and numbers.
5.4 รหัสผู้โทร
The phone stores up to 30 incoming numbers and 10 outgoing numbers.
- Viewing Incoming Calls: Press the DOWN button to access the incoming call list.
- Viewing Outgoing Calls: Press the RD/P button repeatedly to cycle through outgoing calls.

Image: The handset on its base, with icons representing Caller ID, 30 incoming number memories, and 10 outgoing number memories.
5.5 Intercom and Conference Call
- อินเตอร์คอม: If you have multiple registered handsets, you can make intercom calls between them. Press the INT button and select the desired handset.
- โอนสาย: Transfer an external call to another handset.
- การประชุมทางโทรศัพท์: Conduct a three-way conference call involving an external call and two internal handsets.
5.6 Ringing Tones
- การเลือก: Choose from 10 different ringing tones.
- การปรับแต่ง: Set different melodies for different types of calls (e.g., internal vs. external).
5.7 จอแสดงผล LCD
The handset features a 3-line LCD display for clear visibility of caller ID, menu options, and phonebook entries.

Image: A close-up of the handset's LCD screen, demonstrating its 3-line display capability for showing information clearly.
6. การบำรุงรักษา
- การทำความสะอาด: เช็ดหูฟังและฐานด้วยผ้านุ่มๆamp ผ้า ห้ามใช้สารทำความสะอาดที่มีฤทธิ์กัดกร่อนหรือตัวทำละลาย
- การดูแลแบตเตอรี่ ใช้เฉพาะแบตเตอรี่แบบชาร์จได้ที่ระบุไว้เท่านั้น หากไม่ได้ใช้งานโทรศัพท์เป็นเวลานาน ให้ถอดแบตเตอรี่ออก
- สิ่งแวดล้อม: เก็บโทรศัพท์ให้ห่างจากความร้อนสูง แสงแดดโดยตรง และความชื้น
7 การแก้ไขปัญหา
If you encounter issues with your telephone, try the following basic troubleshooting steps:
- ไม่มีเสียงสัญญาณโทรศัพท์: Ensure the telephone line cable is securely connected to both the base unit and the wall socket. Check if the power adapter is properly plugged in.
- ไม่สามารถโทรออก/รับสายได้: Verify that the handset is charged. Check if the telephone line is active.
- โทรศัพท์มือถือไม่แสดงสัญญาณ: Follow the registration steps in the full user manual. Ensure the handset is within range of the base unit.
- คุณภาพเสียงไม่ดี: Check for interference from other electronic devices. Ensure the handset is within optimal range of the base.
- เครื่องตอบรับอัตโนมัติไม่บันทึก: Check the available memory. Ensure the answering machine function is enabled.
สำหรับปัญหาที่ซับซ้อนกว่านี้ โปรดดูส่วนการแก้ไขปัญหาโดยละเอียดในคู่มือผู้ใช้ฉบับเต็ม หรือติดต่อฝ่ายบริการลูกค้า
8. ข้อมูลจำเพาะ
- แบบอย่าง: D1007 TAM
- สี: สีดำ
- วัสดุ: พลาสติก
- ป้อนข้อมูล: 100-240 โวลต์, 50/60 เฮิรตซ์
- ความถี่: 1.8/1.9กิกะเฮิรตซ์
- Interface Languages: Portugu, Spanish, English, French, German, Italian, Dutch, Hungarian, Greek, Polish, Danish, Norwegian, Swedish, Turkish, Russian, Ukrainian (16 kinds)
- แบตเตอรี่: 2 x Rechargeable Batteries (400mAh, 1.2V each)
- ขนาดโทรศัพท์มือถือ: 18 x 5.3 x 2 ซม. (7 x 2 x 0.9 นิ้ว)
- Cradle Size: 11 x 10.5 x 4.3 ซม. (4.3 x 4.1 x 1.6 นิ้ว)
- เวลาสนทนา: Up to 10 hours continued talk
- เวลาสแตนด์บาย: Up to 120 hours on standby
- ความจุเครื่องตอบรับอัตโนมัติ: แม็กซ์ 60 นาที
- Phonebook Memories: 50 entries (12 characters & 20 digits max)
- Incoming Call Memories: 30 ตัวเลข
- Outgoing Call Memories: 10 ตัวเลข
9. การรับประกันและการสนับสนุน
For warranty information and customer support, please refer to the documentation provided at the time of purchase or visit the official Irfora webไซต์ โปรดเก็บใบเสร็จรับเงินไว้เป็นหลักฐานการซื้อ