
KITCHENARM 851011
KITCHENARM 19-in-1 HANDY Bread Machine User Manual
รุ่น : 851011
การแนะนำ
This manual provides comprehensive instructions for the safe and efficient operation, maintenance, and troubleshooting of your KITCHENARM 19-in-1 HANDY Bread Machine, Model 851011. Please read this manual thoroughly before first use and retain it for future reference.

Figure 1: KITCHENARM 19-in-1 HANDY Bread Machine (Model 851011).
เนื้อหาแพ็คเกจ
Verify that all items are present and in good condition upon opening the package. If any items are missing or damaged, contact customer service.
- 1 x KITCHENARM Bread Machine (Model KA8510)
- 1 x User Manual & Recipe Book
- 2 x Kneading Paddles (one for use, one spare)
- 1 x Metal Hook for paddle removal
- 1 x US Three-Prong Plug (integrated)
- 1 x Non-Stick Bread Pan (2LB Vertical Pan)
- 2 x Cup-Spoon Sets (measuring cups and spoons)
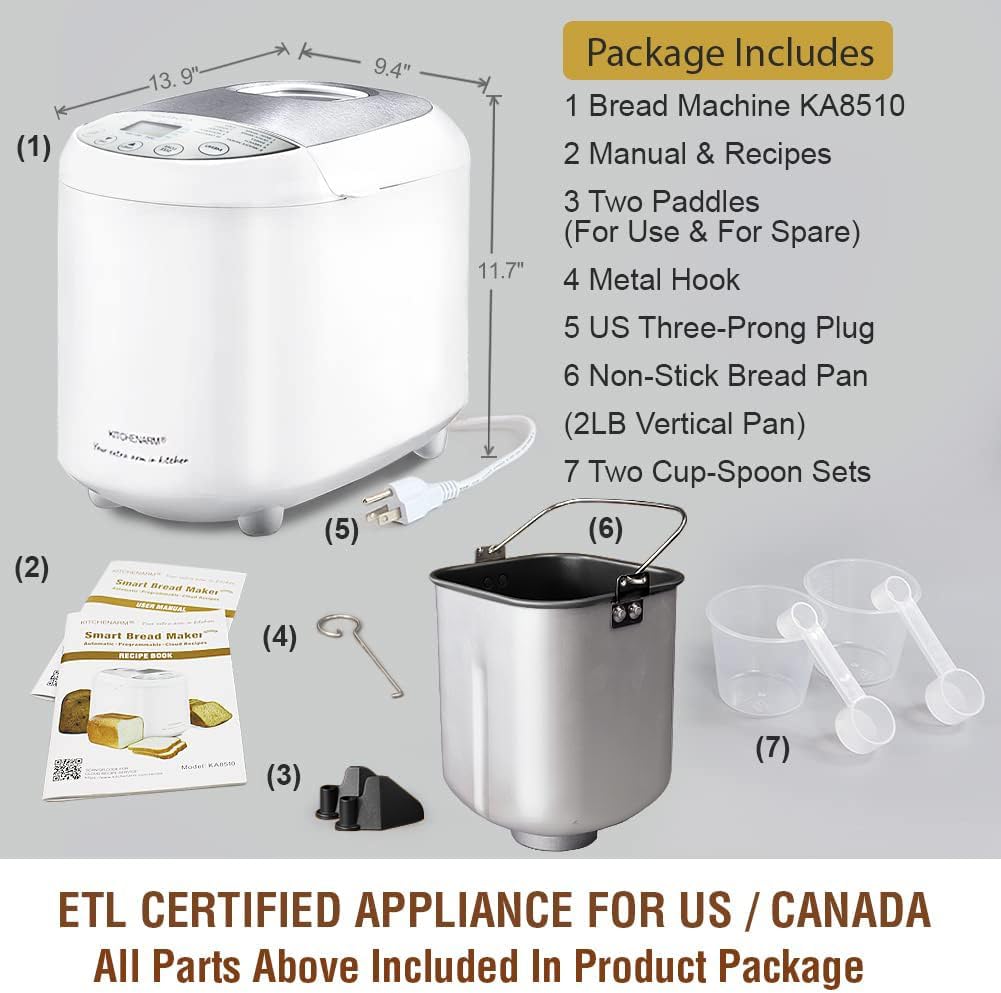
รูปที่ 2: อุปกรณ์เสริมและส่วนประกอบที่รวมอยู่
คำแนะนำด้านความปลอดภัยที่สำคัญ
เมื่อใช้เครื่องใช้ไฟฟ้า ควรปฏิบัติตามข้อควรระวังด้านความปลอดภัยพื้นฐานเสมอ ซึ่งรวมถึงสิ่งต่อไปนี้:
- อ่านคำแนะนำทั้งหมด
- อย่าสัมผัสพื้นผิวที่ร้อน ใช้ที่จับหรือลูกบิด
- เพื่อป้องกันไฟฟ้าช็อต ห้ามจุ่มสายไฟ ปลั๊ก หรือเครื่องใช้ไฟฟ้าลงในน้ำหรือของเหลวอื่นๆ
- จำเป็นต้องมีการดูแลอย่างใกล้ชิดเมื่อมีเด็กหรือใช้งานเครื่องใช้ไฟฟ้าใดๆ ใกล้เด็ก
- ถอดปลั๊กออกเมื่อไม่ได้ใช้งานและก่อนทำความสะอาด ปล่อยให้เย็นลงก่อนใส่หรือถอดชิ้นส่วน
- ห้ามใช้งานเครื่องใช้ไฟฟ้าที่มีสายไฟหรือปลั๊กชำรุด หรือหลังจากที่เครื่องใช้ไฟฟ้าทำงานผิดปกติหรือได้รับความเสียหายในลักษณะใดๆ ก็ตาม นำเครื่องใช้ไฟฟ้ากลับไปที่ศูนย์บริการที่ได้รับอนุญาตที่ใกล้ที่สุดเพื่อตรวจสอบ ซ่อมแซม หรือปรับแต่ง
- การใช้อุปกรณ์เสริมที่ไม่แนะนำโดยผู้ผลิตเครื่องใช้ไฟฟ้าอาจทำให้เกิดการบาดเจ็บได้
- ห้ามใช้กลางแจ้ง
- อย่าให้สายไฟห้อยออกจากขอบโต๊ะหรือเคาน์เตอร์ หรือสัมผัสพื้นผิวที่ร้อน
- ห้ามวางบนหรือใกล้เตาแก๊สหรือเตาไฟฟ้าที่ร้อน หรือในเตาอบที่อุ่น
- ต้องใช้ความระมัดระวังเป็นพิเศษเมื่อเคลื่อนย้ายเครื่องใช้ไฟฟ้าที่มีน้ำมันร้อนหรือของเหลวร้อนอื่นๆ
- หากต้องการตัดการเชื่อมต่อ ให้ปิดการควบคุมใดๆ ก็ได้ จากนั้นถอดปลั๊กออกจากเต้ารับที่ผนัง
- ห้ามใช้เครื่องใช้ไฟฟ้าเพื่อวัตถุประสงค์อื่นนอกเหนือจากที่กำหนดไว้
- เครื่องใช้ไฟฟ้าชนิดนี้มีปลั๊กแบบมีขั้ว (ขั้วหนึ่งกว้างกว่าขั้วอื่น) เพื่อลดความเสี่ยงในการเกิดไฟฟ้าช็อต ปลั๊กชนิดนี้จึงออกแบบมาให้เสียบเข้ากับเต้ารับแบบมีขั้วได้ทางเดียวเท่านั้น หากเสียบปลั๊กไม่เข้าที่เต้ารับ ให้เสียบกลับด้าน หากยังไม่เข้าที่ โปรดติดต่อช่างไฟฟ้าที่มีคุณสมบัติเหมาะสม ห้ามพยายามดัดแปลงปลั๊กด้วยวิธีใดๆ
บันทึกคำแนะนำเหล่านี้
การตั้งค่าและการใช้งานครั้งแรก
Before First Use: Initial Burn-Off
Before using your bread machine for the first time, it is recommended to perform an initial burn-off cycle to eliminate any manufacturing odors or residues. This process takes approximately 10 minutes.
- Remove all packaging materials and accessories from the bread machine.
- Wipe the interior and exterior of the machine with a damp cloth. Ensure the bread pan and kneading paddle are clean and dry.
- Place the empty bread pan with the kneading paddle inserted into the machine. Close the lid.
- Plug the bread machine into a grounded electrical outlet.
- Select a short baking program (e.g., "Bake" or "Home Made" with a short duration if customizable, or simply run an empty cycle for 10 minutes).
- Allow the machine to run for approximately 10 minutes. A slight odor or smoke may be present; this is normal.
- Unplug the machine and allow it to cool completely for at least 2 hours before proceeding with actual bread making.
การระบุส่วนประกอบ

Figure 3: Key components of the bread machine.
- ช่องระบายไอน้ำ: Release steam during baking. Do not block.
- ใหญ่ Viewing หน้าต่าง: Allows observation of the bread-making process.
- ฝาสแตนเลส: ทนทานและทำความสะอาดง่าย
- แผงควบคุมพร้อมจอแสดงผล LCD: For program selection, settings, and status display.
- พิมพ์ขนมปัง: Non-stick pan where ingredients are mixed, kneaded, risen, and baked.
- พายนวด: Mixes and kneads the dough.
คำแนะนำการใช้งาน
ขั้นตอนพื้นฐานในการทำขนมปัง
Follow these general steps for most bread recipes. Refer to the included recipe book for specific ingredient quantities and program recommendations.
- ใส่พายนวด: วางใบพายสำหรับนวดแป้งลงบนแกนด้านในของพิมพ์ขนมปัง
- เพิ่มส่วนผสม: Add ingredients to the bread pan in the order specified by your recipe (typically liquids first, then dry ingredients, with yeast added last, often in a small well on top of the flour).
- วางถาดขนมปัง: Insert the bread pan into the bread machine, ensuring it clicks securely into place. Close the lid.
- เลือกโปรแกรม: Plug in the machine. Use the "MENU" button to select the desired program (e.g., Basic White, French, Gluten Free).
- เลือกขนาดขนมปังและสีเปลือก: Use the "LOAF SIZE" button to choose 1LB, 1.5LB, or 2LB. Use the "CRUST COLOR" button to select Light, Medium, or Dark.
- เริ่มรอบ: Press the "START/STOP" button to begin the bread-making cycle. The machine will automatically mix, knead, rise, and bake.
- เอาขนมปังออก: Once the cycle is complete (indicated by a beep), unplug the machine. Carefully remove the hot bread pan using oven mitts. Invert the pan to release the bread onto a wire rack to cool. Use the metal hook to remove the kneading paddle from the loaf if it remains embedded.

Figure 4: Unique 1-Press Bread Making process.
โปรแกรมที่มีให้เลือก
Your KITCHENARM bread machine features 19 pre-programmed menus, including 12 bread menus and 7 non-bread menus. Each program is optimized for specific recipes.
| เลขที่ | ชื่อรายการ | Description / Typical Use |
|---|---|---|
| 1 | สีขาวพื้นฐาน | สำหรับขนมปังขาวและขนมปังผสม |
| 2 | Express White | Faster cycle for white bread. |
| 3 | หวาน | สำหรับขนมปังที่มีปริมาณน้ำตาลสูง |
| 4 | ภาษาฝรั่งเศส | สำหรับขนมปังเนื้อเบาที่มีเปลือกกรอบ |
| 5 | ปราศจากกลูเตน | Specifically for gluten-free recipes. |
| 6 | ข้าวสาลีโฮลวีท | For whole wheat flour breads. |
| 7 | Dark Rye | For rye bread recipes. |
| 8 | มัลติเกรน | For breads with various grains. |
| 9 | SD Starter | For preparing sourdough starter. |
| 10 | แป้งเปรี้ยว | For baking sourdough bread. |
| 11 | แป้ง | Prepares dough for manual shaping and baking. |
| 12 | คีโต | For low-carb, ketogenic bread recipes. |
| 13 | ขนมปังด่วน | For quick breads using baking powder/soda. |
| 14 | เค้ก | สำหรับอบเค้ก. |
| 15 | แยม | สำหรับทำแยมโฮมเมด |
| 16 | โยเกิร์ต | สำหรับเตรียมทำโยเกิร์ต |
| 17 | นวด | Only performs kneading cycle. |
| 18 | อบ | Only performs baking cycle. |
| 19 | Home Made | Customizable program for advanced users. |
The machine supports 3 loaf sizes (1LB, 1.5LB, 2LB) and 3 crust colors (Dark, Medium, Light). It also features a 15-Hour Delay Timer and an ADD-NUTS Alarm for adding ingredients at the appropriate time.

รูปที่ 5: อดีตamples of items that can be prepared with the 19 programs.
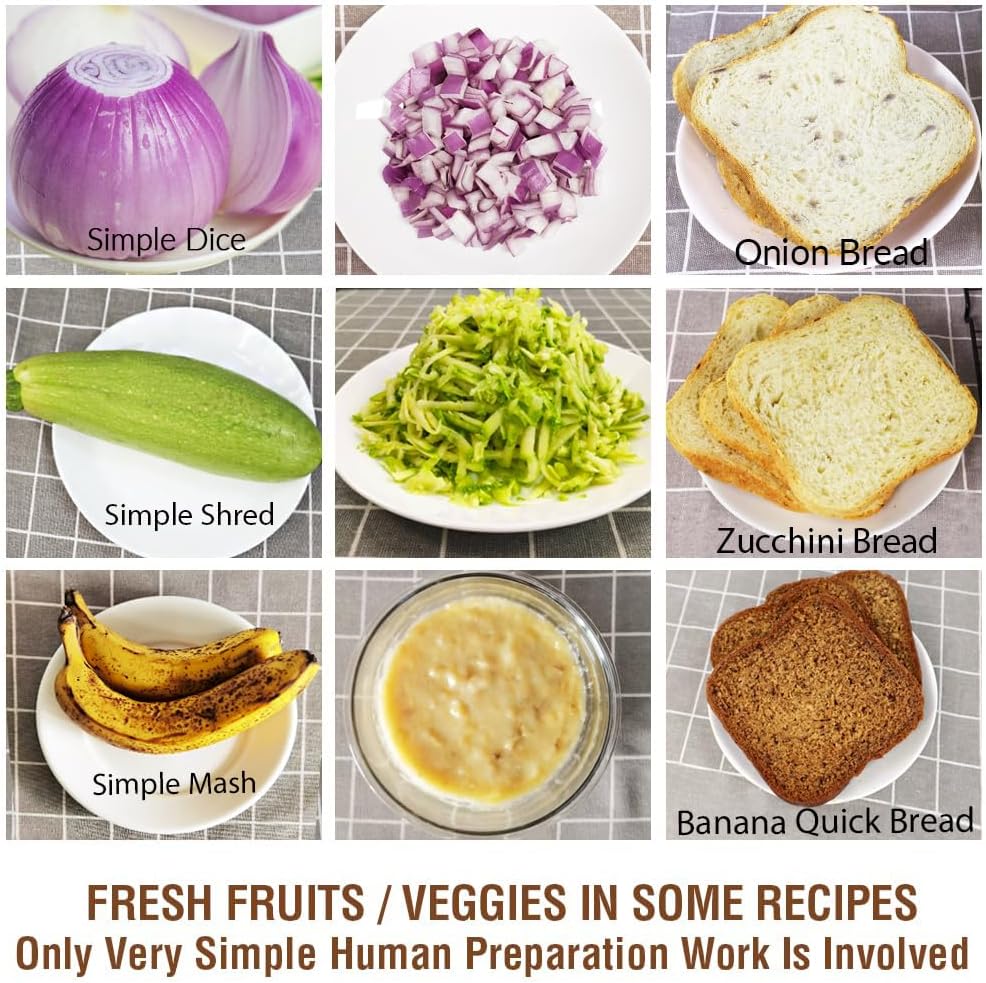
Figure 6: Preparation of fresh fruits and vegetables for recipes.
การดูแลรักษา
การทำความสะอาด
Proper cleaning ensures the longevity and performance of your bread machine. Always unplug the machine and allow it to cool completely before cleaning.
- ถาดอบขนมปังและพายนวดแป้ง: The non-stick bread pan and kneading paddle should be hand washed only with warm, soapy water. Do not use abrasive cleaners or metal scouring pads, as this can damage the non-stick coating. Rinse thoroughly and dry completely.
- ภายนอก: Wipe the exterior body and control panel with a soft, damp ผ้า ห้ามจุ่มตัวเครื่องหลักลงในน้ำหรือของเหลวอื่นใด
- ภายใน: ใช้แบบนุ่มๆamp ใช้ผ้าเช็ดทำความสะอาดภายในห้องอบ เพื่อกำจัดเศษขนมหรือคราบต่างๆ ออกให้หมด
- ฝา: The stainless steel lid can be wiped clean with a damp ผ้า. รับรองว่า viewing window is clear.
พื้นที่จัดเก็บ
Store the bread machine in a cool, dry place when not in use. Ensure all components are clean and dry before storage.
การแก้ไขปัญหา
This section addresses common issues you might encounter. For problems not listed here, please contact customer service.
| ปัญหา | สาเหตุที่เป็นไปได้ | สารละลาย |
|---|---|---|
| ขนมปังไม่ขึ้นฟู หรือขึ้นฟูมากเกินไป | Incorrect yeast amount, expired yeast, incorrect water temperature, incorrect flour type, too much or too little liquid. | Ensure yeast is fresh and active. Use correct water temperature (lukewarm for active dry yeast). Measure ingredients precisely, preferably by weight. Refer to recipe book for correct flour type. |
| ขนมปังมีความหนาแน่นหรือหนักเกินไป | Too much flour, too little liquid, old yeast, incorrect program. | Reduce flour slightly or increase liquid. Check yeast freshness. Ensure correct program is selected for the recipe. |
| Bread has a large hole at the bottom. | Kneading paddle left in bread during baking. | Some programs allow for removal of the kneading paddle before the final rise. Consult your recipe book or manual for specific program timings. Use the metal hook to remove the paddle after baking. |
| Machine does not start or respond. | ไม่ได้เสียบปลั๊ก ไฟดับtage, pan not properly seated, lid not closed. | Ensure the machine is securely plugged into a working outlet. Check circuit breaker. Ensure bread pan is fully inserted and lid is closed. |
| เสียงดังระหว่างการทำงาน | Bread pan not seated correctly, foreign object in pan, machine on uneven surface. | Ensure bread pan is securely locked in place. Check for any foreign objects. Place machine on a stable, flat surface. |
ข้อมูลจำเพาะผลิตภัณฑ์
- ยี่ห้อ: ห้องครัว
- หมายเลขรุ่น: 851011
- สี: White Body - Stainless Steel Lid & Chamber
- ขนาดสินค้า (ลึก x กว้าง x สูง): 9.4" x 13.9" x 11.7"
- น้ำหนักสินค้า: 11.97 ปอนด์
- วัดtage: 550 วัตต์
- จำนวนโปรแกรม: 19
- ขนาดของขนมปัง: 1 ปอนด์, 1.5 ปอนด์, 2 ปอนด์
- สีของเปลือก: แสง, กลาง, มืด
- ตัวตั้งเวลาหน่วงเวลา: นานถึง 15 ชั่วโมง
- ใบรับรอง: ETL Certified for US / Canada
- ผู้ผลิต: Kitchenarm LLC
- การดูแลผลิตภัณฑ์: Hand Wash Only (for bread pan and paddle)
การรับประกันและการสนับสนุนลูกค้า
KITCHENARM is committed to providing high-quality products and excellent customer service.
- การรับประกันสินค้า : This product comes with a 2-YEAR Product Warranty.
- บริการลูกค้า: LIFETIME Customer Service is provided, including access to Cloud Recipes and Recipe Customization assistance.
- ชิ้นส่วนทดแทน: Original replacement parts are available.
For warranty claims, technical support, or to inquire about replacement parts, please contact Kitchenarm LLC customer service through their official channels. Refer to the contact information provided in your product registration or on the official KITCHENARM webเว็บไซต์.

Figure 7: KITCHENARM commitment to warranty and customer service.
Ask a question about this manual
Ask about setup, troubleshooting, compatibility, parts, safety, or missing instructions. Manuals+ will review the question and use this page’s manual context to help answer it.