1. บทนำ
This manual provides detailed instructions for the installation, operation, and maintenance of your SOGTICPS BL912-60A-02US MPPT Solar Charge Controller. This device is designed to manage power flow from your solar panels to your battery bank, ensuring efficient charging and protecting your batteries from overcharge and over-discharge.
บันทึก: This controller utilizes MPPT technology to detect the maximum charging current, which can increase efficiency by 10%-30% compared to standard controllers. It is important to note that this is a compatible MPPT charge controller with PWM intelligent features, not a "true MPPT" controller with a large transformer coil inside.
คุณสมบัติหลัก:
- ระบบปรับระดับเสียงอัตโนมัติ 12V/24Vtagอี การรับรู้
- Advanced MPPT (Maximum Power Point Tracking) technology for optimized charging.
- Multi-function LCD display for system status monitoring.
- Dual USB ports (DC 5V 2A output) for charging external devices.
- Comprehensive protection features: over-charging, over-discharging, reverse polarity, short circuit, and open circuit protection.
- มีการชดเชยอุณหภูมิเพื่อการชาร์จที่แม่นยำ

รูปที่ 1: ด้านหน้า view of the SOGTICPS BL912-60A-02US MPPT Solar Charge Controller, showing the LCD display, control buttons, and dual USB ports.
2. การตั้งค่าและการติดตั้ง
การติดตั้งอย่างถูกต้องมีความสำคัญอย่างยิ่งต่อการทำงานที่ปลอดภัยและมีประสิทธิภาพของตัวควบคุมการชาร์จพลังงานแสงอาทิตย์ของคุณ โปรดปฏิบัติตามขั้นตอนเหล่านี้อย่างระมัดระวัง
2.1 ลำดับการเชื่อมต่อ
สำคัญ: Always connect components in the following sequence to prevent damage to the controller or other system components.
- เชื่อมต่อแบตเตอรี่: First, connect the battery to the charge controller. Ensure the battery has sufficient voltage for the controller to recognize the correct battery type (12V or 24V).
- เชื่อมต่อแผงโซล่าเซลล์: Next, connect the solar panel(s) to the charge controller.
- เชื่อมต่อโหลด (ทางเลือก): Finally, connect your DC load to the charge controller's load terminals.
Disassembly Order: When disconnecting, reverse the order: first disconnect the solar panel, then the battery, and finally the load.
2.2 แผนผังการเดินสายไฟ
Refer to the diagrams below for correct wiring connections.

รูปที่ 2: Labeled components of the SOGTICPS BL912-60A-02US controller, indicating LCD display, control buttons (Menu, Page Up, Page Down/Manual), and dual USB ports. Connection terminals for solar panel, battery, and load are also shown.

รูปที่ 3: Basic wiring diagram showing connections from a solar panel to the controller and from the controller to a DC load. Note the positive (+) and negative (-) terminals.
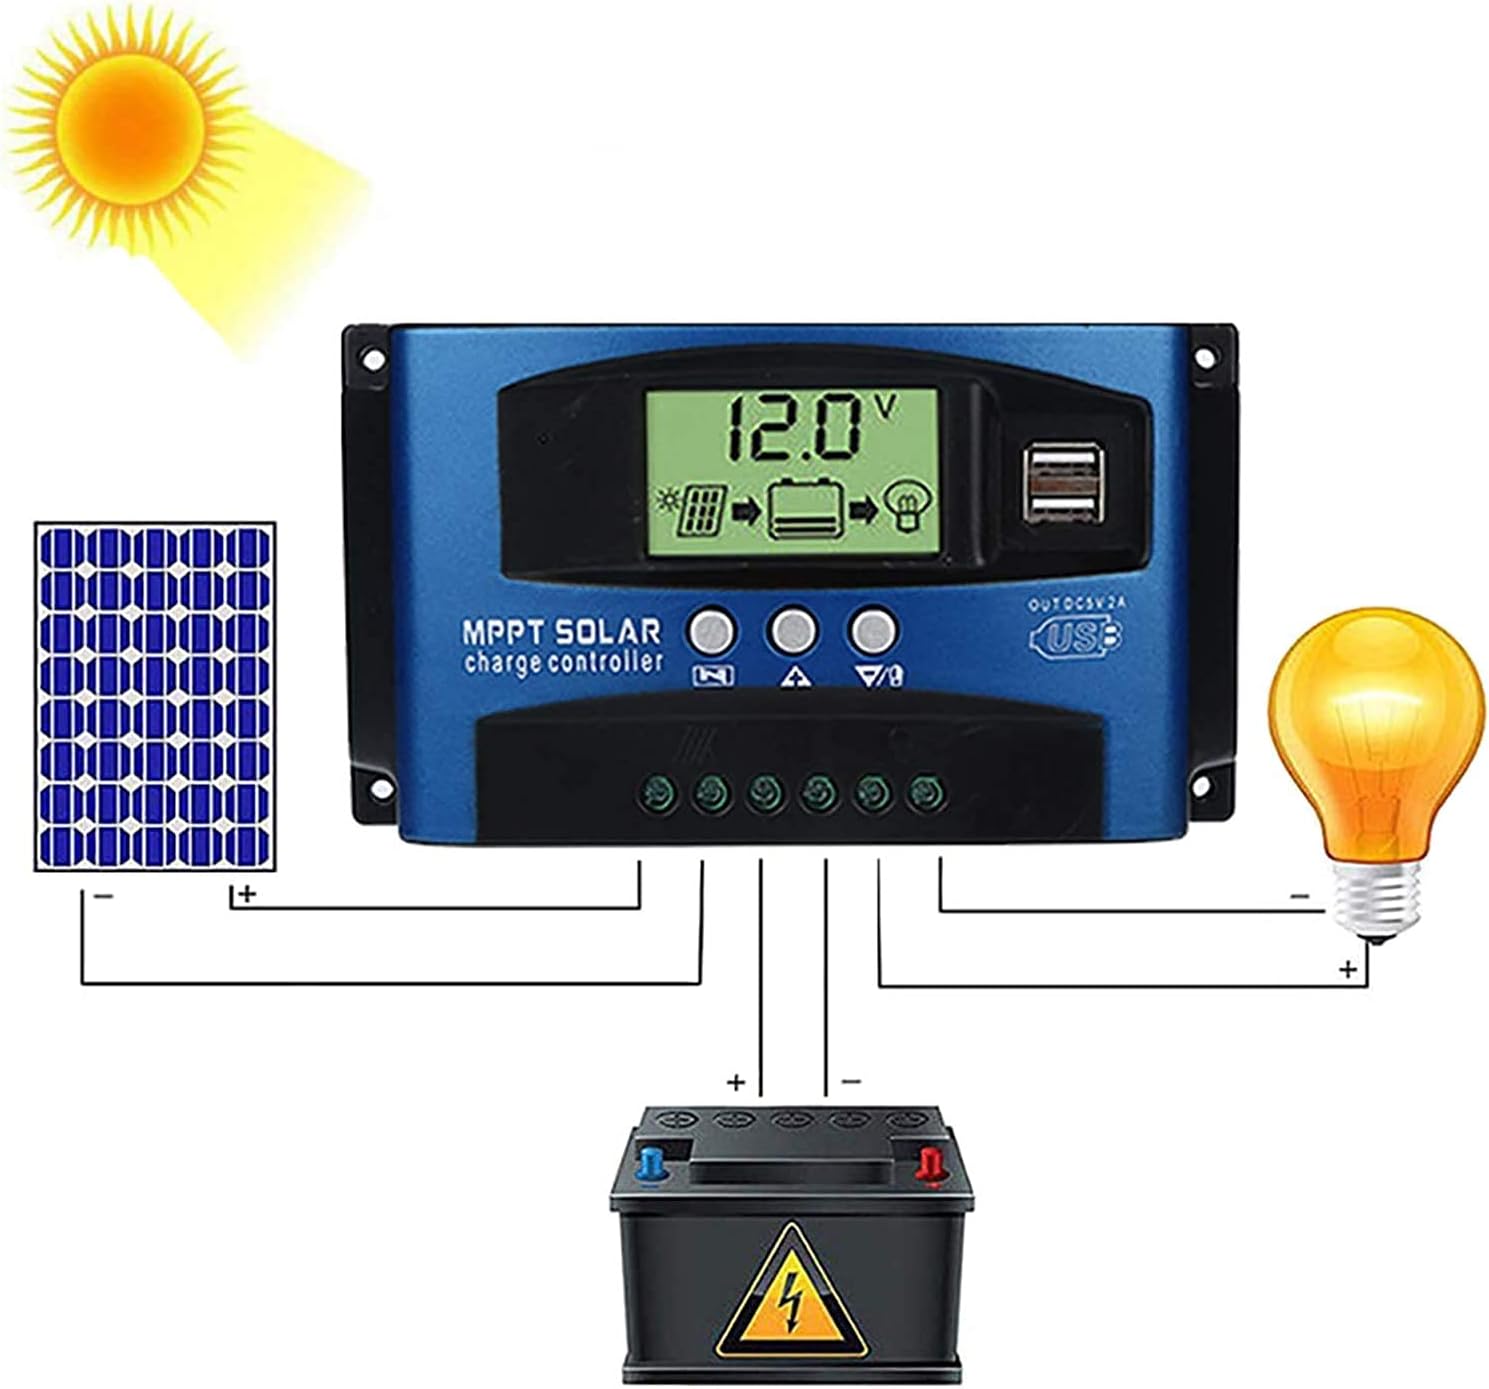
รูปที่ 4: Comprehensive wiring diagram illustrating the connection of a solar panel, the SOGTICPS charge controller, a battery, and a DC load. This diagram shows the correct sequence and polarity for all connections.
2.3 Solar Panel and Battery Voltagความเข้ากันได้
- For a 12V battery system, the working voltage (Voc) of the solar panel should be between 17V and 23V.
- For a 24V battery system, the working voltage (Voc) of the solar panel should be between 36V and 46V.
- ตรวจสอบปริมาณแผงโซลาร์เซลล์tage is within these ranges to prevent damage to the controller.
2.4 การเชื่อมต่ออินเวอร์เตอร์
If using an inverter, connect it directly to the battery terminals, not to the load terminals of the charge controller.
3. การดำเนินการ
จอแสดงผล LCD 3.1 และปุ่มต่างๆ
The LCD display provides real-time information about your system's status. The three buttons below the display are used for navigation and settings adjustment.
- ปุ่มเมนู: Press to cycle through display screens and enter/exit settings menus.
- ปุ่มเลื่อนหน้าขึ้น: ใช้เพื่อเพิ่มค่าหรือเลื่อนขึ้นในเมนู
- Page Down/Manual Button: Used to decrease values, navigate downwards in menus, or manually control the load output.
3.2 Battery Type Recognition
The controller automatically detects 12V or 24V battery systems. Ensure the battery is connected first and has sufficient voltage for proper detection.
3.3 เอาต์พุต USB
The dual USB ports provide a DC 5V 2A output for charging compatible electronic devices.
4. การบำรุงรักษา
การบำรุงรักษาอย่างสม่ำเสมอจะช่วยให้ตัวควบคุมการชาร์จพลังงานแสงอาทิตย์ของคุณมีอายุการใช้งานยาวนานและทำงานได้อย่างมีประสิทธิภาพสูงสุด
- การทำความสะอาด: รักษาตัวควบคุมให้สะอาด ปราศจากฝุ่นและเศษขยะ ใช้ผ้าแห้งเช็ดทำความสะอาด
- การเชื่อมต่อ: ตรวจสอบการเชื่อมต่อสายไฟทั้งหมดเป็นระยะๆ เพื่อให้แน่ใจว่ามีความปลอดภัยและไม่มีการกัดกร่อน
- การระบายอากาศ : ควรติดตั้งตัวควบคุมในบริเวณที่มีการระบายอากาศดี เพื่อป้องกันความร้อนสูงเกินไป
- สภาพแวดล้อม : Avoid exposing the controller to direct sunlight, rain, or excessive humidity.
5 การแก้ไขปัญหา
ส่วนนี้จะกล่าวถึงคำถามและปัญหาทั่วไปที่คุณอาจพบเจอ
- Q: How many watts of solar panels can be connected?
A: For a 12V battery system, the maximum recommended solar panel wattage is 720W. For a 24V battery system, the maximum recommended wattage คือ 1440W
- Q: Does this controller support lithium batteries?
A: Yes, the controller is compatible with both lead-acid and lithium batteries.
- Q: My solar panel is 36V 200W, can I charge a 12V battery?
A: To charge a 12V battery, the solar panel's working voltage (Voc) should be between 17V and 23V. For a 24V battery, the Voc should be between 36V and 46V. If your 36V panel is used with a 12V battery, the voltage is too high and could damage the controller. Ensure your panel's voltage matches the battery system voltagข้อกำหนดอี
- Q: Can an inverter be connected to the load side of the controller?
A: No, please connect the inverter directly to the battery terminals, not to the load terminals of the controller.
- Q: Does the controller have a requirement for battery capacity?
A: While there's no strict minimum, it's recommended that the battery capacity corresponds to the solar panel current. For example, if your solar panel current is 5A, a 50AH battery is preferable. Using a very large solar panel with a very small battery can be dangerous.
- Q: The controller is not turning on or displaying anything.
A: Ensure the battery is connected first and has sufficient voltage. Check all battery connections for proper polarity and secure contact. If the battery voltage is too low, the controller may not power on.
6. ข้อมูลจำเพาะทางเทคนิค
| คุณสมบัติ | ข้อมูลจำเพาะ |
|---|---|
| หมายเลขรุ่น | BL912-60A-02US |
| ยี่ห้อ | ซอติกส์ |
| เล่มระบบtage | อัตโนมัติ 12V / 24V |
| กระแสไฟชาร์จสูงสุด | 60เอ |
| Max Solar Panel Wattagอี (12V) | 720วัตต์ |
| Max Solar Panel Wattagอี (24V) | 1440วัตต์ |
| Solar Panel Working Voltagอี (ระบบ 12V) | 17V-23V (Voc) |
| Solar Panel Working Voltagอี (ระบบ 24V) | 36V-46V (Voc) |
| ประเภทจอภาพ | จอแอลซีดี |
| เอาท์พุต USB | Dual DC 5V 2A |
| ขนาดสินค้า | 6.69 x 3.94 x 1.97 นิ้ว (17 x 10 x 5 ซม.) |
| น้ำหนักสินค้า | 10.6 ออนซ์ (0.3 กก.) |
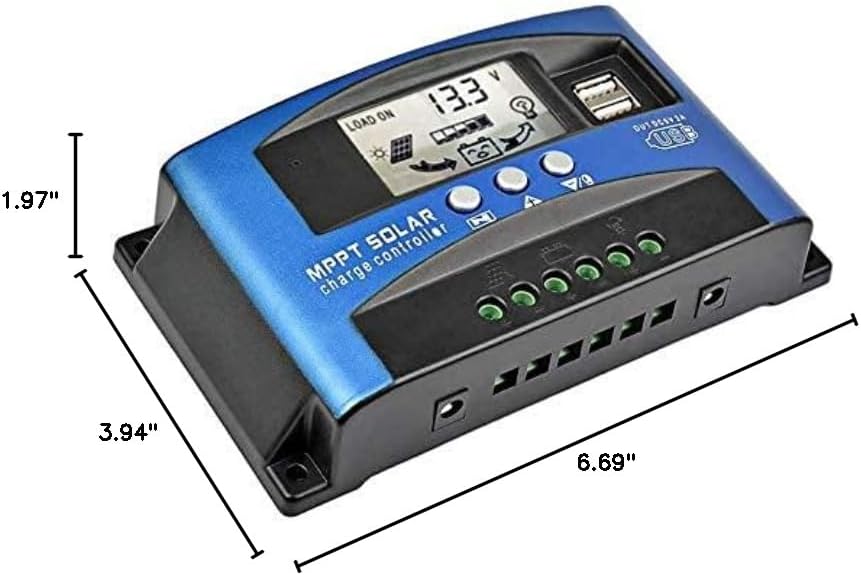
รูปที่ 5: Dimensional drawing of the SOGTICPS BL912-60A-02US solar charge controller, showing its length (6.69"), width (3.94"), and height (1.97").

รูปที่ 6: Examples of typical applications for the solar charge controller, including residential solar systems, garden lighting, street lighting, and integration with wind power systems.
7. การรับประกันและการสนับสนุน
7.1 ข้อมูลการรับประกัน
This SOGTICPS product comes with a รับประกันคืนเงินภายใน 30 วัน และก รับประกัน 12 เดือน for quality-related issues. Please retain your proof of purchase for warranty claims.
7.2 การสนับสนุนลูกค้า
For any questions, technical assistance, or warranty claims, please contact SOGTICPS customer support. Our professional technicians are available to assist you.
Contact information is typically found on the product packaging or the seller's official webเว็บไซต์.