
ERY-100
Machinist MR9A PRO MAX X99 Motherboard User Manual
Model: ERY-100
1. บทนำ
Welcome to the user manual for the Machinist MR9A PRO MAX X99 Motherboard. This guide provides detailed instructions for installing, operating, maintaining, and troubleshooting your motherboard. Please read this manual thoroughly before beginning installation to ensure proper setup and optimal performance.
The Machinist MR9A PRO MAX X99 is designed to support LGA 2011-3 Intel Xeon E5 V3&V4 CPU Processors and DDR4 RAM Memory, offering robust performance for various computing needs.
2. สินค้าหมดview
2.1 คุณสมบัติหลัก
- LGA 2011-3 Socket for Intel Xeon E5 V3&V4 Processors
- DDR4 RAM Memory Support (Four Channel)
- NVME M.2 SSD Support
- การเชื่อมต่อ USB 3.0
2.2 โครงสร้างและส่วนประกอบของเมนบอร์ด
ทำความคุ้นเคยกับส่วนประกอบและขั้วต่อต่างๆ บนเมนบอร์ด

Figure 2.2.1: Detailed layout of the Machinist MR9A PRO MAX X99 Motherboard, highlighting key connectors such as CPU fan headers, power connectors (24PIN DC, 8PIN DC), DDR4 RAM slots, SATA ports, M.2 slots (SATA M.2, NVME M.2, WIFI M.2), USB 2.0 and 3.0 headers, PCIe slots, audio headers, and diagnostic card display.
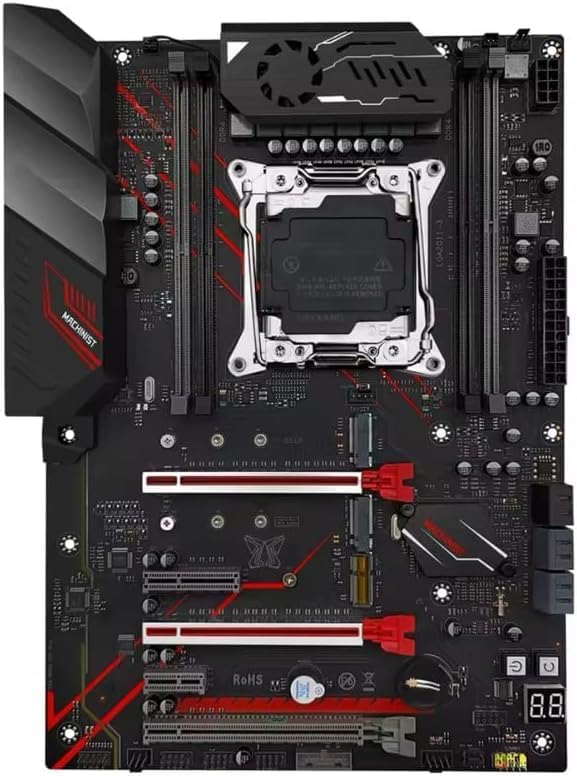
รูปที่ 2.2.2: จากบนลงล่าง view of the Machinist MR9A PRO MAX X99 Motherboard, showcasing its overall design and component placement.
2.3 มิติ

Figure 2.3.1: Dimensions of the Machinist MR9A PRO MAX X99 Motherboard, measuring approximately 300mm in length and 215mm in width.
2.4 อุปกรณ์เสริมที่มีให้

Figure 2.4.1: Standard accessories included with the motherboard, typically a CPU fan bracket with screws and a SATA data cable.
3. ข้อมูลจำเพาะ
| คุณสมบัติ | ข้อมูลจำเพาะ |
|---|---|
| ผู้ผลิต | ช่างเครื่อง |
| หมายเลขรุ่น | ERY-100 |
| ซ็อคเก็ตซีพียู | LGA 2011-3 (Note: Product page lists LGA 1700, but title/description confirm LGA 2011-3 for Xeon E5 V3&V4) |
| โปรเซสเซอร์ที่เข้ากันได้ | Intel Xeon E5 V3&V4 Series |
| เทคโนโลยีหน่วยความจำ RAM | DDR4 |
| ขนาดสูงสุดของหน่วยความจำ RAM | 64GB |
| มีช่องหน่วยความจำให้เลือก | 4 (Four Channel) |
| ประเภทชิปเซ็ต | X99 (Note: Product page lists Intel B760, but title/description confirm X99) |
| อินเทอร์เฟซการเก็บข้อมูล | SATA, NVME M.2 |
| พอร์ต USB | ยูเอสบี 3.0, ยูเอสบี 2.0 |
4. คำแนะนำในการตั้งค่า
4.1 ก่อนที่คุณจะเริ่มต้น
- Ensure you have all necessary components: CPU, CPU cooler, RAM, storage devices (SSD/HDD), power supply, and a compatible PC case.
- Work on a clean, flat, and static-free surface. Use an anti-static wrist strap or frequently touch a grounded metal object to discharge static electricity.
- โปรดดูคู่มือเคสคอมพิวเตอร์ของคุณสำหรับคำแนะนำในการติดตั้งโดยละเอียด
4.2 การติดตั้งเมนบอร์ด
- เตรียมคดี: Install the I/O shield into the rear opening of your PC case. Install standoffs in the case according to the motherboard's mounting holes.
- ติดตั้งซีพียู: Open the CPU socket retention lever. Carefully align the CPU with the socket, ensuring the golden triangle on the CPU matches the triangle on the socket. Gently place the CPU into the socket without forcing it. Close the retention lever to secure the CPU.
- ติดตั้งตัวระบายความร้อน CPU: Apply thermal paste to the CPU if not pre-applied on the cooler. Mount the CPU cooler according to its instructions, ensuring it is securely fastened and makes good contact with the CPU. Connect the CPU fan cable to the 'CPU_FAN' header on the motherboard.
- ติดตั้ง RAM: Open the clips on the DDR4 memory slots. Align the RAM module with the slot, ensuring the notch on the module matches the key in the slot. Press down firmly on both ends of the module until the clips snap into place. For optimal performance, install RAM in the recommended dual-channel or quad-channel configuration as per the motherboard's silkscreen or manual.
- ติดตั้งอุปกรณ์จัดเก็บข้อมูล:
- M.2 SSD: Insert the M.2 SSD into the appropriate M.2 slot (NVME M.2 or SATA M.2) at an angle, then gently push it down and secure it with the provided screw.
- ไดรฟ์ SATA: เชื่อมต่อสายเคเบิลข้อมูล SATA จาก SSD/HDD ของคุณเข้ากับพอร์ต SATA บนเมนบอร์ด
- ติดตั้งเมนบอร์ด: Carefully place the motherboard into the PC case, aligning the screw holes with the installed standoffs. Secure the motherboard with screws.
- เชื่อมต่อพาวเวอร์ซัพพลาย: Connect the 24-pin ATX power cable from your power supply to the main 24-pin power connector on the motherboard. Connect the 8-pin (or 4+4-pin) CPU power cable to the 8-pin CPU power connector. Connect SATA power cables to your storage drives.
- เชื่อมต่อสายเคเบิลแผงด้านหน้า: Connect the power button, reset button, HDD LED, power LED, and USB/audio headers from your PC case to the corresponding pins on the motherboard's front panel header. Refer to the motherboard layout diagram (Figure 2.2.1) for pin locations.
- ติดตั้งการ์ดขยาย: เสียบการ์ดจอหรือการ์ดขยาย PCIe อื่นๆ ลงในช่อง PCIe ที่เหมาะสม และยึดให้แน่นด้วยกลไกการยึดของเคส
5. การใช้งานเมนบอร์ด
5.1 การบูตครั้งแรกและการตั้งค่า BIOS/UEFI
หลังจากติดตั้งฮาร์ดแวร์เสร็จแล้ว ให้เชื่อมต่อจอภาพ คีย์บอร์ด และเมาส์ จากนั้นเปิดเครื่องคอมพิวเตอร์
- ระหว่างกระบวนการบูต ให้กดปุ่มซ้ำๆ เดล or F2 กดปุ่ม (หรือตามที่แสดงบนหน้าจอ) เพื่อเข้าสู่ยูทิลิตี้การตั้งค่า BIOS/UEFI
- In the BIOS/UEFI, you can configure boot order, system time, fan speeds, and other hardware settings. Ensure your storage drive is recognized and set as the primary boot device for OS installation.
- บันทึกการเปลี่ยนแปลงและออกจาก BIOS/UEFI ระบบจะรีสตาร์ท
5.2 การติดตั้งระบบปฏิบัติการและไดรเวอร์
- เสียบอุปกรณ์ติดตั้งระบบปฏิบัติการ (แฟลชไดรฟ์ USB หรือ DVD) แล้วทำตามคำแนะนำบนหน้าจอเพื่อติดตั้งระบบปฏิบัติการที่คุณต้องการ
- After OS installation, install the necessary drivers for your motherboard's components (chipset, LAN, audio, USB, etc.). These drivers are typically available on the manufacturer's website or included on a driver CD/USB drive with the motherboard.
- Regularly check the Machinist official website for the latest driver updates and BIOS/UEFI versions to ensure system stability and performance.
6. การบำรุงรักษา
Proper maintenance can extend the lifespan of your motherboard and ensure stable operation.
- การกำจัดฝุ่น: ทำความสะอาดฝุ่นออกจากเมนบอร์ดและส่วนประกอบต่างๆ เป็นระยะโดยใช้ลมอัด ตรวจสอบให้แน่ใจว่าได้ปิดเครื่องและถอดปลั๊กออกก่อนทำความสะอาด
- อัปเดต BIOS/UEFI: Update your BIOS/UEFI only when necessary, following the manufacturer's instructions carefully. Incorrect updates can damage the motherboard.
- การอัปเดตไดรเวอร์: โปรดอัปเดตไดรเวอร์ของคุณอยู่เสมอ เพื่อให้มั่นใจได้ถึงความเข้ากันได้และประสิทธิภาพสูงสุดกับซอฟต์แวร์และฮาร์ดแวร์ใหม่ๆ
- การจัดการสายเคเบิล: Ensure cables inside the case are neatly routed to improve airflow and prevent obstruction.
7 การแก้ไขปัญหา
หัวข้อนี้ให้แนวทางแก้ไขปัญหาทั่วไปที่คุณอาจพบเจอ
| ปัญหา | สาเหตุที่เป็นไปได้ | สารละลาย |
|---|---|---|
| ระบบเปิดไม่ติด | สายไฟหลวม, แหล่งจ่ายไฟมีปัญหา, การเชื่อมต่อแผงด้านหน้าไม่ถูกต้อง | Check 24-pin and 8-pin power connections. Ensure power supply switch is ON. Verify front panel power button connection. Test with a known good power supply if possible. |
| ไม่มีการแสดงผลบนจอภาพ | การ์ดจอเสียบไม่แน่น สายจอภาพหลวม แรมมีปัญหา | Reseat graphics card. Check monitor cable connections. Try reseating RAM modules or testing with one module at a time. |
| System powers on but no POST (Power-On Self-Test). | CPU not seated correctly, RAM issues, short circuit. | Reseat CPU and check for bent pins. Reseat RAM. Remove all non-essential components and test. Check for any loose screws or components touching the motherboard. |
| ระบบปฏิบัติการไม่ตรวจพบ | Incorrect boot order, faulty storage drive, loose SATA/M.2 cable. | Check BIOS/UEFI boot order. Ensure storage drive is properly connected. Test storage drive on another system if possible. |
| ระบบล่มหรือค้าง | เครื่องร้อนเกินไป, การโอเวอร์คล็อกไม่เสถียร, RAM มีปัญหา, ไดรเวอร์ล้าสมัย | Monitor temperatures. Reset BIOS/UEFI to default settings. Run memory diagnostic tests. Update drivers. |
8. การรับประกันและการสนับสนุน
For specific warranty information regarding your Machinist MR9A PRO MAX X99 Motherboard, please refer to the warranty card included with your product or visit the official Machinist webไซต์ เงื่อนไขการรับประกันอาจแตกต่างกันไปตามภูมิภาคและผู้ค้าปลีก
For technical support, driver downloads, and BIOS/UEFI updates, please visit the official Machinist support webไซต์ คุณยังสามารถติดต่อผู้ค้าปลีกของคุณเพื่อขอความช่วยเหลือได้
Ask a question about this manual
Ask about setup, troubleshooting, compatibility, parts, safety, or missing instructions. Manuals+ will review the question and use this page’s manual context to help answer it.