1. บทนำ
ขอบคุณสำหรับการซื้อasing the MLWSHR Digital LED Alarm Clock Model 8808. This device combines a digital alarm clock with a thermo-hygrometer, offering dual alarms, snooze function, date and year display, 12/24 hour switch, weekday settings, Daylight Saving Time (DST) functionality, auto-dimmable display with three brightness levels, and a convenient 5V1A USB output for charging other devices. Please read this manual carefully to ensure proper use and maintenance of your new alarm clock.
2. ข้อมูลด้านความปลอดภัย
- เก็บอุปกรณ์ให้ห่างจากน้ำและสภาพแวดล้อมที่มีความชื้นสูง
- อย่าให้เครื่องสัมผัสกับอุณหภูมิที่สูงหรือต่ำเกินไปหรือโดนแสงแดดโดยตรงเป็นเวลานาน
- Use only the provided USB Type-C cable for power.
- อย่าพยายามถอดประกอบหรือซ่อมแซมอุปกรณ์ด้วยตนเอง หากมีปัญหาเกิดขึ้น โปรดติดต่อฝ่ายสนับสนุนลูกค้า
- Ensure proper ventilation when using the USB output to charge other devices.
3. เนื้อหาบรรจุภัณฑ์
- MLWSHR Digital LED Alarm Clock Model 8808
- สายไฟ USB Type-C
- คู่มือการใช้งาน
4. สินค้าหมดview
ทำความคุ้นเคยกับส่วนประกอบหลักและปุ่มควบคุมของนาฬิกาปลุกของคุณ
This image displays the front of the MLWSHR Digital LED Alarm Clock, highlighting the time display, weekday indicators, temperature in Celsius, humidity percentage, and dual alarm icons. It also points to the Daylight Saving Time (DST) indicator.

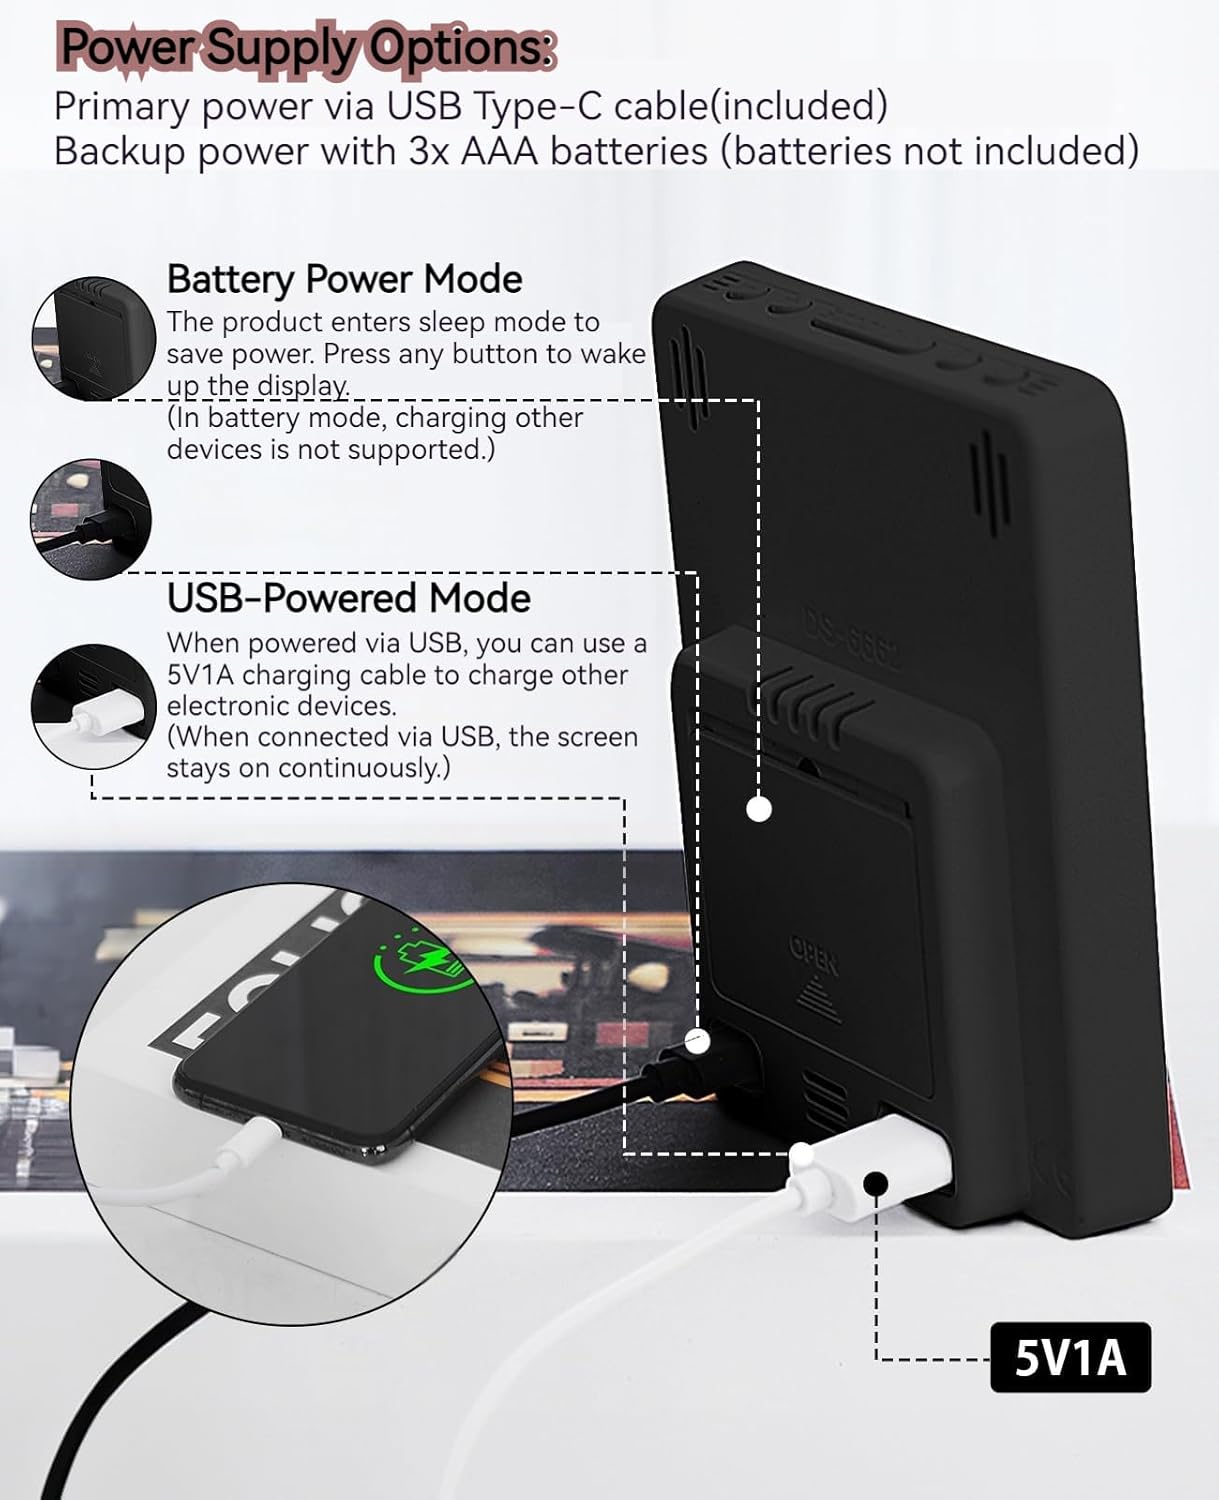
This image illustrates the side and back of the alarm clock, detailing the USB Type-C input for primary power, the battery compartment for 3x AAA backup batteries (not included), and the USB-A output (5V1A) for charging other devices. It also shows the control buttons located on the top edge.
การควบคุม:
- ปุ่ม ตลท.: เข้าสู่โหมดตั้งค่าเวลา วันที่ และนาฬิกาปลุก
- UP (+) Button: Increases values during setting, adjusts brightness.
- DOWN (-) Button: Decreases values during setting, adjusts brightness.
- ปุ่มเลื่อนปลุก/ไฟ: เปิดใช้งานฟังก์ชั่นเลื่อนปลุก ปรับความสว่างหน้าจอ
- ปุ่มสัญญาณเตือนภัย 1: Activates/deactivates Alarm 1, enters Alarm 1 setting.
- ปุ่มสัญญาณเตือนภัย 2: Activates/deactivates Alarm 2, enters Alarm 2 setting.
- 12/24HR Button: สามารถสลับระหว่างรูปแบบเวลา 12 ชั่วโมงและ 24 ชั่วโมงได้
- ปุ่ม °C/°F: Switches between Celsius and Fahrenheit temperature display.
5. การตั้งค่า
5.1 แหล่งจ่ายไฟ
The MLWSHR Digital LED Alarm Clock can be powered in two ways:
- Primary Power (USB Type-C): Connect the provided USB Type-C cable to the clock's input port and plug the other end into a 5V1A USB power adapter (not included). When powered via USB, the display will remain continuously on.
- Backup Power (3x AAA Batteries): Insert 3 AAA batteries (not included) into the battery compartment on the back of the clock. In battery-only mode, the display will enter sleep mode to conserve power. Press any button to temporarily activate the display. Note that the USB output for charging other devices is not supported when operating on battery power alone.
5.2 การตั้งเวลาและวันที่เริ่มต้น
After connecting power, the clock will typically display a default time. To set the correct time and date:
- กดปุ่มค้างไว้ ชุด กดปุ่มค้างไว้ 3 วินาทีเพื่อเข้าสู่โหมดตั้งเวลา ตัวเลขชั่วโมงจะกะพริบ
- ใช้ ขึ้น (+) or ลง (-) ปุ่มเพื่อปรับชั่วโมง
- กด ชุด กดอีกครั้งเพื่อยืนยันชั่วโมง แล้วเปลี่ยนไปตั้งค่านาที ตัวเลขนาทีจะกะพริบ
- ใช้ ขึ้น (+) or ลง (-) ปุ่มปรับนาที
- กดต่อไป ชุด to cycle through and set the Year, Month, and Day using the ขึ้น (+) or ลง (-) buttons for adjustment.
- หลังจากตั้งค่าวันแล้ว ให้กด ชุด กดอีกครั้งเพื่อออกจากโหมดการตั้งค่า
6. คู่มือการใช้งาน
6.1 สวิตช์รูปแบบเวลา 12/24 ชั่วโมง
กดปุ่ม 12/24ชม button to toggle between 12-hour (with AM/PM indicator) and 24-hour time formats.
This video demonstrates various features of the MLWSHR Digital LED Alarm Clock, including the time, temperature, humidity, weekday display, auto/manual brightness adjustment, 12/24 hour switch, and the easy-to-use buttons and USB-C input/USB-A output.
6.2 การตั้งค่าสัญญาณเตือน (สัญญาณเตือน 1 และ สัญญาณเตือน 2)
The clock features two independent alarms. Each alarm can be set for specific days of the week (Monday-Friday, Monday-Saturday, or Monday-Sunday).

This image illustrates the dual alarm functionality, showing how each alarm can be customized to ring on specific days of the week: Monday to Friday, Monday to Saturday, or every day. It highlights the alarm icons and weekday indicators on the display.
- กดปุ่ม นาฬิกาปลุก 1 or นาฬิกาปลุก 2 button to select the desired alarm. The alarm icon will appear on the display.
- กดค้างไว้ที่ปุ่มที่เลือก เตือน button for 3 seconds to enter alarm setting mode. The hour digits will flash.
- ใช้ ขึ้น (+) or ลง (-) ปุ่มเพื่อปรับชั่วโมงการปลุก
- กดปุ่ม เตือน button again to confirm the hour and move to minute setting.
- ใช้ ขึ้น (+) or ลง (-) ปุ่มสำหรับปรับนาทีปลุก
- กดปุ่ม เตือน button again to set the alarm frequency (e.g., Mon-Fri, Mon-Sat, Mon-Sun). Use ขึ้น (+) or ลง (-) ที่จะเลือก
- กดปุ่ม เตือน button one last time to exit alarm setting mode.
- หากต้องการเปิดหรือปิดนาฬิกาปลุก เพียงกดปุ่มที่เกี่ยวข้อง นาฬิกาปลุก 1 or นาฬิกาปลุก 2 button briefly. The alarm icon will appear (ON) or disappear (OFF) from the display.
6.3 ฟังก์ชั่นเลื่อนซ้ำ
When an alarm sounds, you can activate the snooze function for a temporary delay.

This image shows the clock's snooze button and how it functions. When the alarm rings, a brief press of the snooze button will delay the alarm for 5 minutes. Holding the button for more than two seconds will turn off the alarm for that day.
- เมื่อนาฬิกาปลุกดัง ให้กด สนูซ / ไลท์ button briefly. The alarm will pause and ring again after 5 minutes.
- To turn off the alarm for the current day, press and hold the สนูซ / ไลท์ button for more than 2 seconds, or press any other button (except สนูซ / ไลท์).
การปรับความสว่าง 6.4 ระดับ
The clock features an auto-dimmable display and three manual brightness levels.
- หรี่แสงอัตโนมัติ: The built-in light sensor automatically adjusts the display brightness based on ambient light conditions. This is the default setting.
- ปรับความสว่างด้วยตนเอง: กดปุ่มสั้นๆ สนูซ / ไลท์ button to cycle through 3 manual brightness levels (L-01, L-02, L-03).
- To return to auto-dimmable mode, continue pressing the สนูซ / ไลท์ button until 'L-AU' appears on the display.
6.5 Thermometer & Hygrometer
The clock displays indoor temperature and humidity levels.

This image highlights the temperature and humidity readings on the clock's display. It also provides guidance on ideal humidity levels and suggests actions (humidifier/dehumidifier) if levels are too low or too high. The temperature detection range is 23°F to 122°F (-5°C to 50°C) with an error margin of ±2°F.
- สวิตช์หน่วยอุณหภูมิ: กดปุ่ม ° C / ° F button to switch between Celsius and Fahrenheit temperature display.
- The temperature range is 23°F to 122°F (-5°C to 50°C) with an error margin of ±2°F.
- The humidity measurement error is within ±5%.
6.6 USB Power Output (5V1A)
The clock features a USB-A output port (5V1A) that can be used to charge other electronic devices.

This image demonstrates the use of the clock's USB-A output port to charge a smartphone. The clock provides a 5V1A output, making it a convenient charging station. This feature is only available when the clock is powered via its USB Type-C input.
- Connect your device's charging cable to the USB-A output port on the back of the alarm clock.
- Ensure the alarm clock is powered via its USB Type-C input for this feature to function. The USB output is not active when the clock is running on battery power alone.
6.7 เวลาออมแสง (DST)
The clock supports Daylight Saving Time adjustment.
- หากต้องการเปิดหรือปิดใช้งาน DST ให้กดปุ่มค้างไว้ เวลาออมแสง button (if available, or refer to the SET button sequence for DST in specific models). The DST indicator will appear or disappear.
7. การบำรุงรักษา
- เช็ดนาฬิกาด้วยผ้าแห้งเนื้อนุ่ม ห้ามใช้สารทำความสะอาดที่มีฤทธิ์กัดกร่อนหรือตัวทำละลาย
- If the clock will not be used for an extended period, remove the AAA batteries to prevent leakage.
- Keep the USB ports free from dust and debris.
8 การแก้ไขปัญหา
| ปัญหา | สาเหตุที่เป็นไปได้ | สารละลาย |
|---|---|---|
| Display is off or intermittent. | Running on battery power in sleep mode, or no power. | Press any button to activate display in battery mode. Connect USB Type-C cable for continuous display. Check USB power source. |
| ช่องเสียบ USB ไม่สามารถชาร์จอุปกรณ์ได้ | Clock is running on battery power, or USB cable is faulty. | Ensure the clock is connected to primary USB Type-C power. Try a different USB cable. |
| สัญญาณเตือนภัยไม่ดัง | สัญญาณเตือนภัยไม่ได้เปิดใช้งานหรือตั้งค่าไม่ถูกต้อง | Check if the alarm icon is displayed. Re-set the alarm time and frequency. |
| การวัดอุณหภูมิไม่แม่นยำ | Environmental factors or sensor error. | Allow time for the sensor to stabilize. Ensure the clock is not near heat sources or vents. Note the ±2°F error margin. |
| Cannot set time/date. | Not in setting mode, or buttons are unresponsive. | Press and hold the SET button for 3 seconds. Ensure the clock has stable power. |
9. ข้อมูลจำเพาะ
- ยี่ห้อ: MLWSHR
- หมายเลขรุ่น: 8808
- ประเภทจอภาพ: นำ
- แหล่งพลังงาน: USB Type-C (5V1A) / 3x AAA Batteries (backup)
- ขนาดสินค้า : กว้าง 3.54 นิ้ว x สูง 4.72 นิ้ว
- คุณสมบัติ: Dual Alarms, Snooze, Thermo-Hygrometer, Date & Year Display, 12/24 Hour Switch, Weekdays, DST, Auto Dimmable (3 levels), USB Output (5V1A)
- วัสดุ: พลาสติกที่เป็นมิตรต่อสิ่งแวดล้อม
- การใช้งานในร่ม/กลางแจ้ง: ในร่ม
10. การรับประกันและการสนับสนุน
The MLWSHR Digital LED Alarm Clock Model 8808 comes with a รับประกัน 2 ปี นับจากวันที่ซื้อ การรับประกันนี้ครอบคลุมถึงข้อบกพร่องจากการผลิตและการทำงานผิดปกติภายใต้การใช้งานปกติ
For technical support, warranty claims, or any questions regarding your product, please contact MLWSHR customer service through the retailer's platform or visit our official webเว็บไซต์นี้มีข้อมูลการติดต่อ โปรดเตรียมใบเสร็จรับเงินและหมายเลขรุ่นให้พร้อมเมื่อติดต่อฝ่ายสนับสนุน