การแนะนำ
This instruction manual provides important information for the safe and efficient use of your FOHERE Stainless Steel Meat Grinder Attachment. This attachment is designed for use with all KitchenAid Stand Mixers, transforming your mixer into a versatile meat grinder and sausage stuffer. Please read these instructions thoroughly before first use and retain them for future reference.

Image: The FOHERE Meat Grinder Attachment, showcasing its main body, food tray, and various grinding plates and sausage stuffer tubes.
เนื้อหาแพ็คเกจ
The FOHERE Meat Grinder Attachment includes the following components:
- 1 Grinding Head
- 1 Grind Screw (Auger)
- 1 แหวนยึด
- 1 Hopper Plate (Large Removable Food Tray)
- 1 Food Pusher
- 4 Grinding Plates (various sizes)
- 3 Grinding Blades
- 2 Sausage Stuffer Tubes (1.22 inches and 0.71 inches)
- 1 แปรงทำความสะอาด

Image: A visual representation of the included 4 cutting plates, 3 grinding blades, and 2 sausage stuffer tubes, along with examples of their output.
การติดตั้งและการประกอบ
Follow these steps to properly assemble the meat grinder attachment to your KitchenAid Stand Mixer:
- Insert Grind Screw: Insert the grind screw (auger) into the grinding head.
- ติดตั้ง Blade: Place a grinding blade onto the end of the grind screw, ensuring the sharp side of the blade faces outward. Incorrect blade orientation can damage the machine.
- Place Cutting Plate: Select the desired grinding plate and place it over the blade.
- Secure Fixing Ring: Screw the fixing ring onto the grinding head until it is secured, but do not overtighten.
- Attach Hopper Plate: Place the large removable food tray (hopper plate) onto the top of the grinding head.
- Connect to Stand Mixer: Attach the assembled meat grinder to the power hub of your KitchenAid Stand Mixer. Ensure it is securely fastened.

Image: A six-step visual guide demonstrating the assembly process of the meat grinder attachment, from inserting the grind screw to attaching it to the stand mixer.
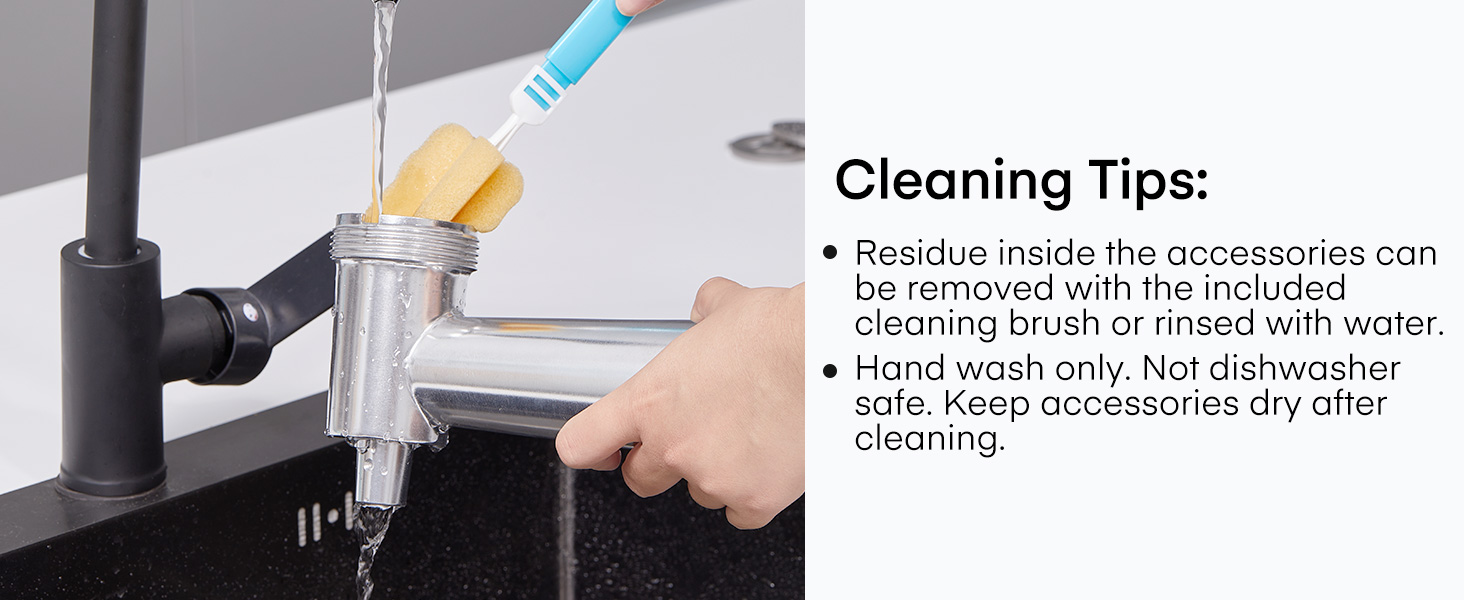
Image: A critical diagram illustrating the correct orientation of the grinding blade (plane outward) versus the incorrect orientation (plane inward), which can cause damage.
คำแนะนำการใช้งาน
การบดเนื้อ
The attachment is suitable for grinding various types of meat for patties, hamburgers, and meat sauces. Ensure meat is cut into appropriate sizes to fit the feeder.
- Prepare meat by cutting it into small strips or cubes. For best results, chill the meat and the grinder components in the freezer for 15-30 minutes before grinding.
- Select the desired grinding plate (e.g., 3mm, 5mm, 7mm, or 3-hole) and assemble the grinder as described in the Setup section.
- Turn on your KitchenAid Stand Mixer to a medium speed setting.
- Place the prepared meat onto the hopper plate.
- Use the food pusher to gently guide the meat into the grinder. Never use your fingers or other utensils to push meat into the grinder.
- Collect the ground meat in a bowl placed beneath the grinder outlet.

Image: The FOHERE Meat Grinder Attachment in operation, producing finely ground meat into a bowl, with various grinding plates displayed.
การทำไส้กรอก
The attachment includes two sausage stuffer tubes (1.22 inches and 0.71 inches) for making various types of sausages.
- เตรียมส่วนผสมไส้กรอกของคุณและ...asinจีเอส.
- Assemble the grinder with the appropriate sausage stuffer tube. The grinding plate and blade are typically removed for sausage stuffing, allowing the mixture to pass directly through the tube.
- เลื่อนตัวซีasing onto the sausage stuffer tube, leaving a small overhang at the end.
- Turn on your KitchenAid Stand Mixer to a low speed setting.
- Place the sausage mixture onto the hopper plate and use the food pusher to guide it into the grinder.
- เมื่อส่วนผสมเติมเต็มช่องว่างasing, gently guide the casing off the tube, forming links as desired.

Image: The FOHERE Meat Grinder Attachment actively stuffing sausage into casings, demonstrating the use of the sausage stuffer tubes.
การทำความสะอาดและการบำรุงรักษา
Proper cleaning and maintenance will ensure the longevity and hygienic operation of your meat grinder attachment.
การถอดประกอบเพื่อทำความสะอาด
Always disassemble the attachment from the stand mixer before cleaning. Separate all components: grinding head, grind screw, blade, grinding plate, fixing ring, hopper plate, food pusher, and sausage stuffer tubes.
คำแนะนำในการทำความสะอาด
- ส่วนประกอบที่ปลอดภัยสำหรับเครื่องล้างจาน: The 4 Grinding Plates, 3 Grinding Blades, and 2 Sausage Stuffer Tubes are dishwasher safe.
- Handwash Only Components: The Large Removable Food Tray (Hopper Plate), Grinding Head, Grind Screw, Fixing Ring, and Food Pusher must be hand washed.
- Handwashing Method: We recommend hand washing these parts with soap and warm water (below 122°F or 50°C). Use the included cleaning brush to remove any residue from hidden crevices or corners.
- การอบแห้ง: After cleaning, ensure all parts are thoroughly dried to prevent rust and preserve the product's quality. Keeping parts dry after cleaning extends their lifespan.

Image: Various components of the meat grinder attachment submerged in water, illustrating the ease of cleaning.

Image: A visual guide demonstrating how to clean the meat grinder attachment using the provided brush and emphasizing hand washing for certain parts.
การแก้ไขปัญหา
If you encounter issues with your FOHERE Meat Grinder Attachment, consider the following:
- Attachment Not Functioning: Ensure the attachment is correctly and securely connected to the KitchenAid Stand Mixer's power hub. Verify the stand mixer is powered on and set to an appropriate speed.
- ประสิทธิภาพการบดที่ไม่ดี: Check if the grinding blade is installed with the sharp side facing outward. Ensure the meat is properly chilled and cut into small enough pieces. Remove any sinew or bone that might be causing blockages.
- Meat Backing Up: This can occur if the meat is not chilled enough, if pieces are too large, or if the blade is incorrectly installed. Disassemble, clean, and reassemble, ensuring all steps are followed correctly.
- ความยากในการทำความสะอาด: Use the provided cleaning brush for hard-to-reach areas. Soak components in warm soapy water before scrubbing.
ข้อมูลจำเพาะ
| คุณสมบัติ | ข้อมูลจำเพาะ |
|---|---|
| ยี่ห้อ | ที่นี่ |
| หมายเลขรุ่น | KA-MG |
| วัสดุ | สแตนเลส |
| น้ำหนักสินค้า | 1.2 กิโลกรัม |
| ขนาดรายการ (ยาว x กว้าง x สูง) | ยาว 9.05 นิ้ว x กว้าง 4.92 นิ้ว x สูง 5.9 นิ้ว |
| ส่วนประกอบที่รวมอยู่ | Meat grinder accessories (15 pieces) |
| ความเข้ากันได้ | All KitchenAid Stand Mixers |
การรับประกันและการสนับสนุน
ข้อมูลการรับประกัน
This FOHERE product is covered by a manufacturer's warranty. Please refer to the product packaging or contact FOHERE customer service for specific warranty terms and conditions.
การสนับสนุนลูกค้า
If you have any questions, require assistance, or need to report an issue with your FOHERE Meat Grinder Attachment, please contact FOHERE customer support. Contact details can typically be found on the product packaging or the official FOHERE webเว็บไซต์.