1. บทนำ
This manual provides essential instructions for the safe and efficient operation of your Saooer Solar Charge Controller. This device is designed to manage the power flow from your solar panel to your battery, ensuring optimal charging and protecting your battery from overcharge and over-discharge. It is compatible with both 12V and 24V solar systems and features a 30A discharge current capacity.
2. คำแนะนำด้านความปลอดภัย
Please read all safety instructions carefully before installation and operation. Failure to follow these instructions may result in damage to the controller, battery, or other components, and may cause personal injury.
- ตรวจสอบให้แน่ใจว่าระดับแบตเตอรี่tage is sufficient for the controller to recognize the battery type before the first installation.
- The charge controller is suitable for lead-acid batteries (OPEN, AGM, GEL) and lithium-ion batteries. Do not use it for other battery types.
- Install the charge controller indoors, away from direct sunlight, high temperatures, and humid environments.
- The controller will heat up during operation; ensure good ventilation.
- The controller's positive and negative terminals should be connected correctly. Reverse connection may damage the device.
- Always connect the battery first, then the solar panel, and finally the load. Disconnect in the reverse order: load, then solar panel, then battery.
3. คุณสมบัติของผลิตภัณฑ์
- เล่มระบบtagความเข้ากันได้: Automatically detects 12V or 24V systems.
- กระแสไฟปล่อย: ความจุ 30A
- Integrated Micro Controller: Manages solar panel and battery operation efficiently.
- พอร์ต USB คู่: Supports mobile phone charging (5V/2A output).
- การป้องกันที่ครอบคลุม: Includes short-circuit protection, open-circuit protection, reverse polarity protection, and over-load protection to enhance system efficiency and battery lifespan.
- จอแสดงผล LCD: Provides clear indication of status and data, allowing for convenient mode switching and parameter configuration.
- พารามิเตอร์ที่ปรับได้: User-configurable settings for various battery types and operational needs.
- ตั้งเวลาในตัว: For load control.
4. เนื้อหาบรรจุภัณฑ์
- 1x Saooer Solar Charge Controller (30A)
5. การตั้งค่าและการติดตั้ง
Follow these steps for proper installation of the solar charge controller. Incorrect connection order can damage the controller.
- เชื่อมต่อแบตเตอรี่: Connect the battery to the charge regulator first. Ensure correct polarity (positive to positive, negative to negative). This allows the controller to recognize the battery voltage.
- เชื่อมต่อแผงโซล่าเซลล์: Connect the solar panel to the solar charge controller. Ensure correct polarity.
- เชื่อมต่อโหลด: Connect the consumer or load to the charge controller regulator. Ensure correct polarity.
Important Disconnection Note:
When disconnecting the system, always remove the solar panel connection first, then the load connection, and finally the battery connection. This prevents potential damage to the controller.
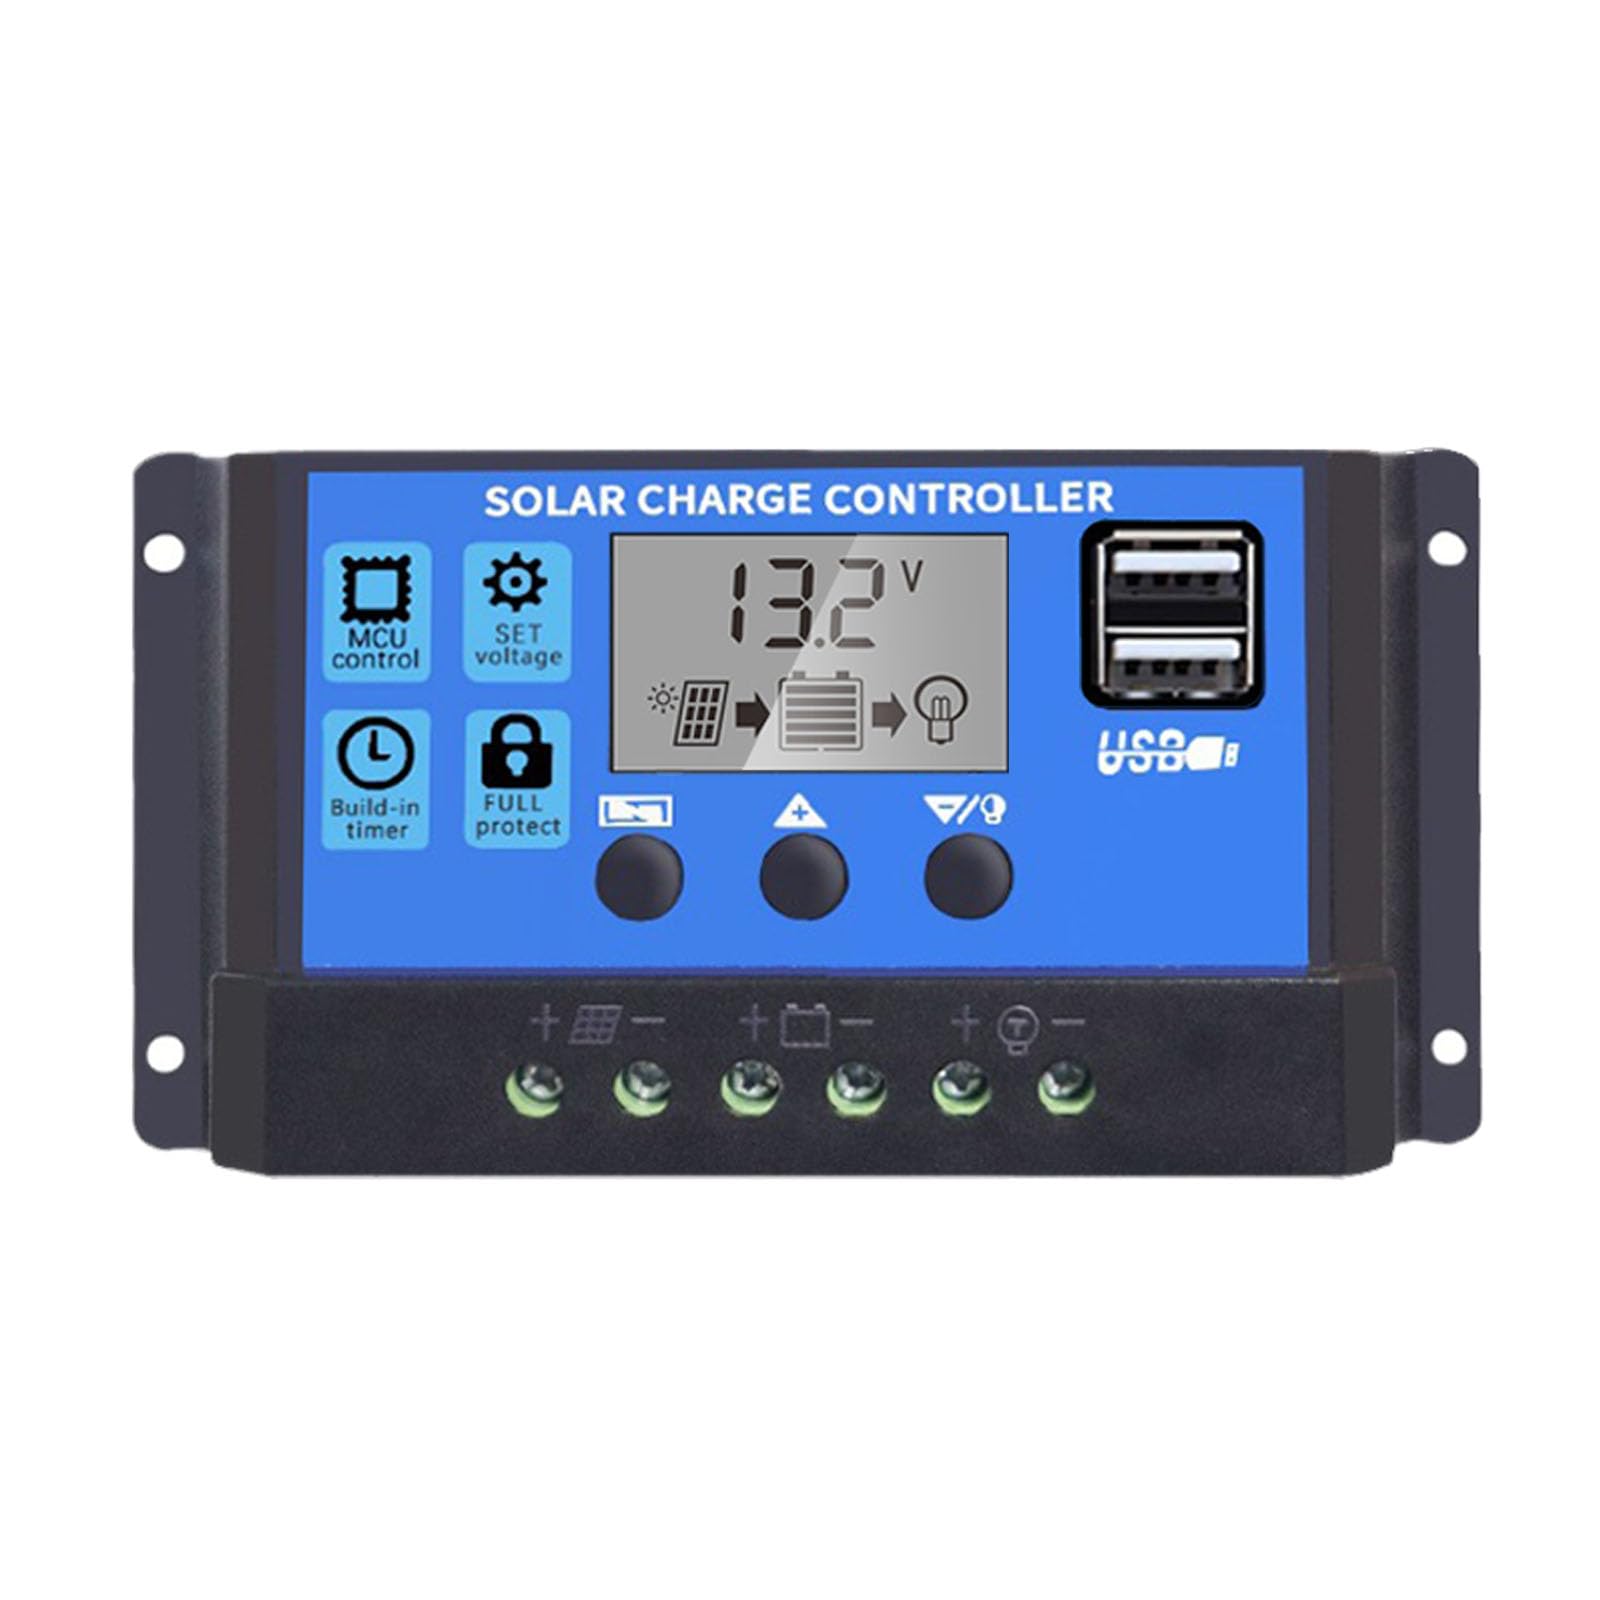

6. คู่มือการใช้งาน
The controller features an LCD display and three buttons for operation: เมนู, UP, และ ลง.
6.1. จอแสดงผล LCD
The LCD display shows real-time system status and data, including battery voltage, charging current, discharging current, and various parameter settings.
6.2. ปุ่มฟังก์ชัน
- ปุ่มเมนู: Press to cycle through different display modes and enter parameter setting mode. Long press to exit setting mode.
- ปุ่มขึ้น: In setting mode, press to increase the parameter value.
- ปุ่มลง: In setting mode, press to decrease the parameter value.
6.3. การตั้งค่าพารามิเตอร์
To adjust parameters (e.g., battery type, charge/discharge voltage limits, load timer settings):
- กดปุ่ม เมนู button until the desired parameter display appears.
- กดค้างไว้ เมนู button until the displayed value starts flashing.
- ใช้ UP และ ลง ปุ่มเพื่อปรับค่า
- Once the desired value is set, long press the เมนู button again to save the setting and exit the flashing state.
Refer to the specific icons on the LCD for detailed parameter identification.

7. การบำรุงรักษา
การบำรุงรักษาอย่างสม่ำเสมอจะช่วยให้ตัวควบคุมการชาร์จพลังงานแสงอาทิตย์ของคุณมีอายุการใช้งานยาวนานและทำงานได้อย่างมีประสิทธิภาพสูงสุด
- ความสะอาด : รักษาตัวควบคุมให้สะอาด ปราศจากฝุ่นและเศษขยะ ใช้ผ้าแห้งเช็ดทำความสะอาด
- การเชื่อมต่อ: Periodically check all wiring connections to ensure they are tight and free from corrosion. Loose connections can cause power loss and overheating.
- การระบายอากาศ : Ensure the installation area has adequate ventilation to prevent overheating of the controller.
- การตรวจสอบ: Inspect the controller for any signs of physical damage or unusual operation.
8 การแก้ไขปัญหา
หากคุณพบปัญหาเกี่ยวกับตัวควบคุมการชาร์จพลังงานแสงอาทิตย์ โปรดลองทำตามขั้นตอนการแก้ไขปัญหาทั่วไปต่อไปนี้:
- ไม่มีจอแสดงผล/ไม่มีพลังงาน: ตรวจสอบการเชื่อมต่อแบตเตอรี่และตรวจสอบให้แน่ใจว่าแบตเตอรี่มีกำลังไฟเพียงพอtage. Verify all wiring is correct and secure.
- แบตเตอรี่ไม่ชาร์จ: ตรวจสอบการเชื่อมต่อแผงโซลาร์เซลล์และตรวจสอบให้แน่ใจว่าแผงได้รับแสงแดดอย่างเพียงพอ ตรวจสอบแรงดันไฟฟ้าของแผงโซลาร์เซลล์tage and current. Ensure the controller's charging parameters are correctly set for your battery type.
- โหลดไม่ทำงาน: Check load connections. Ensure the load is not exceeding the controller's rated current. Check the load timer settings if applicable. The controller may have entered protection mode due to over-discharge or over-load; check the display for error codes or indicators.
- เกินVoltagอี/อันเดอร์-วอลล์tage สัญญาณเตือนภัย: ตรวจสอบปริมาณแบตเตอรี่tage. Ensure solar panel open-circuit voltage does not exceed the controller's maximum input voltage.
หากปัญหายังคงอยู่หลังจากตรวจสอบตามขั้นตอนเหล่านี้แล้ว โปรดติดต่อฝ่ายบริการลูกค้า
9. ข้อมูลจำเพาะ
| คุณสมบัติ | ข้อมูลจำเพาะ |
|---|---|
| ยี่ห้อ | Saooer |
| แบบอย่าง | ตัวควบคุมการชาร์จพลังงานแสงอาทิตย์ 30A |
| เล่มระบบtage | 12V / 24V Auto-sensing |
| กระแสไฟปล่อย | 30เอ |
| วัสดุ | โลหะ, พลาสติก |
| ประเภทจอภาพ | จอแอลซีดี |
| เอาท์พุต USB | Dual USB, 5V/2A |
| ส่วนประกอบที่รวมอยู่ | 1x Solar Charge Controller |

10. การรับประกันและการสนับสนุน
For warranty information, please refer to the documentation provided with your purchase or contact your retailer. For technical support or inquiries, please contact Saooer customer service through their official channels.