
1. บทนำ
The MakerHawk Mesh Node T114 Board V2 is a versatile development board designed for IoT applications, supporting LoRa, Bluetooth 5.0, and GPS functionalities. It integrates an nRF52840 microcontroller and an SX1262 LoRa chip, featuring a 1.14-inch TFT display for real-time data visualization. This board offers flexible power solutions, including USB, lithium battery, and solar panel input, making it suitable for diverse environments and projects such as Meshtastic, Arduino, and LoRaWAN.
This manual provides essential information for setting up, operating, and maintaining your Mesh Node T114 Board V2.
2. อะไรอยู่ในกล่อง
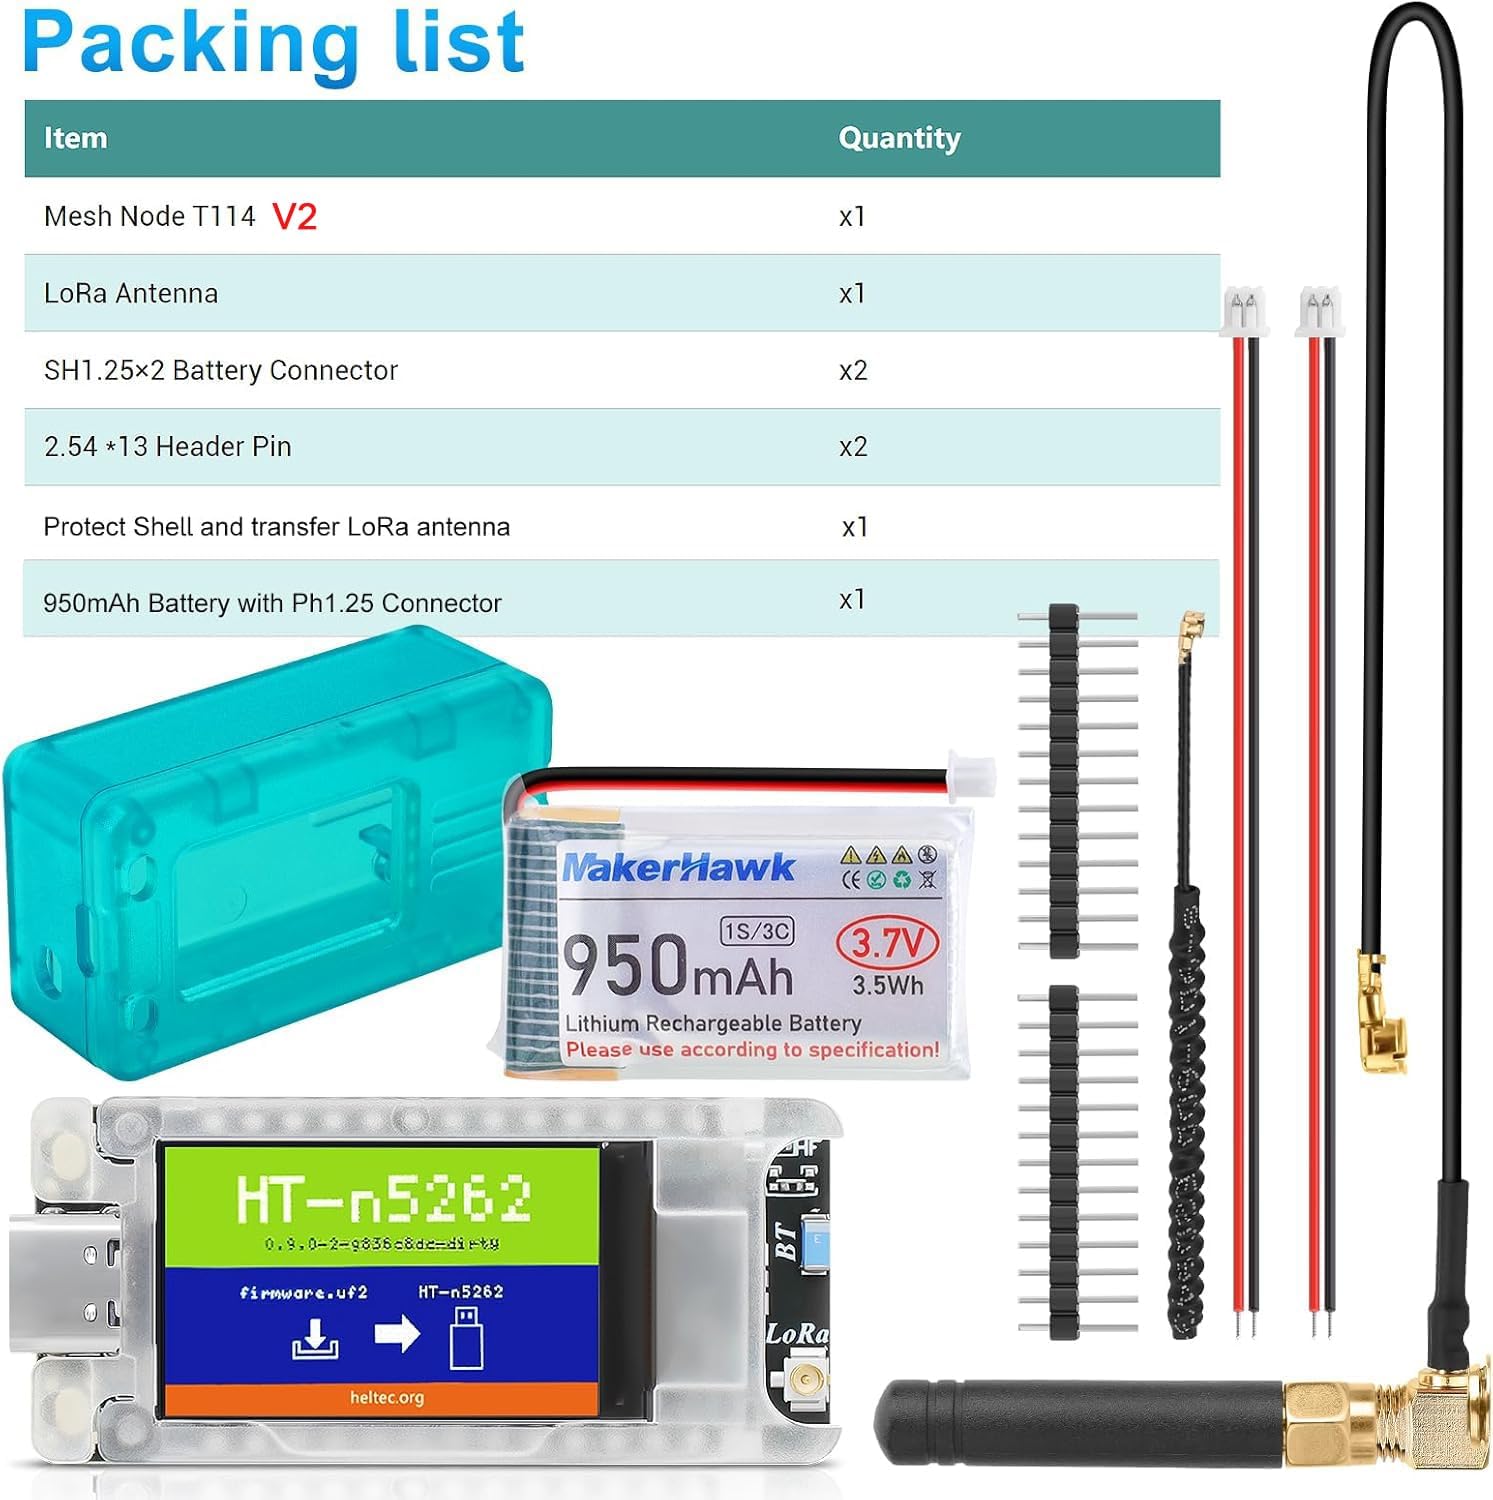
Image: Components included in the Mesh Node T114 V2 package.
- Mesh Node T114 V2 Board x1
- LoRa Antenna x1
- SH1.25×2 Battery Connector x2
- 2.54 × 13 Header Pin x2
- Protective Shell and LoRa Antenna Transfer Cable x1
- 950mAh Battery with PH1.25 Connector x1
3. สินค้าหมดview และคุณสมบัติ
The Mesh Node T114 Board V2 is engineered for robust performance and expandability. Key features include:
- Integrated TFT Display: A 1.14-inch TFT LCD with 135(H) x 240(V) pixels, supporting up to 262k colors, for enhanced interactivity and data visualization.
- โซลูชันด้านพลังงานที่ยืดหยุ่น: Multiple power inputs including 5V USB, lithium battery, and solar panel connectors, ensuring continuous operation. A 950mAh battery is included.
- Extensive Expandability: Connectors for LiPo battery (1.25 * 2P), solar panel (1.25 * 2P), and GNSS module (1.25 * 8P) allow for tailored project integration.
- Reliable and Safe Design: Operates in temperatures from -20℃ to 70℃ with 90% humidity (non-condensing). Features complete voltage regulation, ESD protection, and RF shielding for durability and safety.
- Meshtastic/Arduino Compatibility: Designed to be compatible with popular IoT platforms and development environments.

ภาพ: เหนือview of the Mesh Node T114 Development Board highlighting its features like low power consumption, Arduino/Meshtastic compatibility, LoRa, Bluetooth, external GPS support, and battery/solar power supply.

Image: Detailed diagram of the Mesh Node T114 board, labeling components such as RGB LEDs, MCU+LoRa Chip, User Button, USB Type-C, Reset Button, TFT-LCD, LoRa ANT Connector, Bluetooth ANT, 2*1.25 Solar Panel Connector, 2*1.25 LiPo Connector, 8*1.25 GNSS Connector, and Pin Headers.
4. คำแนะนำในการตั้งค่า
Follow these steps to assemble and prepare your Mesh Node T114 Board V2 for operation:
- เชื่อมต่อแบตเตอรี่: Connect the included 950mAh lithium battery to the 2-pin LiPo connector (labeled P2 or similar) on the board. Ensure correct polarity.
- Attach the LoRa Antenna: Connect the LoRa antenna to the U.FL connector on the board. If using the protective shell, route the antenna cable through the designated opening and connect the external antenna.
- Assemble the Protective Case: Carefully place the Mesh Node T114 board into the bottom half of the protective shell. Ensure the USB-C port, buttons, and display align with the case openings. Then, secure the top half of the shell.
- Optional: Connect GPS Module: If using an external GNSS module (not included), connect it to the 8-pin GNSS module connector (labeled P3). Refer to the GNSS Module Link Instruction image for proper connection.
- การเพิ่มพลังเริ่มต้น: Connect the board to a 5V USB power source using a USB-C cable. The TFT display should light up, indicating power.

ภาพ: ระเบิด view illustrating the assembly of the Mesh Node T114 board, 950mAh battery, and protective case with antenna connection.

Image: Diagram showing how to connect an external GNSS module to the Mesh Node T114 board via the 8*1.25mm connector (P3).
5. คู่มือการใช้งาน
Once assembled and powered, the Mesh Node T114 Board V2 is ready for operation. The specific functionality will depend on the firmware loaded onto the nRF52840 microcontroller.
- เปิด/ปิดเครื่อง: The board powers on automatically when connected to a USB power source or when the battery is connected. There is no dedicated power switch. To power off, disconnect the power source.
- จอแสดงผล TFT: The integrated 1.14-inch TFT display will show information as programmed by the firmware. This can include network status, sensor data, GPS coordinates, or other relevant metrics.
- ปุ่ม: The board includes a 'USER' button and a 'RST' (Reset) button. The 'USER' button's function is typically defined by the loaded firmware, while the 'RST' button restarts the board.
- การอัปโหลดเฟิร์มแวร์: To load or update firmware (e.g., Meshtastic, Arduino sketches), connect the board to your computer via the USB-C port. Follow the specific instructions provided by your chosen development environment or firmware project.
6. การเชื่อมต่อ
The Mesh Node T114 Board V2 supports multiple communication protocols:
- โลร่า: Utilizes the SX1262 chip for long-range, low-power wireless communication. This is ideal for Meshtastic networks and LoRaWAN applications. Ensure the LoRa antenna is properly connected for optimal performance.
- Bluetooth 5.0: The nRF52840 microcontroller provides Bluetooth 5.0 capabilities, including Bluetooth Low Energy (BLE) and Bluetooth mesh. This allows for short-range communication with other Bluetooth-enabled devices.
- จีพีเอส: The board includes a dedicated 8-pin connector for an external GNSS (GPS) module. When connected, this enables location tracking and time synchronization for your projects.
7. โซลูชั่นด้านพลังงาน
The Mesh Node T114 Board V2 offers versatile power input options:
- USB-C (5V): The primary power input for development and continuous operation when connected to a computer or USB power adapter.
- Lithium Battery (3-4.2V): The included 950mAh battery provides portable power. The board features integrated charging circuitry for the connected battery when powered via USB or solar.
- แผงโซล่าเซลล์: A dedicated 1.25 * 2P connector allows for direct connection of a solar panel, enabling autonomous operation and battery charging in remote locations.

ภาพ: ระยะใกล้ view of the Mesh Node T114 interfaces, including the TFT-LCD, Type C interface, Battery/Solar Panel Interface, and GNSS Interface.
8. ข้อมูลจำเพาะ

Image: Part 1 of the technical specifications table for the Mesh Node T114.

Image: Part 2 of the technical specifications table for the Mesh Node T114.
| พารามิเตอร์ | คำอธิบาย |
|---|---|
| ยี่ห้อ | เมคเกอร์ฮอว์ค |
| หมายเลขรุ่น | T114 |
| มหาเทพ | เอ็นอาร์เอฟ52840 |
| ชิปโหนด LoRa | SX1262 |
| ความถี่ | 470~510MHz; 863~870MHz; 902~928MHz |
| แม็กซ์ TX Power | 21 ± 1dBm |
| ความไวในการรับสูงสุด | -135dBm@SF12 BW=125KHz |
| บลูทูธ | Bluetooth LE; Bluetooth 5, Bluetooth mesh |
| ทรัพยากรฮาร์ดแวร์ | USB 2.0, 4 × SPI, 2 × TWI, 2 × UART, 4 × PWM, QPSI, I2S, PDM, ODEC Etc. |
| หน่วยความจำ | 1M ROM, 256KB SRAM |
| อินเทอร์เฟซ | Type-C USB, 2×1.25 lithium battery connector, 2×1.25 solar panel connector, LoRa ANT, 8×1.25 GPS module connector, 2×13×2.54 Header Pin |
| แบตเตอรี่ | 3-4.2V battery power supply and charge (950mAh included) |
| อุณหภูมิในการทำงาน | -20℃ ถึง 70℃ |
| ขนาด | 50.80 × 22.86mm (Board only) |
| น้ำหนักสินค้า | 3.2 ounces (with components) |
| แสดง | Onboard 1.14 inch TFT-LCD display |
| กระแสการนอนหลับลึก | ~11uA |
| Tracker Mode Sleep Current | ~22uA |
| GPS OFF, TFT OFF Current | ~9มิลลิแอมป์ |
| GPS OFF, TFT ON Current | ~20มิลลิแอมป์ |
| GPS ON, TFT ON Current | ~51มิลลิแอมป์ |
9. การบำรุงรักษา
To ensure the longevity and optimal performance of your Mesh Node T114 Board V2, observe the following maintenance guidelines:
- สภาพแวดล้อมการทำงาน: Operate the board within the specified temperature range of -20℃ to 70℃ and humidity of 90% (non-condensing). Avoid extreme temperatures, direct sunlight, and high humidity.
- การป้องกันทางกายภาพ: Always use the provided protective shell to shield the board from dust, accidental impacts, and static discharge.
- การทำความสะอาด: If necessary, gently clean the board and case with a soft, dry cloth. Avoid using liquids or abrasive cleaners.
- การดูแลแบตเตอรี่ When not in use for extended periods, store the lithium battery at approximately 50% charge in a cool, dry place. Avoid fully discharging or overcharging the battery.
- อัพเดตเฟิร์มแวร์: Regularly check for firmware updates from the Meshtastic or Arduino communities, or from MakerHawk, to benefit from new features, improvements, and bug fixes.
10 การแก้ไขปัญหา
If you encounter issues with your Mesh Node T114 Board V2, consider the following common troubleshooting steps:
- ไม่มีไฟ/จอแสดงผล: Ensure the USB-C cable is securely connected and providing 5V power, or that the battery is properly connected and charged.
- ปัญหาเฟิร์มแวร์: If the board is not behaving as expected, try reflashing the firmware. Verify that you are using the correct firmware version for your board.
- Connectivity Problems (LoRa/Bluetooth): Check antenna connections. Ensure that other devices are within range and configured correctly for communication. For LoRa, verify frequency settings match your region.
- GPS ไม่ทำงาน: Confirm the external GNSS module is correctly connected to the P3 connector. Ensure the module has a clear view ของท้องฟ้าสำหรับการรับภาพจากดาวเทียม
- ปัญหาซอฟต์แวร์/ไดรเวอร์: If connecting to a computer for programming, ensure you have the necessary drivers and development environment (e.g., Arduino IDE, PlatformIO) properly installed and configured.
For more detailed troubleshooting guides and community support, refer to the official documentation and resources:

Image: Screenshot of the Heltec Automation 'Docs & Resource' page, which provides user manuals, frameworks, schematics, datasheets, and related resources for the T114 board.
11. การรับประกันและการสนับสนุน
MakerHawk provides comprehensive customer support for the Mesh Node T114 Board V2. For technical assistance, warranty claims, or further inquiries, please contact MakerHawk customer service through their official channels or visit the ร้าน MakerHawk บน Amazon.
โปรดเก็บหลักฐานการซื้อไว้เพื่อวัตถุประสงค์การรับประกัน