1. สินค้าหมดview
The Fuers H.265+ 8-Channel Security DVR Recorder (Model A1008CH) is a versatile surveillance solution designed for home and business security. This DVR supports various camera types including HD-CVBS, TVI, CVI, XVI, AHD, and IP analog cameras, allowing for flexible system expansion. It features H.265+ video compression for efficient storage and comes with a pre-installed 1TB hard drive for 24/7 recording.
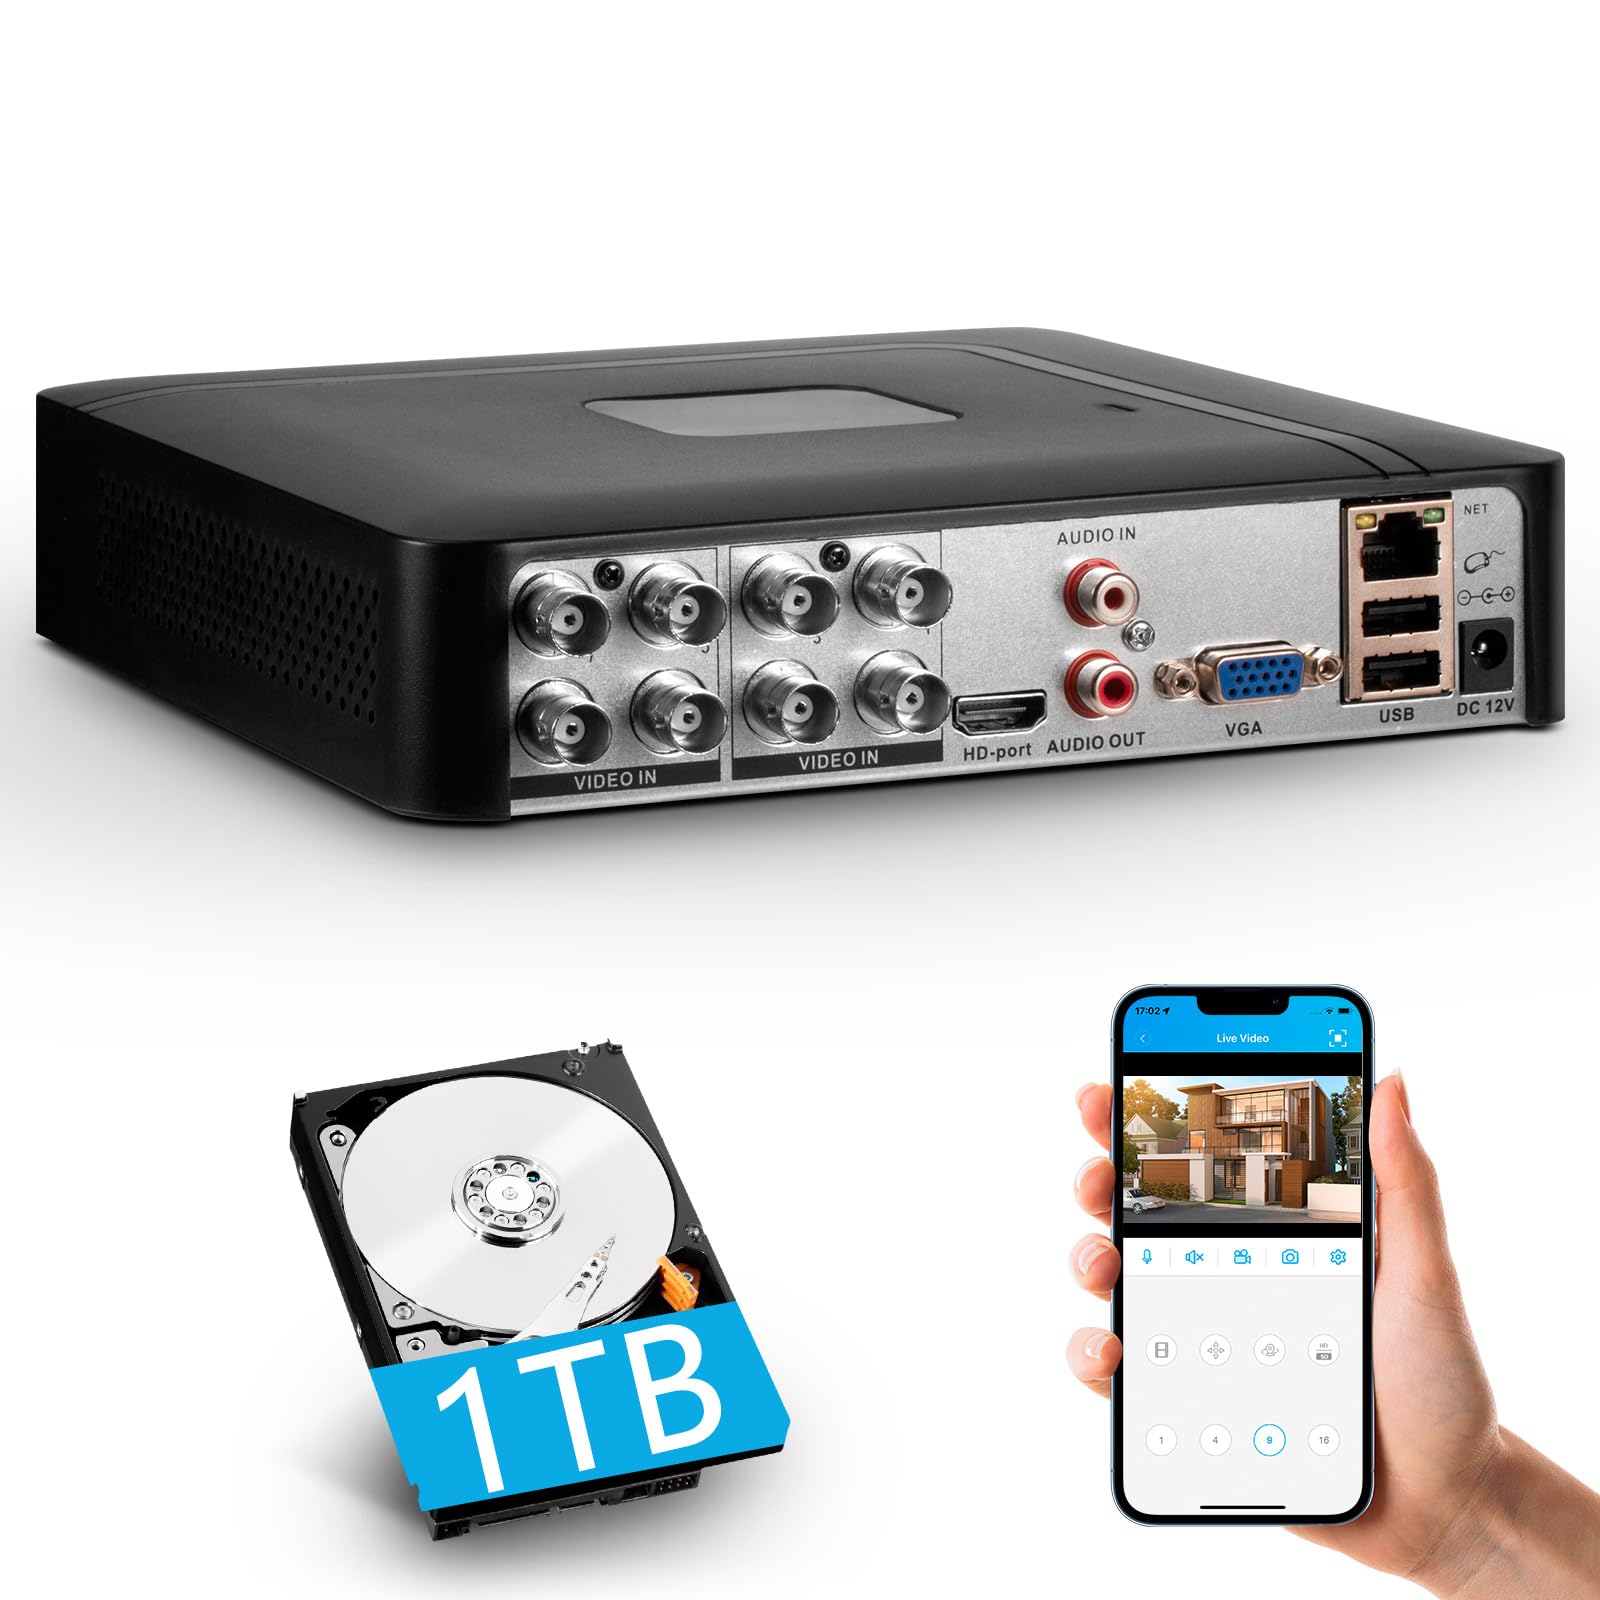
Image 1.1: Fuers H.265+ 8-Channel Security DVR Recorder.
คุณสมบัติหลัก:
- 8-Channel System: Supports up to 8 cameras simultaneously, compatible with HD-TVI, CVBS, CVI, XVI, AHD, and IP cameras.
- การบีบอัดวิดีโอ H.265+: Offers extended recording time and saves up to 50% storage space compared to H.265 systems.
- Pre-installed 1TB HDD: Security-grade hard drive for continuous surveillance recording. Expandable up to 14TB via SATA port.
- การเข้าถึงระยะไกล: View and manage your system remotely using the free iCSee App (iOS/Android) or VMS Client (Windows/Mac).
- การตรวจจับการเคลื่อนไหวอัจฉริยะ: Receive mobile push notifications for detected motion types, including person and face detection.
- การตั้งค่าแบบปลั๊กแอนด์เพลย์: Easy connection with simultaneous VGA/HDMI output.
2. การตั้งค่าและการติดตั้ง
2.1 อะไรอยู่ในกล่อง
ก่อนที่คุณจะเริ่มต้น โปรดตรวจสอบให้แน่ใจว่ามีส่วนประกอบทั้งหมดครบถ้วน:
- 1x A1008 8CH DVR
- 1x 1TB HDD (Pre-installed on DVR)
- 1x DVR Power Adapter
- เมาส์ USB 1x
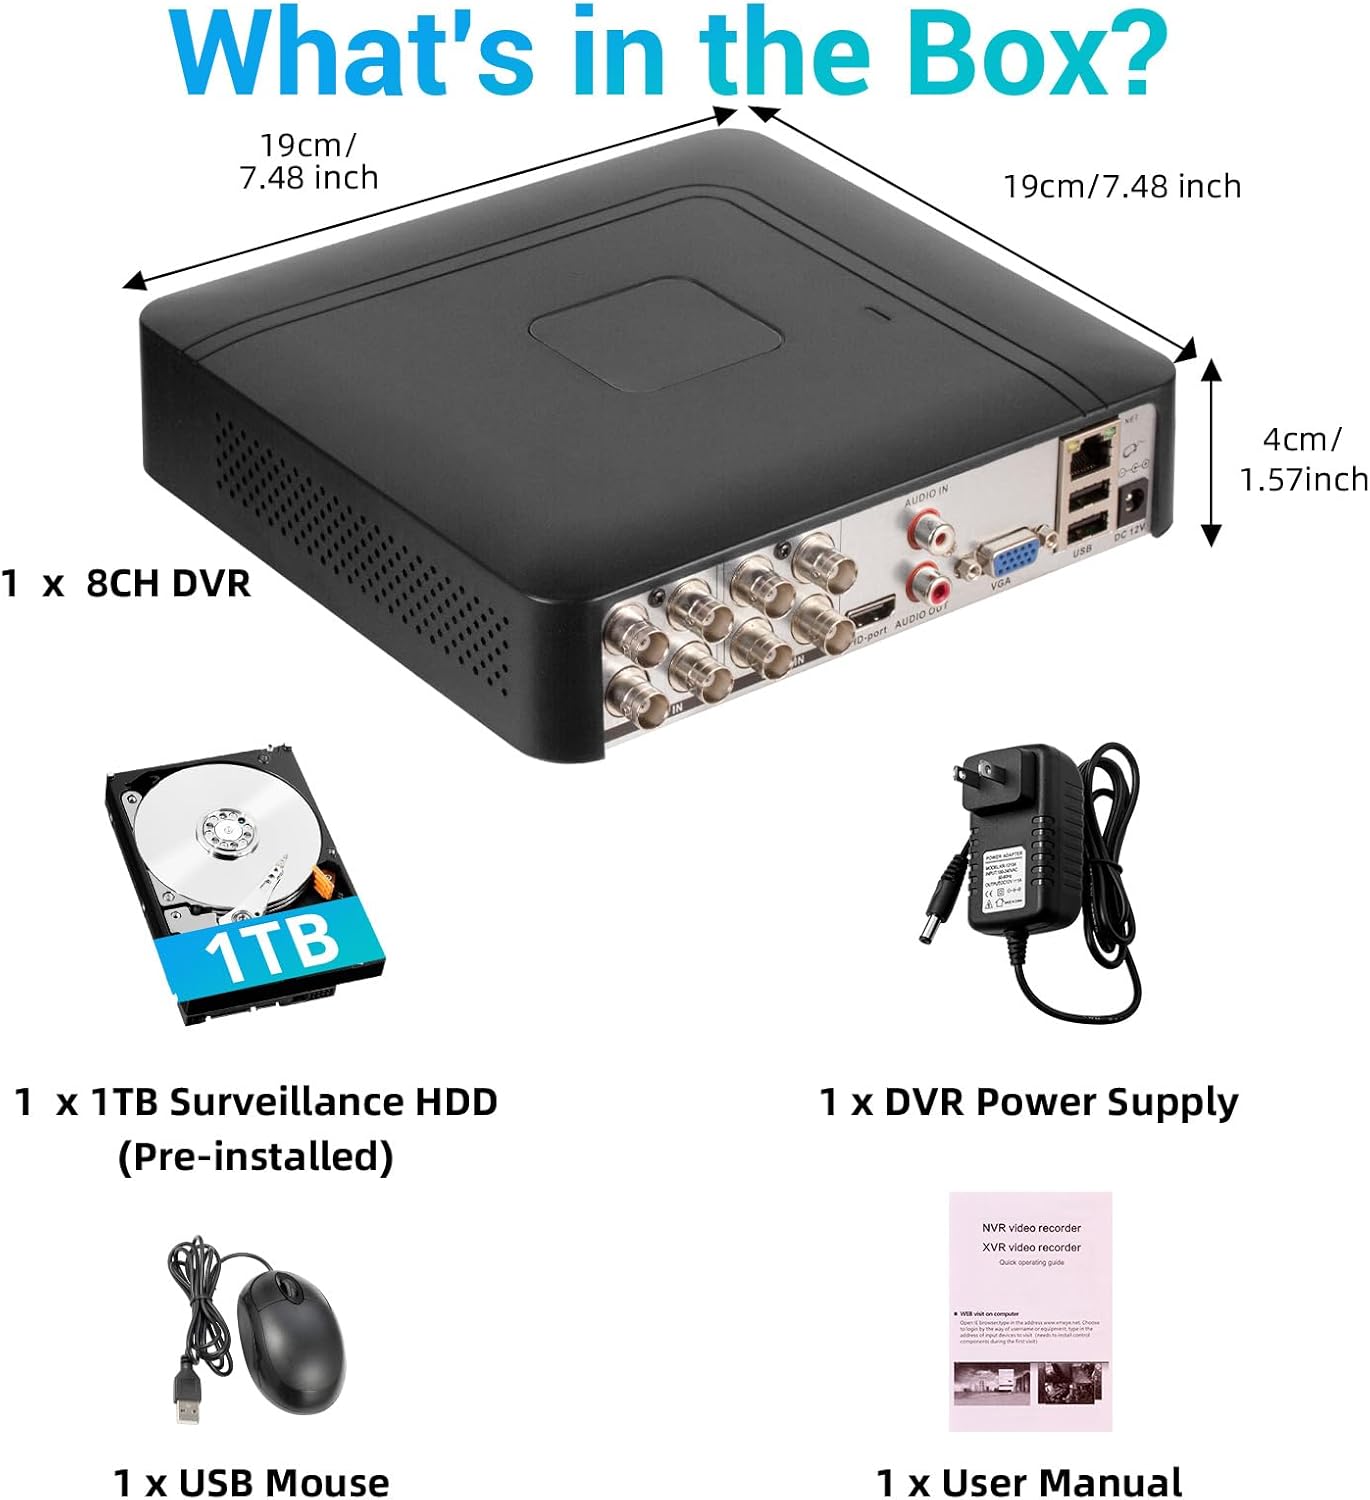
ภาพที่ 2.1: สิ่งของภายในบรรจุภัณฑ์ของผลิตภัณฑ์
2.2 Hard Drive Installation (if not pre-installed or for upgrade)
The DVR comes with a pre-installed 1TB HDD. If you need to replace or upgrade the hard drive (up to 14TB), follow these steps:
- Unscrew the bottom cover of the DVR unit.
- เปิดฝาอย่างระมัดระวังasing.
- Connect the SATA data cable and power cable from the DVR to the new hard drive.
- Secure the hard drive within the casing using the provided screws.
- Close the DVR casinและยึดให้แน่นด้วยสกรู

Image 2.2: Hard drive installation and expansion options.
2.3 Connecting the DVR System
ปฏิบัติตามขั้นตอนเหล่านี้เพื่อเชื่อมต่อระบบ DVR ของคุณ:
- เชื่อมต่อกล้อง: Connect your security cameras to the 'VIDEO IN' ports on the back of the DVR using BNC cables.
- เชื่อมต่อจอภาพ: เชื่อมต่อจอภาพเข้ากับเครื่องบันทึกวิดีโอ (DVR) โดยใช้พอร์ต HDMI หรือ VGA ก็ได้
- เชื่อมต่อเมาส์ USB: เสียบเมาส์ USB ที่ให้มาเข้ากับพอร์ต USB พอร์ตใดพอร์ตหนึ่งบนเครื่องบันทึกวิดีโอ (DVR)
- เชื่อมต่อเครือข่าย (ไม่บังคับสำหรับการเข้าถึงระยะไกล): สำหรับรีโมท viewing and notifications, connect an Ethernet cable from your router to the 'NET' port on the DVR.
- เปิดเครื่อง: Connect the DVR power adapter to the 'DC 12V' port and then plug it into a power outlet.

Image 2.3: Connecting cameras and network to the DVR.
2.4 Initial Setup and Channel Type Selection
Upon first power-on, the system may prompt for initial setup. You may need to select the appropriate channel type for your cameras.
- Right-click on the screen to access the Main Menu.
- นำทางไปที่ ระบบ > ดิจิตอล > ประเภทช่องทาง.
- Select the configuration that matches your camera setup:
- First row: Supports 8 XVI, CVBS, AHD, TVI, CVI coaxial cameras.
- Second row: Supports 8 XVI, CVBS, AHD, TVI, CVI coaxial + 4 IP cameras.
- Third row: Supports 16 1080P IP cameras.
- Fourth row: Supports 16 5MP IP cameras.
- คลิก OK to apply changes. The system may restart.

Image 2.4: DVR Channel Type selection screen.
3. คู่มือการใช้งาน
3.1 สด View และการบันทึก
Once the DVR is powered on and cameras are connected, you should see the live feed on your connected monitor. The system is configured for 24/7 recording to the pre-installed 1TB hard drive.

ภาพที่ 3.1: สด view of multiple camera feeds.
3.2 การเข้าถึงระยะไกลผ่านแอปพลิเคชันบนมือถือ
To access your DVR remotely, download the free iCSee App (for iOS/Android) or VMS Client (for Windows/Mac).
- Download the iCSee App from your device's app store.
- เปิดแอปพลิเคชันและลงทะเบียนบัญชีหากคุณยังไม่มีบัญชี
- In the DVR's main menu, navigate to ข้อมูล > เวอร์ชัน to find the DVR's QR code.
- Use the iCSee app to scan the QR code to add your device.
- เมื่อเพิ่มแล้วคุณสามารถ view ฟีดสด การเล่นซ้ำบันทึก และรับการแจ้งเตือนจากทุกที่ที่มีการเชื่อมต่ออินเทอร์เน็ต

Image 3.2: Steps for remote access via mobile app.
3.3 Playback Recorded Footage
เพื่อview วิดีโอที่บันทึกไว้:
- Right-click on the screen to access the Main Menu.
- เลือก บันทึก > เล่น.
- Choose the desired channel(s) and date/time range for playback.
- คลิก เริ่มเล่น ถึง view ฟูtage.

Image 3.3: Playback interface with timeline.
3.4 การแจ้งเตือนการตรวจจับการเคลื่อนไหว
The DVR supports intelligent motion detection, including person and face detection. When motion is detected, you can receive instant mobile push notifications.
- Configure motion detection settings in the DVR's เตือน เมนู.
- Ensure your mobile app is properly linked and notifications are enabled.

Image 3.4: Human and face detection in action.
4. การบำรุงรักษา
4.1 การจัดการฮาร์ดไดรฟ์
The pre-installed 1TB hard drive provides ample storage. Due to H.265+ compression, storage is optimized. If more storage is needed, you can replace the internal HDD with a larger one (up to 14TB). Regularly check the hard drive status in the DVR's system settings to ensure optimal performance.
4.2 การดูแลทั่วไป
- Keep the DVR in a cool, dry, and well-ventilated area.
- Avoid exposing the unit to direct sunlight, extreme temperatures, or moisture.
- Clean the exterior of the DVR with a soft, dry cloth. Do not use liquid cleaners.
- ตรวจสอบให้แน่ใจว่าการเชื่อมต่อสายเคเบิลทั้งหมดนั้นปลอดภัย
5 การแก้ไขปัญหา
5.1 ไม่มีสัญญาณภาพออกทางจอภาพ
- Check if the DVR is powered on and the power adapter is securely connected.
- Verify the HDMI or VGA cable connection between the DVR and the monitor.
- Ensure the monitor is set to the correct input source (HDMI/VGA).
5.2 กล้องไม่แสดงผล
- Check all camera power and video cable connections.
- Verify that the camera type (AHD, TVI, CVI, etc.) is compatible with the DVR.
- Ensure the correct channel type is selected in the DVR settings (refer to Section 2.4).
- Test cameras individually if possible to isolate the issue.
5.3 การเข้าถึงระยะไกลไม่ทำงาน
- Confirm the DVR is connected to the internet via an Ethernet cable.
- ตรวจสอบการเชื่อมต่ออินเทอร์เน็ตของเราเตอร์ของคุณ
- Ensure the iCSee app is updated to the latest version.
- Verify that the DVR was added correctly to the app by scanning the QR code.
- For some networks, you might need to adjust router settings (e.g., port forwarding), consult your network administrator or ISP.
6. ข้อมูลจำเพาะ
| คุณสมบัติ | รายละเอียด |
|---|---|
| ยี่ห้อ | Fuers |
| หมายเลขรุ่น | A1008ชช |
| จำนวนช่องสัญญาณ | 8 |
| เทคโนโลยีการเชื่อมต่อ | HDMI, USB, VGA |
| อุปกรณ์ที่รองรับ | Desktop, Tablet, Camera, Smartphone |
| ขนาดสินค้า | ยาว 7.48 นิ้ว x กว้าง 7.48 นิ้ว x สูง 1.57 นิ้ว |
| ความจุของหน่วยความจำ | 1 เทราไบต์ (ติดตั้งมาแล้ว) |
| Hard-Drive Size | 1 TB (Expandable up to 14 TB) |
| รูปแบบสื่อ วิดีโอดิจิตอล | H.265 + |
| อินพุตวิดีโอ | AHD, CVI, HDMI, HDTVI, IP Input, VGA |
| ยูพีซี | 765142240850 |
7. การรับประกันและการสนับสนุน
7.1 การรับประกันสินค้า
This Fuers DVR Recorder is covered by a standard manufacturer's warranty. Please refer to the warranty card included with your product or visit the official Fuers webดูรายละเอียดเงื่อนไขและข้อกำหนดการรับประกันได้ที่เว็บไซต์ โปรดเก็บใบเสร็จรับเงินไว้เป็นหลักฐานสำหรับการเคลมประกัน
7.2 การสนับสนุนด้านเทคนิค
For technical assistance, troubleshooting, or any questions regarding your Fuers DVR, please contact Fuers customer support. Contact information can typically be found on the product packaging, the official Fuers webไซต์หรือผ่านผู้ค้าปลีกของคุณ
แหล่งข้อมูลออนไลน์:
- เยี่ยมชม Fuers Store on Amazon สำหรับข้อมูลผลิตภัณฑ์และการอัพเดท