1. บทนำ
This manual provides essential information for the safe and efficient operation of your TOPBULL 40A MPPT Solar Charge Controller. This device is designed to optimize power harvesting from your solar panels and efficiently charge various battery types in 12V or 24V systems. It features advanced Maximum Power Point Tracking (MPPT) technology, comprehensive protection functions, and a user-friendly LCD interface.

ภาพที่ 1: ด้านหน้า view of the TOPBULL 40A MPPT Solar Charge Controller, showing the LCD display and control buttons.
2. คำแนะนำด้านความปลอดภัย
Please read all safety instructions carefully before installation and operation. Failure to follow these instructions may result in personal injury or damage to the controller or other components.
- ตรวจสอบให้แน่ใจว่าการเชื่อมต่อทั้งหมดถูกต้องและแน่นหนาดีแล้วก่อนที่จะจ่ายไฟ
- Do not disassemble or attempt to repair the controller. Refer to qualified personnel for service.
- ติดตั้งตัวควบคุมในบริเวณที่มีอากาศถ่ายเทสะดวก และห่างจากวัสดุไวไฟและความชื้น
- ควรต่อแบตเตอรี่เข้ากับตัวควบคุมก่อนเสมอ จากนั้นจึงต่อกับแผงโซลาร์เซลล์ และสุดท้ายจึงต่อกับอุปกรณ์ที่รับโหลด และเมื่อจะถอดออกก็ควรทำในลำดับย้อนกลับ
- Wear appropriate personal protective equipment, including eye protection, when working with batteries and electrical systems.
- The controller includes multiple electronic protections such as reverse polarity, overcharge, over-discharge, overload, short-circuiting, TVS lightning, overpower, reverse current, and overtemperature protection. However, proper installation is crucial for optimal safety.
3. เนื้อหาบรรจุภัณฑ์
ตรวจสอบว่ามีรายการทั้งหมดอยู่ในแพ็คเกจ:
- TOPBULL 40A MPPT Solar Charge Controller
- สกรูยึด
- คู่มือการใช้งาน (เอกสารนี้)

Image 2: Contents of the product package, showing the controller, user manual, and mounting hardware.
4. สินค้าหมดview
The TOPBULL 40A MPPT Solar Charge Controller features a clear LCD display and intuitive buttons for monitoring and configuration. It is equipped with terminals for solar panel input, battery connection, DC load output, and dual USB ports.
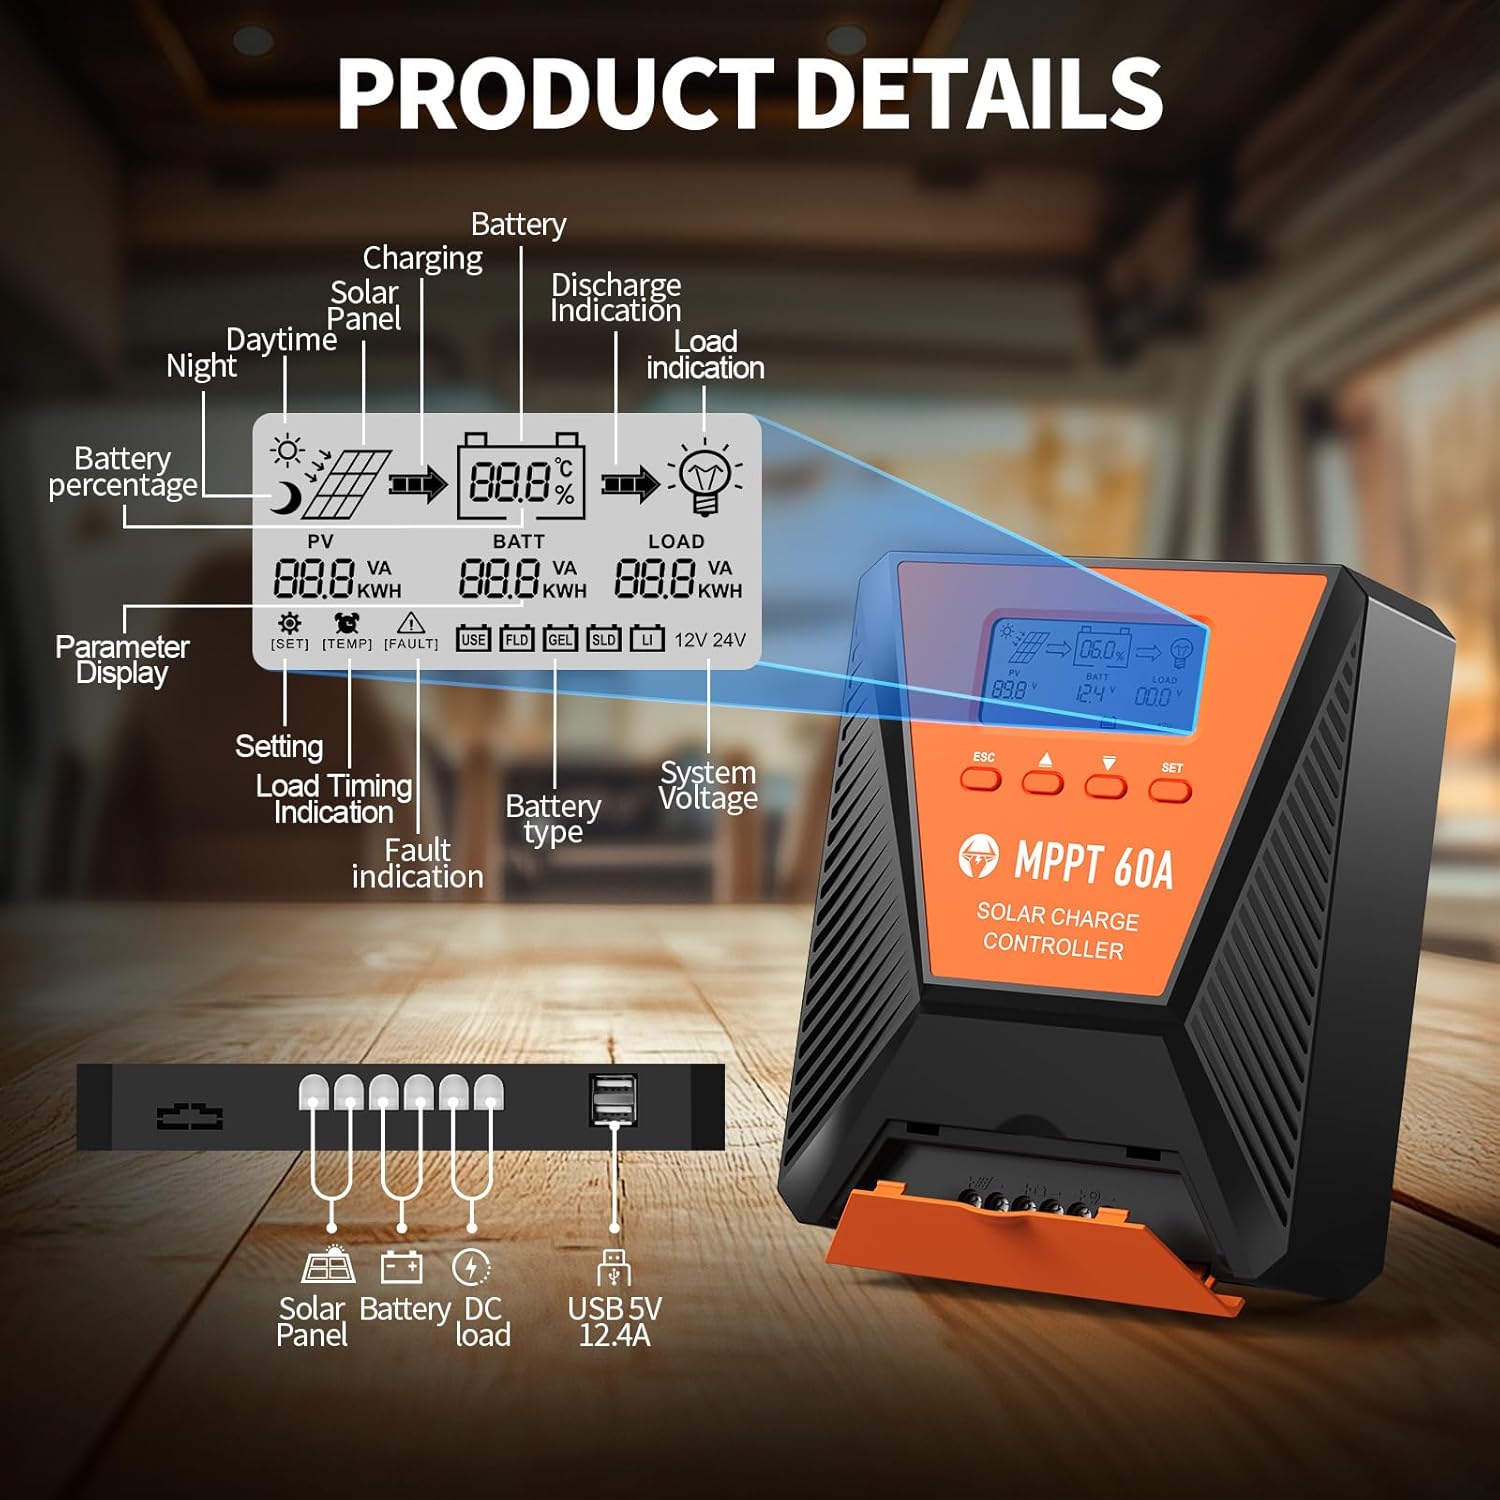
ภาพที่ 3: รายละเอียด view of the controller's LCD display, showing various indicators and parameters, along with the connection ports at the bottom.
ตัวบ่งชี้บนหน้าจอ LCD:
- พีวี: แผงโซลาร์เซลล์ฉบับtage และอำนาจ
- แบต: ปริมาณแบตเตอรี่tage, charge status, and type.
- โหลด: Load status and power.
- เปอร์เซ็นต์แบตเตอรี่tage: Current battery charge level.
- Charging/Discharge Indication: Arrows indicating power flow.
- บ่งชี้ความผิดปกติ: Error codes displayed if issues occur.
- เล่มระบบtage: Automatically detected 12V or 24V.
ปุ่มควบคุม:
- เอสซีเอส: Exit menu or cancel setting.
- ลูกศรขึ้น/ลง: Navigate menus or adjust values.
- SET: Enter menu or confirm setting.
5. การตั้งค่าและการติดตั้ง
โปรดทำตามขั้นตอนเหล่านี้เพื่อติดตั้งตัวควบคุมการชาร์จพลังงานแสงอาทิตย์อย่างถูกต้อง:
- การติดตั้ง: Choose a suitable location for the controller, ensuring adequate ventilation and protection from direct sunlight, high temperatures, and moisture. Use the provided mounting screws to secure the controller.
- การเชื่อมต่อแบตเตอรี่: Connect the battery to the controller's battery terminals first. Ensure correct polarity (positive to positive, negative to negative). The controller will automatically detect the 12V or 24V system voltage.
- การเชื่อมต่อแผงโซลาร์เซลล์: Connect the solar panel to the controller's solar input terminals. Ensure correct polarity. The controller will begin charging the battery.
- DC Load Connection (Optional): Connect your DC loads to the load terminals. Ensure correct polarity.

Image 4: Connection diagram illustrating how to connect the solar panel, battery bank, inverter (for AC load), and DC load to the MPPT controller.
The controller supports various deep cycle battery types, including FLD, LiFePO4, SLD, GEL, and AGM. It also supports 0V lithium battery charging (lithium battery activation function).

Image 5: The controller is compatible with various 12V/24V battery types, automatically identifying voltage and supporting custom parameters and 0V lithium battery charging.
6. คู่มือการใช้งาน
LCD Display and Parameter Settings:
The LCD display provides real-time information about your solar charging system. Use the four buttons (ESC, UP, DOWN, SET) to navigate menus and adjust parameters.
- กด ชุด เพื่อเข้าสู่เมนูหลัก
- ใช้ ขึ้น/ลง to scroll through options such as battery type, load timer settings, and other customizable parameters.
- กด ชุด again to select an option and then use ขึ้น/ลง เพื่อเปลี่ยนค่า
- กด ชุด to confirm changes, or เอสซีเอส เพื่อออกโดยไม่บันทึก
กระบวนการชาร์จ:
The controller utilizes a smart 4-stage charging process to optimize battery health and longevity:
- การเรียกเก็บเงินจำนวนมาก: การชาร์จเร็วเพื่อชาร์จแบตเตอรี่ให้มีความจุประมาณ 80%
- ค่าการดูดซึม: Charging at a constant voltage to bring the battery to 100% capacity.
- ค่าลอย: Maintaining the battery at full charge with a lower voltage.
- Equalization Charge (for specific battery types): Periodically overcharging to balance cell voltagใช่
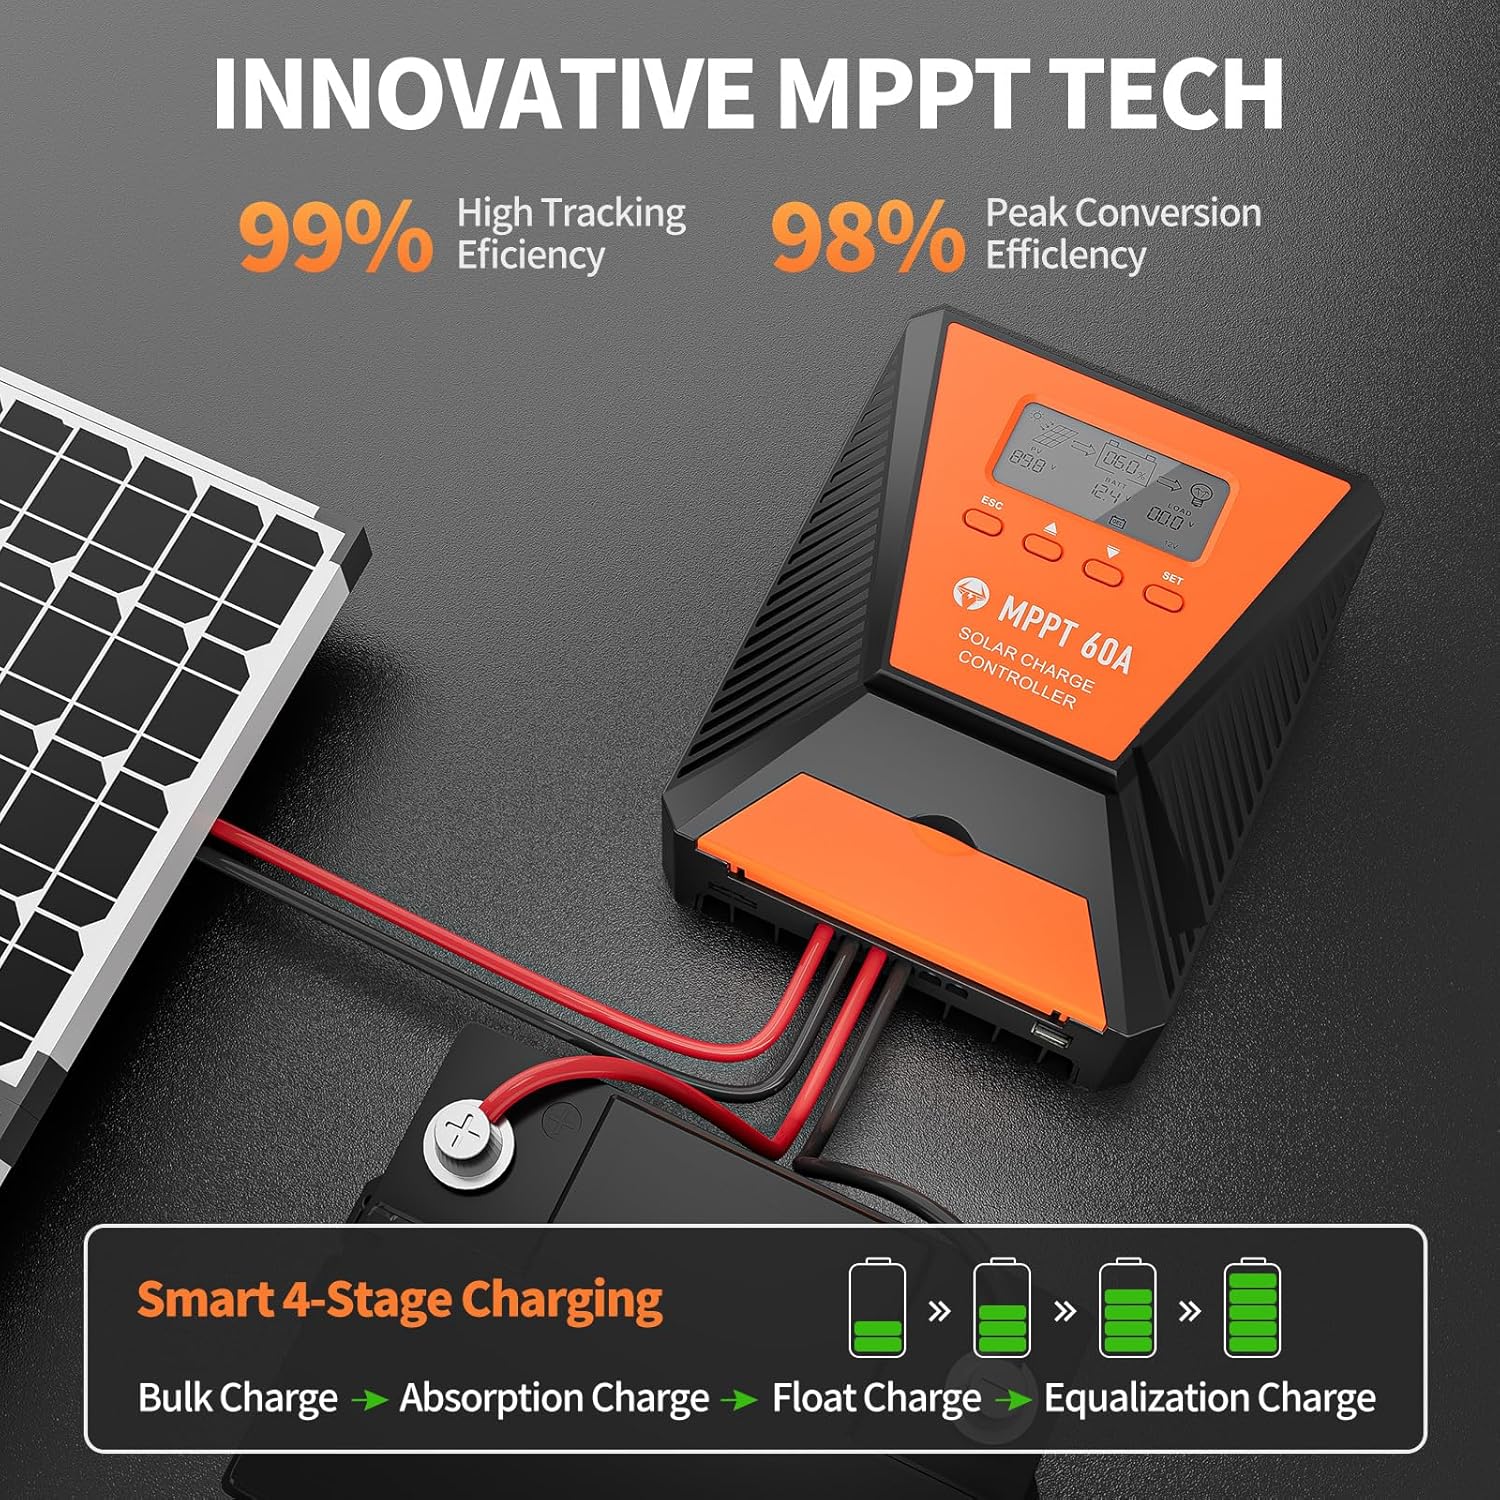
Image 6: The controller features 99% high tracking efficiency and 98% peak conversion efficiency, along with a smart 4-stagกระบวนการชาร์จไฟฟ้า
การชาร์จ USB:
The controller includes dual USB ports for charging electronic devices. These ports provide 5V DC output.
7. การบำรุงรักษา
Regular maintenance ensures optimal performance and extends the lifespan of your solar charge controller and battery system.
- ตรวจสอบการเชื่อมต่อ: ตรวจสอบการเชื่อมต่อสายไฟทั้งหมดเป็นระยะๆ เพื่อดูความแน่นหนาและการกัดกร่อน
- ตัวควบคุมที่สะอาด: รักษาตัวควบคุมให้สะอาด ปราศจากฝุ่นและเศษขยะ ใช้ผ้าแห้งเช็ดทำความสะอาด
- การระบายอากาศ : Ensure the installation area remains well-ventilated to prevent overheating. The controller is designed with a metal case and dual high-speed intelligent fans for enhanced heat dissipation.
- การตรวจสอบแบตเตอรี่: โปรดปฏิบัติตามคำแนะนำในการบำรุงรักษาของผู้ผลิตสำหรับแบตเตอรี่ประเภทเฉพาะของคุณ
- การชดเชยอุณหภูมิ: The controller features a temperature compensation function that automatically adjusts charging and discharging parameters to prolong battery life.
8 การแก้ไขปัญหา
If you encounter issues with your controller, refer to the LCD display for error codes and consult the following common troubleshooting steps:
- ไม่มีจอแสดงผล: ตรวจสอบการเชื่อมต่อแบตเตอรี่และตรวจสอบให้แน่ใจว่าแบตเตอรี่มีกำลังไฟเพียงพอtage.
- ไม่มีการชาร์จ: Verify solar panel connections and ensure adequate sunlight. Check for any fault indications on the LCD.
- โหลดไม่ทำงาน: Check load connections and ensure the load is within the controller's rated capacity. Verify load timer settings.
- รหัสข้อผิดพลาด: The LCD display will show specific error codes for various issues (e.g., overvoltage, อันเดอร์โวลtage, overtemperature, short circuit). Refer to the controller's internal error code list (if provided in a separate document) for detailed explanations and solutions.
The controller incorporates 9 intelligent protection features to safeguard your system:
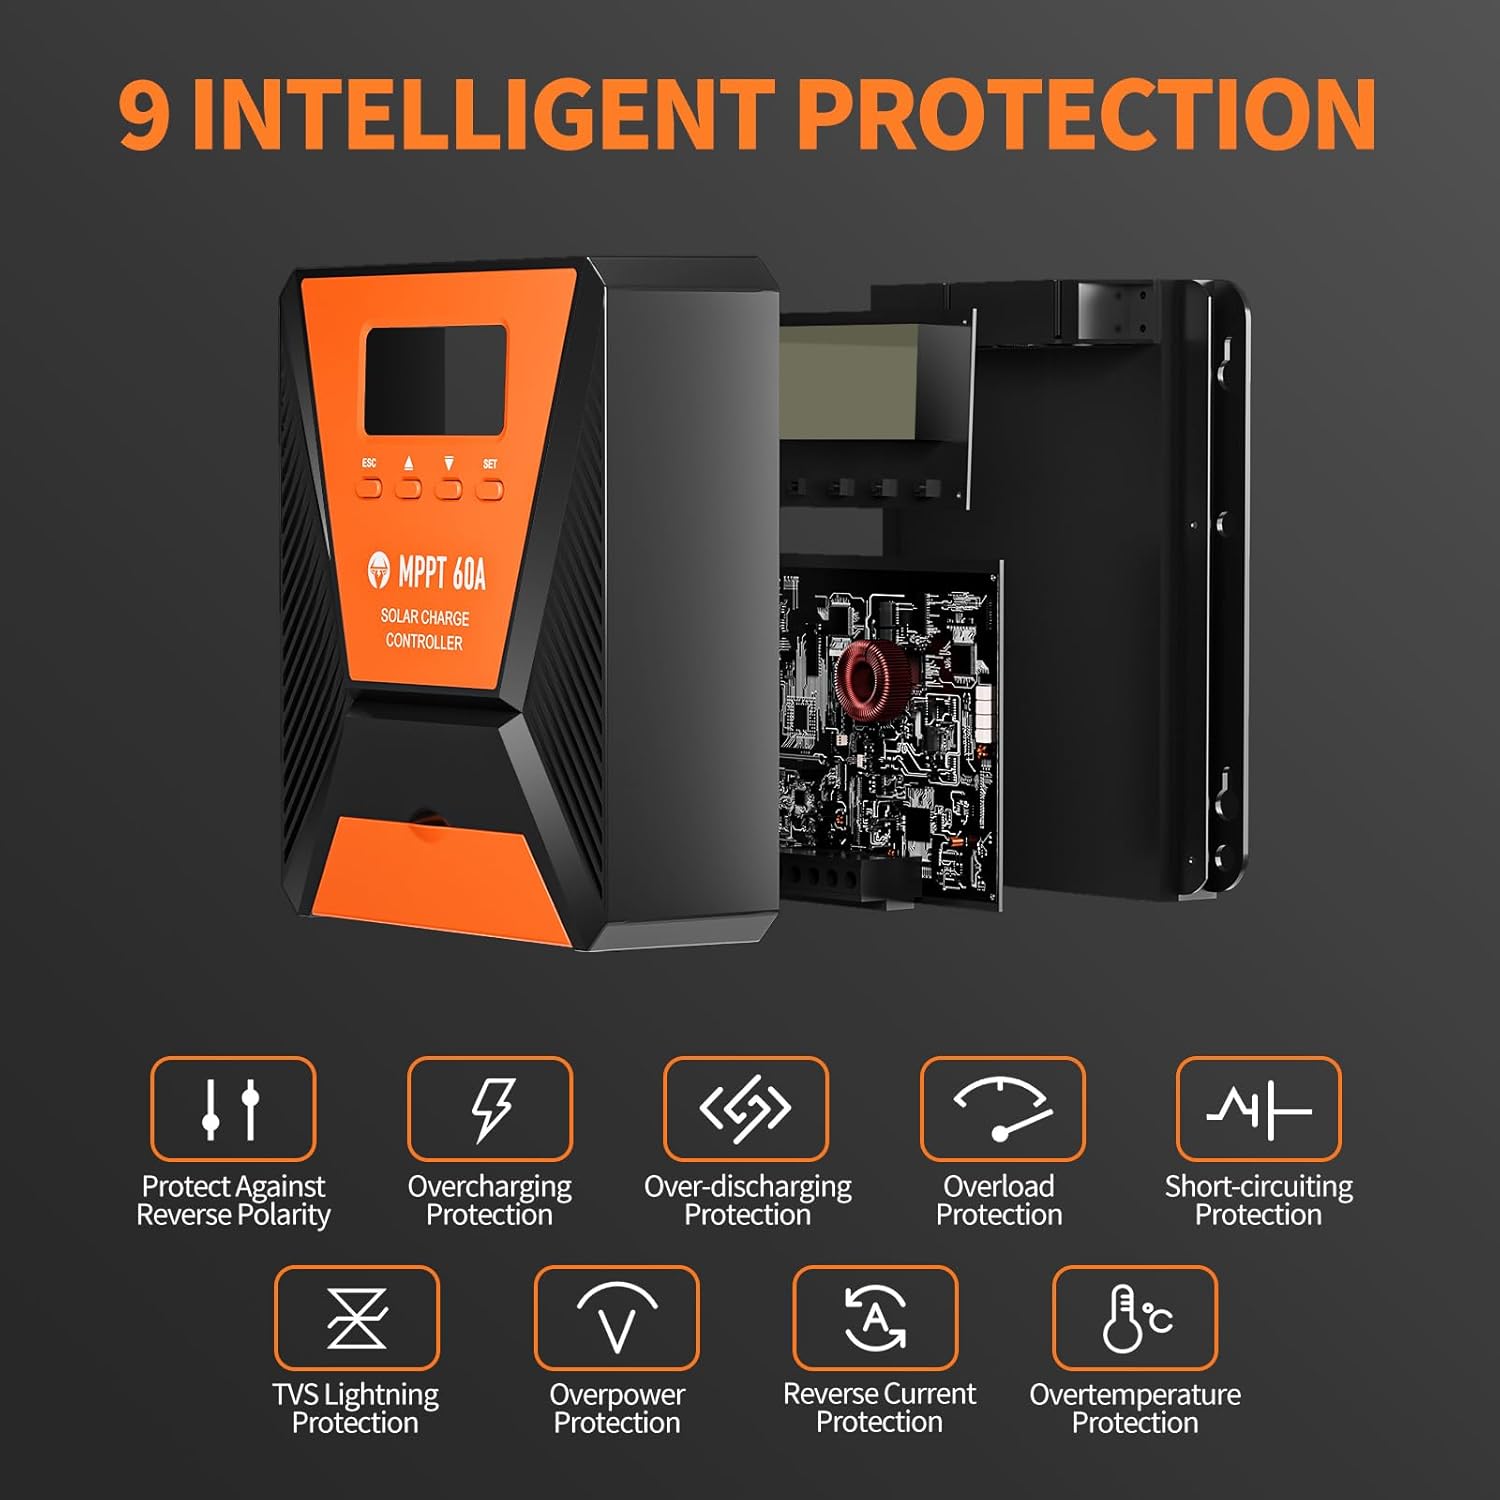
Image 7: The controller provides 9 intelligent protection features, including protection against reverse polarity, overcharging, over-discharging, overload, short-circuiting, TVS lightning, overpower, reverse current, and overtemperature.
9. ข้อมูลจำเพาะ
| คุณสมบัติ | ข้อมูลจำเพาะ |
|---|---|
| แบบอย่าง | 40เอ |
| ยี่ห้อ | ท็อปบูล |
| เล่มระบบtage | 12V/24V Automatic Recognition |
| ประสิทธิภาพการติดตาม | มากกว่า 99% |
| ประสิทธิภาพการแปลงสูงสุด | สูงสุด 98% |
| ประเภทแบตเตอรี่ที่เข้ากันได้ | FLD, LiFePO4, SLD, GEL, AGM |
| อินพุต PV สูงสุด Voltage | กระแสตรง 100 โวลต์ |
| Max Solar Input Power (12V System) | 720วัตต์ |
| Max Solar Input Power (24V System) | 1440วัตต์ |
| เอาท์พุต USB | Dual USB Ports, 5V DC |
| ประเภทจอภาพ | จอแอลซีดี |
| ขนาด (แพ็คเกจ) | 23.6 x 22.1 x 10.59 ซม. |
| น้ำหนัก (แพ็คเกจ) | 1.25 กก. |
| อุปกรณ์เสริมที่รวมอยู่ด้วย | สกรูยึด |
10. การรับประกันและการสนับสนุน
TOPBULL is committed to providing professional technical support. If you have any questions or require assistance with your MPPT solar charge controller, please contact our customer service. We strive to meet your needs and provide the best possible support.