
3.2 Cu ft Two Door Mini Fridge with Freezer
Arctic King 3.2 Cu ft Two Door Mini Fridge with Freezer
คู่มือการใช้งาน
1. บทนำ
ขอบคุณสำหรับการซื้อasing the Arctic King 3.2 Cu ft Two Door Mini Fridge with Freezer. This compact refrigerator is designed for convenience and efficiency, offering separate compartments for refrigeration and freezing. Please read this manual thoroughly before operating your new appliance to ensure safe and proper use, and keep it for future reference.
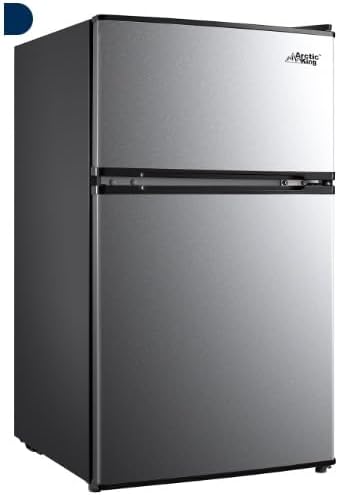
รูปที่ 1.1: ด้านหน้า view of the Arctic King 3.2 Cu ft Two Door Mini Fridge with Freezer in Stainless Steel finish.
2. ข้อมูลด้านความปลอดภัยที่สำคัญ
เพื่อลดความเสี่ยงจากไฟไหม้ไฟฟ้าช็อตหรือการบาดเจ็บเมื่อใช้ตู้เย็นให้ปฏิบัติตามข้อควรระวังพื้นฐานเหล่านี้:
- อ่านคำแนะนำทั้งหมดก่อนใช้เครื่องใช้ไฟฟ้า
- อันตราย: ความเสี่ยงที่เด็กจะเข้าไปติดได้ ก่อนทิ้งตู้เย็นหรือช่องแช่แข็งเครื่องเก่า ควรถอดประตูออก ปล่อยให้ชั้นวางอยู่ที่เดิมเพื่อไม่ให้เด็กปีนเข้าไปข้างในได้ง่าย
- ห้ามทำความสะอาดชิ้นส่วนตู้เย็นด้วยของเหลวไวไฟ เนื่องจากไอระเหยอาจทำให้เกิดไฟไหม้หรือระเบิดได้
- ห้ามเก็บหรือใช้เชื้อเพลิง เช่น น้ำมันเบนซิน หรือไอระเหยและของเหลวไวไฟอื่นๆ ในบริเวณใกล้เคียงกับตู้เย็นนี้หรือตู้เย็นอื่นๆ ไอระเหยอาจก่อให้เกิดอันตรายจากไฟไหม้หรือการระเบิดได้
- ห้ามใช้เครื่องขณะที่มือเปียก
- ตรวจสอบให้แน่ใจว่าอุปกรณ์ต่อสายดินอย่างถูกต้อง
- ถอดปลั๊กตู้เย็นก่อนทำความสะอาดหรือซ่อมแซมใดๆ
- อย่าทำให้วงจรสารทำความเย็นเสียหาย
- เครื่องใช้ไฟฟ้าชิ้นนี้มีไว้สำหรับใช้ในครัวเรือนเท่านั้น
3. การตั้งค่าและการติดตั้ง
3.1 การแกะกล่อง
Carefully remove all packaging materials, including the foam base and adhesive tape. Inspect the refrigerator for any damage. Keep packaging materials until you are satisfied with the product's condition.
3.2 ที่ตั้ง
Choose a location with a strong, level floor capable of supporting the refrigerator when fully loaded. Avoid direct sunlight or heat sources. Allow at least 4 inches (10 cm) of space around the back and sides for proper ventilation.
3.3 การปรับระดับตู้เย็น
The refrigerator has adjustable leveling legs at the front. Use a wrench to turn the legs clockwise to raise the unit or counter-clockwise to lower it. Ensure the refrigerator is level to prevent vibrations and ensure proper door sealing.

รูปที่ 3.1: Detail of the adjustable leveling legs, allowing for easy placement on uneven surfaces.
3.4 การติดตั้งประตูแบบกลับด้าน
This refrigerator features a reversible door hinge, allowing the door to be installed to open from either the left or right side, depending on your preference and space requirements. Refer to the detailed instructions provided in the separate door reversal kit (if applicable) or contact customer support for guidance on this procedure.

รูปที่ 3.2: This image highlights key features including the reversible door hinge, allowing for flexible placement.
3.5 การเชื่อมต่อสายไฟ
Plug the refrigerator into a dedicated, grounded 115V, 60Hz AC outlet. Do not use extension cords or adapter plugs. Allow the refrigerator to stand upright for at least 2-4 hours before plugging it in to allow the refrigerant to settle.
4. การใช้งานตู้เย็นของคุณ
4.1 การควบคุมอุณหภูมิ
The temperature control dial is located inside the refrigerator compartment. Turn the dial to adjust the cooling intensity. Settings typically range from 1 (least cold) to 7 (coldest). Start with a medium setting (e.g., 4) and adjust as needed based on ambient temperature and food load.
4.2 คุณสมบัติภายใน
Your Arctic King mini fridge is equipped with several convenient features:
- ชั้นวางกระจกแบบปรับได้: The refrigerator compartment includes removable and adjustable glass shelves, allowing you to customize storage space for various items.
- ลิ้นชัก Crisper: A dedicated crisper drawer is provided for storing fruits and vegetables, helping to maintain their freshness.
- ที่เก็บประตู: The refrigerator door features multiple shelves, including a 2L bottle rack and a can dispenser, for convenient storage of beverages and smaller items.
- Separate Freezer Compartment: The top section is a dedicated freezer compartment for frozen foods. This is a manual defrost freezer.
- ไฟภายใน: An interior light illuminates the refrigerator compartment when the door is opened.

รูปที่ 4.1: ภายใน view แสดงasing the separate freezer, adjustable shelves, crisper drawer, and door storage with food items.
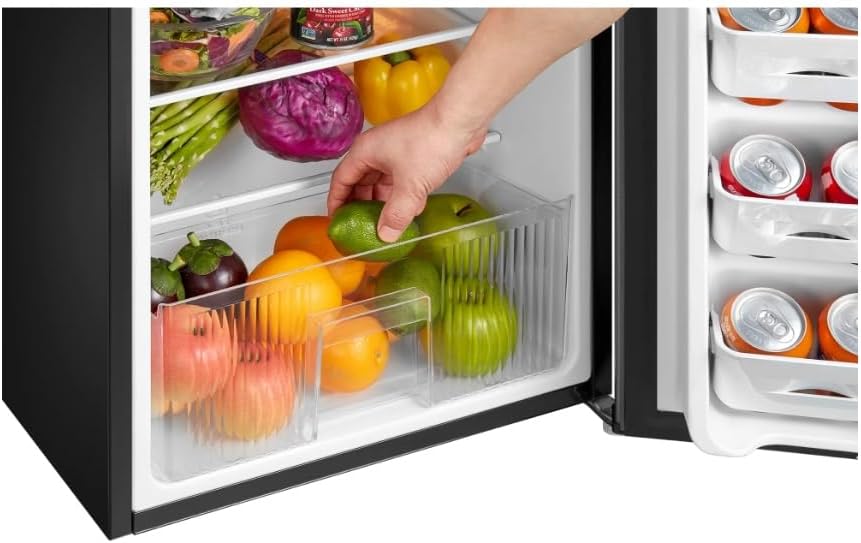
รูปที่ 4.2: A hand demonstrating access to the crisper drawer, ideal for fresh produce.
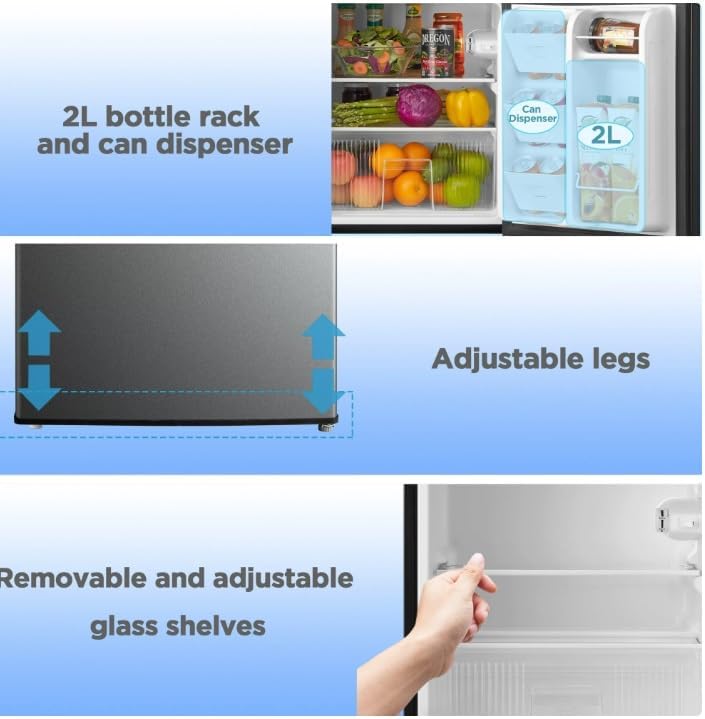
รูปที่ 4.3: This image highlights the 2L bottle rack, can dispenser, and the removable and adjustable glass shelves.
5. การดูแลรักษา
5.1 การทำความสะอาด
Always unplug the refrigerator before cleaning. Clean the interior and exterior surfaces regularly with a mild detergent and warm water. Wipe dry with a soft cloth. Do not use harsh chemicals, abrasive cleaners, or sharp objects.
5.2 การละลายน้ำแข็งในช่องแช่แข็ง
This refrigerator features a manual defrost freezer. When ice buildup on the freezer walls reaches about 1/4 inch (6 mm) thick, it's time to defrost.
- ถอดปลั๊กตู้เย็น
- นำอาหารทั้งหมดออกจากช่องแช่แข็งแล้วนำไปใส่ในกล่องเก็บความเย็น
- เปิดประตูช่องแช่แข็งทิ้งไว้เพื่อให้น้ำแข็งละลายเองตามธรรมชาติ คุณสามารถวางผ้าขนหนูไว้ด้านล่างเพื่อซับน้ำได้ ห้ามใช้ของมีคมหรืออุปกรณ์ให้ความร้อนเพื่อเร่งการละลายน้ำแข็ง
- Once defrosted, clean and dry the freezer interior thoroughly.
- เสียบปลั๊กตู้เย็นกลับเข้าไป และนำอาหารกลับเข้าไปเมื่ออุณหภูมิคงที่แล้ว
5.3 พลังงาน Outages
กรณีไฟดับtage, keep the refrigerator door closed to maintain the internal temperature for as long as possible. Most food will remain frozen for 1-2 days if the door is not opened frequently.
6. คำแนะนำการแก้ไขปัญหา
ก่อนที่จะติดต่อฝ่ายบริการ โปรดตรวจสอบปัญหาทั่วไปต่อไปนี้:
| ปัญหา | สาเหตุที่เป็นไปได้ | สารละลาย |
|---|---|---|
| ตู้เย็นไม่ทำงาน | ไม่ได้เสียบปลั๊ก; เบรกเกอร์ตัดวงจร; ตัวควบคุมอุณหภูมิถูกตั้งค่าเป็น "ปิด" | ตรวจสอบให้แน่ใจว่าเสียบปลั๊กแน่นดีแล้ว รีเซ็ตเบรกเกอร์วงจร และปรับปุ่มควบคุมอุณหภูมิไปที่ค่าที่ต้องการ |
| อุณหภูมิร้อนเกินไป | Door opened too frequently; large amount of warm food added; poor ventilation; temperature control set too low. | Minimize door openings; allow warm food to cool before placing in fridge; ensure adequate space around unit; adjust temperature control to a colder setting. |
| มีน้ำแข็งเกาะมากเกินไปในช่องแช่แข็ง | Freezer door not sealed properly; frequent door openings; high humidity. | Check door gasket for proper seal; reduce frequency of door openings; defrost as per instructions. |
| การทำงานที่มีเสียงดัง | Refrigerator not level; loose parts; normal operating sounds. | Level the unit using adjustable legs; check for loose items inside; gurgling/hissing sounds are normal refrigerant flow. |
7. ข้อมูลจำเพาะผลิตภัณฑ์
Below are the key specifications for your Arctic King Mini Fridge:
| คุณสมบัติ | รายละเอียด |
|---|---|
| ยี่ห้อ | ทั่วไป |
| แบบอย่าง | 3.2 Cu ft Two Door Mini Fridge with Freezer |
| ความจุ | 3.2 ลูกบาศก์ฟุต |
| การกำหนดค่า | ตู้แช่แข็งขนาดกะทัดรัดแบบวางด้านบน |
| ขนาดสินค้า (ลึก x กว้าง x สูง) | ลึก 18.5 นิ้ว x กว้าง 33.3 นิ้ว x สูง 19.4 นิ้ว |
| สี | สแตนเลส |
| จำนวนประตู | 2 |
| ระบบละลายน้ำแข็ง | คู่มือ |
| คุณสมบัติพิเศษ | Adjustable legs, Removable glass shelves, Reversible door, Separate Freezer, Thermostat Control |
| ประเภทการติดตั้ง | อิสระ |
| การจัดอันดับดาวของ BEE | 1 ดาว |

รูปที่ 7.1: Product dimensions: 18.5 inches deep, 19.4 inches wide, and 33.0 inches high.
8. การรับประกันและการสนับสนุนลูกค้า
For warranty information or technical support, please refer to the warranty card included with your product or contact the retailer or manufacturer directly. Please have your product model number and purchase date available when contacting support.
ผู้ผลิต: ทั่วไป
หากต้องการความช่วยเหลือเพิ่มเติม โปรดไปที่เว็บไซต์อย่างเป็นทางการของผู้ผลิต webไซต์หรือติดต่อสายบริการลูกค้า
Ask a question about this manual
Ask about setup, troubleshooting, compatibility, parts, safety, or missing instructions. Manuals+ will review the question and use this page’s manual context to help answer it.