การแนะนำ
This manual provides comprehensive instructions for the operation, maintenance, and troubleshooting of your JVSCAM C8 Digital Camera. Please read this manual thoroughly before using the camera to ensure proper functionality and to maximize your user experience. The JVSCAM C8 is a compact and portable digital camera designed for capturing high-quality photos and videos, featuring autofocus, digital zoom, and various creative filters.
มีอะไรอยู่ในกล่อง
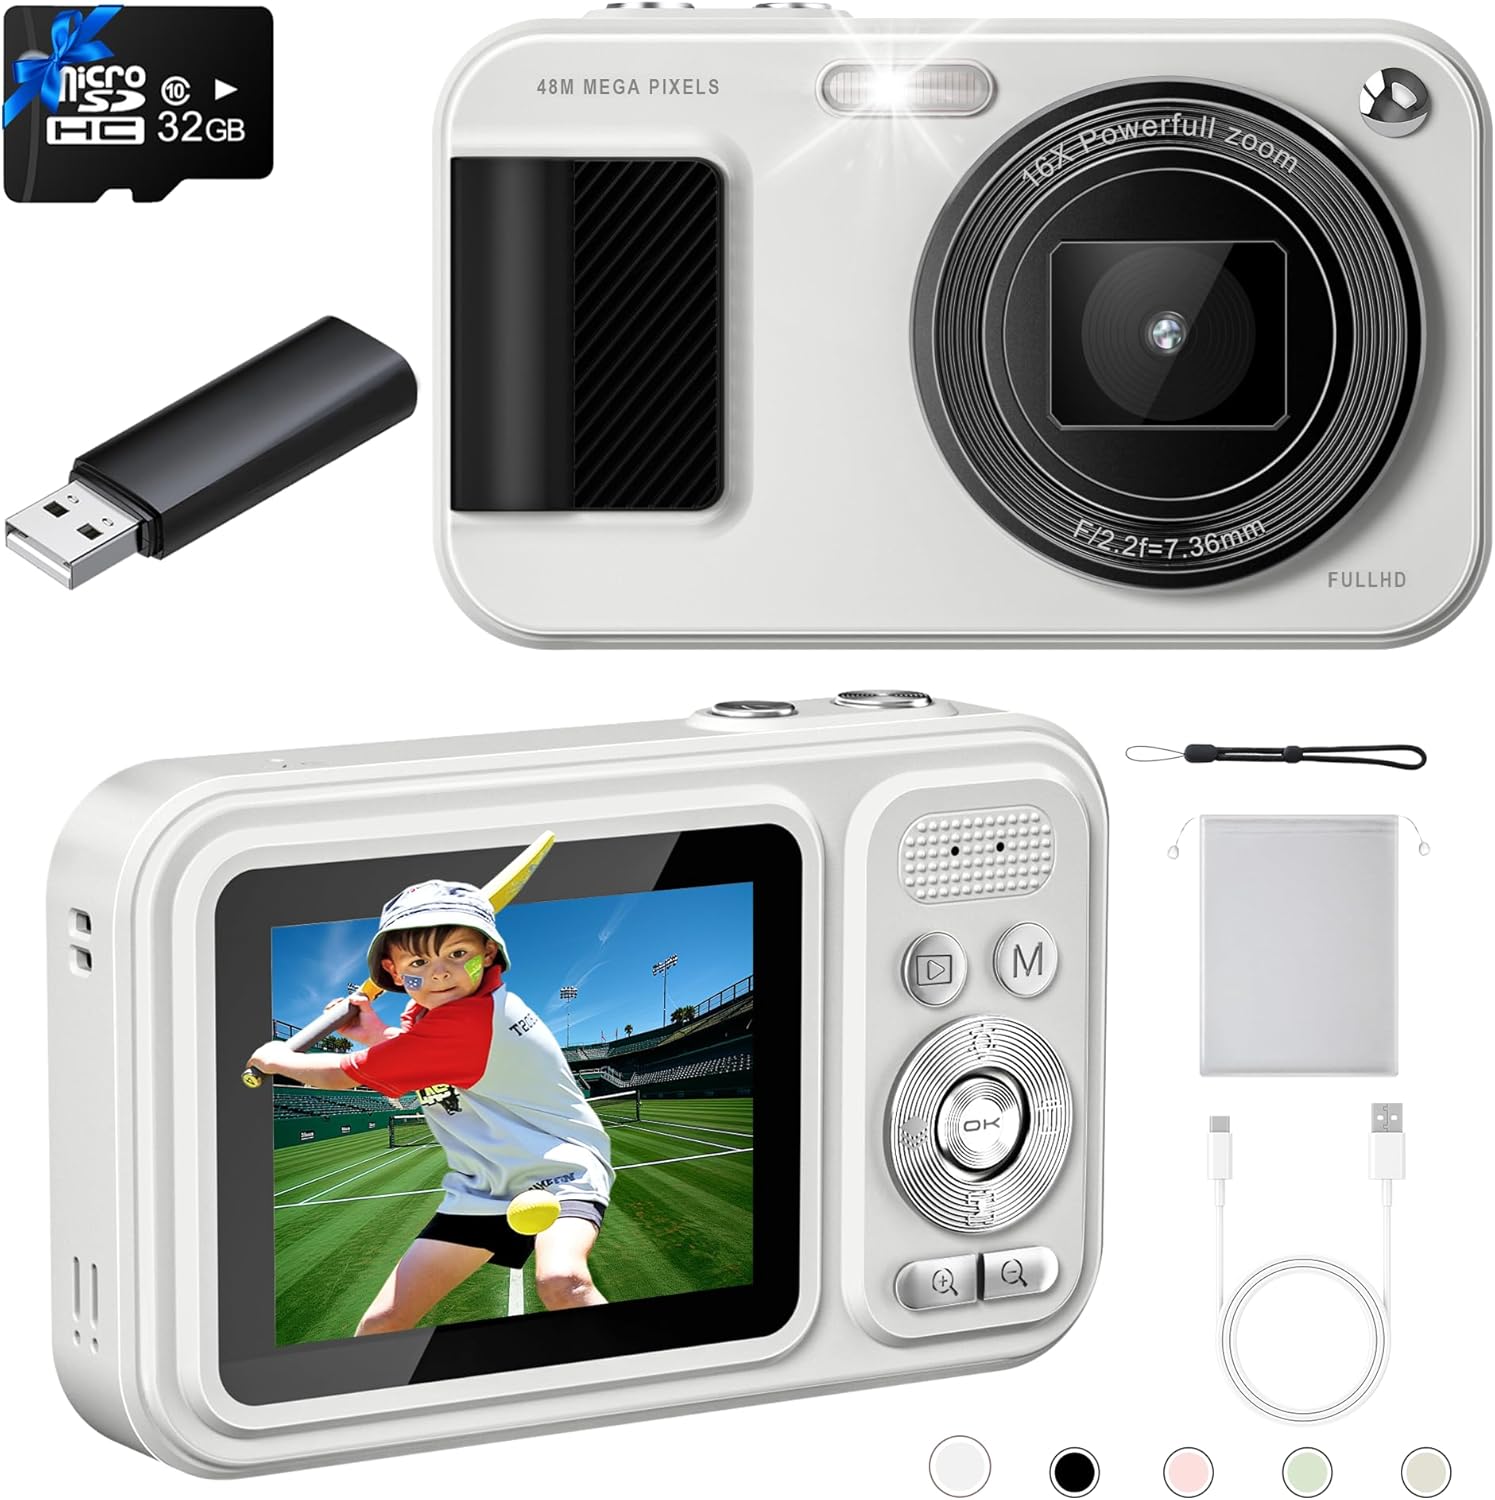
เมื่อเปิดบรรจุภัณฑ์ โปรดตรวจสอบว่าประกอบด้วยสิ่งของต่อไปนี้ทั้งหมด:
- JVSCAM C8 Digital Camera
- 32GB TF Card
- สาย USB Type-C
- เครื่องอ่านการ์ด
- สายคล้องคอ
- คู่มือการใช้งาน (เอกสารนี้)
- กระเป๋าเก็บของ
- ผ้าเลนส์

รูปที่ 1: Included accessories with the JVSCAM C8 Digital Camera, including the camera, 32GB TF card, Type-C cable, card reader, lanyard, and storage bag.
สินค้าเกินview
Familiarize yourself with the physical components of your camera:
รูปที่ 2: ด้านหน้าและด้านหลัง views of the JVSCAM C8 Digital Camera, showcasing the lens, flash, display screen, and control buttons.
ส่วนประกอบหลัก:
- เลนส์: จับภาพและวิดีโอ
- แฟลช: ให้แสงสว่างในสภาวะแสงน้อย
- หน้าจอแสดงผล: การแสดงสด view, เมนู และการเล่น
- ปุ่มควบคุม: Navigate menus, adjust settings, and operate functions.
- ปุ่มชัตเตอร์: เริ่มการถ่ายภาพหรือบันทึกวิดีโอ
- ไมโครโฟน: บันทึกเสียงระหว่างการบันทึกวิดีโอ
- พอร์ต USB (Type-C): สำหรับการชาร์จและถ่ายโอนข้อมูล
- ช่องเสียบการ์ดหน่วยความจำ: For inserting the 32GB TF card.
การตั้งค่า
1. การชาร์จแบตเตอรี่
The camera has a built-in 1500mAh rechargeable battery. Before first use, fully charge the camera.
- Connect the supplied Type-C USB cable to the camera's USB port.
- เชื่อมต่อปลายสายอีกด้านหนึ่งเข้ากับอะแดปเตอร์ไฟ USB (ไม่รวมอยู่ด้วย) หรือพอร์ต USB ของคอมพิวเตอร์
- ไฟแสดงสถานะการชาร์จจะสว่างขึ้น เมื่อชาร์จเต็มแล้ว ไฟจะเปลี่ยนหรือดับลง
- A full charge provides over 180 minutes of continuous shooting.

รูปที่ 3: The camera features a 1500mAh battery, supporting over 30,000 photos or 240 minutes of continuous video recording.
2. การใส่การ์ดหน่วยความจำ
The camera comes with a 32GB TF (MicroSD) card. Ensure it is properly inserted before use.
- ค้นหาช่องเสียบการ์ดหน่วยความจำที่ด้านข้างของกล้อง
- Insert the 32GB TF card into the slot with the gold contacts facing down, until it clicks into place.
- ในการถอด ให้ค่อยๆ ดันการ์ดเข้าไปด้านในจนกว่ามันจะเด้งออกมา
3. การติดสายคล้องคอ
Attach the included lanyard to prevent accidental drops.
- Thread the thin loop of the lanyard through the lanyard hole on the camera body.
- Pass the larger end of the lanyard through the loop and pull tight to secure.
คำแนะนำการใช้งาน
เปิด/ปิดเครื่อง
- To power on, press and hold the power button located on the top of the camera for a few seconds.
- หากต้องการปิดเครื่อง ให้กดปุ่มเปิด/ปิดค้างไว้จนกว่าหน้าจอจะดับลง
- Utilize the Auto-off function in settings to conserve battery life.
การถ่ายภาพ
- Power on the camera. The display will show the live view.
- โฟกัสอัตโนมัติ: Gently press the shutter button halfway down. The camera will automatically focus, indicated by the focus frame changing from red to green.
- Once focused, press the shutter button all the way down to capture the 48MP photo.

รูปที่ 4: The autofocus feature ensures clear images by adjusting the lens when the shutter button is half-pressed.
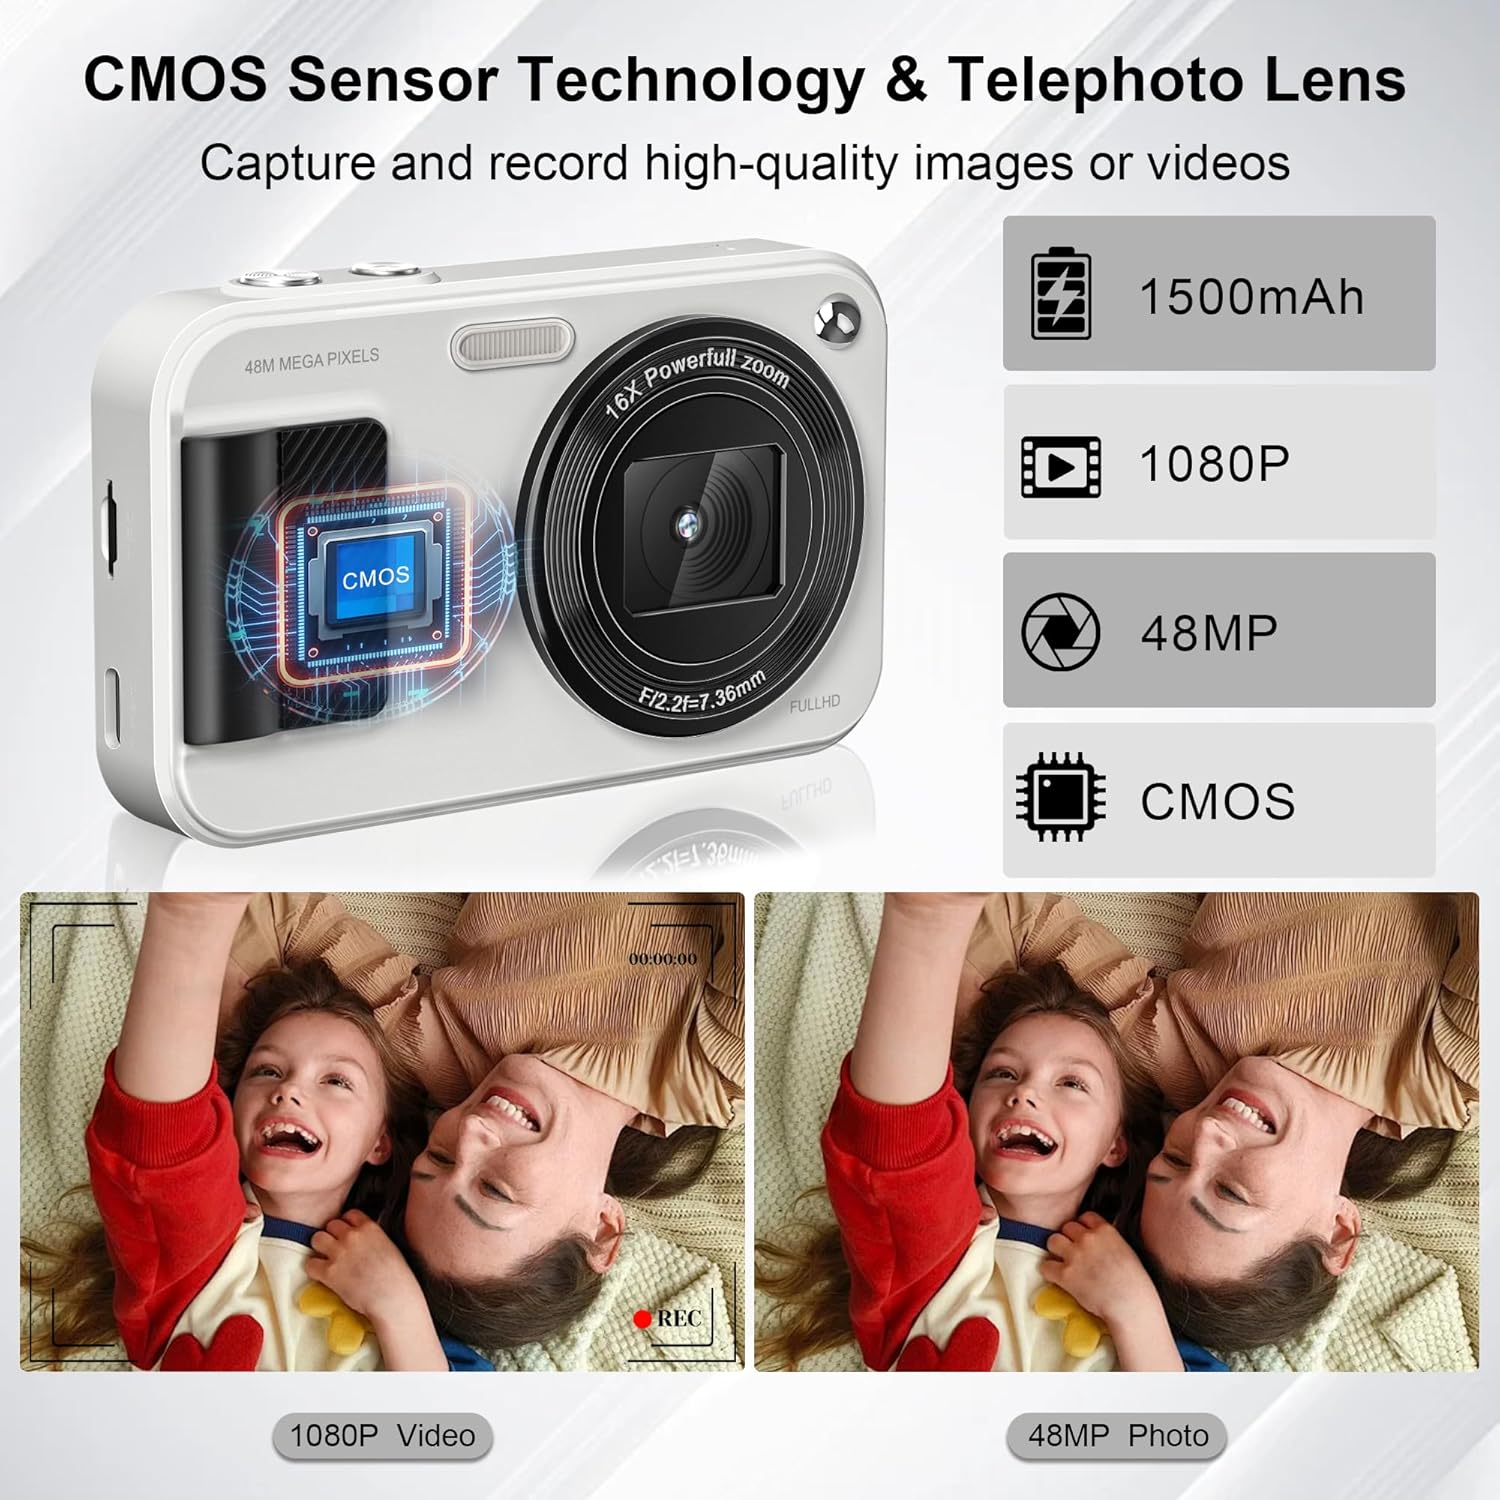
รูปที่ 5: Equipped with a CMOS image sensor and telephoto lens, the camera captures vivid 48MP photos and smooth 1080P videos.
การบันทึกวิดีโอ
- In camera mode, press the 'Mode' button (M) to switch to video recording mode.
- Press the shutter button to start recording FHD 1080P video. The recording indicator will appear on the screen.
- กดปุ่มชัตเตอร์อีกครั้งเพื่อหยุดการบันทึก
- The camera includes a built-in microphone for audio capture during videos.
ฟังก์ชั่นซูม
- Use the '+' and '-' buttons on the control pad to adjust the 16x digital zoom.
- Zoom in with '+' and zoom out with '-'.

รูปที่ 6: The camera offers 16x digital zoom for capturing distant subjects, anti-shake for stable images, and smile/face detection for optimal portraits.
คุณสมบัติพิเศษ
- 22 Filters: Access various filter effects through the menu to enhance your photos.
- ป้องกันการสั่น: This function helps reduce blur caused by camera movement.
- การตรวจจับรอยยิ้ม: The camera can automatically detect smiles and capture photos.
- Timed Shooting (Self-Timer): Set a delay (2s, 5s, 10s) before the photo is taken. Ideal for group shots.
- ถ่ายภาพต่อเนื่อง: Capture multiple photos in quick succession by holding down the shutter button.
- ไฟ LED ในตัว: Ensures clear photos even in low-light conditions. Activate via the control buttons.

รูปที่ 7: Utilize the self-timer for delayed shots (2s, 5s, 10s) and continuous shooting for capturing action sequences.

รูปที่ 8: Explore 22 built-in filter effects to add creative touches to your photos, and use the fill light for improved illumination.
Connecting to Computer (Transferring Files)
You can transfer photos and videos to your computer or phone using the provided card reader or Type-C cable.
- วิธีใช้เครื่องอ่านบัตร: Remove the TF card from the camera and insert it into the supplied card reader. Plug the card reader into your computer's USB port. The card will appear as a removable drive, allowing you to copy files.
- การใช้งานสาย Type-C: Connect the camera directly to your computer using the Type-C USB cable. The camera may appear as a removable disk or prompt you to select a connection mode (e.g., Mass Storage). Select the appropriate mode to access your files.
การซ่อมบำรุง
- การทำความสะอาด: Use the provided lens cloth to gently wipe the lens and screen. For stubborn smudges, use a specialized camera lens cleaning solution. Do not use abrasive materials or harsh chemicals.
- การดูแลแบตเตอรี่ To prolong battery life, avoid exposing the camera to extreme temperatures. Charge the battery regularly, even if the camera is not in frequent use.
- พื้นที่จัดเก็บ: When not in use, store the camera in the provided storage bag in a cool, dry place away from direct sunlight and moisture.
การแก้ไขปัญหา
| ปัญหา | สาเหตุที่เป็นไปได้ / วิธีแก้ไข |
|---|---|
| กล้องไม่สามารถเปิดได้ | Battery may be depleted. Charge the battery fully. Ensure the power button is pressed and held sufficiently. |
| ไม่สามารถถ่ายภาพ/วิดีโอได้ | Memory card may be full or not inserted correctly. Check card insertion or delete unnecessary files. Ensure sufficient battery charge. |
| ภาพมีความเบลอ | Ensure autofocus is engaged (shutter button half-pressed until green frame appears). Check for smudges on the lens and clean if necessary. Use anti-shake feature. |
| แฟลชไม่ทำงาน | Check flash settings in the menu; ensure it's set to 'On' or 'Auto'. |
| ไม่สามารถโอนได้ fileไปที่คอมพิวเตอร์ | Ensure the camera is connected properly via Type-C cable or the card reader is functioning. Try a different USB port or cable. Check computer's device manager for recognition. |
ข้อมูลจำเพาะ
| คุณสมบัติ | รายละเอียด |
|---|---|
| ความละเอียดของภาพ | 48 ล้านพิกเซล |
| ความละเอียดวิดีโอ | FHD 1080P |
| เซ็นเซอร์รับภาพ | ซีมอส |
| ซูม | ซูมดิจิตอล 16 เท่า |
| ความจุของแบตเตอรี่ | ลิเธียมไออน 1500mAh (รวมอยู่ด้วย) |
| พื้นที่จัดเก็บ | การ์ด TF ขนาด 32GB (มีให้ในชุด) |
| ขนาด (กว้าง x ยาว x สูง) | 4.13 x 2.51 x 0.91 นิ้ว |
| น้ำหนักสินค้า | 4.2 ออนซ์ |
| วัสดุ | โลหะและพลาสติก |
| คุณสมบัติพิเศษ | Autofocus, Anti-Shake, 22 Filters, Smile Detection, Timed/Continuous Shooting, Self-Timer, Built-in LED Light, Webฟังก์ชั่นลูกเบี้ยว |

รูปที่ 9: The compact size and light weight (0.26 lbs) make the JVSCAM C8 highly portable.
การรับประกันและการสนับสนุน
Your JVSCAM C8 Digital Camera is covered by a two-year satisfactory warranty ตั้งแต่วันที่ซื้อสินค้า
If you encounter any issues or have questions regarding your camera, please contact JVSCAM customer support. Our staff is available to provide prompt assistance.
- การสนับสนุนลูกค้า: Refer to the contact information provided on the product packaging or the official JVSCAM webเว็บไซต์.