
1. บทนำ
Thank you for choosing the pxton 666S Walkie Talkie. This manual provides essential information for the safe and efficient operation of your two-way radio. Please read this manual thoroughly before use to ensure optimal performance and to prevent damage to the device.

Image 1.1: pxton 666S Walkie Talkies in use, highlighting key features.
2. สินค้าหมดview
2.1 ส่วนประกอบที่รวมอยู่
- pxton 666S Walkie Talkie Unit(s)
- 1500mAh แบตเตอรี่ลิเธียมไอออน
- ฐานชาร์จ
- อะแดปเตอร์แปลงไฟ
- คลิปหนีบเข็มขัด
- เสาอากาศ
- Headphones (earpiece with microphone)
- คู่มือการใช้งาน
2.2 คุณสมบัติหลัก
- VOX (ระบบแลกเปลี่ยนเสียงอัตโนมัติ): Hands-free communication.
- การลดเสียงรบกวน: ช่วยเพิ่มความคมชัดของเสียงในสภาพแวดล้อมที่มีเสียงรบกวน
- TOT (ตัวจับเวลาหมดเวลา): ป้องกันการส่งข้อมูลระยะยาวโดยไม่ตั้งใจ
- ไฟฉายในตัว: เพื่อการส่องสว่างในสภาวะแสงน้อย
- ฟังก์ชั่นการตรวจสอบ: ช่วยให้สามารถรับฟังสัญญาณที่อ่อนได้
- ฟังก์ชั่นการสแกน: Scans active channels.
- ระยะยาว: Up to 3 miles in open areas, 1.2 miles in suburban, 0.6 miles in urban.
- แบตเตอรี่ลิเธียมไอออน 1500mAh: Provides extended standby and talk time.
- ทนน้ำ: Offers protection against splashes.
- 16 ช่อง: For diverse communication needs.
2.3 Parts of the Walkie Talkie
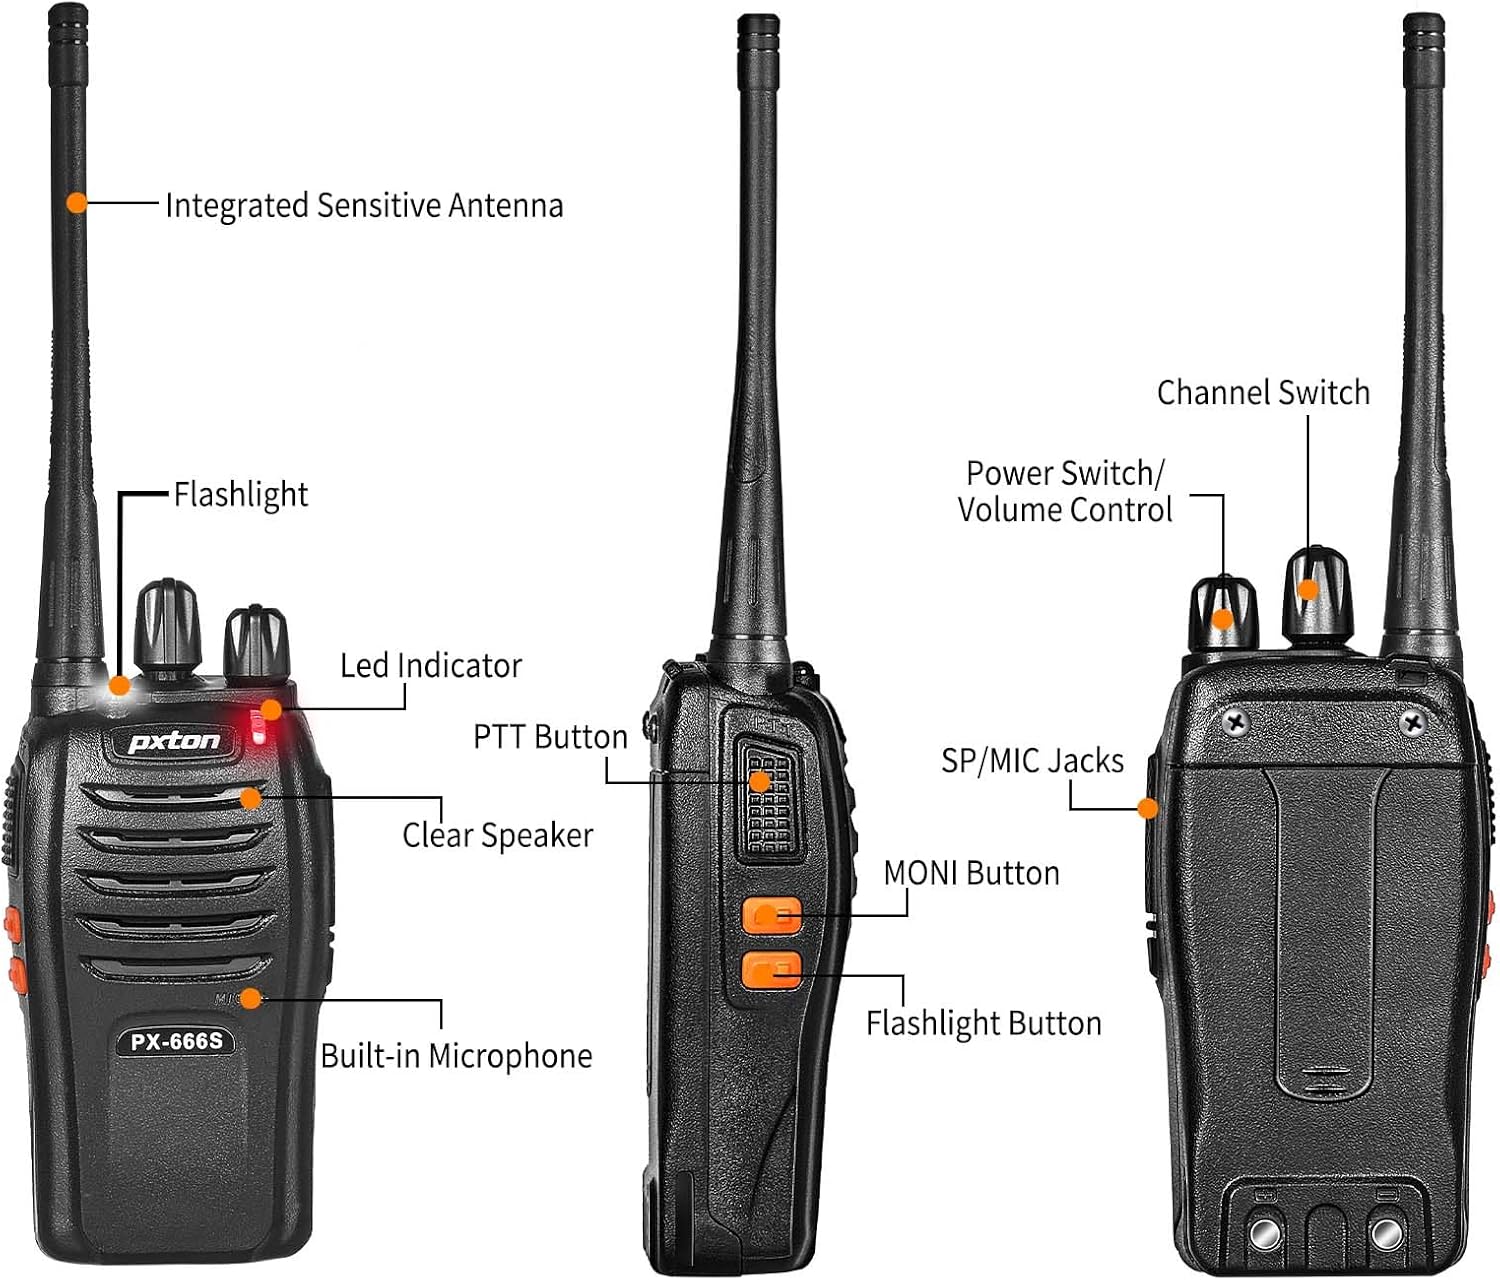
ภาพที่ 2.1: ด้านหน้าและด้านข้าง view of the pxton 666S with labeled components.

ภาพที่ 2.2: มุม view of the pxton 666S with labeled components.
3. การตั้งค่า
3.1 การติดตั้งและการชาร์จแบตเตอรี่
- ตรวจสอบให้แน่ใจว่าวิทยุสื่อสารปิดอยู่
- วางแบตเตอรี่ลิเธียมไอออนขนาด 1500mAh ให้ตรงกับช่องใส่แบตเตอรี่ด้านหลังวิทยุ
- ค่อยๆ ดันแบตเตอรี่เข้าที่จนกระทั่งคลิกเข้าที่
- To charge, place the walkie talkie into the charging base. Ensure the charging contacts align.
- เชื่อมต่ออะแดปเตอร์ไฟเข้ากับฐานชาร์จและเสียบเข้ากับเต้ารับที่ผนัง
- The LED indicator on the radio will typically show red during charging and turn green when fully charged.
- เวลาในการชาร์จประมาณ 3-4 ชั่วโมงสำหรับการชาร์จเต็ม

Image 3.1: Battery installation and specifications.

Image 3.2: Walkie talkie in charging base.
3.2 การติดอุปกรณ์เสริม
- เสาอากาศ: หมุนเสาอากาศตามเข็มนาฬิกาเข้ากับขั้วต่อด้านบนของวิทยุจนแน่น อย่าขันแน่นเกินไป
- คลิปหนีบเข็มขัด: Attach the belt clip to the designated slots on the back of the radio using the provided screws.
- หูฟัง: Insert the headphone jack into the SP/MIC jacks on the side of the radio. Ensure it is fully inserted for proper connection.
4. คู่มือการใช้งาน
4.1 การเปิด/ปิดเครื่องและการควบคุมระดับเสียง
- เปิดเครื่อง: Rotate the Power Switch/Volume Control knob (top left knob) clockwise until you hear a click. The radio will emit a tone, and the LED indicator will flash.
- หมดแรง: Rotate the Power Switch/Volume Control knob counter-clockwise until you hear a click.
- การปรับระดับเสียง: After powering on, continue rotating the Power Switch/Volume Control knob clockwise to increase volume or counter-clockwise to decrease volume.
4.2 การเลือกช่องสัญญาณ
- Rotate the Channel Switch knob (top right knob) to select your desired channel (1-16).
- ตรวจสอบให้แน่ใจว่าวิทยุทุกเครื่องในกลุ่มของคุณตั้งค่าไว้ที่ช่องสัญญาณเดียวกันสำหรับการสื่อสาร
4.3 การส่งและรับ
- การส่ง: Press and hold the PTT (Push-To-Talk) button on the side of the radio. Speak clearly into the microphone (located below the speaker grille). Release the PTT button to stop transmitting.
- เพื่อรับ: When the PTT button is not pressed, the radio is in receive mode. You will hear incoming transmissions through the speaker or connected headphones.
4.4 ฟังก์ชั่น VOX
The VOX function allows for hands-free operation. When activated, the radio will automatically transmit when it detects your voice, without needing to press the PTT button. Refer to your radio's programming software for VOX activation and sensitivity adjustment (programming cable sold separately).
4.5 การใช้งานไฟฉาย
Press the dedicated Flashlight Button (often located below the PTT button) to turn the built-in LED flashlight on or off.
4.6 Monitoring and Scan Functions
- ปุ่ม MONI: Press and hold the MONI (Monitor) button to temporarily disable squelch and listen to all activity on the current channel, including weak signals.
- ฟังก์ชั่นการสแกน: The scan function allows the radio to automatically sweep through programmed channels to detect active transmissions. Activation and channel programming for scan typically require programming software.
4.7 ระยะการสื่อสาร
The actual communication range varies significantly based on terrain and obstructions:
- Open Areas (e.g., flat terrain, mountain peaks): ระยะทางสูงสุด 3 ไมล์
- Suburban/Countryside: ประมาณ 1.2 ไมล์
- City Limits (with buildings and obstructions): ประมาณ 0.6 ไมล์

Image 4.1: Communication distance in various environments.
5. การบำรุงรักษา
- การทำความสะอาด: ใช้แบบนุ่มๆamp ผ้าสำหรับทำความสะอาดภายนอกวิทยุ ห้ามใช้สารเคมีหรือตัวทำละลายที่รุนแรง
- การดูแลแบตเตอรี่ Avoid fully discharging the battery frequently. Charge the battery regularly, even if not in use, to maintain its lifespan. Do not expose batteries to extreme temperatures.
- พื้นที่จัดเก็บ: เก็บวิทยุสื่อสารไว้ในที่แห้งและเย็นเมื่อไม่ได้ใช้งาน ถอดแบตเตอรี่ออกหากจะเก็บไว้นาน
- เสาอากาศ: ห้ามดัดหรือดัดแปลงเสาอากาศ เพราะอาจส่งผลต่อประสิทธิภาพการทำงาน
6 การแก้ไขปัญหา
| ปัญหา | สาเหตุที่เป็นไปได้ | สารละลาย |
|---|---|---|
| วิทยุไม่สามารถเปิดได้ | แบตเตอรี่เหลือน้อยหรือติดตั้งไม่ถูกต้อง | ชาร์จแบตเตอรี่ให้เต็ม แล้วใส่แบตเตอรี่กลับเข้าไปให้แน่น |
| ไม่สามารถส่งหรือรับได้ | เลือกช่องสัญญาณไม่ถูกต้อง อยู่นอกระยะสัญญาณ แบตเตอรี่เหลือน้อย | ตรวจสอบให้แน่ใจว่าวิทยุทุกเครื่องอยู่ในช่องสัญญาณเดียวกัน ขยับเข้าไปใกล้วิทยุเครื่องอื่นมากขึ้น ชาร์จแบตเตอรี่ |
| คุณภาพเสียงไม่ดีหรือมีสัญญาณรบกวน | Weak signal. Obstructions. Volume too low/high. | Move to an open area. Adjust volume. Use MONI button to check for weak signals. |
| อายุการใช้งานแบตเตอรี่สั้นกว่าที่คาดไว้ | Frequent transmissions. Old battery. Extreme temperatures. | Reduce transmission time. Replace old battery. Operate in moderate temperatures. |
7. ข้อมูลจำเพาะ
| คุณสมบัติ | รายละเอียด |
|---|---|
| ยี่ห้อ | พิกเซลตัน |
| หมายเลขรุ่น | 666วินาที |
| จำนวนช่องสัญญาณ | 16 |
| ช่วงความถี่ | ยูเอชเอฟ |
| ระยะการพูดคุย (สูงสุด) | 3 ไมล์ (พื้นที่โล่ง) |
| ความจุของแบตเตอรี่ | ลิเธียมไอออน 1500mAh |
| อายุการใช้งานแบตเตอรี่โดยเฉลี่ย | Up to 120 hours standby, 12 hours continuous talk |
| เล่มที่tage | 3.7 โวลต์ (กระแสตรง) |
| ระดับความต้านทานต่อน้ำ | ทนน้ำ |
| คุณสมบัติพิเศษ | Long Range, Noise Reduction, VOX, Flashlight, Monitoring, Scan |
| อุปกรณ์ที่รองรับ | PX-888S, PX-777S, PX-888S Pro (with same programming tools/cables) |

Image 7.1: Size comparison of pxton 666S walkie talkie.
8. การรับประกันและการสนับสนุน
pxton offers a 30-day no-questions-asked replacement and refund policy for your peace of mind. Additionally, we provide lifelong after-sales service to ensure your satisfaction.
If you encounter any issues or have questions regarding your pxton 666S walkie talkie, please do not hesitate to reach out to pxton customer support. We are committed to assisting you and resolving any concerns you may have.
For support, please refer to the contact information provided with your purchase or visit the official pxton webเว็บไซต์.