
1. บทนำ
This manual provides essential information for the safe and effective operation of your Mastech MS8301A Digital Multimeter. Please read this manual thoroughly before using the device to ensure proper functionality and to prevent potential hazards. Keep this manual for future reference.
2. ข้อมูลด้านความปลอดภัย
Always adhere to the following safety precautions to avoid electric shock or personal injury, and to prevent damage to the multimeter or the equipment under test.
- อ่านคำแนะนำ: Understand all instructions and safety information before use.
- จัดอันดับVoltage: ห้ามใช้เกินปริมาณที่กำหนดtage, as marked on the multimeter, between the terminals or between any terminal and ground.
- นำไปสู่การทดสอบ: ตรวจสอบสายทดสอบว่ามีฉนวนชำรุดหรือมีโลหะเปลือยหรือไม่ หากชำรุดให้เปลี่ยนใหม่
- การตัดวงจร: ตัดกระแสไฟออกจากวงจรและปล่อยประจุไฟฟ้าแรงสูงทั้งหมดtagตัวเก็บประจุอีก่อนการทดสอบความต้านทาน ความต่อเนื่อง ไดโอด หรือความจุ
- การเลือกฟังก์ชั่น: ตรวจสอบให้แน่ใจว่าสวิตช์ฟังก์ชันอยู่ในตำแหน่งที่ถูกต้องสำหรับการวัดที่กำลังดำเนินการอยู่
- วงจรสด: Do not measure current on a live circuit with the test leads connected in parallel.
- สภาพแวดล้อมการทำงาน: Do not operate the multimeter in explosive gas, vapor, or damp สภาพแวดล้อม
- อุปกรณ์ป้องกันภัยส่วนบุคคล: Always wear appropriate personal protective equipment, such as safety glasses, when working with electrical circuits.
- ระดับความปลอดภัย: This device is rated for CAT III 600V. Do not exceed this rating.
3. สินค้าหมดview
3.1 คุณสมบัติ
The Mastech MS8301A Digital Multimeter offers a range of features for various electrical measurements:
- แสดง: 2000 นับ
- การเก็บข้อมูล: หยุดภาพหน้าจอขณะอ่านค่า เพื่อความสะดวกในการบันทึก
- Battery Tester: For 1.5V and 9V batteries.
- การออกแบบที่กะทัดรัด: Product Size: 150mm x 74mm x 48mm (5.9" x 2.9" x 1.7")
- น้ำหนักเบา: Product Weight: 220g (0.48lb)

Image: Detailed features and specifications of the Mastech MS8301A multimeter, including display count, data hold, battery test function, and physical dimensions.
3.2 ส่วนประกอบ
The Mastech MS8301A package typically includes the following components:
- Mastech MS8301A Digital Multimeter Unit
- สายทดสอบ (สีแดงและสีดำ)
- AAA Batteries (2x1.5V)
- ใบรับรองการสอบเทียบ (ถ้ามี)
- คู่มือเริ่มต้นอย่างรวดเร็ว
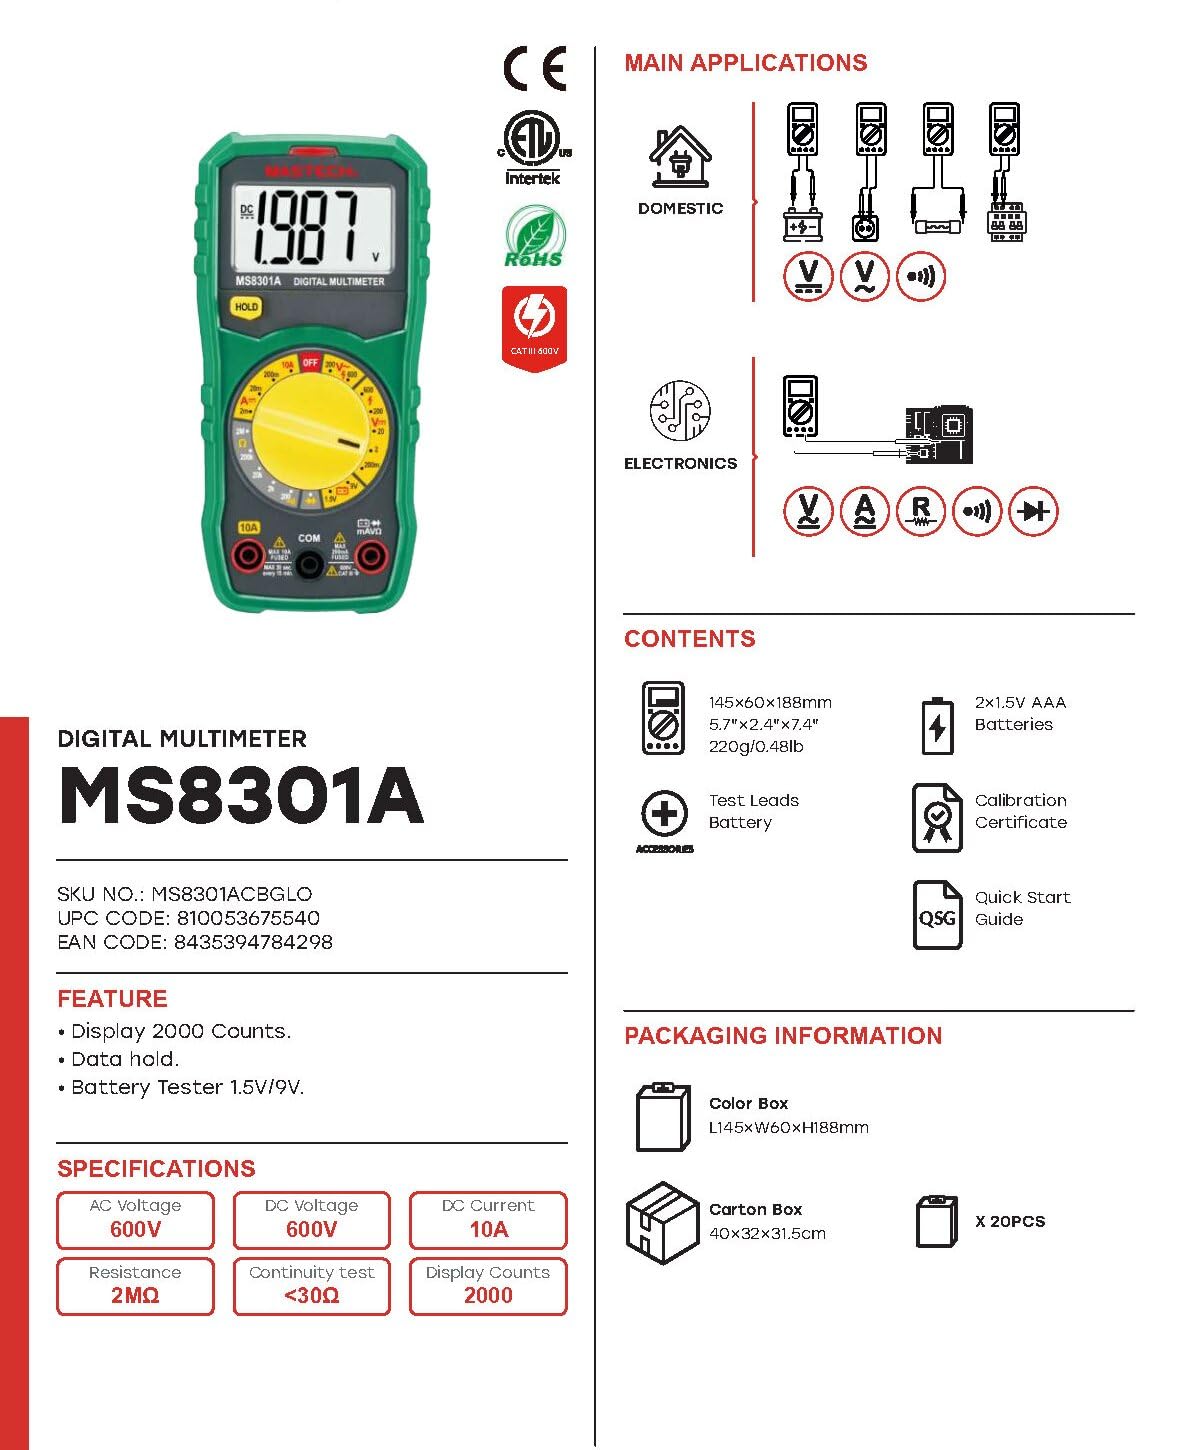
Image: The Mastech MS8301A Digital Multimeter showing its front panel, rotary switch, display, input jacks, and a list of included accessories such as test leads and batteries.
4. การตั้งค่า
4.1 การติดตั้งแบตเตอรี่
- ตรวจสอบให้แน่ใจว่ามัลติมิเตอร์ปิดอยู่ และถอดสายวัดทั้งหมดออก
- ค้นหาฝาครอบช่องใส่แบตเตอรี่ที่ด้านหลังของมัลติมิเตอร์
- คลายสกรูยึดออก แล้วถอดฝาครอบออก
- ใส่แบตเตอรี่ AAA ขนาด 1.5 โวลต์ จำนวน 2 ก้อน โดยสังเกตขั้วให้ถูกต้อง (+ และ -) ตามที่ระบุไว้ภายในช่องใส่แบตเตอรี่
- ปิดฝาช่องใส่แบตเตอรี่และขันสกรูให้แน่น
4.2 การเชื่อมต่อสายทดสอบ
เชื่อมต่อสายวัดทดสอบเข้ากับช่องเสียบที่เหมาะสมบนมัลติมิเตอร์:
- ใส่ สีดำ นำสายทดสอบเข้าไปใน คอม (แจ็ค) ทั่วไป
- สำหรับการวัดส่วนใหญ่ (Vol.tage, Resistance, Diode, Continuity, Temperature, Battery Test), insert the สีแดง นำสายทดสอบเข้าไปใน VΩmA แจ็ค.
- For high current measurements (up to 10A), insert the สีแดง นำสายทดสอบเข้าไปใน 10เอ แจ็ค.
5. คู่มือการใช้งาน
ก่อนทำการวัดใดๆ โปรดตรวจสอบให้แน่ใจว่าได้ต่อสายวัดอย่างถูกต้องและตั้งสวิตช์หมุนไปที่ฟังก์ชันที่ต้องการแล้ว
5.1 การวัดปริมาตร DCtage (V=)
- Set the rotary switch to the desired V= range (e.g., 20V for measuring up to 20V DC).
- ต่อสายทดสอบสีแดงเข้ากับด้านบวก (+) ของวงจร และสายทดสอบสีดำเข้ากับด้านลบ (-)
- อ่านเล่มที่tagค่า e บนจอแสดงผล
5.2 การวัดปริมาณไฟฟ้ากระแสสลับtagอี (วี~)
- Set the rotary switch to the desired V~ range (e.g., 200V for measuring up to 200V AC).
- เชื่อมต่อสายทดสอบเข้ากับขั้วไฟ ACtagแหล่งที่มา
- อ่านเล่มที่tagค่า e บนจอแสดงผล
5.3 การวัดกระแสไฟฟ้ากระแสตรง (A=)
- สำคัญ: Disconnect power to the circuit before connecting the multimeter in series.
- Set the rotary switch to the desired A= range (e.g., 200mA or 10A). Remember to move the red lead to the 10A jack for high current.
- เปิดวงจรที่ต้องการวัดกระแสไฟฟ้า
- ต่อมัลติมิเตอร์แบบอนุกรมเข้ากับวงจร โดยตรวจสอบให้แน่ใจว่ากระแสไฟฟ้าไหลผ่านมัลติมิเตอร์
- จ่ายไฟให้กับวงจรและอ่านค่ากระแสไฟฟ้าบนหน้าจอแสดงผล
5.4 การวัดค่าความต้านทาน (โอห์ม)
- สำคัญ: ตรวจสอบให้แน่ใจว่าวงจรไม่มีกระแสไฟฟ้าและตัวเก็บประจุทั้งหมดคายประจุหมดแล้วก่อนทำการวัดค่าความต้านทาน
- Set the rotary switch to the desired Ω พิสัย.
- เชื่อมต่อสายทดสอบข้ามส่วนประกอบที่ต้องการวัด
- อ่านค่าความต้านทานบนจอแสดงผล
5.5 การทดสอบไดโอด (|)
- สำคัญ: ตรวจสอบให้แน่ใจว่าได้ถอดไดโอดออกจากวงจรแล้ว
- ตั้งสวิตช์โรตารี่ไปที่ การทดสอบ Diode ตำแหน่ง.
- เชื่อมต่อสายวัดสีแดงเข้ากับขั้วบวก และสายวัดสีดำเข้ากับขั้วลบของไดโอด หน้าจอจะแสดงแรงดันไฟฟ้าไปข้างหน้าtagอีลดลง
- สลับขั้วสายไฟ หน้าจอควรแสดง "OL" (Open Loop) สำหรับไดโอดที่ใช้งานได้ดี
5.6 การทดสอบความต่อเนื่อง (-)
- สำคัญ: ตรวจสอบให้แน่ใจว่าวงจรไม่มีพลังงาน
- ตั้งสวิตช์โรตารี่ไปที่ การทดสอบความต่อเนื่อง ตำแหน่ง.
- Connect the test leads across the component or wire to be tested.
- หากค่าความต้านทานต่ำกว่าประมาณ 30 โอห์ม เสียงกริ่งจะดังขึ้น แสดงว่าอุปกรณ์ทำงานต่อเนื่อง และหน้าจอจะแสดงค่าความต้านทานด้วย
5.7 Battery Test (1.5V/9V)
- ตั้งสวิตช์โรตารี่ไปที่ 1.5โวลต์ or 9V battery test position, corresponding to the battery type.
- ต่อสายทดสอบสีแดงเข้ากับขั้วบวก (+) ของแบตเตอรี่ และสายทดสอบสีดำเข้ากับขั้วลบ (-)
- อ่านปริมาณแบตเตอรี่tage บนจอแสดงผล
5.8 การเก็บข้อมูล
กดปุ่ม "HOLD" เพื่อหยุดการแสดงค่าปัจจุบันบนหน้าจอ กดอีกครั้งเพื่อยกเลิกการหยุดชั่วคราวและกลับมาแสดงค่าแบบเรียลไทม์
6. ข้อมูลจำเพาะ
| การวัด | พิสัย | ปณิธาน |
|---|---|---|
| DC ฉบับที่tage | 200mV / 2V / 20V / 200V / 600V | 100µV / 1mV / 10mV / 100mV / 1V |
| ฉบับ ACtage | 200โวลต์/600โวลต์ | 100mV/1V |
| กระแสไฟฟ้าตรง | 2mA / 20mA / 200mA / 10A | 1µA / 10µA / 100µA / 10mA |
| ความต้านทาน | 200Ω / 2kΩ / 20kΩ / 200kΩ / 2MΩ | 0.1Ω / 1Ω / 10Ω / 100Ω / 1kΩ |
| การทดสอบความต่อเนื่อง | Buzzer sounds at <30Ω | - |
| การทดสอบ Diode | ไปข้างหน้าฉบับtagอี ดรอป | - |
| การทดสอบแบตเตอรี่ | 1.5โวลต์/9โวลต์ | - |
ข้อมูลจำเพาะทั่วไป
- แสดง: 2000 นับ
- แหล่งจ่ายไฟ: แบตเตอรี่ AAA 2 ก้อน 1.5V
- ขนาด : 150mm x 74mm x 48mm (5.9 "x 2.9" x "1.7)
- น้ำหนัก: 220กรัม (0.48ปอนด์)
- ระดับความปลอดภัย: กสท.600 XNUMXV
- วัสดุ: อะคริโลไนไตรล์ บิวทาไดอีน สไตรีน (ABS)
- สี: สีฟ้า

Image: A table detailing manual ranging specifications for various Mastech digital multimeters, including the MS8301A, showing display counts, safety ratings, and measurement capabilities.
7. การบำรุงรักษา
7.1 การเปลี่ยนแบตเตอรี่
When the battery low indicator appears on the display, replace the batteries immediately to ensure accurate readings. Follow the steps outlined in Section 4.1 for battery installation.
7.2 การทำความสะอาด
เช็ดเคสด้วยโฆษณาamp ใช้ผ้าและผงซักฟอกอ่อนๆ เช็ดทำความสะอาด ห้ามใช้สารกัดกร่อนหรือตัวทำละลาย ตรวจสอบให้แน่ใจว่ามัลติมิเตอร์แห้งสนิทก่อนใช้งาน
7.3 พื้นที่จัดเก็บ
If the multimeter is not used for an extended period, remove the batteries to prevent leakage and damage to the device. Store in a cool, dry place away from direct sunlight.
8 การแก้ไขปัญหา
| ปัญหา | สาเหตุที่เป็นไปได้ | สารละลาย |
|---|---|---|
| ไม่มีจอแสดงผลหรือจอแสดงผลมืด | Dead or low batteries; incorrect battery polarity. | เปลี่ยนแบตเตอรี่ ตรวจสอบทิศทางของแบตเตอรี่ |
| แสดง "OL" (โอเวอร์โหลด) | Measurement exceeds selected range; open circuit. | Select a higher range; check for open circuit in the component or leads. |
| การอ่านไม่ถูกต้อง | Incorrect function selected; poor test lead connection; damaged test leads. | Verify function switch position; ensure secure lead connection; inspect and replace damaged leads. |
| ไม่มีเสียงบี๊บแสดงความต่อเนื่อง | วงจรเปิด; ความต้านทานสูงเกินไป | Check for breaks in the circuit; ensure resistance is below 30Ω. |
9. การรับประกันและการสนับสนุน
Mastech products are designed for reliability and performance. For specific warranty information, please refer to the warranty card included with your product or contact Mastech customer support. Keep your purchase receipt as proof of purchase.
For technical support or service inquiries, please visit the official Mastech webไซต์หรือติดต่อศูนย์บริการที่ได้รับอนุญาต