
MakeSkyBlue 60A-V123
คู่มือผู้ใช้ตัวควบคุมการชาร์จพลังงานแสงอาทิตย์ MPPT MakeSkyBlue 60A
Model: 60A-V123
1. บทนำ
This user manual provides detailed instructions for the installation, operation, and maintenance of your MakeSkyBlue 60A MPPT Solar Charge Controller. This advanced controller is designed to efficiently manage power from your solar panels to charge various battery types, ensuring optimal performance and longevity of your solar power system.

Figure 1: MakeSkyBlue 60A MPPT Solar Charge Controller (Front View)
2. คุณสมบัติหลัก
- เทคโนโลยี MPPT: Achieves 98.2% efficiency, providing 30% more power than PWM controllers. Features dynamic shading compensation and dual cooling (aluminum + fan). EN50530 certified for LiFePO4/AGM/Gel batteries, ensuring a 20% longer lifespan.
- หลายเล่มtagความเข้ากันได้: Versatile 12V/24V/48V auto-recognition caters to various battery setups, enhancing system flexibility.
- จอแสดงผล LCD: Multi-function Liquid Crystal Display with backlight shows cumulative power generation, error codes, and adjustable parameters.
- Automatic Battery Voltagการตรวจจับ: Automatically supports 12V, 24V, 48V Lead-Acid, AGM, and Gel batteries in series or parallel connection on Bat+, Bat- terminals.
- การป้องกันแบตเตอรี่อัจฉริยะ: Guards against overcharging, overvoltage และปริมาตรต่ำtage, safeguarding your battery's health.
3. การตั้งค่าและการติดตั้ง
3.1. เนื้อหาบรรจุภัณฑ์
ตรวจสอบว่ามีส่วนประกอบทั้งหมดอยู่:
- MakeSkyBlue 60A MPPT Solar Charge Controller
- Mounting accessories (if included)
- คู่มือการใช้งาน (เอกสารนี้)
3.2 การติดตั้งตัวควบคุม
Choose a dry, well-ventilated location away from direct sunlight and heat sources. Ensure adequate clearance around the unit for proper airflow and cooling. Mount the controller vertically to allow for efficient heat dissipation through the cooling fins and fan.

Figure 2: Product Dimensions (Dimensions in inches: Height 21.65, Width 14.96, Depth 8.66)
3.3. การเชื่อมต่อสายไฟ
Follow the wiring diagram carefully. Always connect the battery first, then the solar panels, and finally the load (if applicable). Ensure all connections are secure and correct polarity is observed.
- การเชื่อมต่อแบตเตอรี่: Connect the battery to the BAT+ and BAT- terminals. The controller will automatically detect the battery voltagอี (12V/24V/48V)
- การเชื่อมต่อแผงโซลาร์เซลล์: Connect the solar panel array to the PV+ and PV- terminals. Ensure the PV array open circuit voltage (Voc) is within the specified range for your battery voltage (20V-80V for 12V, 37V-105V for 24V, 72V-160V for 48V).
- การเชื่อมต่อโหลด (ทางเลือก): If using the controller's load output, connect your DC load to the OUT+ and OUT- terminals.
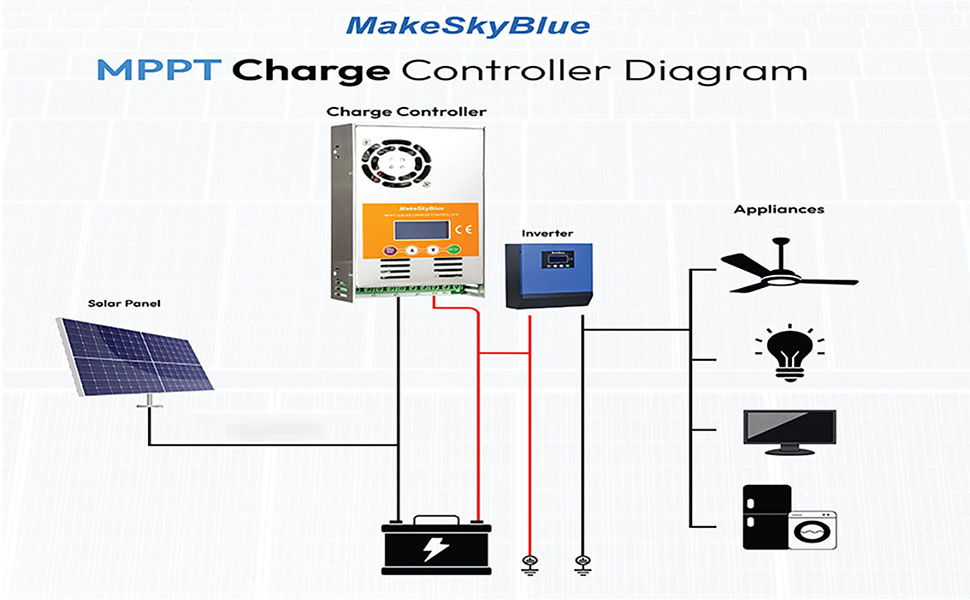
Figure 3: MPPT Charge Controller System Diagram. This diagram illustrates the connection flow from solar panel to charge controller, then to battery and inverter, which powers various appliances.
3.4. ความเข้ากันได้ของแบตเตอรี่
The controller is compatible with a variety of battery types, including:
- แบตเตอรี่ AGM
- Lithium Batteries (LiFePO4)
- Lead-Acid Batteries (Flooded)
- แบตเตอรี่เจล

Figure 4: Compatible Battery Types (Gel, Flooded, AGM)
4. คู่มือการใช้งาน
4.1. จอแสดงผล LCD ด้านบนview
The multi-function LCD provides real-time monitoring of system status, including charging current, battery voltage, and power generation. It also displays error codes for troubleshooting.
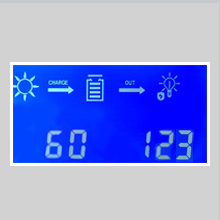
Figure 5: Close-up of the LCD Display showing charging status and numerical values.
4.2. โหมดการชาร์จ
The controller utilizes a three-stage charging process to optimize battery performance and extend lifespan. The default charging mode is for lead-acid batteries. Charging voltage can be set from 12V-17V for 12V batteries, 24V-34V for 24V batteries, and 48V-68V for 48V batteries.

Figure 6: MPPT Tracking Technology Graph. This graph illustrates how MPPT technology tracks the maximum power point of the solar panel, unlike PWM which operates at a fixed voltage.
5. การบำรุงรักษา
การบำรุงรักษาอย่างสม่ำเสมอจะช่วยให้ตัวควบคุมการชาร์จพลังงานแสงอาทิตย์ของคุณมีอายุการใช้งานยาวนานและทำงานได้อย่างมีประสิทธิภาพสูงสุด
- การทำความสะอาด: Periodically clean the exterior of the controller, especially the cooling fins and fan area, to prevent dust buildup that can impede heat dissipation.
- การเชื่อมต่อ: Check all wiring connections regularly to ensure they are tight and free from corrosion.
- การตรวจติดตามอุณหภูมิ: The controller has built-in temperature protection. The fan activates when the temperature exceeds 45°C and turns off below 40°C. Ensure the operating environment does not consistently exceed 75°C.
- อัพเดตเฟิร์มแวร์: ตรวจสอบของผู้ผลิต webเข้าชมเว็บไซต์เพื่อตรวจสอบการอัปเดตเฟิร์มแวร์ที่มีให้ใช้งาน
6 การแก้ไขปัญหา
หากคุณพบปัญหาเกี่ยวกับตัวควบคุมการชาร์จพลังงานแสงอาทิตย์ โปรดดูปัญหาทั่วไปและวิธีแก้ไขต่อไปนี้:
| ปัญหา | สาเหตุที่เป็นไปได้ | สารละลาย |
|---|---|---|
| ไม่มีการแสดงผล/ปิดเครื่อง | แบตเตอรี่ไม่ได้เชื่อมต่อหรือระดับเสียงต่ำtage; loose wiring. | ตรวจสอบการเชื่อมต่อแบตเตอรี่และปริมาตรtage. Ensure battery voltagค่า e สูงกว่าเกณฑ์การทำงานขั้นต่ำ |
| No charging from PV | No sunlight; PV array open circuit voltage too low/high; PV polarity reversed. | Check sunlight conditions. Verify PV array voltage is within specifications. Correct PV polarity. |
| การป้องกันการชาร์จไฟมากเกินไป | ปริมาณแบตเตอรี่tage reached overcharging protection limit. | This is a normal protection feature. The controller will stop charging once the battery reaches the overcharging protection voltage (15V for 12V, 30V for 24V, 60V for 48V). |
| คำเตือนอุณหภูมิสูง | Insufficient ventilation; ambient temperature too high. | Ensure proper airflow around the controller. Reduce ambient temperature if possible. Clean cooling fins. |
For specific error codes displayed on the LCD, refer to the detailed user manual (PDF) available for download.
7. ข้อมูลจำเพาะ
| พารามิเตอร์ | ค่า |
|---|---|
| ยี่ห้อ | MakeSkyBlue |
| แบบอย่าง | 60A-V123 |
| กระแสไฟฟ้าที่ได้รับการจัดอันดับ | 60เอ |
| เล่มระบบtage | 12V/24V/48V Auto Detect |
| Max PV Array Power (12V Battery) | ≤ 720 วัตต์ |
| Max PV Array Power (24V Battery) | ≤ 1440 วัตต์ |
| Max PV Array Power (48V Battery) | ≤ 2800 วัตต์ |
| แรงดันไฟฟ้าวงจรเปิดของแผงโซลาร์เซลล์tage (Voc) for 12V Battery | 20V-80V |
| แรงดันไฟฟ้าวงจรเปิดของแผงโซลาร์เซลล์tage (Voc) for 24V Battery | 37V-105V |
| แรงดันไฟฟ้าวงจรเปิดของแผงโซลาร์เซลล์tage (Voc) for 48V Battery | 72V-160V |
| การป้องกันกระแสไฟฟ้าจำกัด | 61เอ |
| การป้องกันอุณหภูมิ | >75 องศาเซลเซียส |
| อุณหภูมิเมื่อเปิดพัดลม | >45 องศาเซลเซียส |
| อุณหภูมิปิดพัดลม | <40 องศาเซลเซียส |
| การป้องกันการชาร์จเกินฉบับที่tage (แบตเตอรี่ 12V) | 15โวลต์ |
| การป้องกันการชาร์จเกินฉบับที่tage (แบตเตอรี่ 24V) | 30โวลต์ |
| การป้องกันการชาร์จเกินฉบับที่tage (แบตเตอรี่ 48V) | 60โวลต์ |
| ประเภทจอภาพ | จอแอลซีดี |
| สี | ส้ม |
| น้ำหนักสินค้า | 2.83 ปอนด์ |
| ขนาดแพ็คเกจ | 10 x 8.03 x 2.83 นิ้ว |
| ยูพีซี | 634769632594 |
8. การรับประกันและการสนับสนุน
For detailed warranty information and technical support, please refer to the official MakeSkyBlue resources.
- คู่มือผู้ใช้อย่างเป็นทางการ (PDF): For comprehensive details and advanced settings, download the official PDF manual: ดาวน์โหลดคู่มือการใช้งาน
- แผนการคุ้มครอง: พิจารณาซื้อasing extended protection plans for your device. Available options include 3-Year, 4-Year, and Complete Protect plans.
- MakeSkyBlue Store: Visit the official MakeSkyBlue store for more products and support: MakeSkyBlue Store
Ask a question about this manual
Ask about setup, troubleshooting, compatibility, parts, safety, or missing instructions. Manuals+ will review the question and use this page’s manual context to help answer it.