1. บทนำ
This user manual provides essential information for the setup, operation, and maintenance of your Radxa Zero 3W Single Board Computer. The Radxa Zero 3W is a compact and powerful computing platform featuring an RK3566 4-core CPU, ARM Mali-G52-2EE GPU, and NPU, designed for a wide range of applications requiring high performance in a small form factor.
Please read this manual thoroughly before using the device to ensure proper functionality and to avoid potential issues.
รูปที่ 1: ด้านบน view of the Radxa Zero 3W Single Board Computer, showing the main components including the Rockchip RK3566 SoC.
2. สินค้าหมดview และคุณสมบัติ
The Radxa Zero 3W is a highly integrated single board computer offering robust performance for various embedded projects, IoT applications, and multimedia tasks.
คุณสมบัติหลัก:
- โปรเซสเซอร์: Rockchip RK3566 Quad-core ARM Cortex-A55 CPU (up to 1.6GHz)
- กราฟิก: ARM Mali-G52-2EE GPU (supports OpenGL ES1.1/2.0/3.2, Vulkan 1.1 and OpenCL 2.0)
- หน่วยความจำ: LPDDR4 RAM (2GB for this model)
- พื้นที่จัดเก็บ: Onboard eMMC (Note: This specific model is "without GPIO" and relies on microSD for storage)
- เอาท์พุตวิดีโอ: Micro HDMI with up to 1080P@60fps output
- การเชื่อมต่อ:
- USB 3.0 Host Type C port
- USB 2.0 OTG Type C port
- Wireless: WiFi 6 (IEEE 802.11 a/b/g/n/ac/ax)
- Bluetooth: BT 5.4 with BLE
- อินเทอร์เฟซกล้อง: MIPI CSI for camera connection
- รองรับระบบปฏิบัติการ: Linux (various distributions), Android, FreeBSD

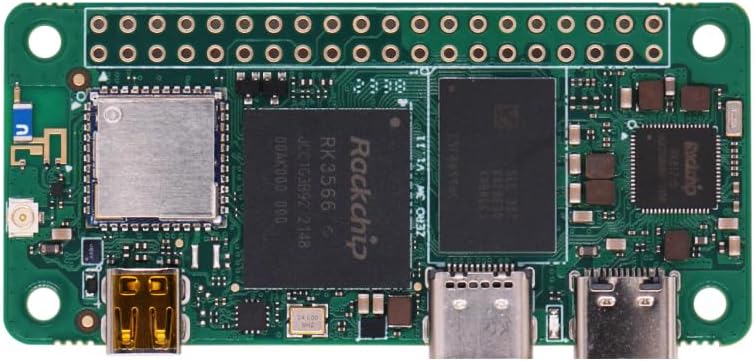
Figure 2: Detailed diagram of the Radxa Zero 3W, highlighting key components such as USB ports, RAM, Rockchip RK3566, wireless module, Micro HDMI, and MIPI CSI.

Figure 3: Illustration emphasizing the integrated WiFi 6 and Bluetooth 5.4 capabilities of the Radxa Zero 3W, with options for onboard or external antenna.
3. คู่มือการติดตั้ง
3.1. อะไรอยู่ในกล่อง
- Radxa Zero 3W Single Board Computer (Board Body)
Note: Additional accessories such as power supply, microSD card, HDMI cable, and peripherals are sold separately and are required for operation.
3.2. ส่วนประกอบที่จำเป็น (ไม่รวม)
- แหล่งจ่ายไฟ: 5V USB-C power adapter (minimum 2A recommended).
- พื้นที่จัดเก็บ: High-speed microSD card (Class 10 or higher, 8GB or larger) for operating system.
- แสดง: Monitor or TV with Micro HDMI input.
- อุปกรณ์อินพุต: USB keyboard and mouse (may require a USB-C hub or adapter).
- Operating System Image: Downloadable from the official Radxa webเว็บไซต์.
3.3. การติดตั้งระบบปฏิบัติการ
- Download OS Image: Visit the official Radxa documentation webงาน (wiki.radxa.com/Zero_3W/downloads) to download the desired operating system image (e.g., Debian, Ubuntu).
- เตรียมการ์ด MicroSD: Use an image flashing tool (e.g., Balena Etcher, Raspberry Pi Imager) to write the downloaded OS image to your microSD card. Ensure the microSD card is properly formatted before flashing.
- ใส่การ์ด MicroSD: Carefully insert the prepared microSD card into the Micro SD Card Slot on the Radxa Zero 3W.

รูปที่ 4: ด้านล่าง view of the Radxa Zero 3W, indicating the location of the Micro SD Card Slot.
3.4. การเชื่อมต่อเริ่มต้น
- เชื่อมต่อจอแสดงผล: Connect your monitor or TV to the Micro HDMI port on the Radxa Zero 3W using a Micro HDMI to HDMI cable.
- เชื่อมต่ออุปกรณ์ต่อพ่วง: Connect your USB keyboard and mouse to the USB-C Host port (or via a USB-C hub if multiple peripherals are needed).
- เปิดเครื่อง: Connect the 5V USB-C power supply to the USB 2.0 OTG Type C port. The board should power on automatically and begin booting the operating system from the microSD card.
4. คู่มือการใช้งาน
4.1. First Boot and Configuration
Upon first boot, the operating system will initialize. Follow the on-screen prompts to complete the initial setup, which may include setting up user accounts, network configuration (WiFi), and system updates.
4.2. Network Connectivity (WiFi/Bluetooth)
The Radxa Zero 3W supports WiFi 6 and Bluetooth 5.4.
- ไวไฟ: Configure WiFi through the operating system's network settings. Ensure your WiFi network is within range.
- บลูทูธ: Enable and pair Bluetooth devices via the OS Bluetooth manager.
4.3. Multimedia Usage
The board's ARM Mali-G52-2EE GPU and dedicated hardware decoders (H.264/H.265) enable smooth multimedia playback.
- การเล่นวิดีโอ: Supports H.264/H.265 decoding up to 4K@60fps and encoding up to 1080P@60fps. Use compatible media players within your chosen OS.
- เอาท์พุต HDMI: Connect to a display via the Micro HDMI port for 1080P@60fps video output.

Figure 5: The Radxa Zero 3W connected to a display, demonstrating its 1080P@60fps output capability via Micro HDMI.
4.4. Camera Module Connection (MIPI CSI)
The Radxa Zero 3W includes a MIPI CSI interface for connecting compatible camera modules.
- Ensure the camera module is compatible with the MIPI CSI interface and the chosen operating system.
- Carefully connect the camera ribbon cable to the MIPI CSI connector on the board.
- Refer to the specific camera module's documentation and the Radxa Zero 3W software documentation for driver installation and usage instructions.

Figure 6: The Radxa Zero 3W connected to a camera module, illustrating the MIPI CSI interface for imaging applications.
5. การบำรุงรักษาและการดูแล
- ปิดเครื่องอย่างปลอดภัย: Always shut down the operating system properly before disconnecting power to prevent data corruption.
- การจัดการ: Handle the board by its edges to avoid touching components, especially when powered on. Static electricity can damage sensitive components.
- สิ่งแวดล้อม: Operate the board in a clean, dry environment. Avoid extreme temperatures, humidity, and direct sunlight.
- การระบายความร้อน: For prolonged heavy loads, consider adding a heatsink or fan to the RK3566 SoC to prevent overheating and ensure stable performance.
- การทำความสะอาด: Use a soft, dry brush or compressed air to remove dust from the board. Do not use liquids or solvents.
- การอัปเดตซอฟต์แวร์: Regularly update your operating system and installed software to ensure security and optimal performance.
6 การแก้ไขปัญหา
ปัญหาทั่วไปและวิธีแก้ไข:
- Board does not power on:
- Ensure the USB-C power supply is connected to the correct port (USB 2.0 OTG Type C) and provides sufficient current (minimum 2A).
- ตรวจสอบว่าแหล่งจ่ายไฟใช้งานได้ปกติ
- ไม่มีเอาต์พุตแสดงผล:
- Check the Micro HDMI cable connection to both the board and the monitor.
- ตรวจสอบให้แน่ใจว่าจอภาพถูกตั้งค่าให้เป็นแหล่งอินพุตที่ถูกต้อง
- Verify the OS image was flashed correctly to the microSD card.
- Some monitors may require specific EDID settings; consult online forums or Radxa documentation.
- Operating system does not boot:
- Re-flash the OS image to the microSD card, ensuring the process completes without errors.
- Try a different, high-quality microSD card.
- Ensure the correct OS image for the Radxa Zero 3W is used.
- WiFi/Bluetooth not working:
- Check if the wireless module is enabled in the operating system settings.
- Ensure drivers are correctly installed (usually included in official Radxa OS images).
- ตรวจสอบการเชื่อมต่อเสาอากาศหากใช้เสาอากาศภายนอก
- Board gets hot:
- This is normal under heavy load. Consider adding a passive heatsink or active cooling solution for sustained high performance.
For more detailed troubleshooting and community support, refer to the official Radxa documentation and forums.
7. ข้อมูลจำเพาะ
| คุณสมบัติ | คำอธิบาย |
|---|---|
| ชื่อรุ่น | Radxa ZERO 3W 2GB without GPIO |
| โปรเซสเซอร์ | Rockchip RK3566 (Quad-core ARM Cortex-A55) |
| จีพียู | ARM Mali-G52-2EE |
| แรม | แรม 2GB |
| พื้นที่จัดเก็บ | MicroSD Card Slot (eMMC not included in this model) |
| เอาท์พุตวิดีโอ | Micro HDMI (up to 1080P) |
| พอร์ต USB | 1x USB 3.0 Host Type C, 1x USB 2.0 OTG Type C |
| ไร้สาย | 802.11ax (ไวไฟ 6) |
| บลูทูธ | BT 5.4 พร้อม BLE |
| อินเทอร์เฟซกล้อง | เอ็มไอพีไอ ซีเอสไอ |
| ระบบปฏิบัติการ | ลินุกซ์, แอนดรอยด์ |
| ขนาด | ขนาดโดยประมาณ 2.87 x 2.05 x 0.87 นิ้ว (ขนาดบรรจุภัณฑ์) |
| น้ำหนัก | ประมาณ 1.13 ออนซ์ |
8. การรับประกันและการสนับสนุน
8.1. ข้อมูลการรับประกัน
Please refer to the official Radxa website or your point of purchase for detailed warranty terms and conditions. Warranty coverage typically applies to manufacturing defects and does not cover damage caused by misuse, accidents, or unauthorized modifications.
8.2. การสนับสนุนด้านเทคนิค
For technical assistance, software downloads, and community support, please visit the official Radxa documentation and community forums:
- Radxa Wiki/Documentation: https://wiki.radxa.com/
- Radxa Community Forum: https://forum.radxa.com/
These resources provide comprehensive guides, tutorials, and a platform to interact with other users and developers.

Figure 7: Visual representation of Radxa's comprehensive technical documentation and active community support resources.


