
1. บทนำและเรื่องอื่นๆview
The Wonrabai ESP32-S3 Development Board (Model: ESP32-S3-Touch-LCD-1.28-B) is a compact, high-performance microcontroller unit (MCU) board designed for rapid development and integration into various products. It features an onboard 1.28-inch capacitive round touch display with 240x240 resolution, a Li-battery recharge manager, and a 6-axis sensor (3-axis accelerometer and 3-axis gyroscope).
This board is equipped with an Xtensa 32-bit LX7 dual-core processor operating up to 240MHz, supporting 2.4GHz Wi-Fi (802.11 b/g/n) and Bluetooth 5 (BLE) with an integrated antenna. It includes 512KB SRAM, 384KB ROM, 2MB PSRAM, and an external 16MB Flash memory. The device is housed in a durable CNC metal case with an acrylic dull-polish bottom plate and utilizes a Type-C connector for modern connectivity.

Image 1.1: Wonrabai ESP32-S3 Development Board highlighting key features like Type-C port, 32-bit LX7 Dual-core Processor, CNC Metal Case, Touch Display, 240x240 Pixels, and 65K Color display.
2. เนื้อหาบรรจุภัณฑ์
ตรวจสอบว่ามีสินค้าทั้งหมดที่ระบุไว้ด้านล่างอยู่ในแพ็คเกจของคุณ:
- ESP32-S3-Touch-LCD-1.28 Board x1
- SH1.0 12PIN cable x1
- ไขควง x1

Image 2.1: Visual representation of the package contents, including the ESP32-S3-Touch-LCD-1.28 board, SH1.0 12PIN cable, and screwdriver.
3. คุณสมบัติของผลิตภัณฑ์
The ESP32-S3 Development Board offers a comprehensive set of features for various applications:
- โปรเซสเซอร์: Xtensa 32-bit LX7 dual-core processor, up to 240MHz.
- การเชื่อมต่อ: 2.4GHz Wi-Fi (802.11 b/g/n) and Bluetooth 5 (BLE) with onboard antenna.
- หน่วยความจำ: 512KB SRAM, 384KB ROM, 2MB PSRAM, and 16MB external Flash memory.
- แสดง: 1.28-inch capacitive touch display, 240x240 resolution, 65K color, embedded GC9A01 Display Driver and CST816S Touch Driver.
- เซ็นเซอร์: Onboard QMI8658 6-axis IMU (3-axis accelerometer and 3-axis gyroscope) for motion gesture detection.
- การจัดการพลังงาน: 3.7V Li-battery recharge/discharge header and manager (ETA6096).
- อินเทอร์เฟซ: Type-C connector for programming and power, 6 x GPIO pins via SH1.0 connector.
- กรณี: CNC metal case with an acrylic dull-polish bottom plate.
- พลังงานต่ำ: Supports flexible clock and independent module power supply settings for optimized power consumption.
- USB Serial: Integrated USB serial port full-speed controller.

Image 3.1: Diagram illustrating the key components and their locations on the ESP32-S3 Development Board.
4. คำแนะนำในการตั้งค่า
Follow these steps to set up your ESP32-S3 Development Board:
- Connect SH1.0 12PIN Cable: If your application requires external GPIO connections, carefully connect the provided SH1.0 12PIN cable to the corresponding header on the board. Ensure correct orientation to avoid damage.
- การเชื่อมต่อไฟฟ้า: Connect the board to a power source using a standard USB Type-C cable. This connection also serves as the programming interface.
- การเชื่อมต่อแบตเตอรี่ (ไม่จำเป็น): For portable applications, connect a 3.7V Lithium battery to the MX1.25 2P battery header. The onboard manager handles charging and discharging.
- การตั้งค่าซอฟต์แวร์: Refer to the online tutorial and development resources for instructions on setting up your development environment (e.g., Arduino IDE, ESP-IDF) and uploading your first program. The official tutorial can be found at: n9.cl/g3oqf.

Image 4.1: Illustration of connecting the SH1.0 12PIN cable to the development board.
5. คู่มือการใช้งาน
Once the board is set up and programmed, you can begin operating it:
- เปิดเครื่อง: The board powers on automatically when connected via USB Type-C or a charged battery.
- จอสัมผัส: Interact with the 1.28-inch capacitive touch display by tapping or swiping as programmed. The display offers 240x240 resolution and 65K colors.
- การสื่อสารแบบไร้สาย: Utilize the integrated Wi-Fi and Bluetooth 5 capabilities for wireless data transfer and communication with other devices.
- การตรวจจับการเคลื่อนไหว: The QMI8658 6-axis IMU provides accelerometer and gyroscope data, enabling motion gesture detection and orientation tracking in your applications.
- การใช้งาน GPIO: The 6 GPIO pins available via the SH1.0 connector can be configured flexibly for various input/output functions as per your project requirements.
- ปุ่มรีเซ็ต: Press the RESET button to restart the board.
- ปุ่ม BOOT: Press and hold the BOOT button while pressing RESET to enter download mode for firmware updates or initial programming.
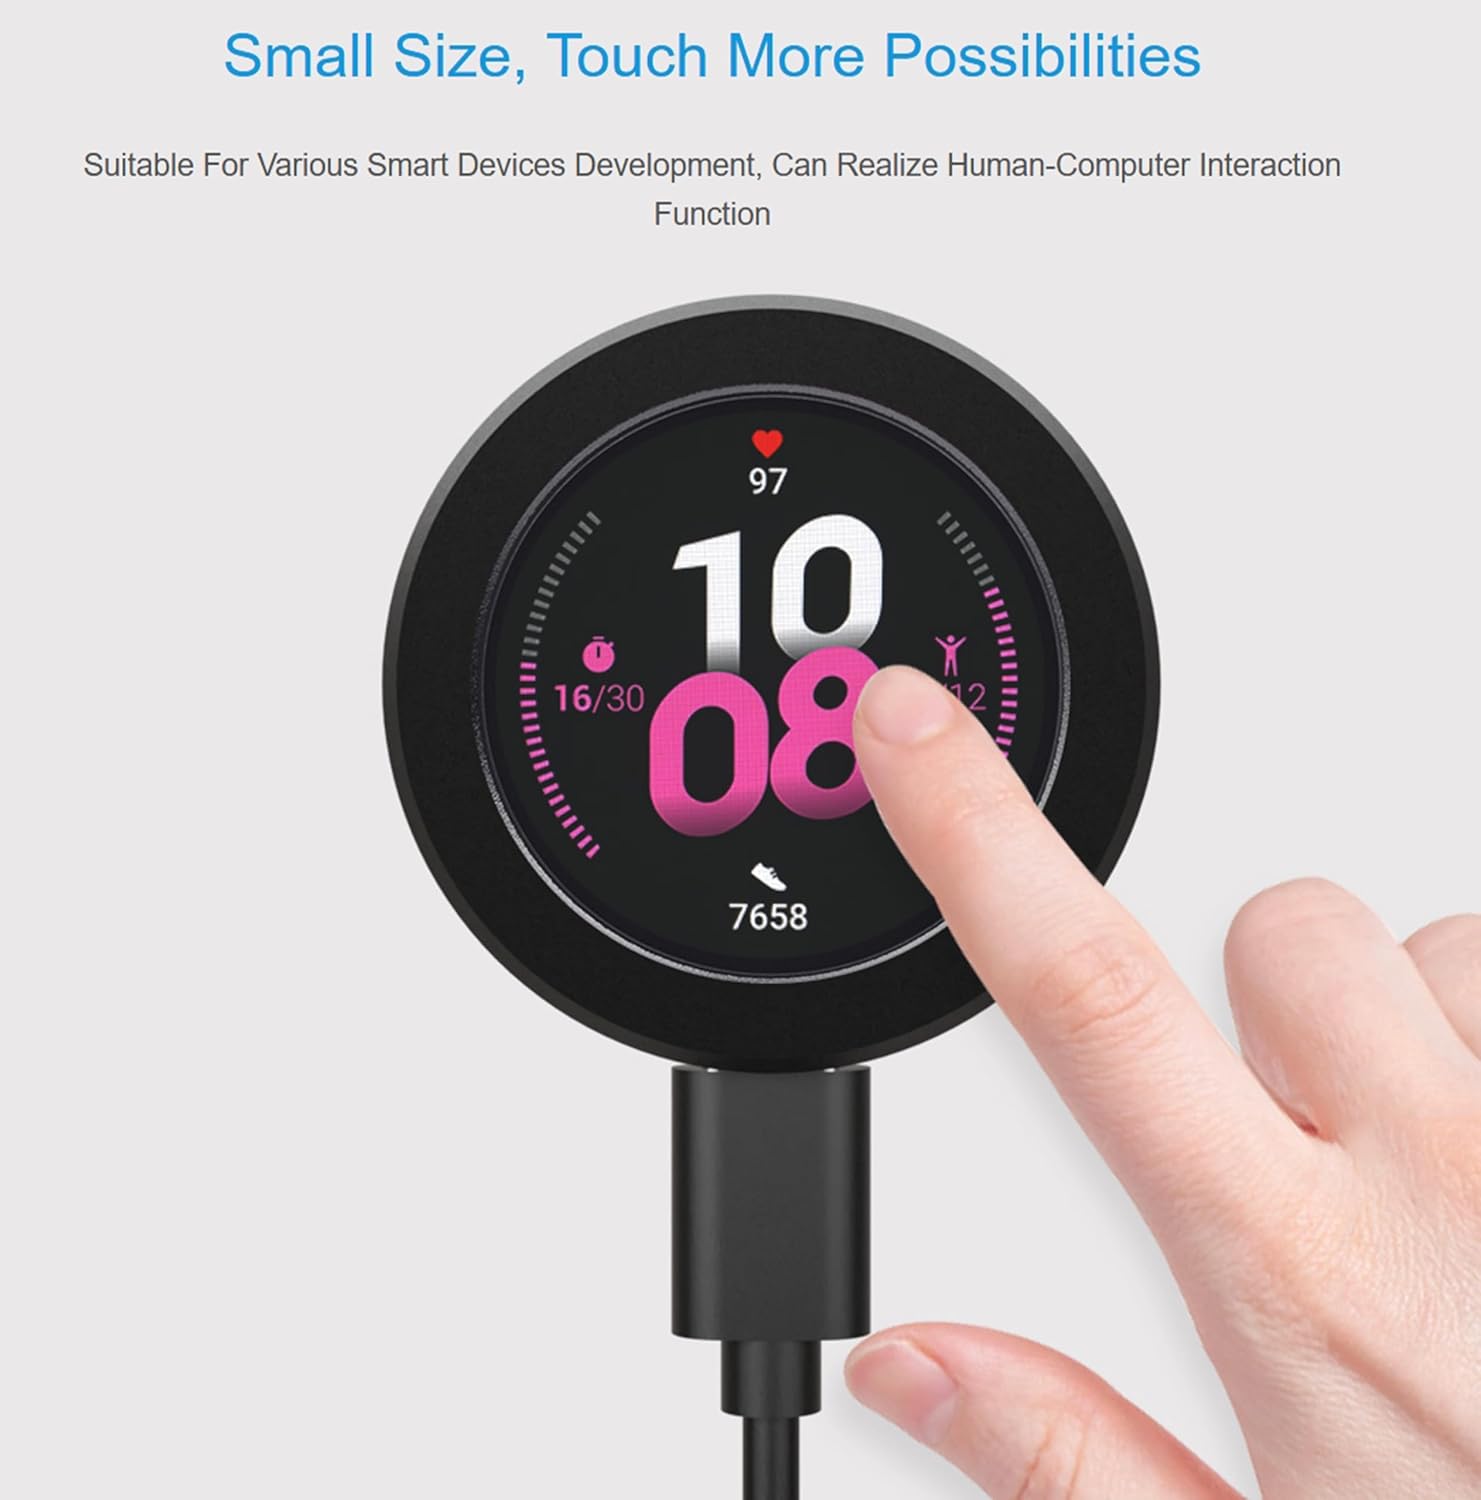
Image 5.1: User interacting with the capacitive touch display of the development board.
6. คำจำกัดความของพิน
Understanding the pinout is crucial for connecting external components. The following diagram illustrates the pin definitions for the SH1.0 12PIN connector:
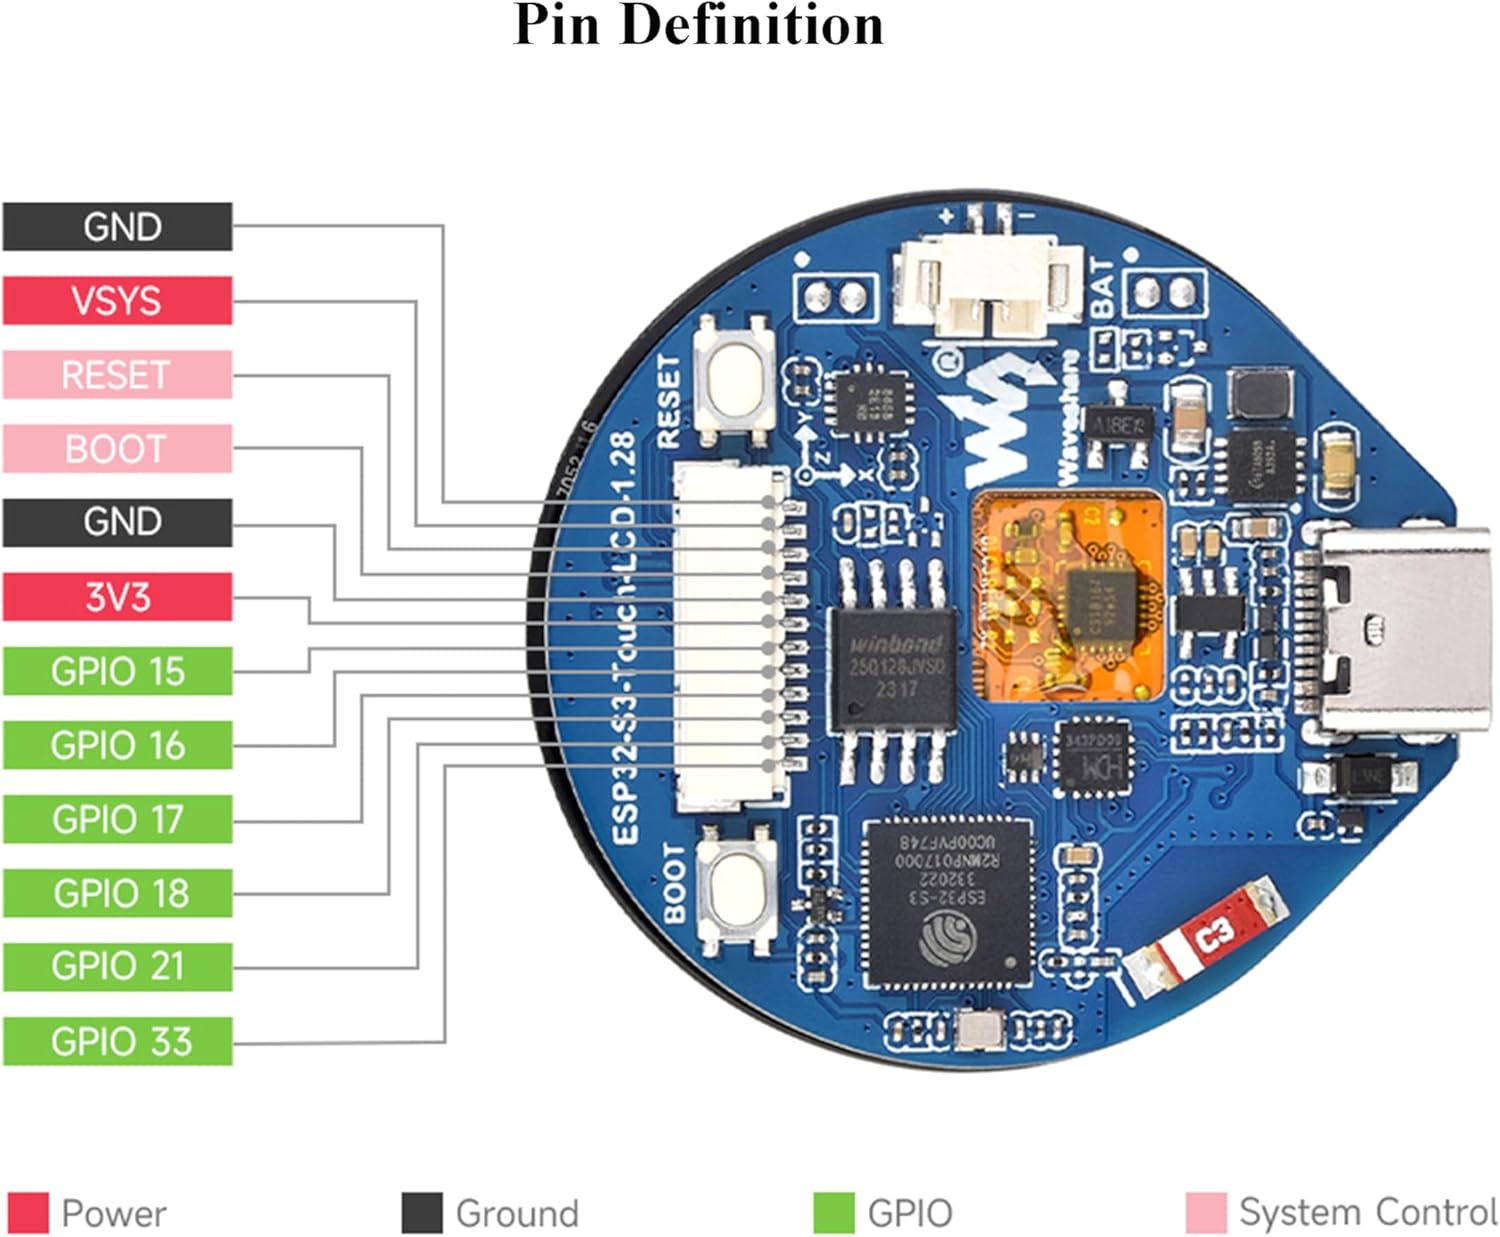
Image 6.1: Detailed pinout diagram for the ESP32-S3 Development Board, indicating power, ground, GPIO, and system control pins.
Key pins include:
- จีเอ็นดี: การเชื่อมต่อกราวด์
- VSYS: ปริมาตรของระบบtagอีอินพุต
- รีเซ็ต: รีเซ็ตพิน
- บูต: พินเลือกโหมดการบูต
- 3V3: 3.3V power output.
- GPIO 15, 16, 17, 18, 21, 33: General Purpose Input/Output pins, configurable for various digital and analog functions.
7. การบำรุงรักษา
To ensure the longevity and optimal performance of your ESP32-S3 Development Board, observe the following maintenance guidelines:
- การจัดการ: Always handle the board by its edges to avoid touching sensitive components.
- การทำความสะอาด: Use a soft, dry cloth to clean the metal case and display. Avoid using liquid cleaners directly on the board.
- สิ่งแวดล้อม: Operate and store the board in a dry environment, away from extreme temperatures, humidity, and direct sunlight.
- พลัง: Ensure stable power supply. When using a battery, monitor its charge level and recharge as needed. The onboard battery manager is designed for 3.7V Li-batteries.
- อัพเดตเฟิร์มแวร์: Regularly check for and apply firmware updates to benefit from performance improvements and bug fixes.
8 การแก้ไขปัญหา
If you encounter issues with your development board, consider the following:
- เมนบอร์ดไม่เปิดใช้งาน:
- Check the USB Type-C cable connection and ensure the power source is active.
- If using a battery, ensure it is charged and properly connected to the MX1.25 header.
- หน้าจอสัมผัสไม่ตอบสนอง:
- It is normal for touch sensitivity and accuracy to be reduced at the edge of the round touch screen.
- Ensure your code correctly initializes and handles the CST816S touch driver.
- Restart the board using the RESET button.
- ข้อผิดพลาดในการเขียนโปรแกรม:
- ตรวจสอบให้แน่ใจว่าได้เลือกบอร์ดและพอร์ตที่ถูกต้องใน IDE ของคุณแล้ว
- Ensure all necessary drivers (e.g., CH343P USB to UART chip driver) are installed.
- Try entering download mode by holding the BOOT button while pressing RESET before uploading.
- ปัญหาการเชื่อมต่อ Wi-Fi/Bluetooth:
- Check your code for correct Wi-Fi/Bluetooth initialization and credentials.
- When using the development board, pay attention to the ceramic antenna area and avoid the PCB board, metal, and plastic parts covering the ceramic antenna, as this can interfere with signal.
- ปัญหาการชาร์จแบตเตอรี่:
- The onboard high-efficiency charge/discharge power management chip ETA6096 and MX1.25 battery header are designed for a 3.7V single-cell lithium battery.
- The current charging current is set to 1A. For different charging currents, refer to the schematic to change the R15 resistor.
For further assistance, consult the online tutorial and development resources provided by Wonrabai at n9.cl/g3oqf.
