1. บทนำ
This manual provides instructions for the installation, operation, and maintenance of the AUTOFREE Rear Bumper, New Design 102 Style. Please read this manual thoroughly before installation and use to ensure proper function and safety.
2. ความเข้ากันได้
This rear bumper is designed for:
- 2019-2024 แรม 1500 (Excludes Classic Model)
3. เนื้อหาบรรจุภัณฑ์
ตรวจสอบว่าส่วนประกอบทั้งหมดมีอยู่ก่อนเริ่มการติดตั้ง:
- 1 x AUTOFREE Rear Bumper (New Design 102 Style)
- All necessary mounting accessories (bolts, washers, nuts, etc.)
- 1 x Set of 4-inch LED Pod Lights (2 lights total)
- 2 x D-Ring Shackles
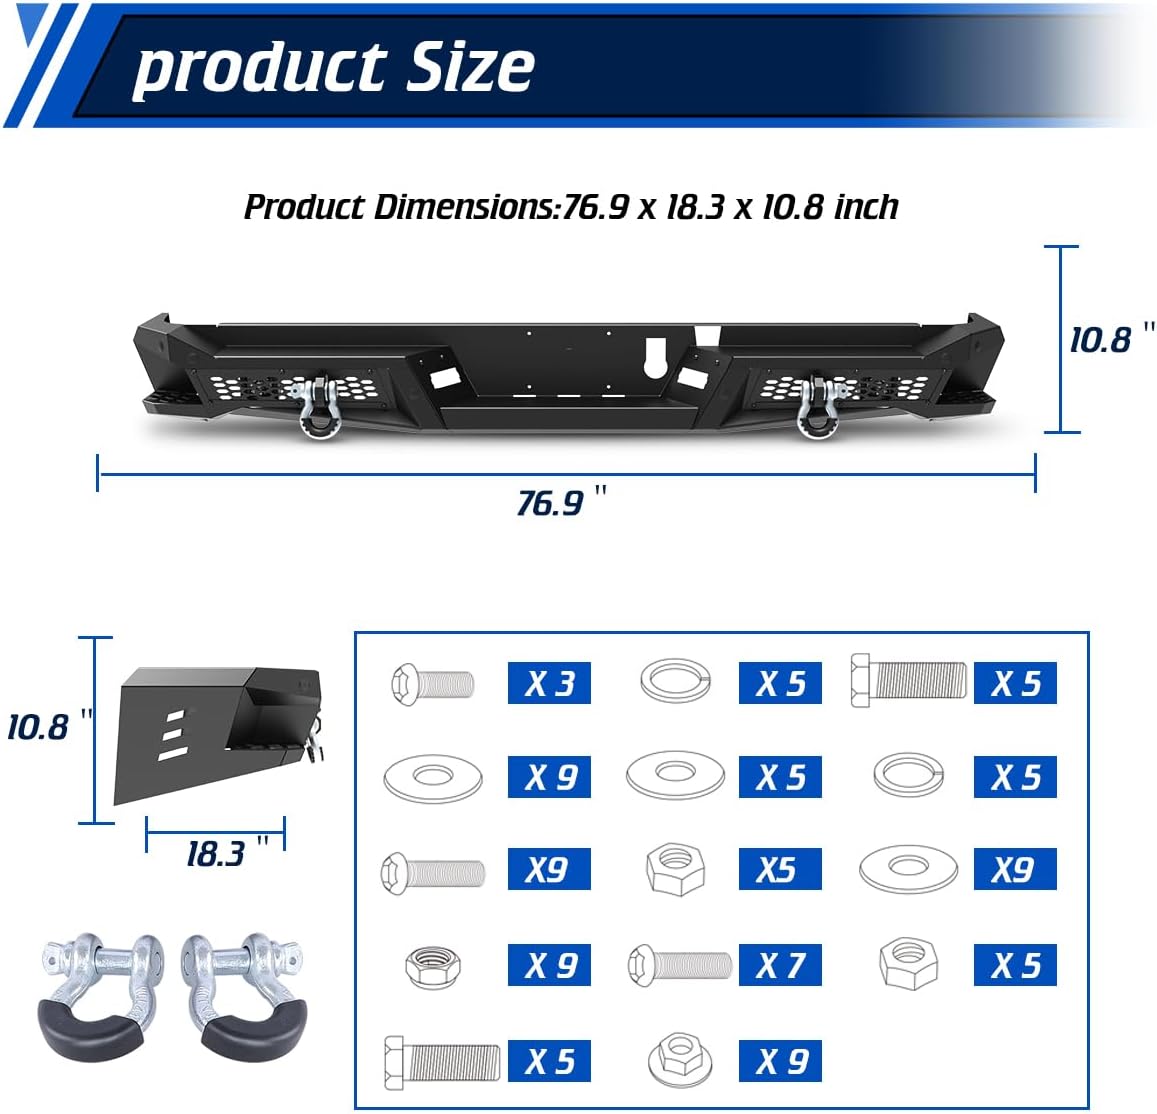
ภาพ: เหนือview of product dimensions and included hardware components.
4. คุณสมบัติ
The AUTOFREE Rear Bumper (New Design 102 Style) includes the following features:
- วัสดุ: Constructed from Q235A Steel for durability.
- เสร็จ: Powder Coated Black for corrosion resistance.
- Park Distance Sensor Mounting Holes: Designed to retain full functionality of factory backup sensors. Includes anti-dust plugs for unused sensor holes.
- LED Pod Light Mounting Brackets: Accepts 3-inch or 4-inch pod lights on each side. A set of 4-inch LED pod lights is included.
- Honeycomb Decorative Mesh & Decorative Frames: Frames allow for custom color spraying.
- D-Ring Mounts & D-Ring Shackles: High-strength D-ring mounts with included D-ring shackles for recovery options.
- License Lamp รูยึด: Compatible with OEM license plate lights (lights not included).
- Integrated Side Steps: Two side steps with a cut-out, non-slip design for convenient access to the truck bed.
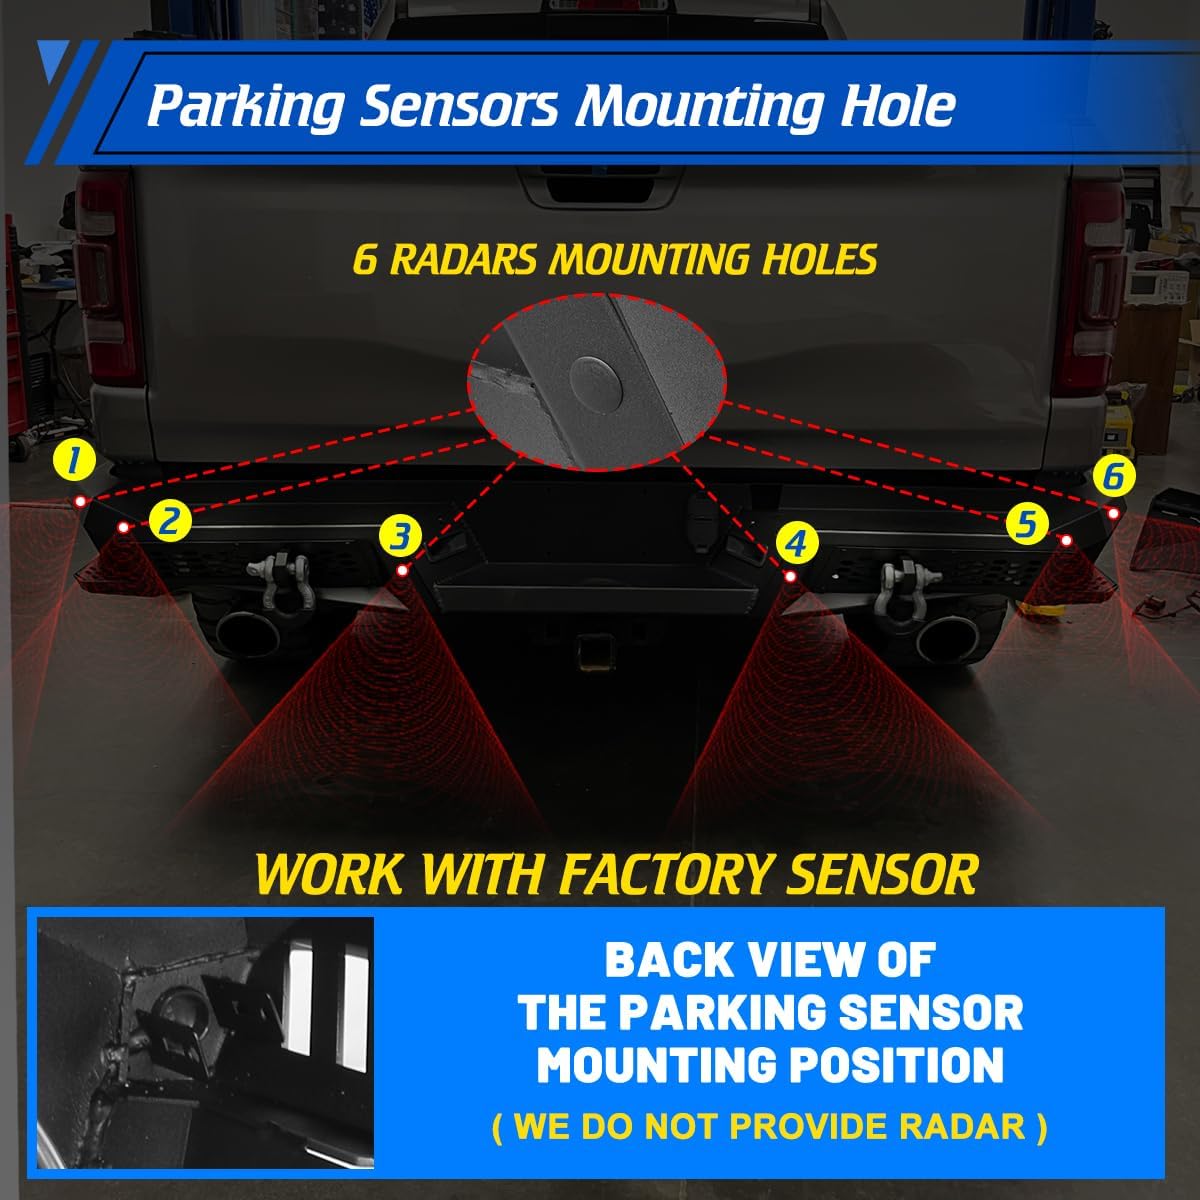
Image: Detail of parking sensor mounting holes, designed to work with factory sensors.
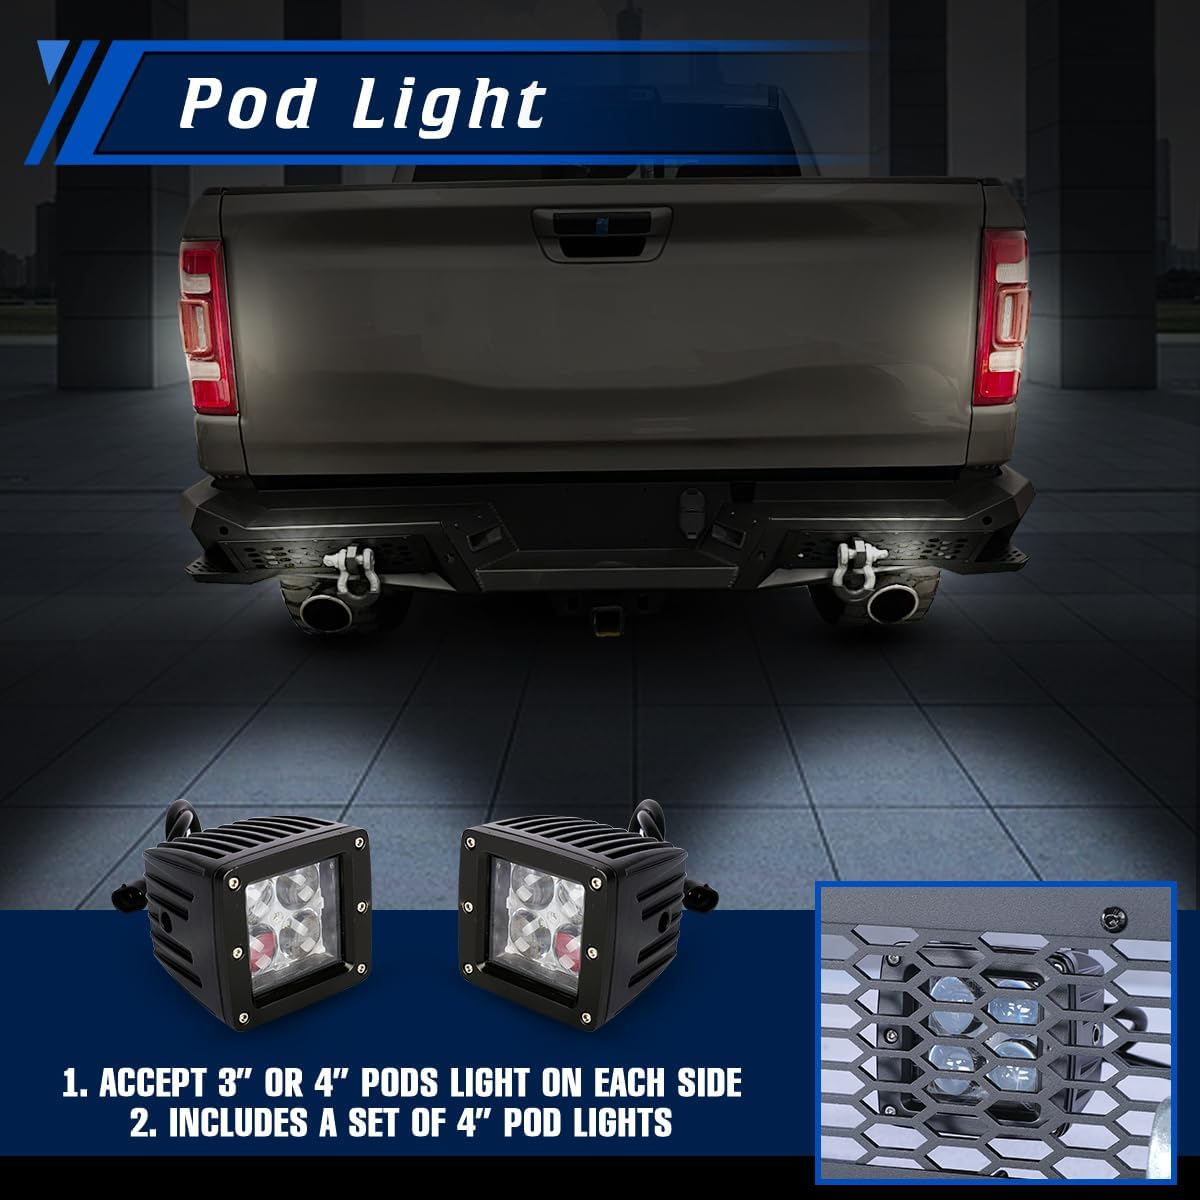
Image: Illustration of the pod light mounting locations and the included 4-inch LED pod lights.

Image: Display of various reserved holes and features on the bumper, such as drain holes, mounting holes for trailer plug, spare tire operating hole, anti-slip steps, shackle mounting brackets, license plate mounting holes, and license lamp รูยึด

ภาพ: อดีตample of decorative frames that can be customized with DIY color spraying.
5. การตั้งค่า (การติดตั้ง)
The AUTOFREE Rear Bumper is designed for a direct bolt-on installation, utilizing existing factory holes. No cutting or drilling is required for installation.
- การตระเตรียม: จอดรถบนพื้นราบและดึงเบรกมือ ถอดขั้วลบของแบตเตอรี่รถยนต์ออก
- ถอดกันชนเดิมออก: Carefully remove the existing rear bumper according to your vehicle's service manual. Disconnect any wiring for lights or sensors.
- Assemble New Bumper: Attach any sub-components to the new bumper as instructed in the detailed installation guide (if provided separately). This may include the LED pod lights and D-ring shackles.
- Mount New Bumper: Align the AUTOFREE Rear Bumper with the factory mounting points on the vehicle frame. Secure it using the provided hardware. Ensure all bolts are tightened to the manufacturer's specifications.
- การเชื่อมต่อสายไฟ: Reconnect any wiring for parking sensors and connect the included LED pod lights. Ensure all connections are secure and properly insulated.
- การตรวจสอบขั้นสุดท้าย: Reconnect the vehicle battery. Test all lights and sensors to ensure proper operation.
Note: A detailed step-by-step installation video or manual may be available online. Refer to these resources for visual guidance.

Image: The AUTOFREE Rear Bumper (New Design 102 Style) installed on a 2019-2024 RAM 1500, demonstrating the final appearance.

Image: The rear bumper is designed to work with the factory trailer hitch.
6. ปฏิบัติการ
This bumper enhances your vehicle's utility and appearance. Utilize its features as follows:
- Side Steps: Use the integrated side steps for easier and safer access to the truck bed. The non-slip design provides secure footing.
- D-Ring Shackles: The included D-ring shackles can be used for vehicle recovery operations. Ensure proper recovery techniques are followed and that the shackles are securely fastened before use.
- LED Pod Lights: The included 4-inch LED pod lights can be wired to your vehicle's reverse lights or to a separate switch for supplemental rear lighting.
- เซ็นเซอร์ช่วยจอด: The bumper maintains the functionality of your factory parking sensors. Ensure sensors are clean and unobstructed for accurate readings.

Image: Demonstration of a person utilizing the integrated side step for convenient access to the truck bed.
7. การบำรุงรักษา
To ensure the longevity and appearance of your AUTOFREE Rear Bumper, follow these maintenance guidelines:
- การทำความสะอาดปกติ: Wash the bumper regularly with mild soap and water to remove dirt, salt, and other debris. Avoid abrasive cleaners or harsh chemicals that could damage the powder coat finish.
- ตรวจสอบฮาร์ดแวร์: Periodically check all mounting bolts and hardware for tightness. Re-tighten as necessary to prevent loosening due to vibrations.
- ตรวจสอบความเรียบร้อยของงาน: Inspect the powder coat finish for any chips or scratches. Touch up any damage promptly to prevent rust and corrosion.
- Sensor and Light Check: Ensure parking sensors are clean and free from obstructions. Verify that LED pod lights are functioning correctly.
8 การแก้ไขปัญหา
If you encounter any issues with your AUTOFREE Rear Bumper, consider the following:
- กันชนหลวม: If the bumper feels loose, check all mounting bolts and ensure they are securely tightened.
- เซ็นเซอร์จอดรถทำงานผิดปกติ: Ensure sensors are clean and free of mud, ice, or debris. Verify that all sensor wiring connections are secure.
- LED Pod Lights Not Working: Check wiring connections for the LED lights. Ensure they are properly connected to a power source and ground. Verify that the light units themselves are not damaged.
- เสียงที่ผิดปกติ: Inspect the bumper and surrounding areas for any loose components or contact points that might be causing noise.
For issues not resolved by these steps, contact AUTOFREE customer support.
9. ข้อมูลจำเพาะ
| ข้อมูลจำเพาะ | รายละเอียด |
|---|---|
| หมายเลขรุ่น | NRM03B102-BX |
| วัสดุ | เหล็กกล้า Q235A |
| เสร็จสิ้นภายนอก | เคลือบสีดำแบบผง |
| ตำแหน่งอะไหล่ยนต์ | หลัง |
| น้ำหนักผลิตภัณฑ์ | 86.42 ปอนด์ (39.2 กก.) |
| ขนาดสินค้า (กว้าง x ยาว x สูง) | 195 ซม. x 46.51 ซม. x 27.51 ซม. (76.9 x 18.3 x 10.8 นิ้ว) |
| ประเภทการติดตั้ง | Bolt-On (No cutting or drilling required) |
10. การรับประกันและการสนับสนุน
AUTOFREE provides the following coverage for this product:
- นโยบายการคืนสินค้า/เปลี่ยนสินค้า: 30-day return or replacement policy for incompatibility or defects.
- การรับประกันแบบจำกัด: 12-month limited warranty for product malfunction.
For warranty claims, technical assistance, or any other inquiries, please contact AUTOFREE customer support through your purchase platform or the official AUTOFREE webเว็บไซต์.