1. บทนำ
Welcome to the user manual for your Tangxi X99 P4 Motherboard. This document provides essential information and detailed instructions to help you install, operate, and maintain your motherboard effectively. Please read this manual thoroughly before proceeding with any installation or operation.
2. ข้อมูลด้านความปลอดภัย
โปรดปฏิบัติตามข้อควรระวังด้านความปลอดภัยต่อไปนี้เสมอ เพื่อป้องกันความเสียหายต่อเมนบอร์ดหรือการบาดเจ็บต่อตัวคุณเอง:
- Disconnect the power supply from your computer before installing or removing any components.
- Handle the motherboard and other components with care to avoid electrostatic discharge (ESD). Use an anti-static wrist strap if available.
- ตรวจสอบให้แน่ใจว่ามีการระบายอากาศที่เหมาะสมภายในเคสคอมพิวเตอร์ของคุณเพื่อป้องกันความร้อนสูงเกินไป
- อย่าให้เมนบอร์ดสัมผัสกับความชื้นหรืออุณหภูมิที่สูงหรือสูงเกินไป
- If you encounter any issues, refer to the troubleshooting section or seek professional assistance.
3. คุณสมบัติหลัก
The Tangxi X99 P4 Motherboard offers a robust platform for your desktop PC with the following key features:
- 6-Phase Power Supply: Ensures stable power delivery with a modular design for efficient heat dissipation.
- การขยายอินเทอร์เฟซหลายแบบ: Equipped with an LGA 2011-3 socket, including 4 USB 3.0 and 6 USB 2.0 interfaces for diverse peripheral needs.
- ชิปเซ็ตแบบรวม: Features an integrated sound card and network card for convenient audio and network connectivity.
- DDR4 Dual Channel Support: High-efficiency memory support for up to 128GB DDR4 modules.
- High-Speed NVME M.2: Supports NVME PCIE X4 channel M.2 high-speed hard drives with theoretical bandwidths up to 4 GB/s.
4. เนื้อหาบรรจุภัณฑ์
Upon unpacking your Tangxi X99 P4 Motherboard, please verify that all the following items are included:
- 1 x Tangxi X99 P4 Motherboard (with integrated CR2032 button battery)
- 1 x I/O Backplate
- สายเคเบิลข้อมูล SATA 1 เส้น
- 1 x คู่มือผู้ใช้ (เอกสารนี้)

Image: Tangxi X99 P4 Motherboard with included I/O backplate and SATA cable.
5. ข้อมูลจำเพาะ
| คุณสมบัติ | คำอธิบาย |
|---|---|
| ยี่ห้อ | ถังซี |
| ชื่อรุ่น | Tangxih0v2eg3t6f |
| ชิปเซ็ต | For H81 Series (Integrated 6-channel audio chip) |
| ซ็อคเก็ตซีพียู | แอลพีจีเอ 2011-3 |
| ซีพียูที่รองรับ | E5 V3/V4 series, i7 58xx/68xx series |
| เทคโนโลยีหน่วยความจำ RAM | DDR4 Dual Channel |
| ความจุหน่วยความจำสูงสุด | สูงสุด 128GB |
| อินเทอร์เฟซการ์ดกราฟิก | 1x PCIE X16 slot, Integrated, PCI, PCI-Express x16 |
| ช่องเสียบขยาย | 1x PCIE X1 slot |
| อินเทอร์เฟซการจัดเก็บข้อมูล | 2x SATA 2.0 ports, 1x SATA 3.0 interface, 1x NVME M.2 interface (up to 4 GB/s) |
| พอร์ต USB | 1 set USB 3.0 pins, 1 set USB 2.0 pins, 2x USB 3.0 (rear), 4x USB 2.0 (rear) |
| I / O การเชื่อมต่อ | PS/2 Keyboard/Mouse, 1x RJ45 Network, Audio Interface |
| ขั้วต่อสายไฟหลัก | 24 ขา |
| โหมดพลังงาน | 6 เฟส |
| ประเภทแบตเตอรี่ | CR2032 Button Battery (240 mAh) |
| อุปกรณ์ที่รองรับ | Keyboard, Personal Computer, Mouse |
6. การตั้งค่าและการติดตั้ง
ส่วนนี้จะแนะนำขั้นตอนการติดตั้งเมนบอร์ดและส่วนประกอบต่างๆ อย่างละเอียด
6.1. เมนบอร์ดเกินview
Familiarize yourself with the layout of your motherboard before beginning installation.

ภาพ: ภาพรวม view of the Tangxi X99 P4 Motherboard, highlighting key components like the CPU socket, RAM slots, and expansion slots.
6.2. การติดตั้งซีพียู
Follow these steps to install your LGA 2011-3 compatible CPU:
- Locate the LGA 2011-3 CPU socket on the motherboard.
- Gently push down the load lever and pull it outwards to open the CPU socket cover.
- Carefully align the CPU with the socket, ensuring the gold triangle on the CPU matches the indicator on the socket. Do not force the CPU into place.
- Once seated, close the socket cover and push the load lever back into its locked position.
- ทาซิลิโคนระบายความร้อนลงบนซีพียู และติดตั้งพัดลมระบายความร้อนซีพียูตามคำแนะนำของผู้ผลิต

ภาพ: รายละเอียด view of the LGA 2011-3 CPU socket, essential for correctly installing your compatible processor.
6.3. การติดตั้งหน่วยความจำ (RAM)
The motherboard supports DDR4 dual-channel memory. Install your RAM modules as follows:
- คลายคลิปที่ปลายทั้งสองด้านของช่องเสียบหน่วยความจำ DDR4
- จัดตำแหน่งรอยบากบนโมดูล RAM ให้ตรงกับร่องในช่องเสียบหน่วยความจำ
- กดลงบนปลายทั้งสองด้านของโมดูล RAM ให้แน่นจนกระทั่งคลิปล็อกเข้าที่
- For dual-channel performance, install modules in matching color slots (if applicable) or refer to the motherboard's silkscreen for recommended configurations.
6.4. การติดตั้งอุปกรณ์จัดเก็บข้อมูล
The motherboard supports NVME M.2 SSDs and SATA drives.
6.4.1. NVME M.2 SSD Installation
- Locate the NVME M.2 slot on the motherboard.
- ถอดสกรูสแตนด์ออฟ M.2 ออก
- ใส่ M.2 SSD เข้าไปในช่องโดยทำมุม 30 องศา
- กด SSD ลงเบาๆ แล้วยึดด้วยสกรูยึด
6.4.2. การติดตั้งไดรฟ์ SATA
- ต่อปลายด้านหนึ่งของสายเคเบิลข้อมูล SATA เข้ากับพอร์ต SATA บนเมนบอร์ด
- เชื่อมต่อปลายอีกด้านหนึ่งของสายเคเบิลข้อมูล SATA เข้ากับฮาร์ดไดรฟ์หรือ SSD ของคุณ
- เชื่อมต่อสายไฟ SATA จากหน่วยจ่ายไฟ (PSU) เข้ากับฮาร์ดไดรฟ์

Image: This image highlights the high-speed NVME M.2 interface for modern SSDs and the various USB 3.0 and USB 2.0 ports available for peripheral connections.
6.5. การติดตั้งการ์ดขยาย (PCIe)
To install a graphics card or other PCIe expansion cards:
- Locate the appropriate PCIE X16 or PCIE X1 slot.
- ถอดฝาครอบช่องขยายที่สอดคล้องกันออกจากเคสพีซีของคุณ
- วางการ์ดให้ตรงกับช่องเสียบแล้วกดลงไปให้แน่นจนกว่าจะเข้าที่สนิท
- ยึดการ์ดเข้ากับเคสด้วยสกรู
- Connect any necessary power cables from your PSU to the graphics card.
6.6. Connecting I/O Peripherals
Connect your external devices to the rear I/O panel:
- อุปกรณ์ยูเอสบี: Connect keyboards, mice, and other USB devices to the available USB 2.0 or USB 3.0 ports.
- สายเคเบิลเครือข่าย: Connect an Ethernet cable to the RJ45 network port for internet access.
- อุปกรณ์เสียง: Connect speakers, headphones, or microphones to the audio jacks.
- อุปกรณ์ PS/2: If using legacy PS/2 keyboards or mice, connect them to the dedicated PS/2 ports.
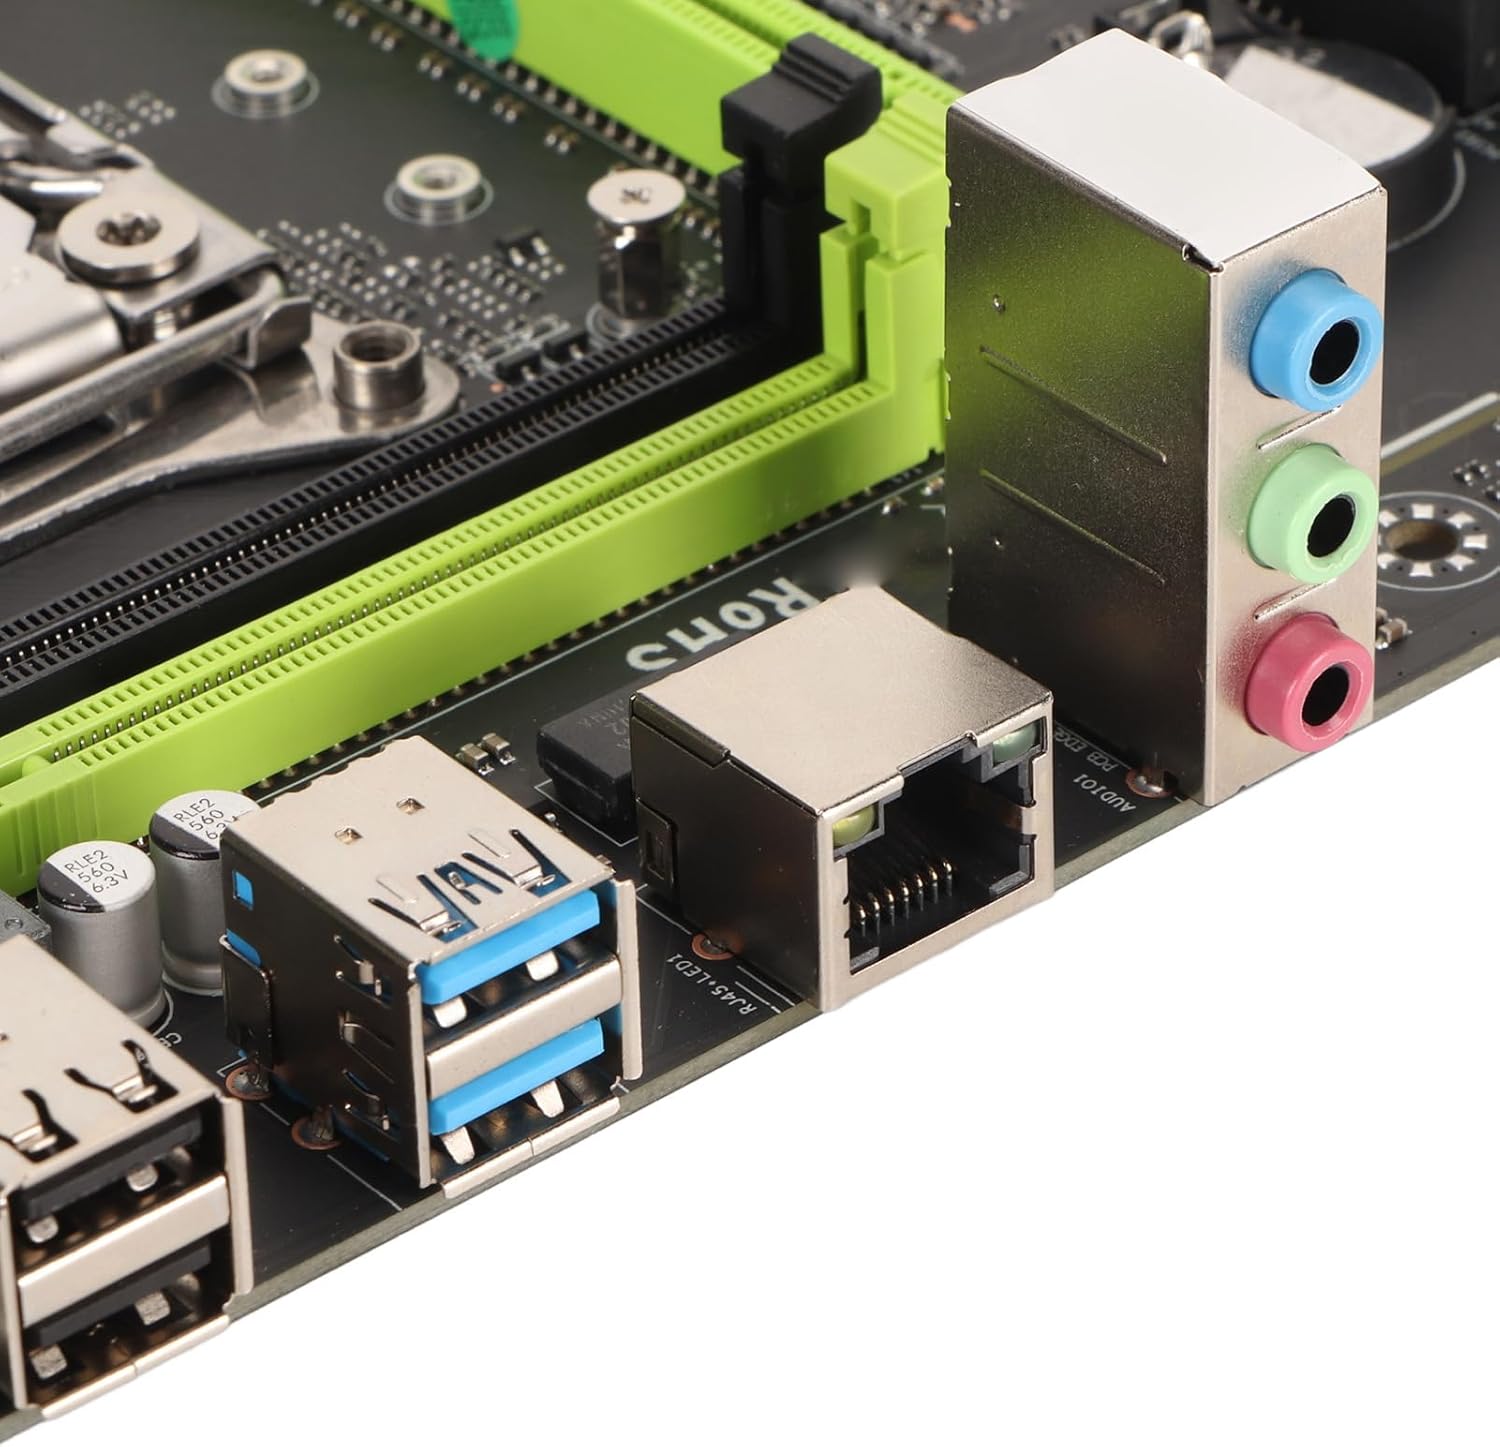
Image: The rear input/output panel of the motherboard, illustrating the available ports for connecting external devices such as keyboards, mice, network cables, and audio equipment.
7. คู่มือการใช้งาน
7.1. เปิดเครื่องครั้งแรก
After completing all hardware installations, connect your monitor, keyboard, and mouse. Connect the power cord to your PSU and turn on the power switch. Press the power button on your PC case. The system should boot up, and you should see a display on your monitor.
7.2. การกำหนดค่า BIOS/UEFI
To access the BIOS/UEFI setup utility, press the designated key (usually DEL or F2) repeatedly during the initial boot sequence. In the BIOS/UEFI, you can configure boot order, system time, and other advanced settings. Save your changes before exiting.
7.3. การติดตั้งไดร์เวอร์
After installing your operating system, it is crucial to install the necessary drivers for your motherboard's components (chipset, audio, network, etc.). These drivers are typically provided on a CD/DVD included with the motherboard or can be downloaded from the Tangxi official webเว็บไซต์.
8. การบำรุงรักษา
การบำรุงรักษาตามปกติจะช่วยให้เมนบอร์ดของคุณมีอายุการใช้งานยาวนานและมีประสิทธิภาพเหมาะสมที่สุด
8.1. การทำความสะอาด
Periodically clean the interior of your PC case to remove dust buildup, which can impede airflow and cause overheating. Use compressed air to gently clear dust from the motherboard, CPU cooler, and other components. Ensure the system is powered off and unplugged before cleaning.
8.2. การอัปเดตเฟิร์มแวร์
Check the Tangxi official website for BIOS/UEFI firmware updates. Firmware updates can improve system stability, add new features, or enhance compatibility. Follow the instructions provided by Tangxi carefully when performing a firmware update, as an incorrect procedure can damage the motherboard.
9 การแก้ไขปัญหา
หากคุณพบปัญหาเกี่ยวกับเมนบอร์ด โปรดพิจารณาขั้นตอนการแก้ไขปัญหาทั่วไปต่อไปนี้:
- ไม่มีไฟฟ้า: Ensure all power cables (24-pin ATX, 8-pin CPU, PCIe power) are securely connected. Check your PSU and power outlet.
- ไม่มีจอแสดงผล: Verify that your monitor is connected and powered on. Reseat your graphics card and RAM modules. Try booting with only one RAM stick.
- ความไม่เสถียรของระบบ/การขัดข้อง: Check for overheating. Ensure all drivers are up to date. Test RAM modules individually.
- ไม่ตรวจพบอุปกรณ์ต่อพ่วง: Ensure the device is properly connected. Try a different port. Install necessary drivers.
- รีเซ็ต BIOS: If system settings are incorrect, you can clear the CMOS by removing the CR2032 battery for a few minutes or using the designated CMOS clear jumper (refer to motherboard silkscreen).
10. การรับประกันและการสนับสนุน
Warranty information for the Tangxi X99 P4 Motherboard is typically provided at the point of purchase or can be found on the official Tangxi webไซต์ โปรดเก็บหลักฐานการซื้อไว้เพื่อใช้ในการเรียกร้องการรับประกัน
For technical support, driver downloads, or further assistance, please visit the official Tangxi website or contact your retailer. Provide your motherboard model number (Tangxih0v2eg3t6f) and a detailed description of your issue when seeking support.