
1. สินค้าหมดview
The Cuifati ITX Computer Motherboard H6 ME is designed for compact computing systems, offering essential features for a reliable and efficient build. This motherboard supports LGA 1155 CPUs and DDR3 memory, providing a stable foundation for various applications.
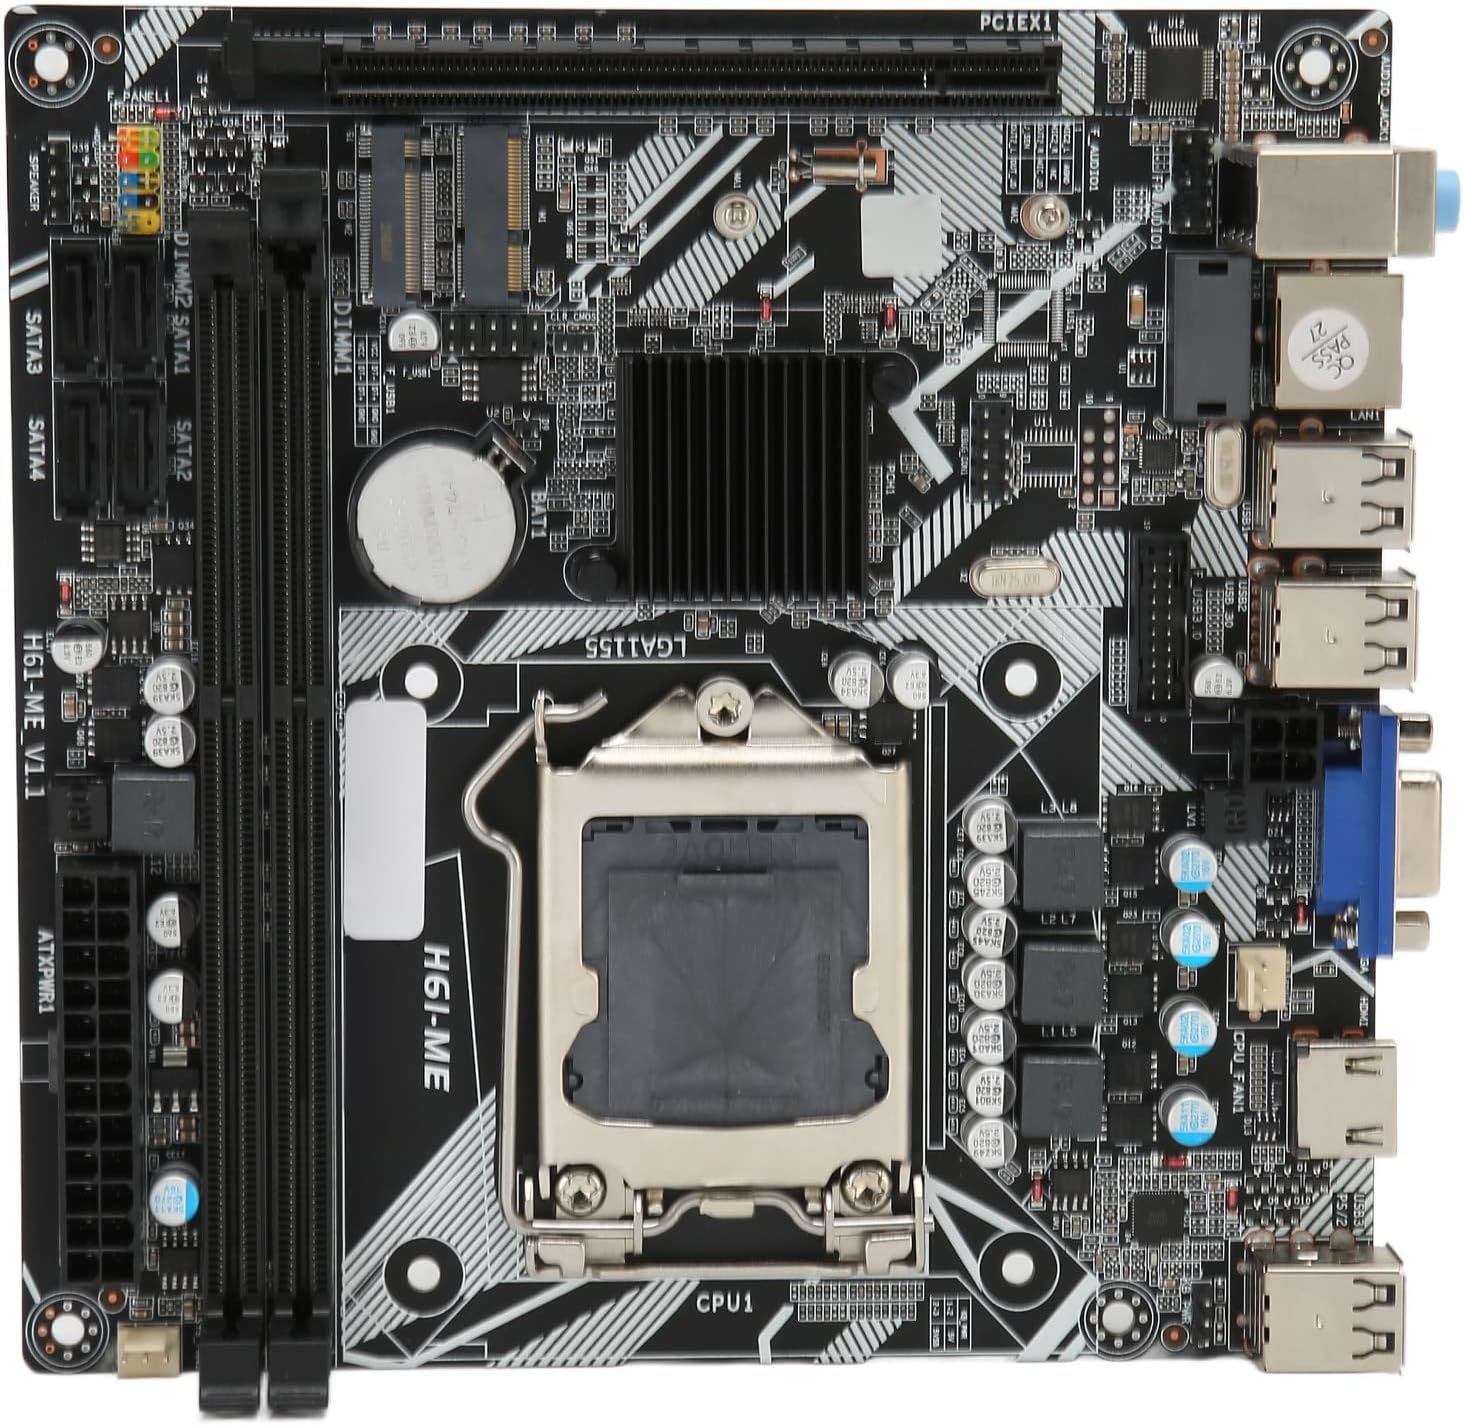
Figure 1: Cuifati ITX Computer Motherboard H6 ME (Top View)
2. คุณสมบัติหลัก
- LGA 1155 CPU Slot: Supports LGA 1155 processors for stable performance.
- Multiphase Power Design: Features stable and accurate multiphase power delivery for improved CPU performance.
- เอาต์พุตวิดีโอ HD: Equipped with VGA and HD Multimedia Interface (HDMI) for digital high-definition video output.
- หน่วยความจำ DDR3 แบบ Dual Channel: Incorporates two DDR3 memory slots, supporting up to 16GB, enhancing overall system performance.
- Multiple USB2.0 Interfaces: Provides 10 USB2.0 interfaces (4 front, 6 rear) for extensive peripheral connectivity.
- ตัวเลือกการจัดเก็บ: Includes 4 SATA2.0 ports and M.2 NVME support for various storage solutions.
- PCIe 16X Slot: Features a PCIe 16X slot for dedicated graphics cards or other expansion cards.
3. เนื้อหาบรรจุภัณฑ์
ตรวจสอบว่ามีรายการทั้งหมดอยู่ในบรรจุภัณฑ์ก่อนดำเนินการติดตั้ง
- 1 x Cuifati LGA 1155 Motherboard (H6 ME)
- 1 x Metal I/O Plate
- 1 x SATA Connecting Cable

Figure 2: Motherboard and Included Accessories
4. การตั้งค่าและการติดตั้ง
This section provides instructions for installing the Cuifati H6 ME motherboard into your computer system. Ensure your system is powered off and unplugged before beginning any installation.
4.1. การระบุส่วนประกอบ
Familiarize yourself with the layout of the motherboard and its various connectors.

Figure 3: Motherboard Component Diagram
- CPU Slot (LGA 1155): For installing your Intel LGA 1155 processor.
- DDR3 Slots: Two slots for DDR3 memory modules.
- PCIe 16X Slot: สำหรับการ์ดจอหรือการ์ดขยายอื่นๆ
- SATA2.0 Ports: Four ports for connecting SATA storage devices (HDDs/SSDs).
- NVME M.2 Slot: For high-speed NVME M.2 SSDs.
- ขั้วต่อแผงด้านหน้า: Pins for power switch, reset switch, HDD LED, and power LED.
- USB2.0 Headers: สำหรับพอร์ต USB ที่แผงด้านหน้า
- 24-Pin ATX Power Connector: Main power input from the power supply.
- 4-Pin CPU Power Connector: พลังงานเพิ่มเติมสำหรับซีพียู
- พอร์ต I/O ด้านหลัง: USB, VGA, HDMI, LAN, Audio ports.
4.2. ขั้นตอนการติดตั้ง
- เตรียมคดี: ตรวจสอบให้แน่ใจว่าเคสคอมพิวเตอร์ของคุณพร้อมสำหรับการติดตั้งเมนบอร์ดแล้ว ติดตั้งตัวยึดหากจำเป็น
- ติดตั้งแผ่นป้องกันพอร์ต I/O: Snap the metal I/O plate into the corresponding opening in your computer case.
- ติดตั้งซีพียู:
- เปิดคันโยกซ็อกเก็ต CPU และถอดฝาครอบป้องกันออก
- Carefully align your LGA 1155 CPU with the socket, ensuring the notches on the CPU match the keys on the socket.
- วาง CPU ลงในซ็อกเก็ตเบาๆ อย่าฝืน
- ปิดก้านซ็อกเก็ตเพื่อยึดซีพียู
- ติดตั้งตัวระบายความร้อน CPU: Apply thermal paste (if not pre-applied) and install your CPU cooler according to its manufacturer's instructions. Connect the CPU fan cable to the "CPU FAN" header on the motherboard.
- ติดตั้งหน่วยความจำ (RAM):
- คลายคลิปที่ปลายทั้งสองด้านของช่องเสียบหน่วยความจำ DDR3
- จัดตำแหน่งรอยบากบนโมดูลหน่วยความจำ DDR3 ให้ตรงกับร่องในช่องเสียบ
- กดปลายทั้งสองข้างของโมดูลหน่วยความจำให้แน่นจนกระทั่งคลิปล็อคเข้าที่
- ติดตั้งเมนบอร์ด: วางเมนบอร์ดลงในเคสอย่างระมัดระวัง โดยจัดตำแหน่งรูสกรูให้ตรงกับตัวรองรับ จากนั้นขันเมนบอร์ดให้แน่นด้วยสกรู
- เชื่อมต่อสายไฟ:
- เชื่อมต่อสายไฟ ATX 24 พินจากพาวเวอร์ซัพพลายเข้ากับขั้วต่อไฟหลักบนเมนบอร์ด
- Connect the 4-pin CPU power cable to the CPU power connector.
- ติดตั้งอุปกรณ์จัดเก็บข้อมูล: Connect your SATA HDDs/SSDs to the SATA2.0 ports using the provided SATA cable. If using an NVME M.2 SSD, install it into the M.2 slot and secure it with the screw.
- ติดตั้งการ์ดจอ (ไม่จำเป็น): If using a dedicated graphics card, insert it into the PCIe 16X slot and secure it. Connect any necessary PCIe power cables from your power supply.
- เชื่อมต่อสายเคเบิลแผงด้านหน้า: Connect the power switch, reset switch, HDD LED, and power LED cables from your case to the corresponding pins on the motherboard's front panel header. Refer to the motherboard diagram (Figure 3) for pin assignments.
- เชื่อมต่อสาย USB และสายสัญญาณเสียง: Connect front panel USB and audio cables to their respective headers on the motherboard.

Figure 4: PCIe 16X Slot for Expansion Cards
5. คู่มือการใช้งาน
เมื่อติดตั้งและเชื่อมต่อส่วนประกอบทั้งหมดแล้ว คุณสามารถเปิดระบบได้
5.1. เปิดเครื่องครั้งแรก
- เชื่อมต่อจอภาพ คีย์บอร์ด และเมาส์เข้ากับพอร์ตที่เหมาะสมบนแผง I/O ด้านหลัง
- Plug in the power cable to your power supply and turn on the power supply switch.
- กดปุ่มเปิด/ปิดบนเคสคอมพิวเตอร์ของคุณ
- The system should boot up, and you should see output on your monitor.
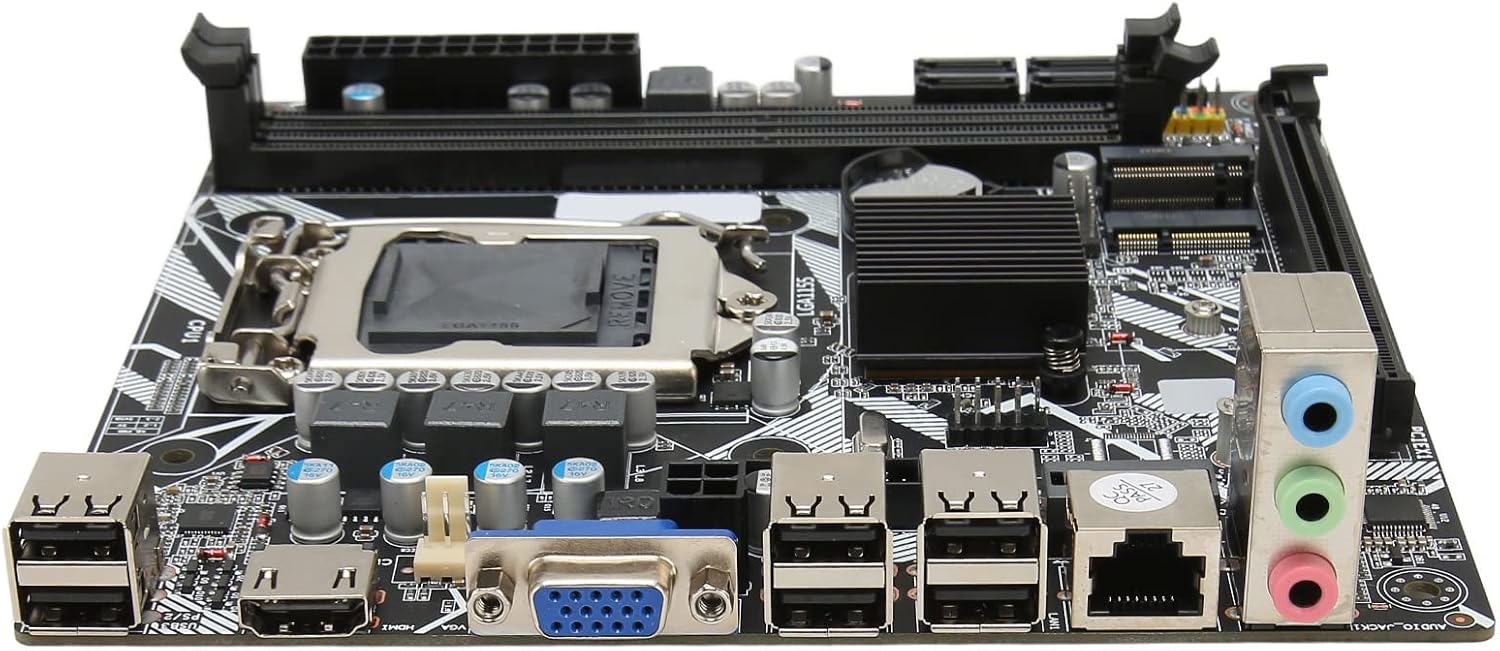
รูปที่ 5: พอร์ต I/O ด้านหลัง
5.2. การตั้งค่า BIOS/UEFI
To access the BIOS/UEFI setup utility, press the designated key (usually เดล or F2) repeatedly during the initial boot sequence. From the BIOS, you can configure system settings, boot order, and monitor hardware status.
5.3. การติดตั้งระบบปฏิบัติการ
Once the system is stable, you can proceed with installing your preferred operating system (e.g., Windows, Linux) from a bootable USB drive or DVD.
6. การบำรุงรักษา
Proper maintenance can extend the lifespan of your motherboard and ensure optimal performance.
- การกำจัดฝุ่น: ควรทำความสะอาดฝุ่นภายในเคสคอมพิวเตอร์เป็นประจำ โดยเฉพาะอย่างยิ่งบริเวณพัดลมและแผ่นระบายความร้อน โดยใช้ลมเป่าอัดแรงดันสูง ตรวจสอบให้แน่ใจว่าได้ปิดเครื่องและถอดปลั๊กออกก่อนทำความสะอาด
- การจัดการสายเคเบิล: จัดวางสายเคเบิลให้เรียบร้อยเพื่อเพิ่มการไหลเวียนของอากาศและป้องกันการรบกวน
- อัปเดต BIOS: ตรวจสอบผู้ผลิตเป็นระยะ website for BIOS updates. Update the BIOS only if necessary and follow the instructions carefully to avoid system instability.
- สภาพแวดล้อม : ควรใช้งานเมนบอร์ดในบริเวณที่มีอากาศถ่ายเทสะดวก หลีกเลี่ยงแสงแดดโดยตรง ความร้อนสูง และความชื้น
7 การแก้ไขปัญหา
หัวข้อนี้จะกล่าวถึงปัญหาทั่วไปที่คุณอาจพบเจอ
- ไม่มีไฟฟ้า:
- Check if the power supply is plugged in and switched on.
- Verify that the 24-pin and 4-pin power cables are securely connected to the motherboard.
- ตรวจสอบให้แน่ใจว่าสายเคเบิลของสวิตช์เปิดปิดแผงด้านหน้าเชื่อมต่อกับหัวต่อบนเมนบอร์ดอย่างถูกต้อง
- ไม่มีจอแสดงผล:
- Confirm that the monitor is connected to the correct video output (VGA or HDMI) on the motherboard or graphics card.
- ลองถอดและเสียบโมดูล RAM ใหม่ ลองบูตเครื่องโดยเสียบ RAM เพียงโมดูลเดียวดู
- ถอดและเสียบการ์ดจอใหม่ (ถ้ามี)
- Ensure the CPU is properly seated and the CPU cooler is installed correctly.
- ความไม่เสถียรของระบบ/การขัดข้อง:
- Check for overheating. Ensure CPU cooler and case fans are functioning.
- ตรวจสอบโมดูลหน่วยความจำเพื่อหาข้อผิดพลาดโดยใช้เครื่องมือวินิจฉัย
- ตรวจสอบให้แน่ใจว่าไดรเวอร์ทั้งหมด (ชิปเซ็ต, กราฟิก ฯลฯ) ได้รับการอัปเดตแล้ว
- ไม่ตรวจพบอุปกรณ์ต่อพ่วง:
- ลองเชื่อมต่ออุปกรณ์ต่อพ่วงกับพอร์ต USB อื่น
- ตรวจสอบให้แน่ใจว่าได้ติดตั้งไดรเวอร์ที่จำเป็นสำหรับอุปกรณ์ต่อพ่วงแล้ว
- Check BIOS settings to ensure USB ports are enabled.
8. ข้อมูลจำเพาะ
| คุณสมบัติ | คำอธิบาย |
|---|---|
| เมนบอร์ดรุ่น | H6 ME |
| ประเภทเมนบอร์ด | ไอทีเอ็กซ์ |
| CPU Slot Type | แอลจีเอ 1155 |
| สล็อตหน่วยความจำ | DDR3 x 2 |
| ความจุหน่วยความจำสูงสุด | สูงสุด 16GB |
| พอร์ต SATA | SATA2.0 x 4 |
| ช่องเสียบการ์ดกราฟิก | PCIe 16X |
| อินเทอร์เฟซ USB | USB2.0 x 10 (4 Front, 6 Rear) |
| อินเทอร์เฟซการขยาย | VGA x 1, HD Multimedia Interface (HDMI) x 1, M.2, NVME M.2, DEBUG Pin x 1 |
| Sound Audio Card | Realtek ALC662 Sound Chip |
| การ์ดเครือข่าย | 100M Network Card |
| แบตเตอรี่ในตัว | 240mAh CR2032 x 1 |
| น้ำหนักสินค้า | 1.13 ปอนด์ |
| ขนาดแพ็คเกจ | 8.27 x 7.87 x 1.97 นิ้ว |
| หมายเลขรุ่น | CUIFATI6wgctin4bz |
9. การรับประกันและการสนับสนุน
For warranty information or technical support, please refer to the retailer where the product was purchased or visit the official Cuifati webไซต์นี้ โปรดเก็บหลักฐานการซื้อไว้เพื่อใช้ยืนยันการรับประกัน
ผู้ผลิต: CUIFATI
วันที่เข้าใช้งานครั้งแรก: วันที่ 19 ธันวาคม 2023
For additional assistance, you may contact Cuifati customer service through their official channels.