
1. บทนำ
The Vivolink USB-C 4K KVM Extender (Model W126974534) is designed to extend USB-C signals, including 4K video, USB data (for keyboard, mouse, and other peripherals), and control signals, over long distances using HDBaseT 3.0 technology. This system consists of a Transmitter (TX) unit and a Receiver (RX) unit, connected by a single Cat6a/7 Ethernet cable. It enables users to operate a computer or other USB-C source device from a remote location with a display, keyboard, and mouse, maintaining high-quality 4K resolution.
2. ข้อมูลด้านความปลอดภัย
- อ่านคำแนะนำทั้งหมดอย่างละเอียดก่อนใช้งานอุปกรณ์
- อย่านำอุปกรณ์นี้ไปวางไว้กลางฝน ความชื้น หรือความชื้นสูงเกินไป
- ต้องแน่ใจว่ามีการระบายอากาศที่เหมาะสมเพื่อป้องกันความร้อนสูงเกินไป อย่าปิดกั้นช่องระบายอากาศ
- Use only the power adapters provided with the unit.
- ห้ามเปิดหรือดัดแปลงตัวเครื่องเอง ควรส่งมอบเครื่องให้ช่างผู้ชำนาญการเป็นผู้ดำเนินการซ่อมบำรุง
- เก็บอุปกรณ์ให้ห่างจากสนามแม่เหล็กไฟฟ้าที่มีความแรง
- ตัดการเชื่อมต่อไฟฟ้าระหว่างเกิดพายุฝนฟ้าคะนองหรือเมื่อไม่ได้ใช้งานเป็นเวลานาน
3. เนื้อหาบรรจุภัณฑ์
โปรดตรวจสอบสิ่งของภายในบรรจุภัณฑ์อย่างละเอียด หากมีสิ่งของใดสูญหายหรือเสียหาย โปรดติดต่อตัวแทนจำหน่ายของคุณทันที
- 1x Vivolink USB-C 4K KVM Extender Transmitter (TX) Unit
- 1x Vivolink USB-C 4K KVM Extender Receiver (RX) Unit
- อะแดปเตอร์ไฟ 2x (DC 12V)
- สาย USB-C ถึง USB-C 1 เส้น
- 1x คู่มือผู้ใช้
- Mounting accessories (if included)
4. สินค้าหมดview
The Vivolink USB-C 4K KVM Extender leverages HDBaseT 3.0 technology to provide uncompressed 4K video, audio, USB 2.0, and control signals over a single Cat6a/7 cable up to 100 meters. This solution is ideal for applications requiring remote access to a USB-C enabled computer, such as control rooms, medical imaging, digital signage, and educational facilities.
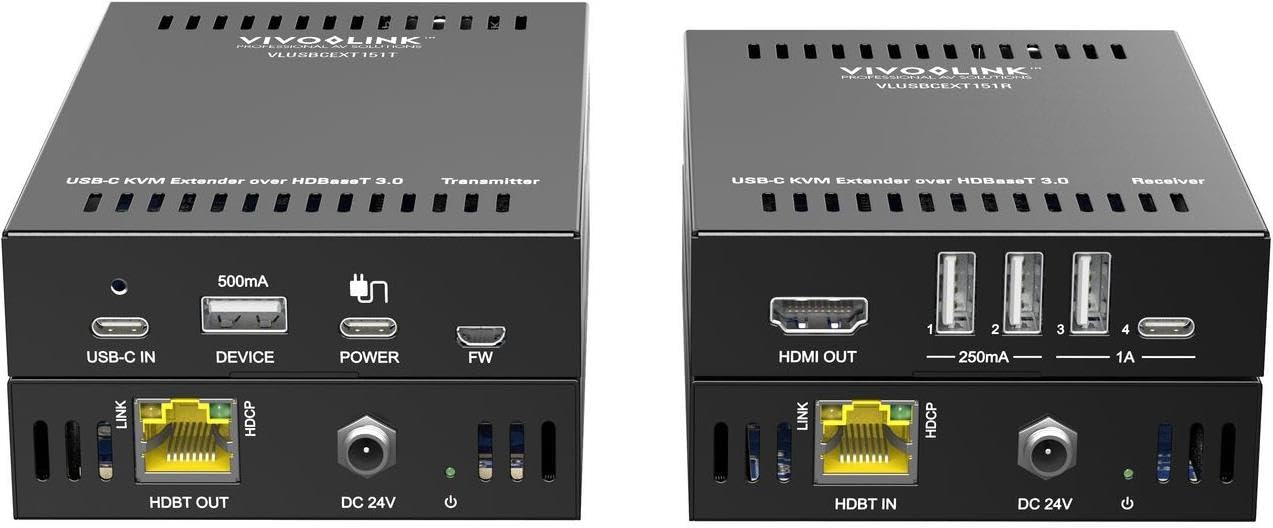
ภาพที่ 1: Vivolink USB-C 4K KVM Extender units. This image displays the compact design of both the transmitter and receiver units, highlighting their various ports for connectivity.
The Transmitter unit connects to your USB-C source device (e.g., laptop, PC), while the Receiver unit connects to your display, keyboard, mouse, and other USB peripherals at the remote location. The HDBaseT 3.0 link ensures reliable and high-bandwidth transmission.
5. คำแนะนำในการตั้งค่า
Follow these steps to set up your Vivolink USB-C 4K KVM Extender:
- ปิดอุปกรณ์: Ensure all devices, including your source computer, display, and the KVM extender units, are powered off before making any connections.
- เชื่อมต่อแหล่งที่มากับเครื่องส่งสัญญาณ: Connect your USB-C source device (e.g., PC, laptop) to the USB-C input port on the Transmitter (TX) unit using the provided USB-C cable.
- เชื่อมต่อจอแสดงผลกับเครื่องรับ: Connect your display (monitor) to the HDMI output port on the Receiver (RX) unit using an HDMI cable.
- Connect Peripherals to Receiver: Connect your USB keyboard, mouse, and any other USB peripherals to the USB ports on the Receiver (RX) unit.
- Connect TX and RX Units: Connect the HDBaseT OUT port on the Transmitter (TX) unit to the HDBaseT IN port on the Receiver (RX) unit using a single, high-quality Cat6a or Cat7 Ethernet cable. Ensure the cable length does not exceed 100 meters for optimal performance.
- ใช้พลัง: Connect the provided 12V DC power adapters to both the Transmitter (TX) and Receiver (RX) units, then plug them into power outlets.
- เปิดอุปกรณ์: Power on your display, then your source computer. The extender units will typically power on automatically when connected to power.
- ตรวจสอบการเชื่อมต่อ: Check for signal on your remote display and test the functionality of your keyboard and mouse.
6. คู่มือการใช้งาน
Once the Vivolink USB-C 4K KVM Extender is set up correctly, operation is straightforward:
- การตรวจจับสัญญาณอัตโนมัติ: The extender units are designed to automatically detect and transmit the video, audio, and USB signals from your source device to the remote display and peripherals.
- ปณิธาน: The system supports resolutions up to 4K (3840x2160) at 60Hz, depending on the capabilities of your source and display devices.
- ฟังก์ชั่น USB: All connected USB devices (keyboard, mouse, USB drives, etc.) should function as if directly connected to the source computer.
- การปั่นจักรยานด้วยพลัง: If you encounter any issues, try power cycling both the Transmitter and Receiver units, as well as your source computer and display.
7. การบำรุงรักษา
To ensure the longevity and optimal performance of your Vivolink USB-C 4K KVM Extender, follow these maintenance guidelines:
- การทำความสะอาด: ใช้ผ้าแห้งนุ่มเช็ดทำความสะอาดภายนอกตัวเครื่อง ห้ามใช้น้ำยาทำความสะอาดหรือสเปรย์กระป๋อง
- การระบายอากาศ : ตรวจสอบให้แน่ใจว่าช่องระบายอากาศของทั้งสองเครื่องไม่มีสิ่งกีดขวาง เพื่อป้องกันความร้อนสูงเกินไป
- การจัดการสายเคเบิล: Keep cables neatly organized and avoid sharp bends or excessive tension on connectors.
- สิ่งแวดล้อม: Store and operate the device in a cool, dry environment, away from direct sunlight, heat sources, and extreme temperatures.
8 การแก้ไขปัญหา
If you experience issues with your KVM extender, refer to the following troubleshooting steps:
| ปัญหา | วิธีแก้ปัญหาที่เป็นไปได้ |
|---|---|
| No video on remote display |
|
| คีย์บอร์ด/เมาส์ไม่ตอบสนอง |
|
| Intermittent signal or flickering video |
|
9. ข้อมูลจำเพาะ
- ยี่ห้อ: วีโว่ลิงค์
- แบบอย่าง: W126974534 (VLUSBCEXT150)
- เทคโนโลยี: HDBaseT3.0
- ความละเอียดวิดีโอ: ความละเอียดสูงสุด 4K (3840x2160) ที่ 60Hz
- ป้อนข้อมูล: USB-C (on TX unit)
- เอาท์พุต: HDMI (on RX unit)
- ยูเอสบี: USB 2.0 (on RX unit for peripherals)
- ระยะขยาย: Up to 100 meters (328 feet) over Cat6a/7 cable
- แหล่งจ่ายไฟ: DC 12V (via included power adapters)
- ผู้ผลิต: วีโว่ลิงค์
- ASIN: B0CPWLBPGF
10. การรับประกันและการสนับสนุน
Vivolink products are designed for reliability and performance. For information regarding warranty coverage, technical support, or service, please refer to the warranty card included with your product or visit the official Vivolink website. Please have your product model number (W126974534) and purchase details ready when contacting support.
แหล่งข้อมูลออนไลน์: For the latest drivers, firmware updates, and additional support documentation, please visit the Vivolink support page.