
1. บทนำ
The ESP32-PICO-KIT-1 is a compact development board designed by Espressif, featuring the ESP32-PICO-V3 chip. This board provides a robust hardware platform for developing and prototyping applications based on the ESP32, enabling users to explore its extensive functionalities, including Wi-Fi connectivity. This manual will guide you through the essential steps to set up, operate, maintain, and troubleshoot your ESP32-PICO-KIT-1.
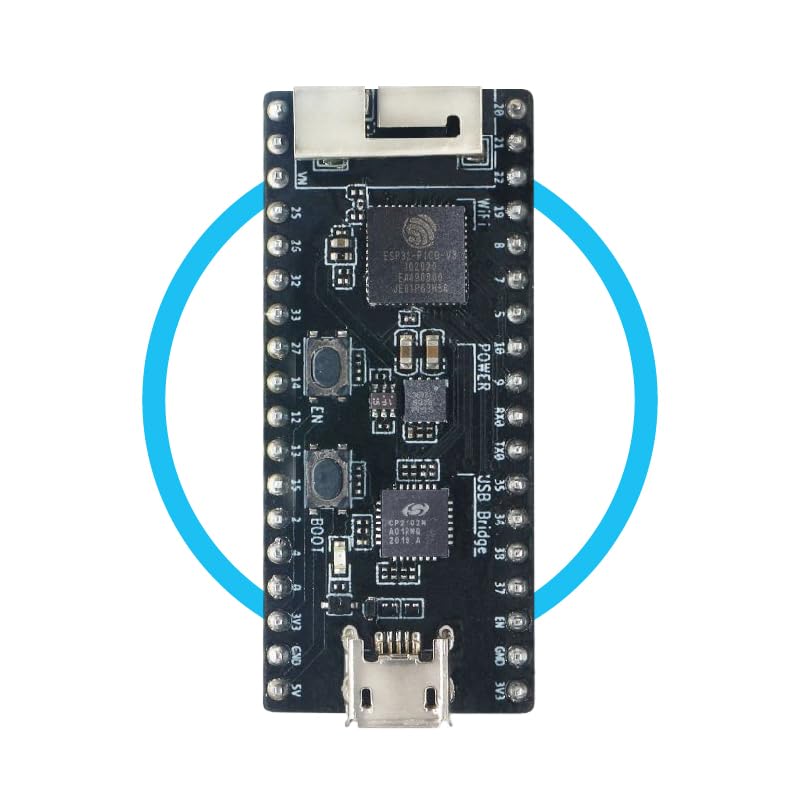
Figure 1: Espressif ESP32-PICO-KIT-1 Development Board. This image displays the compact form factor of the development board, highlighting its main components and pin headers.
2. การตั้งค่า
Follow these steps to prepare your ESP32-PICO-KIT-1 for development:
- การแกะกล่อง: Carefully remove the ESP32-PICO-KIT-1 board from its packaging. Inspect for any visible damage.
- การเชื่อมต่อไฟฟ้า: Connect the board to your computer using a standard Micro-USB cable. The board will draw power from the USB port. Ensure the cable is securely connected to both the board's Micro-USB port and your computer's USB port.
- การติดตั้งไดร์เวอร์: Depending on your operating system (Windows, macOS, Linux), you may need to install USB-to-Serial drivers (e.g., CP210x or FTDI drivers) to allow your computer to communicate with the ESP32-PICO-KIT-1. These drivers are typically available on the Espressif official website or the chip manufacturer's webเว็บไซต์.
- การตั้งค่าสภาพแวดล้อมการพัฒนา: Install the necessary development tools, such as the Espressif IDF (IoT Development Framework) or Arduino IDE with ESP32 board support. Refer to the official Espressif documentation for detailed instructions on setting up your preferred development environment.
3. Operating the ESP32-PICO-KIT-1
Once your development environment is set up, you can begin programming and operating your ESP32-PICO-KIT-1:
- Connecting to the IDE: Open your chosen Integrated Development Environment (IDE). Select the correct board model (ESP32 Dev Module or similar) and the serial port corresponding to your connected ESP32-PICO-KIT-1.
- Uploading Firmware: Write or load your application code. Compile the code and then upload it to the ESP32-PICO-KIT-1 board via the USB connection. The board will typically reset automatically after a successful upload.
- Monitoring Serial Output: Use the serial monitor feature in your IDE to view debug messages and output from your running application on the ESP32-PICO-KIT-1. Ensure the baud rate in the serial monitor matches the baud rate configured in your code.
- การเชื่อมต่อ Wi-Fi: The ESP32-PICO-KIT-1 supports Wi-Fi. Your application code can utilize the ESP-IDF Wi-Fi libraries to connect to local networks, host access points, or perform other network-related tasks.
4. การบำรุงรักษา
Proper care ensures the longevity and reliable operation of your ESP32-PICO-KIT-1:
- การจัดการ: Always handle the board by its edges to avoid touching sensitive electronic components. Static electricity can damage the board.
- การทำความสะอาด: If necessary, gently clean the board with a soft, dry, anti-static brush or cloth. Avoid using liquids or abrasive materials.
- พื้นที่จัดเก็บ: เก็บกระดานไว้ในที่แห้งและเย็น หลีกเลี่ยงแสงแดดโดยตรงและอุณหภูมิที่สูงหรือต่ำเกินไป หากเก็บเป็นเวลานาน ให้ใช้ถุงป้องกันไฟฟ้าสถิต
- แหล่งจ่ายไฟ: Use a stable and appropriate power supply (via USB) to prevent damage to the board. Avoid using uncertified or faulty USB cables.
5 การแก้ไขปัญหา
ต่อไปนี้เป็นวิธีแก้ไขปัญหาทั่วไปที่คุณอาจพบเจอ:
- คอมพิวเตอร์ตรวจไม่พบแผงวงจร:
- ตรวจสอบให้แน่ใจว่าเสียบสาย USB แน่นสนิทและใช้งานได้ปกติ
- Verify that the correct USB-to-Serial drivers are installed for your operating system.
- ลองใช้พอร์ต USB อื่นบนคอมพิวเตอร์ของคุณ
- การอัปโหลดเฟิร์มแวร์ล้มเหลว:
- Check if the correct serial port is selected in your IDE.
- Ensure the board is in programming mode (some boards require pressing a 'BOOT' button while resetting).
- Verify that your development environment is correctly configured for the ESP32.
- ปิดแอปพลิเคชันอื่นๆ ที่อาจกำลังใช้งานพอร์ตอนุกรมอยู่
- No Output on Serial Monitor:
- Confirm the baud rate in the serial monitor matches the baud rate set in your code.
- Ensure your code includes serial print statements.
- Check if the board is powered and running your program.
- ปัญหาการเชื่อมต่อ Wi-Fi:
- Double-check Wi-Fi credentials (SSID and password) in your code.
- Ensure the Wi-Fi network is within range and operating on a 2.4 GHz band (ESP32 typically supports 2.4 GHz).
- ตรวจสอบให้แน่ใจว่าเราเตอร์ของคุณไม่ได้บล็อกการเชื่อมต่อใหม่ หรือไม่ได้เปิดใช้งานการกรองที่อยู่ MAC
6. ข้อมูลจำเพาะ
Key technical specifications for the ESP32-PICO-KIT-1 Development Board:
| คุณสมบัติ | รายละเอียด |
|---|---|
| ชื่อรุ่น | ESP32-PICO-KIT-1 |
| ยี่ห้อโปรเซสเซอร์ | เอสเพรสซิฟ |
| จำนวนโปรเซสเซอร์ | 2 |
| ขนาดหน่วยความจำ RAM ที่ติดตั้ง | 520 กิโลไบต์ |
| เทคโนโลยีหน่วยความจำ RAM | แอลพีดีดีอาร์2 |
| เทคโนโลยีการเชื่อมต่อ | ไวไฟ |
| พอร์ต USB รวม | 1 |
| ระบบปฏิบัติการ | Linux (compatible) |
| อุปกรณ์ที่รองรับ | Computers, Smartphones, Microcontrollers |
7. ข้อมูลการรับประกัน
The ESP32-PICO-KIT-1 Development Board comes with a การรับประกันจากผู้ผลิต 2 ปี. This warranty covers defects in materials and workmanship under normal use. For warranty claims or detailed terms and conditions, please refer to the official Espressif webไซต์หรือติดต่อฝ่ายสนับสนุนลูกค้าของพวกเขา
Additionally, the product is eligible for a 30-day refund/replacement return policy from the point of purchase, subject to the retailer's terms.
8. การสนับสนุน
For further assistance, technical documentation, and community support, please visit the official Espressif webเว็บไซต์:
- Espressif Official Webเว็บไซต์: www.espressif.com
- เอกสารประกอบ: Access detailed datasheets, programming guides, and application notes for the ESP32-PICO-KIT-1 and ESP32 series.
- ฟอรั่มชุมชน: Engage with other developers and Espressif experts to share knowledge and troubleshoot issues.
For direct inquiries regarding your purchase, please contact the seller, ESPRESSIF SYSTEMS, through the Amazon platform.