1. บทนำ
This manual provides detailed instructions for the installation, operation, and maintenance of your EVTSCAN Digital Thermoregulator. This device is designed to precisely control heating equipment, such as wall-mounted boilers and gas boilers, ensuring a stable and energy-efficient temperature environment. Please read this manual thoroughly before installation and use to ensure proper function and safety.
2. ข้อมูลด้านความปลอดภัย
โปรดปฏิบัติตามข้อควรระวังด้านความปลอดภัยต่อไปนี้เสมอ เพื่อป้องกันความเสียหายต่ออุปกรณ์หรือการบาดเจ็บส่วนบุคคล:
- ตรวจสอบให้แน่ใจว่าได้ถอดแหล่งจ่ายไฟออกก่อนการติดตั้งหรือการบำรุงรักษา
- หากคุณไม่แน่ใจเกี่ยวกับการเดินสายไฟ ควรให้ช่างผู้ชำนาญการดำเนินการติดตั้ง
- อย่าให้เครื่องโดนน้ำหรือความชื้นมากเกินไป
- ใช้เฉพาะแบตเตอรี่ชนิดที่ระบุ (แบตเตอรี่ AA 2 ก้อน) และตรวจสอบให้แน่ใจว่าขั้วถูกต้อง
- เก็บอุปกรณ์ให้ห่างจากวัสดุไวไฟ
3. สินค้าหมดview
The EVTSCAN Digital Thermoregulator features a clear LCD display for easy monitoring and a simple interface for temperature control. Its compact design allows for discreet integration into your living space.

รูปที่ 3.1 : ด้านหน้า view of the Digital Thermoregulator. The LCD screen displays current settings and room temperature, with a rotary knob below for adjustments.
ส่วนประกอบหลัก:
- จอแสดงผล LCD: Shows set temperature, room temperature, time, and operational icons.
- ปุ่มควบคุม/ลูกบิด: ใช้สำหรับการนำทางเมนูและปรับแต่งการตั้งค่า
- ช่องใส่แบตเตอรี่: Located on the rear or side for 2 AA batteries.
- ขั้วต่อสายไฟ: For connection to the heating system.
4. ข้อมูลจำเพาะ
| คุณสมบัติ | ข้อมูลจำเพาะ |
|---|---|
| แบบอย่าง | EVTSCANok0g9ct2zq |
| โหมดพลังงาน | แบตเตอรี่ AA 2 ก้อน (ไม่รวม) |
| Screen Accuracy | 0.5℃ |
| เซ็นเซอร์โพรบ | กทช. (10k) 1% |
| กำลังการติดต่อ | Greater than 30-230 V DC working voltage, lower current. Reference: 5 A 30 V (HF relay) or 2 A 30 V (NEC relay) |
| ช่วงแสดงอุณหภูมิ | 1 ถึง 40℃ |
| Default Temperature Adjustment Range | 5 ถึง 35℃ |
| ช่วงอุณหภูมิในการทำงาน | 0 ถึง 50℃ |
| โปรแกรมที่กำลังดำเนินการ | Set once a week |
| เอาท์พุต | รีเลย์สวิตชิ่ง |
| วัสดุ | โพลีคาร์บอเนตทนไฟ |
| น้ำหนัก | 170 กรัม |
5. การตั้งค่าและการติดตั้ง
The EVTSCAN Digital Thermoregulator is designed for simple installation. Follow these steps carefully:
5.1. การเปิดออกและการตรวจสอบ
นำส่วนประกอบทั้งหมดออกจากบรรจุภัณฑ์อย่างระมัดระวัง ตรวจสอบว่าอุปกรณ์ทั้งหมดที่ระบุไว้ในบรรจุภัณฑ์ยังคงอยู่ในสภาพสมบูรณ์และไม่เสียหาย
- 1 Digital Temperature Controller
- 2 สกรู
5.2. การติดตั้งแบตเตอรี่
The device requires 2 AA batteries for operation. These are not included in the package.
- Locate the battery compartment on the back of the thermoregulator.
- เปิดฝาช่องใส่แบตเตอรี่
- ใส่แบตเตอรี่ AA จำนวน 2 ก้อน โดยให้แน่ใจว่าขั้วถูกต้อง (+/-)
- ปิดฝาช่องใส่แบตเตอรี่ให้แน่น

รูปที่ 5.1: มุม view of the thermoregulator, illustrating its compact size and potential location for battery access or mounting points.
5.3. การติดตั้งและการเดินสายไฟ
The thermoregulator is designed for wall mounting. Ensure the power to your heating system is turned off before proceeding with wiring.
- เลือกตำแหน่งที่เหมาะสมบนผนังภายในอาคาร โดยให้ห่างจากแสงแดดโดยตรง ลมโกรก หรือแหล่งความร้อนที่อาจส่งผลต่อการวัดอุณหภูมิ
- Mount the backplate (if detachable) to the wall using the provided screws.
- Connect the thermoregulator to your boiler or heating system according to the wiring diagram provided with your boiler and the thermoregulator's terminal markings. This typically involves connecting the switching relay output to the boiler's control input.
- Secure the thermoregulator onto the mounted backplate.
บันทึก: For wiring, consult a qualified electrician if you are unfamiliar with electrical installations.
6. คู่มือการใช้งาน
The EVTSCAN Digital Thermoregulator uses a microcomputer control technology to maintain your desired temperature efficiently.
6.1. Powering On and Initial Display
Once batteries are installed, the LCD display will illuminate, showing the current room temperature, set temperature, and time.
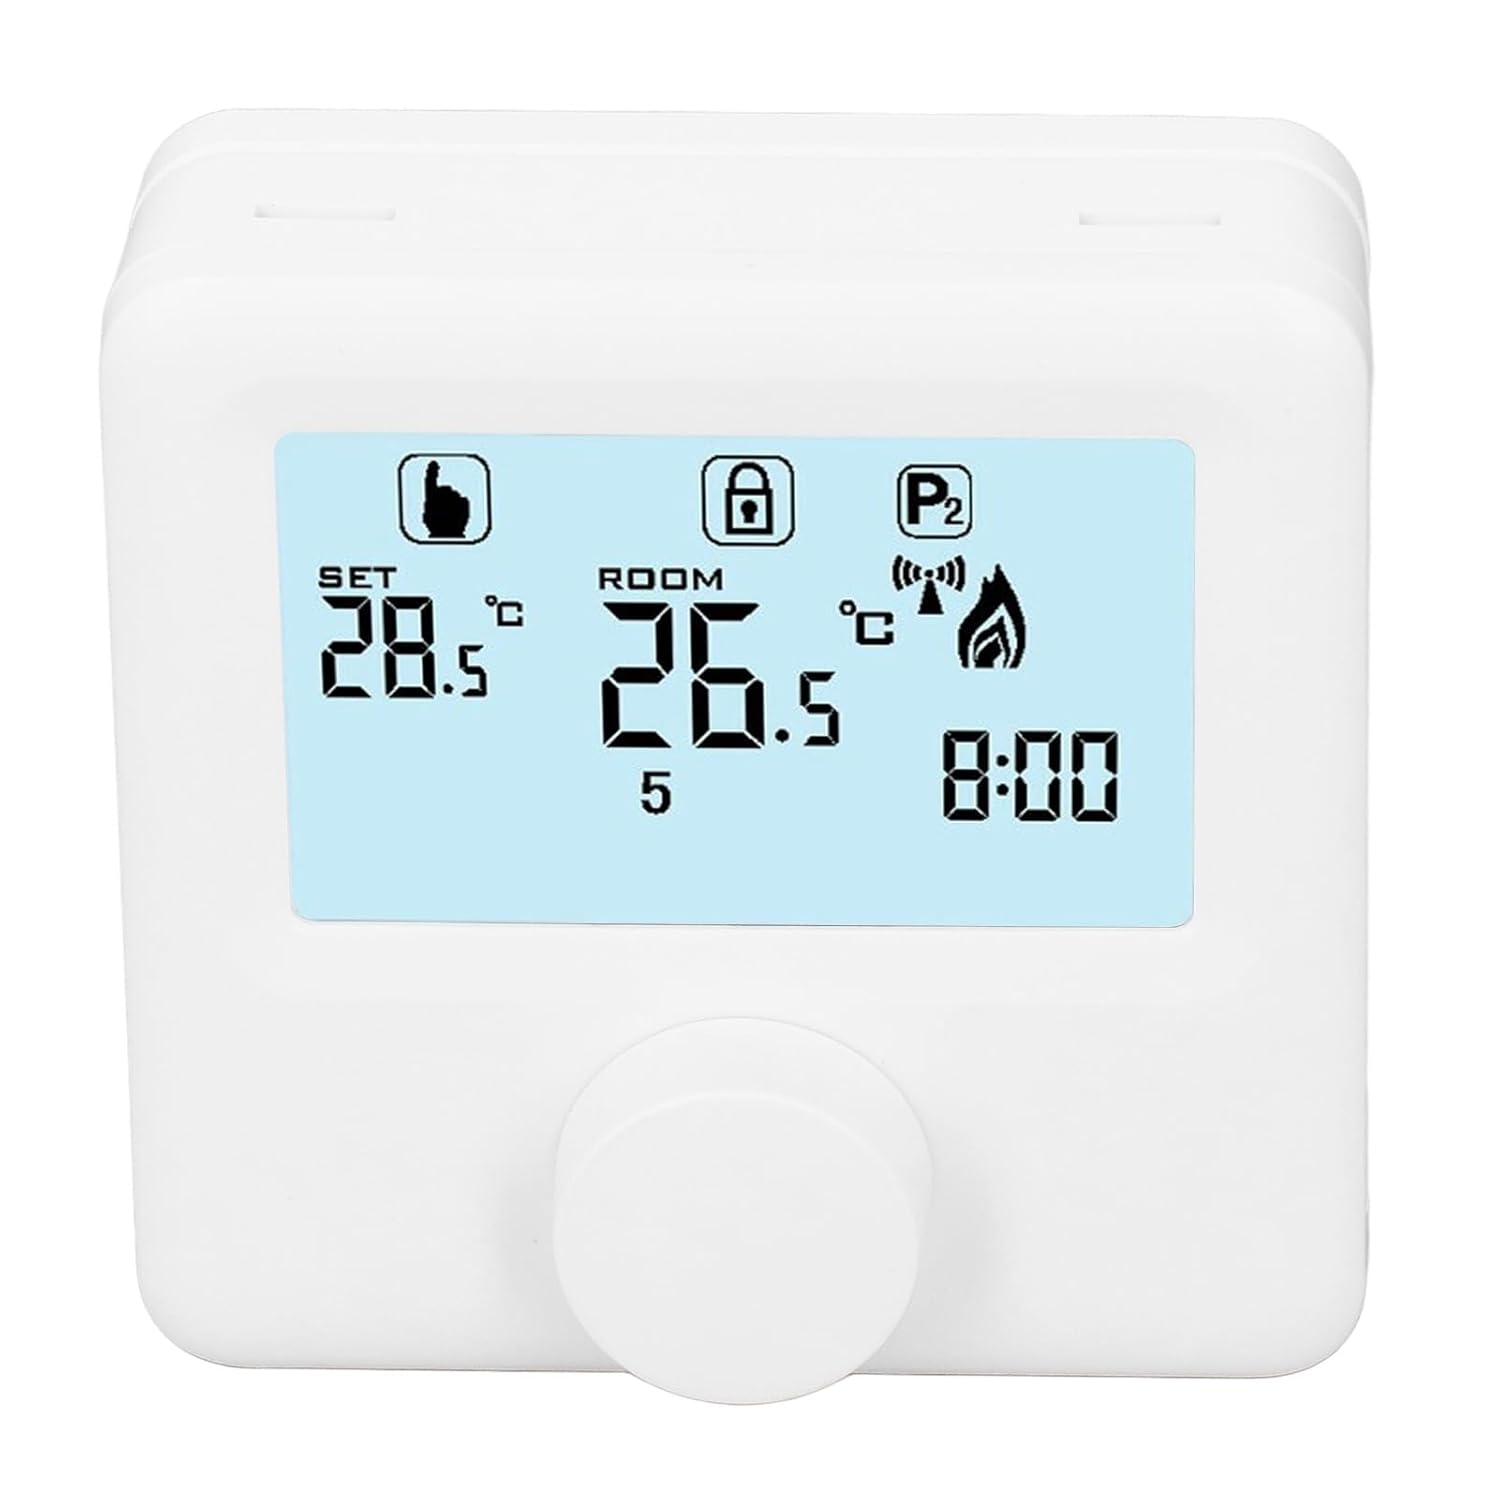
รูปที่ 6.1: รายละเอียด view of the LCD display. It shows the set temperature (SET), room temperature (ROOM), a lock icon, a program icon (P2), a signal icon, a flame icon indicating heating, and the current time.
6.2. การตั้งอุณหภูมิ
วิธีปรับอุณหภูมิที่ต้องการ:
- Rotate the control knob to increase or decrease the set temperature. The "SET" value on the display will change accordingly.
- The device will automatically activate or deactivate the heating system to maintain the set temperature within the range of 1 to 40 ℃. The default adjustment range is 5 to 35 ℃.
6.3. ตารางการเขียนโปรแกรมประจำสัปดาห์
The thermoregulator supports a weekly programming schedule. This allows you to set different temperatures for various times of the day across the week.
- Press and hold the control knob (or a designated button, if available) to enter programming mode.
- Use the control knob to navigate through days of the week and time slots.
- Adjust the desired temperature for each programmed period.
- Confirm your settings to save the weekly program. The device will then operate according to this schedule.
6.4. Understanding Display Icons
- SET: Indicates the target temperature you have set.
- ห้อง: แสดงอุณหภูมิห้องโดยรอบในขณะนั้น
- ไอคอนเปลวไฟ: ไฟจะสว่างขึ้นเมื่อระบบทำความร้อนทำงาน
- ไอคอนล็อค: May indicate a keypad lock feature to prevent accidental changes.
- P1/P2 Icon: Indicates the current program mode (e.g., P1 for comfort, P2 for economy, or specific weekly program segments).
- ไอคอนสัญญาณ: May indicate wireless communication status if applicable.
7. การบำรุงรักษา
Regular maintenance ensures the longevity and optimal performance of your thermoregulator.
- การทำความสะอาด: เช็ดอุปกรณ์ด้วยผ้านุ่มและแห้ง ห้ามใช้น้ำยาทำความสะอาดที่มีฤทธิ์กัดกร่อนหรือตัวทำละลาย
- การเปลี่ยนแบตเตอรี่: Replace batteries when the low battery indicator appears on the display. Always replace both batteries simultaneously with new AA batteries.
- พื้นที่เซ็นเซอร์: Ensure the temperature sensor area (usually a small vent on the device) is free from dust and obstructions for accurate readings.
8 การแก้ไขปัญหา
If you encounter issues with your EVTSCAN Digital Thermoregulator, refer to the following common problems and solutions:
- จอแสดงผลว่างเปล่า:
- ตรวจสอบว่าใส่แบตเตอรี่ถูกต้องหรือไม่
- เปลี่ยนแบตเตอรี่เก่าด้วยแบตเตอรี่ใหม่
- ระบบทำความร้อนไม่ตอบสนอง:
- Ensure the thermoregulator is powered on and the flame icon is displayed when heating is expected.
- Verify wiring connections to the boiler are secure and correct.
- Check the boiler's power supply and status.
- ตรวจสอบให้แน่ใจว่าอุณหภูมิที่ตั้งไว้สูงกว่าอุณหภูมิห้องในปัจจุบัน
- การอ่านอุณหภูมิที่ไม่แม่นยำ:
- Ensure the device is not exposed to direct sunlight, drafts, or heat sources.
- Clean any dust or debris from the sensor area.
- ไม่สามารถเปลี่ยนแปลงการตั้งค่าได้:
- Check if the lock icon is displayed. If so, refer to the operating instructions to unlock the keypad.
หากปัญหายังคงอยู่ โปรดติดต่อฝ่ายสนับสนุนลูกค้า
9. การรับประกันและการสนับสนุน
Specific warranty information for this product is not provided in the available data. Please refer to the product packaging or the retailer's webเว็บไซต์สำหรับรายละเอียดการรับประกัน
For technical support or further assistance, please contact EVTSCAN customer service through their official channels or the retailer from whom you purchased the product.
You can visit the EVTSCAN store on Amazon for more information: EVTSCAN Store