1. บทนำ
This manual provides detailed instructions for the operation and maintenance of your INKBIRDPLUS Digital Thermostat Outlet, Model WK. This device is designed to precisely control temperature for various applications, offering both heating and cooling modes, along with versatile timing functions. Please read this manual thoroughly before use to ensure proper functionality and safety.

Image 1.1: INKBIRDPLUS Digital Thermostat Outlet WK with temperature probe.
2. สินค้าหมดview
2.1 คุณสมบัติหลัก
- Heating & Cooling Modes: Automatically switches between heating and cooling based on set temperatures.
- การทำงานแบบปลั๊กแอนด์เพลย์: Simple setup, just plug into a standard outlet.
- ฟังก์ชั่นจับเวลา: Includes Cycle Timer (F01), Countdown ON (F02), Countdown OFF (F03), and Countdown ON/OFF (F04) modes.
- ช่วงควบคุมอุณหภูมิที่กว้าง: -40 ° F ถึง 248 ° F (-40 ° C ถึง 120 ° C)
- จอแสดงผล LCD ย้อนแสง: Clear visibility of current and set temperatures in various lighting conditions.
- ฟังก์ชั่นเพิ่มเติม: Temperature calibration, memory function, reset option, and screen lock protection.
2.2 ส่วนประกอบและจอแสดงผล
โปรดทำความคุ้นเคยกับปุ่มต่างๆ และไฟแสดงสถานะบนหน้าจอของอุปกรณ์:

Image 2.1: Labeled diagram of the thermostat outlet's display and control buttons.
- อุณหภูมิที่วัดได้: แสดงอุณหภูมิปัจจุบันที่ตรวจวัดได้จากหัววัด
- อุณหภูมิเริ่มต้น (เปิด): อุณหภูมิที่อุปกรณ์ที่เชื่อมต่อจะเปิดใช้งาน
- อุณหภูมิหยุด (ปิด): อุณหภูมิที่อุปกรณ์ที่เชื่อมต่อจะปิดการทำงาน
- ตัวบ่งชี้ปริมาณงานที่ผลิตได้: Illuminates when the outlet is providing power to the connected appliance.
- ปุ่มโหมด: Used to switch between temperature control and timing modes.
- ปุ่ม ตลท.: ใช้สำหรับเข้าสู่โหมดการตั้งค่าและยืนยันการเลือก
- ปุ่มขึ้น: ใช้เพื่อเพิ่มค่าหรือเลื่อนดูเมนู
- ปุ่มลง: ใช้สำหรับลดค่าหรือเลื่อนดูเมนู
- ปุ่มรีเซ็ต: A small button (often recessed) to restore factory settings.
3. คำแนะนำในการตั้งค่า
3.1 การเชื่อมต่อเริ่มต้น
- Plug the INKBIRDPLUS Digital Thermostat Outlet into a standard 110V-120V AC power outlet.
- Connect your heating or cooling appliance (e.g., heater, fan, refrigerator) to the outlet on the thermostat. Ensure the appliance's power consumption does not exceed 15A/1800W.
- Place the temperature probe in the desired location where you want to monitor and control the temperature. Ensure the probe is not directly exposed to heat sources or drafts that could skew readings.
4. คู่มือการใช้งาน
4.1 Temperature Control Mode (Heating/Cooling)
The device operates in either heating or cooling mode based on your set temperatures.

ภาพที่ 4.1: อดีตample applications for heating and cooling control.
- Setting Heating Mode: Set the 'Start Temperature (ON)' to be ต่ำกว่า than the 'Stop Temperature (OFF)'. The device will activate the connected appliance when the measured temperature drops below the 'Start Temperature' and turn it off when it reaches the 'Stop Temperature'.
- Setting Cooling Mode: Set the 'Start Temperature (ON)' to be สูงกว่า than the 'Stop Temperature (OFF)'. The device will activate the connected appliance when the measured temperature rises above the 'Start Temperature' and turn it off when it drops to the 'Stop Temperature'.
To adjust temperature settings:
- กดปุ่ม ชุด button once. The 'Start Temperature (ON)' will flash.
- ใช้ UP or ลง buttons to adjust the desired 'Start Temperature'.
- กด ชุด again. The 'Stop Temperature (OFF)' will flash.
- ใช้ UP or ลง buttons to adjust the desired 'Stop Temperature'.
- กด ชุด a third time to confirm and exit the setting mode. The display will return to showing the measured temperature.
4.2 ฟังก์ชันการตั้งเวลา
The thermostat offers four timing modes (F01-F04). Press the โหมด button repeatedly to cycle through these options.
F01: โหมดตั้งเวลาแบบวนรอบ
This mode allows the appliance to cycle ON and OFF for set durations. For example, ON for 12 hours, then OFF for 12 hours, repeating.

Image 4.2: F01 Cycle Timer Mode illustration.
F02: โหมดนับถอยหลังเปิด
The appliance will remain OFF for a set countdown period, then turn ON and stay ON indefinitely.

Image 4.3: F02 Countdown ON Mode illustration.
F03: โหมดปิดการนับถอยหลัง
The appliance will remain ON for a set countdown period, then turn OFF and stay OFF indefinitely.

Image 4.4: F03 Countdown OFF Mode illustration.
F04: Countdown ON and Countdown OFF Mode
The appliance will turn ON for a set duration, then turn OFF for another set duration, and then stay OFF indefinitely.
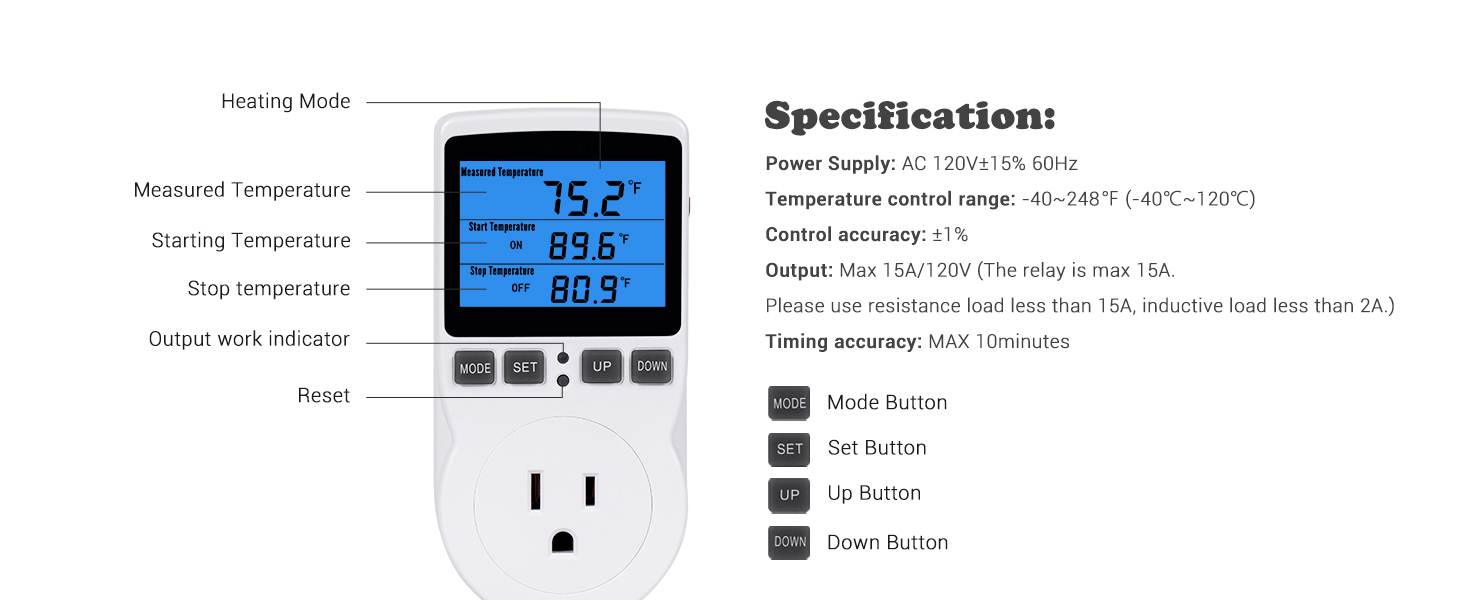
Image 4.5: F04 Countdown ON and OFF Mode illustration.
To set timing functions (for any F01-F04 mode):
- กดปุ่ม โหมด button until the desired timing mode (F01-F04) is displayed.
- กดปุ่ม ชุด button. The first time parameter (e.g., ON hours for F01) will flash.
- ใช้ UP or ลง ปุ่มเพื่อปรับค่า
- กด ชุด to move to the next time parameter (e.g., ON minutes, then OFF hours, etc.).
- Repeat step 3 and 4 until all parameters are set.
- กด ชุด one last time to confirm and exit the setting mode.
5. การสอบเทียบ
If you suspect the temperature reading is inaccurate, you can calibrate the device:
- Unplug the thermostat from the power outlet.
- Plug the thermostat back into the power outlet.
- Immediately after plugging in, press and hold the โหมด button for a few seconds until the screen indicates it is in calibration mode.
- ใช้ UP or ลง buttons to adjust the temperature reading to match a known accurate thermometer.
- กดปุ่ม ชุด button to confirm the calibration and exit the mode.
6. การบำรุงรักษา
- Keep the device clean by wiping it with a dry, soft cloth. Do not use abrasive cleaners or immerse the device in water.
- Ensure the temperature probe is clean and free from debris for accurate readings.
- Avoid placing the device in areas with extreme humidity, dust, or direct sunlight.
- Regularly check the power cord and probe cable for any signs of damage.
7 การแก้ไขปัญหา
7.1 ปัญหาทั่วไป
- การอ่านอุณหภูมิไม่แม่นยำ:
- Ensure the probe is correctly placed and not affected by external factors (e.g., direct sunlight, drafts, or being too close to the appliance being controlled).
- ดำเนินการสอบเทียบอุณหภูมิตามที่อธิบายไว้ในหัวข้อ 5
- Check the probe cable for damage. A damaged probe may require replacement.
- เครื่องใช้ไฟฟ้าไม่เปิด/ปิด:
- Verify that the 'Start Temperature' and 'Stop Temperature' are set correctly for either heating or cooling mode (refer to Section 4.1).
- Ensure the connected appliance is properly plugged into the thermostat outlet and is functioning independently.
- Check if the thermostat is in a timing mode (F01-F04) that might override temperature control. Switch back to temperature control mode if necessary.
- Confirm the appliance's power draw does not exceed the thermostat's maximum capacity (15A/1800W).
- จอแสดงผลไม่ทำงาน:
- Ensure the thermostat is securely plugged into a live power outlet.
- If the screen is locked, unlock it according to the device's specific instructions (usually a combination of button presses).
- Try resetting the device by pressing the recessed Reset button.
8. ข้อมูลจำเพาะ
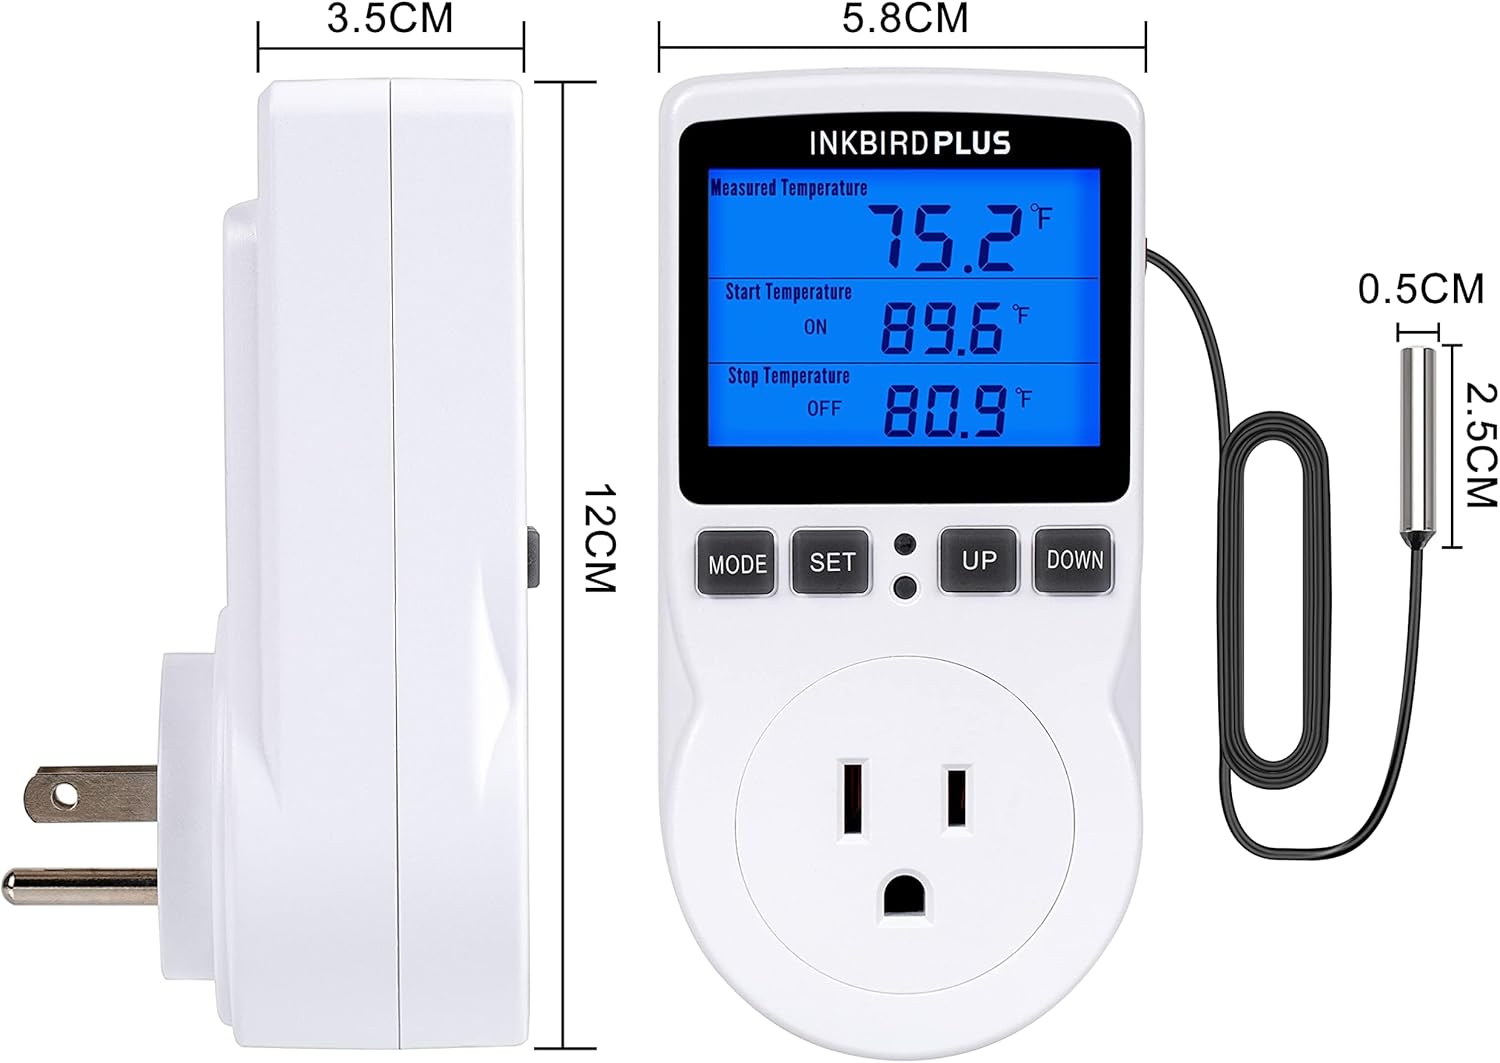
ภาพที่ 8.1: ขนาดของผลิตภัณฑ์
| คุณสมบัติ | ข้อมูลจำเพาะ |
|---|---|
| แหล่งจ่ายไฟ | ไฟฟ้ากระแสสลับ 120V±15% 60Hz |
| ช่วงการควบคุมอุณหภูมิ | -40°F ถึง 248°F (-40°C ถึง 120°C) |
| ความแม่นยำในการควบคุม | ±1% |
| เอาท์พุต | Max 15A/120V (Resistive load less than 15A, Inductive load less than 2A) |
| ช่วงเวลา | 0-99 ชม. 59 นาที |
| ประเภทจอภาพ | จอ LCD พร้อมไฟแบ็คไลท์ |
| ขนาดสินค้า | ลึก 3.7 นิ้ว x กว้าง 2.5 นิ้ว x สูง 5.5 นิ้ว |
| น้ำหนักสินค้า | 6.2 ออนซ์ |
| วัสดุ | พลาสติก |
9. การรับประกันและการสนับสนุน
For warranty information and technical support, please refer to the documentation included with your product or visit the official INKBIRDPLUS webไซต์ โปรดเก็บใบเสร็จรับเงินไว้เป็นหลักฐานการซื้อสำหรับการเรียกร้องการรับประกัน