1. ข้อมูลด้านความปลอดภัยที่สำคัญ
Please read all instructions carefully before using the EVTSCAN Projection Clock. Keep this manual for future reference.
- อย่าให้เครื่องสัมผัสกับอุณหภูมิที่สูงหรือต่ำเกินไป แสงแดดโดยตรง หรือความชื้นสูง
- ควรหลีกเลี่ยงการทำนาฬิกาตกหรือกระแทกอย่างแรง
- อย่าพยายามถอดประกอบหรือซ่อมแซมอุปกรณ์ด้วยตนเอง โปรดติดต่อเจ้าหน้าที่บริการที่มีคุณสมบัติเหมาะสม
- Use only the specified power adapter (DC 5.0V, 1.2A) or appropriate batteries (2xAAA, not included).
- เก็บให้พ้นจากมือเด็ก
2. สินค้าหมดview
The EVTSCAN Projection Clock is a versatile digital alarm clock featuring a 3-inch backlit LCD screen that displays time, date, day of the week, temperature, and humidity. It includes a projection function to display time and temperature on a wall or ceiling, dual alarms with snooze, and a USB port for charging mobile phones.
คุณสมบัติหลัก:
- 12/24-hour time format display.
- Date and day of the week display (7 languages for week).
- Temperature detection (-9℃ to +50℃) and humidity detection (20% to 95%).
- Projection function with 180-degree rotation for time and temperature.
- Dual alarm clocks with slowly increasinปริมาตรกรัม
- ฟังก์ชันเลื่อนปลุก 5 นาที
- ช่องเสียบ USB สำหรับชาร์จอุปกรณ์พกพา
- Adjustable backlight with 4 levels (high, medium, low, off).

รูปที่ 2.1: ด้านหน้า view of the EVTSCAN Projection Clock, showing the LCD display and projection lens.
3. เนื้อหาบรรจุภัณฑ์
เมื่อแกะกล่องแล้ว โปรดตรวจสอบให้แน่ใจว่าสินค้าทั้งหมดที่ระบุไว้ด้านล่างนี้มีอยู่และอยู่ในสภาพดี:
- 1 x EVTSCAN Projection Clock
- สาย USB 1 เส้น
- 1 x คู่มือผู้ใช้ภาษาอังกฤษ
Note: 2xAAA batteries are required for battery power and are not included in the package.
4. การตั้งค่า
4.1 การเปิดเครื่องอุปกรณ์
The EVTSCAN Projection Clock can be powered by either AAA batteries or via the included USB cable.
4.1.1 การติดตั้งแบตเตอรี่
- หาฝาปิดช่องใส่แบตเตอรี่ที่ด้านหลังของนาฬิกา
- Slide open the cover.
- ใส่แบตเตอรี่ AAA สอง (2) ก้อน โดยตรวจสอบให้แน่ใจว่าขั้วถูกต้อง (+/-)
- ปิดฝาช่องใส่แบตเตอรี่ให้แน่น
Note: When powered by batteries, the backlight will only light up for 8 seconds when activated to conserve power. The projection lamp will also light up for 8 seconds.
4.1.2 การเชื่อมต่อไฟผ่าน USB
- Connect the small end of the provided USB cable to the DC 5.0V 1.2A input port on the back of the clock.
- ต่อปลายสาย USB ด้านที่ใหญ่กว่าเข้ากับอะแดปเตอร์แปลงไฟ USB ที่ใช้งานร่วมกันได้ (ไม่ได้รวมอยู่ในชุด) หรือพอร์ต USB ที่มีไฟเลี้ยง
Note: When powered by USB, the backlight and projection lamp can remain continuously on, with adjustable brightness for the backlight.
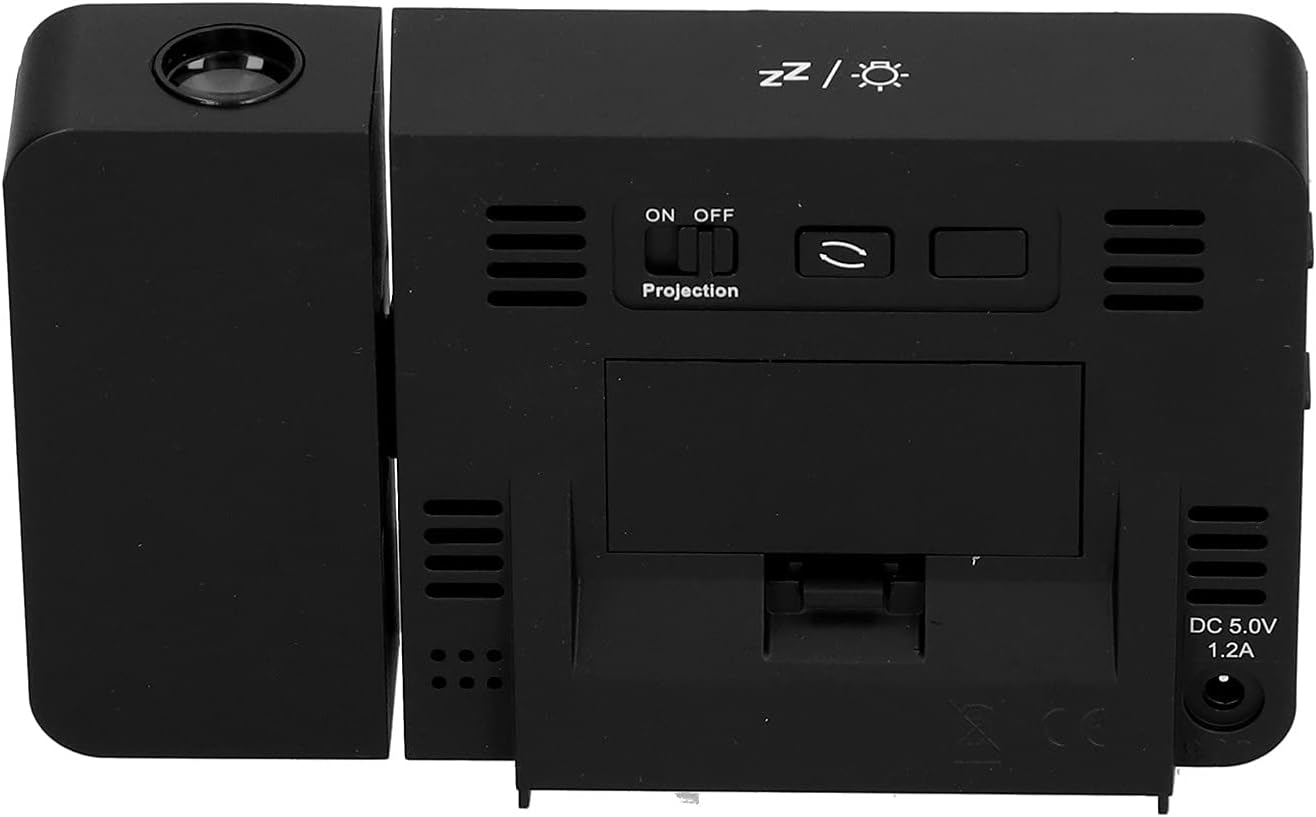
รูปที่ 4.1: หลัง view of the clock, indicating the battery compartment and DC 5.0V 1.2A power input.
5. คู่มือการใช้งาน
5.1 ฟังก์ชันปุ่ม
Familiarize yourself with the control buttons located on the front and sides of the clock:
- เวลา: เข้าสู่โหมดตั้งเวลา
- เตือน: เข้าสู่โหมดการตั้งค่าสัญญาณเตือน
- +: Increases values, switches 12/24HR format, adjusts backlight.
- -: Decreases values, switches temperature units (℃/℉).
- Projection ON/OFF Switch: Activates or deactivates the projection. (Located on the back/side)
- Alarm 1 ON/OFF Switch: Activates or deactivates Alarm 1. (Located on the side)
- Alarm 2 ON/OFF Switch: Activates or deactivates Alarm 2. (Located on the side)
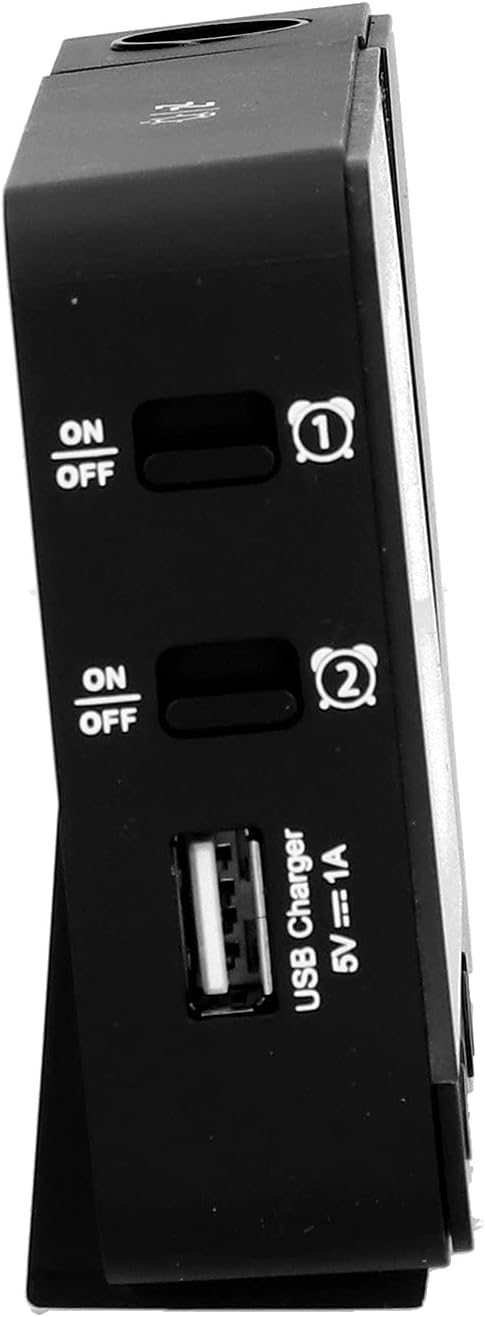
รูปที่ 5.1: ด้านข้าง view showing Alarm 1 and Alarm 2 ON/OFF switches, and the USB charging port.
5.2 การตั้งเวลาและวันที่
- กดปุ่มค้างไว้ เวลา button to enter time setting mode. The hour display will flash.
- ใช้ + or - ปุ่มเพื่อปรับชั่วโมง
- กด เวลา again to confirm the hour and move to minute setting. Adjust with + or -.
- กดต่อไป เวลา to cycle through setting year, month, and day. Adjust each with + or -.
- หลังจากตั้งวันแล้ว ให้กด เวลา กดอีกครั้งเพื่อออกจากโหมดการตั้งค่า
- หากต้องการสลับระหว่างรูปแบบเวลา 12 ชั่วโมงและ 24 ชั่วโมง ให้กดปุ่ม + button during normal time display.
- To switch between Celsius (℃) and Fahrenheit (℉) for temperature, press the - button during normal time display.
5.3 การตั้งค่าสัญญาณเตือน
นาฬิกาเรือนนี้มีระบบตั้งปลุกอิสระ 2 ระบบ (นาฬิกาปลุก 1 และ นาฬิกาปลุก 2)
- กดปุ่มค้างไว้ เตือน button to enter Alarm 1 setting mode. The Alarm 1 hour display will flash.
- ใช้ + or - ปุ่มเพื่อปรับชั่วโมงการปลุก
- กด เตือน again to confirm the hour and move to Alarm 1 minute setting. Adjust with + or -.
- กด เตือน again to move to Alarm 2 hour setting, and repeat the process for Alarm 2.
- After setting Alarm 2 minutes, press เตือน กดอีกครั้งเพื่อออกจากโหมดการตั้งค่า
- To activate or deactivate an alarm, use the corresponding สัญญาณเตือน 1 เปิด/ปิด or สัญญาณเตือน 2 เปิด/ปิด switch on the side of the clock. An alarm icon will appear on the display when active.
5.3.1 ฟังก์ชั่นเลื่อนซ้ำ
When an alarm sounds, press any button (except the alarm ON/OFF switch) to activate the 5-minute snooze function. The alarm will sound again after 5 minutes. To turn off the alarm completely, slide the corresponding alarm ON/OFF switch to OFF.
5.4 ฟังก์ชันการฉายภาพ
The clock can project the time and temperature onto a wall or ceiling.
- ค้นหาตำแหน่ง เปิด/ปิดการฉายภาพ switch on the back of the clock. Slide it to ON to activate the projection.
- Adjust the angle of the projection arm (the part with the lens) to direct the projection as desired. The arm can rotate nearly 180 degrees.
- The projection will display the current time and temperature in a soft red color.

รูปที่ 5.2: ด้านข้าง view showing the projection arm extended and ready for use.

รูปที่ 5.3: The clock projecting time and temperature onto a wall in a bedroom setting.
5.5 การปรับแสงพื้นหลัง
When the clock is powered by USB, the backlight can be adjusted to four levels: high, medium, low, or off. Repeatedly press the + button during normal time display to cycle through the brightness levels.
When powered by batteries, the backlight will illuminate for 8 seconds when any button is pressed, then turn off to conserve power.
พอร์ตชาร์จ USB 5.6 พอร์ต
The clock features a USB charging port (5V=1A) on its side. You can use this port to charge your mobile phone or other small electronic devices while the clock is connected to USB power.
Note: The USB charging port only functions when the clock is powered via the USB cable. It does not work when the clock is running on battery power.
6. การบำรุงรักษา
6.1 การทำความสะอาด
- เช็ดพื้นผิวนาฬิกาด้วยผ้าแห้งเนื้อนุ่ม
- Do not use abrasive cleaners, solvents, or chemical sprays, as these may damage the finish or electronic components.
- Keep the projection lens clean for clear projection. Use a soft, lint-free cloth.
6.2 การเปลี่ยนแบตเตอรี่
When the display becomes dim or the clock functions erratically while on battery power, it's time to replace the AAA batteries. Refer to Section 4.1.1 for battery installation instructions. Always replace both batteries at the same time with new ones.
7 การแก้ไขปัญหา
| ปัญหา | สาเหตุที่เป็นไปได้ | สารละลาย |
|---|---|---|
| หน้าจอแสดงผลนาฬิกาว่างเปล่าหรือสว่างน้อย | No power, low batteries, or USB cable not connected. | Check battery installation and replace if necessary. Ensure USB cable is securely connected to a power source. |
| Projection is unclear or not visible. | Projection switch is OFF, lens is dirty, or projection distance is too far/close. | Ensure Projection switch is ON. Clean the projection lens. Adjust the clock's distance from the projection surface. |
| สัญญาณเตือนภัยไม่ดัง | Alarm is not set or is deactivated. | Verify alarm time is set correctly. Ensure the corresponding Alarm ON/OFF switch is in the ON position. |
| พอร์ตชาร์จ USB ไม่ทำงาน | Clock is running on battery power, or USB cable is not connected to a power source. | Ensure the clock is powered via the USB cable and connected to a functional power adapter. |
| เวลา/วันที่ไม่ถูกต้อง | เวลา/วันที่ไม่ได้ตั้งค่าอย่างถูกต้อง | โปรดดูหัวข้อ 5.2 เพื่อตั้งค่าเวลาและวันที่ใหม่ |
8. ข้อมูลจำเพาะ
| แบบอย่าง: | B0CLGDFCGX |
| ยี่ห้อ: | อีวีทีสแกน |
| วัสดุ: | ABS (อะคริโลไนไตรล์ บิวทาไดอีน สไตรีน) |
| ขนาดสินค้า : | ขนาดโดยประมาณ 13.5 x 8 x 2.5 ซม. (5.3 x 3.1 x 1.0 นิ้ว) |
| น้ำหนัก: | ประมาณ 242g (8.5 ออนซ์) |
| ประเภทจอภาพ: | จอ LCD ดิจิทัลพร้อมไฟแบ็คไลท์ |
| แหล่งพลังงาน: | 2xAAA batteries (not included) or DC 5.0V 1.2A via USB cable |
| เอาต์พุตการชาร์จ USB: | 5V=1A |
| ช่วงการตรวจจับอุณหภูมิ: | -9℃ to +50℃ (1℃ resolution) |
| ช่วงการตรวจจับความชื้น: | 20% to 95% (1% resolution) |
| Temperature/Humidity Calibration Time: | 30 วินาที |
| ระดับแสงไฟ: | 4 levels (High, Medium, Low, Off) when USB powered; 8s illumination when battery powered. |
| ฉาย Lamp: | Always on when USB powered; 8s illumination when battery powered. |

รูปที่ 8.1: Product dimensions: 5.3 inches wide by 3.1 inches high.
9. การรับประกันและการสนับสนุน
EVTSCAN products are manufactured to high quality standards. For specific warranty information, please refer to the warranty card included with your purchase or contact your retailer.
If you encounter any issues or have questions regarding your EVTSCAN Projection Clock, please contact the seller or EVTSCAN customer support for assistance. Please have your model number (B0CLGDFCGX) ready when contacting support.
หากต้องการความช่วยเหลือเพิ่มเติม คุณสามารถไปที่ EVTSCAN Store on Amazon.