1. บทนำ
This manual provides detailed instructions for the setup, operation, and maintenance of your Raddy WF-80C Wireless Weather Station. This device offers comprehensive monitoring of indoor and outdoor environmental conditions, including temperature, humidity, barometric pressure, and weather forecasts. It also features an atomic clock with dual alarms and moon phase tracking.

Figure 1: Raddy WF-80C Wireless Weather Station with main unit and three remote sensors.
2. เนื้อหาบรรจุภัณฑ์
- 1 x Raddy WF-80C Main Display Unit
- 3 x Wireless Outdoor Sensors (R4 model)
- 1 x อะแดปเตอร์ไฟ AC
- 1 x คู่มือผู้ใช้
- Batteries (1 Lithium Metal for main unit, 6 AAA for sensors)

Figure 2: Package contents of the Raddy WF-80C Weather Station.
3. การตั้งค่า
3.1 การจ่ายไฟให้กับตัวเครื่องหลัก
- Insert the included Lithium Metal battery into the main unit's battery compartment. This battery serves as a backup for settings during power outagใช่
- Connect the AC power adapter to the main unit and plug it into a power outlet. The display will light up.
3.2 Installing Batteries in Outdoor Sensors
- Open the battery compartment on each of the three wireless outdoor sensors.
- Insert 2 new AAA batteries into each sensor, ensuring correct polarity.
- ปิดช่องใส่แบตเตอรี่
3.3 Pairing Sensors with Main Unit
The sensors should automatically pair with the main unit once powered on. Allow a few minutes for the main unit to receive data from all three sensors. If a sensor does not connect, ensure it is within the 100m (330ft) transmission range and press the 'CH' button on the main unit to manually search for sensors.

Figure 3: Multi-zone monitoring with three wireless remote sensors.
3.4 การวางตำแหน่งเซ็นเซอร์
Place outdoor sensors in shaded, dry locations away from direct sunlight and rain to ensure accurate readings and prolong battery life. The sensors have a 100m (330ft) range.
3.5 ตัวเลือกการติดตั้ง
The main unit can be placed on a tabletop using its integrated kickstand or wall-mounted using the keyhole slots on the back.

Figure 4: Main unit with table stand and wall-mounting options.
3.6 วิดีโอแนะนำการตั้งค่า
Video 1: A visual guide demonstrating the setup process, including battery installation and initial configuration (Note: This video is for a similar model, but the setup steps are generally applicable).
4. คู่มือการใช้งาน
4.1 แสดงผลเกินview
The 7.5" color display provides a clear overview of all measured data. It features dedicated sections for indoor temperature/humidity, outdoor temperature/humidity (for up to 3 sensors), weather forecast, moon phase, time, date, and comfort indicators.

รูปที่ 5: รายละเอียด view of the 7.5" color display.
4.2 ฟังก์ชันปุ่ม
Buttons on the front/top of the unit allow for easy operation:
- เตือน: Set and activate/deactivate alarms.
- ช. (ช่อง): Switch between outdoor sensor channels (1, 2, 3) or initiate a search for sensors.
- เตือน: Set high/low temperature/humidity alerts.
- SNZ/LIGHT: Snooze alarm, adjust backlight brightness, or turn off backlight.
- ลง/ขึ้น: Adjust values during settings.
- เส้นทาง: Enter settings mode for time, date, and other parameters.

Figure 6: Convenient front and top panel buttons for easy operation.
4.3 การตั้งเวลาและวันที่ (นาฬิกาอะตอม)
The WF-80C features an RCC atomic timekeeping function for accurate, self-adjusting time. Upon initial setup, it will attempt to synchronize. If manual adjustment is needed:
- Press and hold the 'MODE' button to enter time setting mode.
- Use 'UP' and 'DOWN' buttons to adjust values (e.g., 12/24-hour format, hour, minute, year, month, day).
- Press 'MODE' to confirm each setting and move to the next.

Figure 7: Atomic Clock with DCF Feature for precise timekeeping.
4.4 Weather Forecast and Barometric Pressure
The station provides a 6-icon weather forecast based on barometric pressure trends. It also displays the current barometric pressure and its tendency.

Figure 8: Weather forecast icons and moon phase display.
4.5 Comfort Level and Mold Risk Indicators
The display includes comfort level indicators (Dry, Comfort, Wet) and mold risk alerts, which are determined by indoor humidity levels.

Figure 9: Comfort level and mold risk indicators for indoor environment.
4.6 Adjustable Backlight and Night Mode
The display offers five brightness levels. An automatic night mode can be configured for reduced brightness during specific hours, ideal for bedrooms.
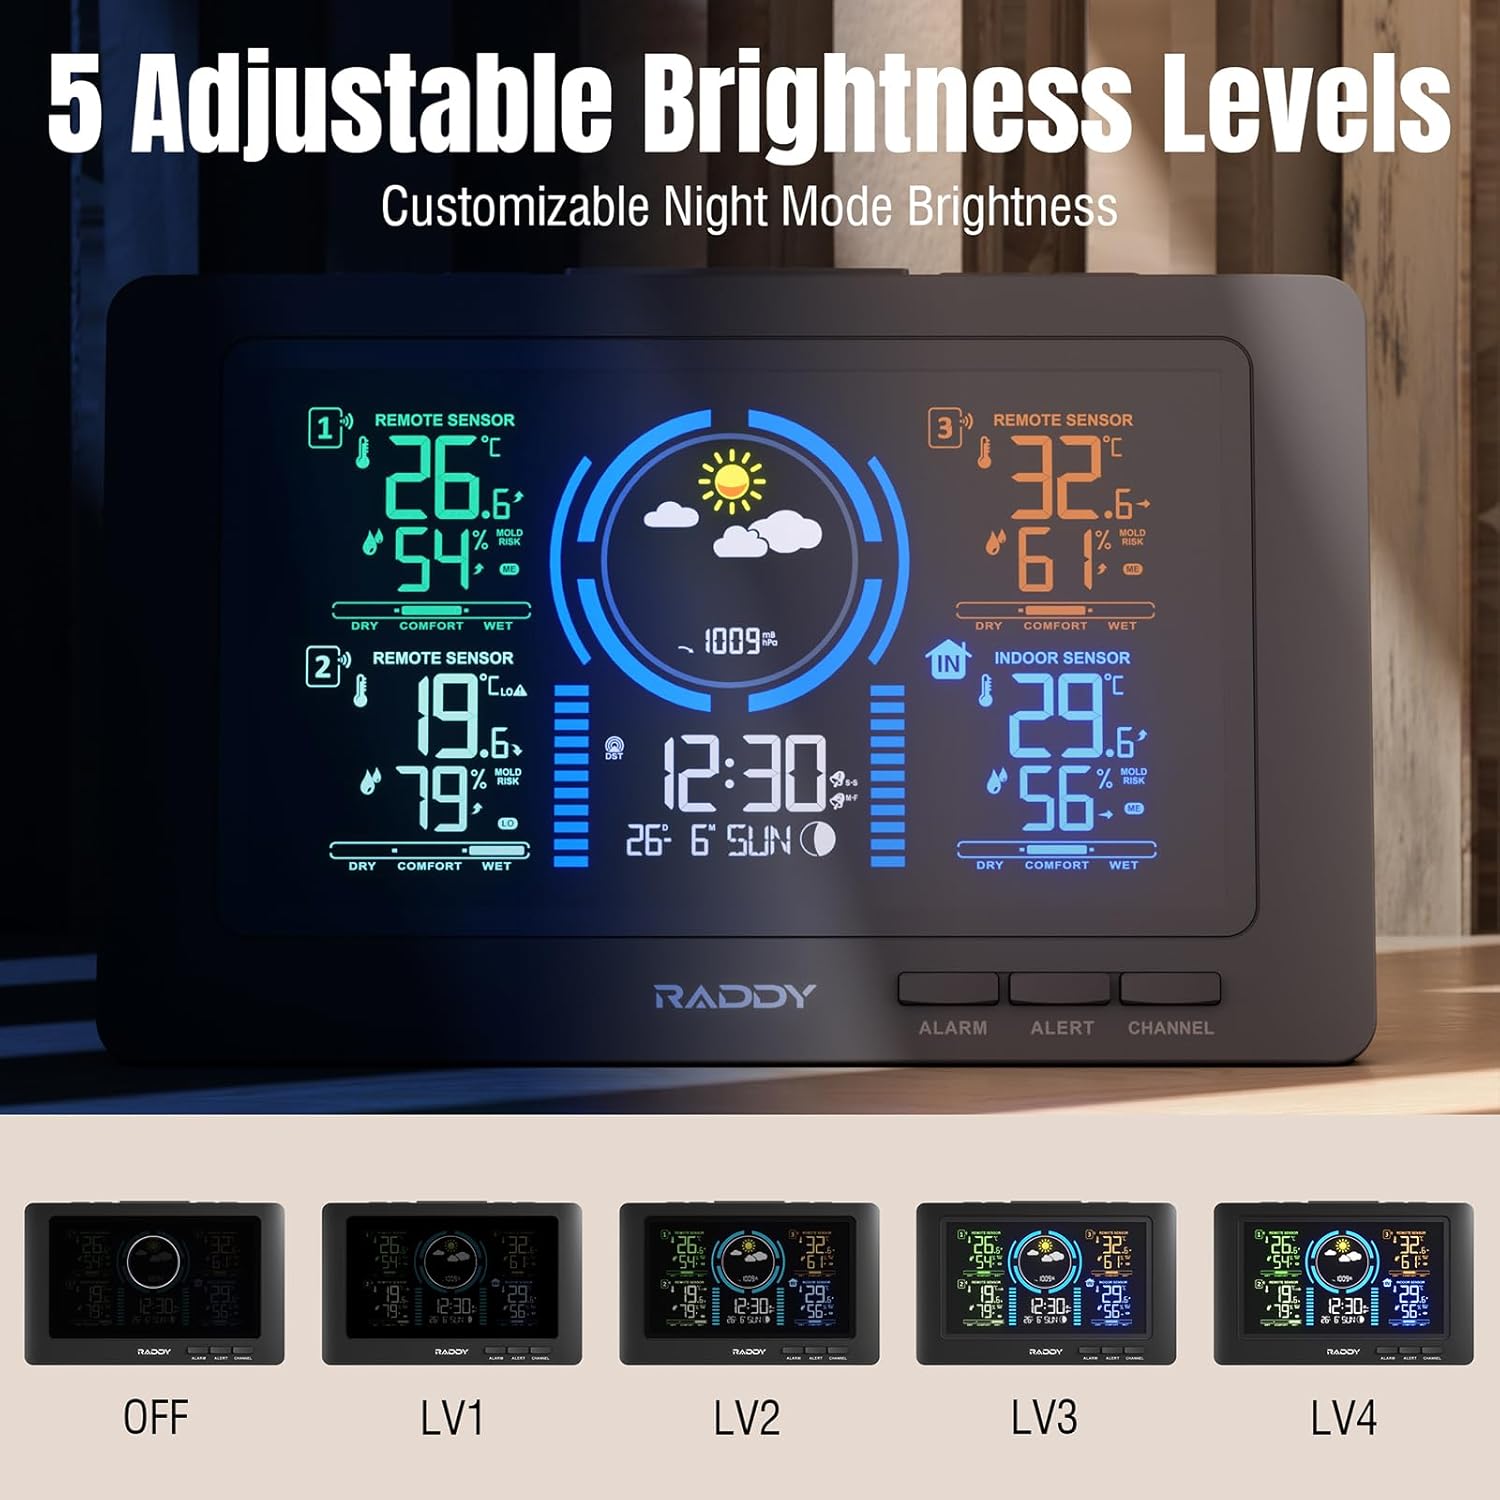
Figure 10: Five adjustable brightness levels for optimal viewการไอเอ็นจี
4.7 สัญญาณเตือนและการแจ้งเตือน
Set dual alarms for different times (e.g., weekdays/weekends). High/low alerts can be configured for temperature and humidity to notify you when conditions exceed preset ranges.

Figure 11: High/Low Alerts for temperature and humidity.

Figure 12: Dual alarm clocks for flexible scheduling.
พอร์ตชาร์จ USB 4.8 พอร์ต
The main unit includes a USB port for charging external devices like smartphones.
5. การบำรุงรักษา
5.1 การเปลี่ยนแบตเตอรี่
Replace batteries in the outdoor sensors annually or when the low battery indicator appears on the main unit. Ensure to use fresh AAA batteries.
5.2 การทำความสะอาด
Wipe the display and sensor units with a soft, dry cloth. Avoid using abrasive cleaners or solvents.
6 การแก้ไขปัญหา
- No outdoor sensor data: Ensure sensors have fresh batteries and are within range. Press the 'CH' button on the main unit to manually search. Avoid major obstructions between sensors and the main unit.
- เวลา/วันที่ไม่ถูกต้อง: Verify the atomic clock signal reception. If necessary, manually set the time and date via the 'MODE' button.
- ปัญหาการแสดงผล: Check the power connection. Adjust backlight brightness using the 'SNZ/LIGHT' button.
- Alarm cannot be turned off: If an alarm is active and cannot be deactivated through the 'ALARM' button, try removing the backup battery and unplugging the unit for a few minutes to perform a hard reset.
7. ข้อมูลจำเพาะ
- ยี่ห้อ: แรดดี้
- แบบอย่าง: WF-80C
- แหล่งพลังงาน: Battery Powered (1 Lithium Metal included for main unit, 6 AAA for sensors)
- ขนาดสินค้า : 4.83 x 21.59 x 13.97 ซม.; 710 กรัม
- คุณสมบัติพิเศษ: 3 Sensors, Adjustable Brightness, Alarm, Clock, Large Display, Atomic Clock, Weather Forecast, Moon Phase, Comfort Indicators, Mold Risk Alerts, USB Charging Port
- ช่วงการส่งสัญญาณ: Up to 100m (330ft) for outdoor sensors
- ผู้ผลิต: แรดดี้
- ประเทศต้นกำเนิด: จีน
8. การรับประกันและการสนับสนุน
For warranty information or technical support, please refer to the contact details provided in your product packaging or visit the official Raddy webไซต์นี้ โปรดเก็บใบเสร็จรับเงินที่ซื้อไว้เพื่อใช้เรียกร้องการรับประกัน