
1. บทนำ
ขอบคุณสำหรับการซื้อasing the PPLEE RGB Digital Alarm Clock, Model CR1008R. This clock is designed to provide accurate timekeeping, customizable alarm functions, and convenient charging options. Please read this manual thoroughly before use to ensure proper operation and to maximize your product experience.
2. ข้อมูลด้านความปลอดภัย
- Ensure the power adapter is compatible with your local power supply (100-240V).
- อย่าให้เครื่องโดนน้ำหรือความชื้นมากเกินไป
- Avoid placing the clock near heat sources or in direct sunlight.
- ใช้เฉพาะอะแดปเตอร์ที่ให้มาเท่านั้น
- เก็บให้พ้นจากมือเด็ก
- ใส่แบตเตอรี่ AAA ให้ถูกต้องเพื่อใช้งานฟังก์ชั่นสำรองไฟ (แบตเตอรี่ไม่ได้รวมอยู่ในชุด)
3. เนื้อหาบรรจุภัณฑ์
ตรวจสอบว่ามีรายการทั้งหมดอยู่ในแพ็คเกจของคุณ:
- 1 x PPLEE RGB Digital Clock
- อะแดปเตอร์ไฟฟ้า 1 ตัว
- 1 x สายไฟ
- 1 x คู่มือผู้ใช้ (เอกสารนี้)

Image: The package includes the RGB digital clock, power adapter, power cord, and user manual.
4. สินค้าหมดview
Familiarize yourself with the main components of your alarm clock.

ภาพ: ด้านหน้า view of the PPLEE RGB Digital Alarm Clock displaying time with RGB digits and a smartphone charging via its USB port.
แผงด้านหน้า: Large LED display for time, AM/PM indicator, DST indicator, Alarm indicator.
แผงด้านบน: Snooze/Light bar, Hour button, Minute button.
แผงด้านหลัง:
- DC IN Port: For power adapter connection.
- USB Charging Port: For charging external devices.
- Type-C Charging Port: For charging external devices.
- Alarm ON/OFF Switch.
- Alarm Volume Control (Low/Med/High).
- Dimmer Control (for display brightness).
- Time Format Switch (12H/24H).
- DST (Daylight Saving Time) Switch.
- Set Time Button.
- Set Alarm Button.
- Multi-Color Button (for display and night light).
- Battery Compartment (for 2x AAA backup batteries).

ภาพ: ด้านหลัง view of the alarm clock highlighting the various control buttons and charging ports, including dimmer, alarm volume, time/alarm set, and time format switches.
5. การตั้งค่า
5.1 การเชื่อมต่อสายไฟ
- Connect the power cord to the DC IN port on the back of the clock.
- Plug the power adapter into a standard electrical outlet (AC 100-240V).
- The clock display will light up.
5.2 การติดตั้งระบบสำรองไฟด้วยแบตเตอรี่
For battery backup, which saves settings during power outages and can trigger the alarm, install 2 AAA batteries (not included) into the battery compartment on the back of the clock.
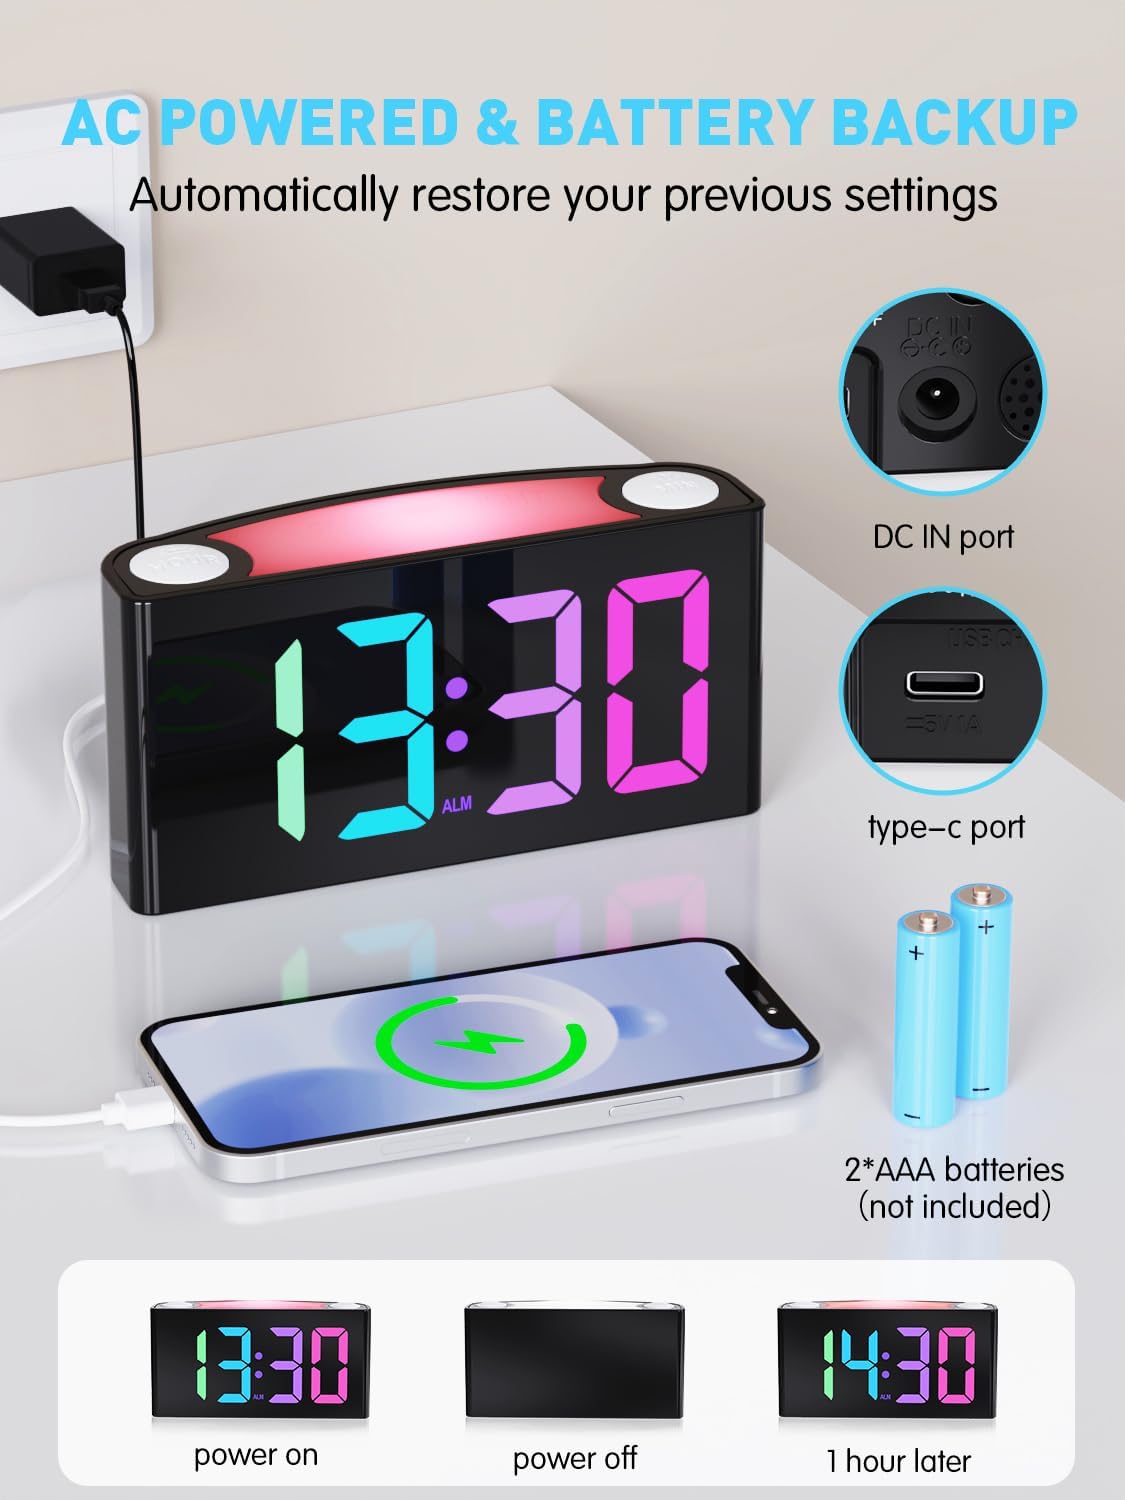
Image: The alarm clock is shown connected to AC power, with an open battery compartment indicating where to insert 2 AAA batteries for backup. The display shows "13:30" (power on), a blank screen (power off), and "14:30" (1 hour later, demonstrating time retention).
บันทึก: The clock's main functions (display, USB charging, alarm) require AC power. Batteries only provide backup for time memory and alarm trigger during power interruptions.
6. คู่มือการใช้งาน
6.1 การตั้งเวลา
- กดปุ่ม "SET TIME" button on the rear panel. The display will start flashing.
- กดปุ่ม "ชั่วโมง" button (on top) to adjust the hour.
- กดปุ่ม "นาที" button (on top) to adjust the minute.
- กด "SET TIME" again to save, or wait 5 seconds for automatic confirmation.
Video: Demonstrates how to set the time on the PPLEE RGB Digital Alarm Clock, including adjusting hours and minutes and confirming the setting.
6.2 การตั้งปลุก
- เลื่อน "เปิด/ปิดสัญญาณเตือน" switch to the "ON" position. The alarm indicator will light up.
- กดปุ่ม "SET ALARM" button on the rear panel. The alarm time display will start flashing.
- กดปุ่ม "ชั่วโมง" button (on top) to adjust the alarm hour.
- กดปุ่ม "นาที" button (on top) to adjust the alarm minute.
- กด "SET ALARM" again to save, or wait 5 seconds for automatic confirmation.
To turn off the alarm, slide the "เปิด/ปิดสัญญาณเตือน" switch to the "OFF" position. The alarm indicator will disappear.
6.3 Display Brightness (Dimmer)
The clock features a 7-level dimmer for the time display (0%-100% brightness).
- ใช้ "DIMMER" button on the rear panel to cycle through brightness levels.

Image: The alarm clock display shows various brightness levels from 0% to 100%, illustrating the 7-level dimmer function.
โหมดไฟกลางคืน 6.4 โหมด
The clock includes an 8-mode/7-color night light with 3 adjustable brightness settings.
- กดปุ่ม "โหมดพัก/โหมดเบา" bar on top to turn the night light on/off and cycle through colors/modes.
- To adjust night light brightness, press and hold the "โหมดพัก/โหมดเบา" บาร์.

Image: A person sleeping next to the alarm clock, which emits a soft yellow night light from its top bar. Below are icons indicating 3-level adjustable brightness for the night light.
6.5 ระดับเสียงปลุก
Adjust the alarm volume to your preference (Low, Medium, High).
- ใช้ "ALARM VOLUME" switch on the rear panel to select the desired volume level.

Image: A person reaching for the snooze bar on the alarm clock, which displays "8:30". The image also illustrates the 3-level adjustable alarm volume (90db, 103db, 110db).
6.6 ฟังก์ชั่นเลื่อนซ้ำ
เมื่อเสียงสัญญาณเตือนดังขึ้น ให้กดปุ่มขนาดใหญ่ "โหมดพัก/โหมดเบา" bar on top to activate snooze for 9 extra minutes of sleep.
The alarm will sound again after 9 minutes. To completely turn off the alarm, use the "เปิด/ปิดสัญญาณเตือน" สวิตช์.
6.7 12/24 Hour Format and DST
- ใช้ "TIME FORMAT" switch on the rear panel to toggle between 12-hour and 24-hour display.
- ใช้ "DST" switch on the rear panel to enable or disable Daylight Saving Time (adjusts time by 1 hour).
6.8 Dual Charging Ports
The clock is equipped with a Type-C output port and a USB output port for charging your devices.

Image: The alarm clock with its display showing "12:00" and two smartphones connected to its USB and Type-C charging ports, indicating active charging.
Simply connect your device's charging cable to the appropriate port on the back of the clock.
7. การบำรุงรักษา
- เช็ดนาฬิกาด้วยผ้าแห้งเนื้อนุ่ม ห้ามใช้สารทำความสะอาดที่มีฤทธิ์กัดกร่อนหรือตัวทำละลาย
- โปรดถอดปลั๊กนาฬิกาก่อนทำความสะอาด
- If not in use for an extended period, remove the backup batteries.
8 การแก้ไขปัญหา
| ปัญหา | สารละลาย |
|---|---|
| หน้าจอแสดงผลนาฬิกาว่างเปล่า | Check if the power adapter is securely plugged into both the clock and the wall outlet. Ensure the outlet has power. |
| สัญญาณเตือนภัยไม่ดัง | Verify the "ALARM ON/OFF" switch is in the "ON" position. Check the alarm volume setting. Ensure the alarm time is correctly set. |
| เวลาไม่ถูกต้องหลังจากไฟดับtage. | Ensure 2 AAA batteries are installed in the battery compartment for backup. If batteries were not present or depleted, reset the time manually. |
| Devices not charging via USB/Type-C. | Confirm the clock is connected to AC power. Check the charging cable and the device being charged. |
| ไฟกลางคืนไม่ทำงาน | Press the "SNOOZE/LIGHT" bar to cycle through modes and turn on the light. Check if the clock is powered. |
9. ข้อมูลจำเพาะ
| หมายเลขรุ่น | CR1008R |
| ยี่ห้อ | พีพีลี |
| ประเภทจอภาพ | Digital LED (RGB) |
| ขนาดสินค้า | กว้าง 6.46 นิ้ว x สูง 3.39 นิ้ว |
| แหล่งพลังงาน | Corded Electric (AC 100-240V) |
| แบตเตอรี่สำรอง | แบตเตอรี่ AAA 2 ก้อน (ไม่รวม) |
| พอร์ตชาร์จ | 1 x USB, 1 x Type-C |
| ความสว่างของจอภาพ | 7-level adjustable dimmer |
| ไฟกลางคืน | 8 modes / 7 colors, 3-level adjustable brightness |
| ระดับเสียงปลุก | 3-level adjustable (Low, Medium, High) |
| เลื่อนระยะเวลา | 9 นาที |
10. การรับประกันและการสนับสนุน
For warranty information or technical support, please refer to the contact details provided with your purchase or visit the official PPLEE webไซต์นี้ โปรดเก็บใบเสร็จรับเงินที่ซื้อไว้เพื่อใช้เรียกร้องการรับประกัน
อีเมล: support@pplec.net