1. สินค้าหมดview
The Dpofirs Dash Cam is a dual-channel car recording system designed to capture video footage from the front and rear of your vehicle. It features 1080P Full HD front recording, a 2-inch display, wide-angle lenses, loop recording, and G-sensor functionality for comprehensive vehicle monitoring.
คุณสมบัติที่สำคัญ ได้แก่:
- Synchronized HD recording from front, interior, and rear cameras.
- Loop recording to ensure continuous recording by overwriting older files.
- 6-layer high transparency glass lens for clear image quality.
- Wide vision angles: 170° front, 110° cabin, and 110° rear.
- Wide Dynamic Range (WDR) image processing for optimal recording in various lighting conditions.
2. เนื้อหาบรรจุภัณฑ์
โปรดตรวจสอบว่ารายการทั้งหมดที่ระบุไว้ด้านล่างมีอยู่ในแพ็คเกจของคุณหรือไม่:
- 1 x Dpofirs Dash Cam (Main Unit)
- 1 x ด้านหลังview Camera with Cable
- 1 x Car Charger with Cable
- 1 x ขาตั้งแบบดูดติดกระจก
- 2 x Screws (for rear camera mounting)
- 1 x Adhesive Tape (for rear camera mounting)
- 1 x คู่มือผู้ใช้
Note: A Micro SD memory card (up to 32GB) is required for recording and is not included in the package.

Image: Dpofirs Dash Cam main unit, rear camera, car charger, suction cup mount, screws, and adhesive tape.
3. การตั้งค่าและการติดตั้ง
3.1 การใส่การ์ดหน่วยความจำ
- ตรวจสอบให้แน่ใจว่ากล้องติดรถยนต์ปิดอยู่
- Locate the Micro SD card slot on the side of the main unit.
- ใส่การ์ด Micro SD Class 10 หรือสูงกว่า (ความจุสูงสุด 32GB) ลงในช่องเสียบจนกระทั่งได้ยินเสียงคลิกเข้าที่
- ในการถอด ให้ค่อยๆ ดันการ์ดเข้าไปอีกครั้งจนกว่าการ์ดจะเด้งออกมา
3.2 การติดตั้งกล้องติดหน้ารถ
- ทำความสะอาดบริเวณกระจกหน้ารถที่คุณต้องการติดตั้งกล้องติดรถยนต์
- Attach the suction cup bracket to the dash cam.
- Press the suction cup firmly against the windshield, ensuring it does not obstruct your view.
- ปรับมุมกล้องให้ชัด view ของถนนข้างหน้า

ภาพ: ด้านหน้า view of the Dpofirs Dash Cam with its suction cup mount.
3.3 การติดตั้งกล้องด้านหลัง
- Identify a suitable location on your rear windshield or license plate area for the rear camera.
- Use the provided adhesive tape or screws to securely mount the rear camera.
- เชื่อมต่อสายเคเบิลกล้องหลังเข้ากับตัวกล้องติดรถยนต์หลัก จัดวางสายเคเบิลให้เรียบร้อยไปตามแผงตกแต่งภายในรถเพื่อหลีกเลี่ยงการรบกวน

Image: Dpofirs Dash Cam main unit and the rear camera, illustrating the dual camera setup.
3.4 การต่อสายไฟ
- เสียบที่ชาร์จในรถยนต์เข้ากับช่องเสียบไฟ 12V ของรถยนต์ (ช่องเสียบที่จุดบุหรี่)
- Connect the other end of the car charger cable to the USB power input port on the dash cam.
- กล้องติดรถยนต์จะเปิดอัตโนมัติและเริ่มบันทึกเมื่อเปิดกุญแจรถ
4. คู่มือการใช้งาน
4.1 การควบคุมขั้นพื้นฐาน
กล้องติดรถยนต์มีปุ่มหลายปุ่มสำหรับการนำทางและการควบคุม:
- ปุ่มเปิด/ปิด: Press and hold to turn the device on/off. Short press to toggle screen display.
- ปุ่มเมนู (M): Press to enter the menu settings. Press again to cycle through menu options.
- ปุ่มตกลง: Confirm selections in the menu or start/stop recording.
- ปุ่มขึ้น/ลง: เลือกตัวเลือกในเมนูหรือปรับการตั้งค่า

ภาพ: ด้านหน้า view of the Dpofirs Dash Cam showing the display screen and control buttons (OK, M, Power, Up, Down).
4.2 โหมดการบันทึก
The dash cam supports various recording functionalities:
- การบันทึกแบบวนซ้ำ: This feature automatically overwrites the oldest video files when the memory card is full, ensuring continuous recording without manual intervention. Video segments are typically recorded in 1, 3, or 5-minute intervals.
- เซ็นเซอร์ G (ระบบล็อคฉุกเฉิน): The built-in G-sensor detects sudden impacts or collisions. When triggered, the current video segment is automatically locked and saved to prevent it from being overwritten by loop recording.
- การตรวจสอบที่จอดรถ: When enabled, the dash cam will automatically start recording if it detects motion or impact while the vehicle is parked. This feature requires a constant power supply (e.g., hardwire kit, not included) to function continuously.

Image: Visual explanation of Loop Recording, Emergency Lock (G-Sensor), and Parking Monitor functions.

Image: Icons representing Gravity Sensor (G-Sensor) and Loop Recording features.
4.3 การตั้งวันที่และเวลา
- กดปุ่ม Menu (M) ปุ่มเพื่อเข้าสู่เมนูการตั้งค่า
- ใช้ ขึ้น/ลง buttons to navigate to the 'Date/Time' setting.
- กด OK เพื่อเข้าสู่การตั้งค่า
- ใช้ ขึ้น/ลง เพื่อปรับค่าและ OK เพื่อย้ายไปยังฟิลด์ถัดไป
- เมื่อตั้งค่าเสร็จแล้ว ให้กด Menu (M) ที่จะออกไป
4.4 การเล่นวิดีโอ
- Stop recording by pressing the OK button if currently recording.
- กดปุ่ม โหมด button (often labeled 'M' or a specific mode button) to switch to playback mode.
- ใช้ ขึ้น/ลง buttons to select the desired video file.
- กด OK เพื่อเล่นวิดีโอที่เลือก
4.5 Understanding Camera Views

Image: Illustration of the comprehensive recording capabilities from the front, interior, and rear lenses.
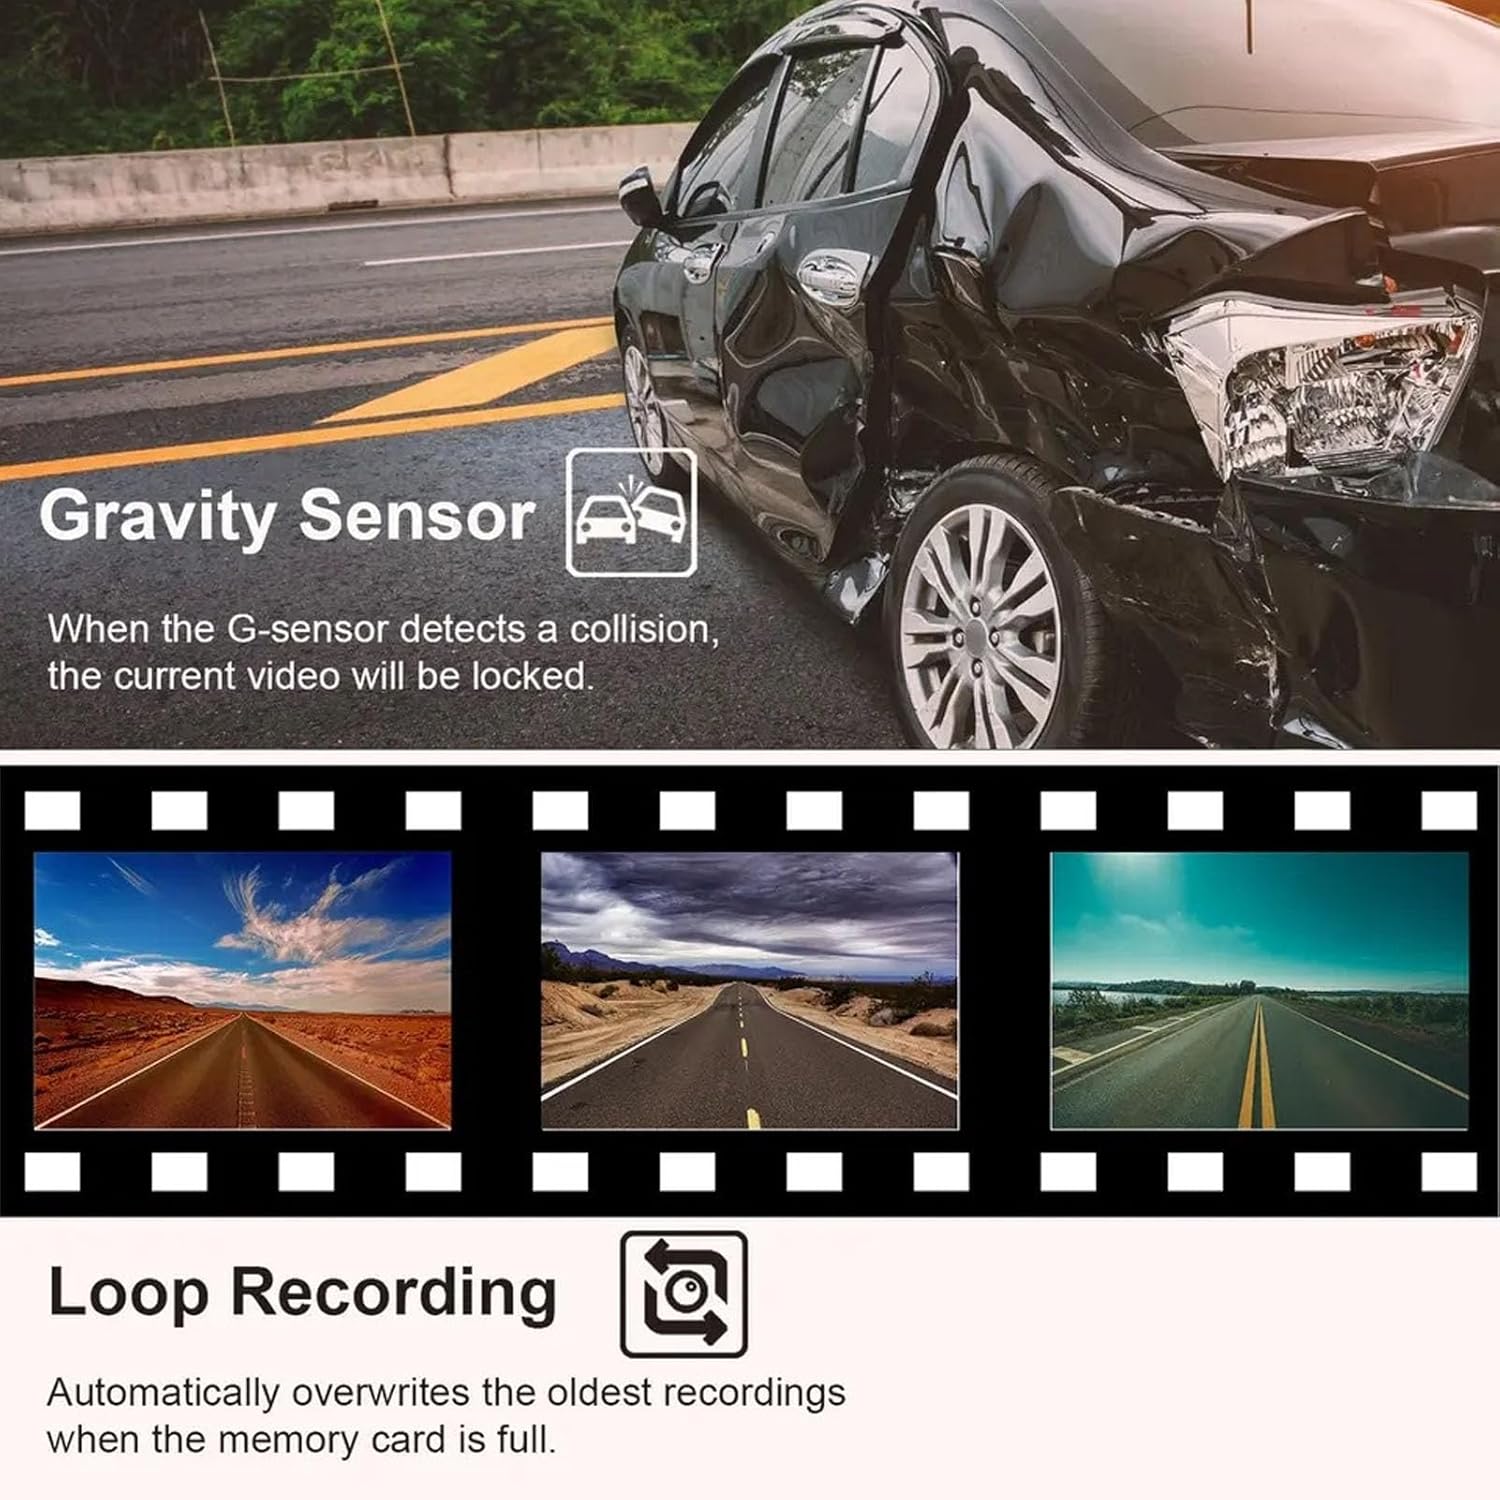
Image: Specific details on the 170° front (1080P), 110° inside (480P), and 110° rear (480P) camera views.
5. การบำรุงรักษา
5.1 Cleaning the Lenses and Screen
- Use a soft, lint-free cloth to gently wipe the camera lenses and the display screen.
- สำหรับรอยเปื้อนฝังแน่น ให้เช็ดออกเล็กน้อยampen the cloth with lens cleaning solution. Avoid harsh chemicals.
- Ensure lenses are clean for optimal video quality.
5.2 การจัดการการ์ดหน่วยความจำ
- It is recommended to format the Micro SD card periodically (e.g., once a month) to maintain optimal performance and prevent data corruption.
- To format, navigate to the 'Format' option in the dash cam's menu settings and confirm.
- Replace the memory card if you experience frequent recording errors or data loss.
6 การแก้ไขปัญหา
6.1 Dash Cam Not Powering On
- Ensure the car charger is securely plugged into both the dash cam and the vehicle's 12V power outlet.
- Check if the vehicle's 12V power outlet is functioning correctly (e.g., by testing with another device).
- Verify that the vehicle's ignition is on, as the dash cam typically powers on with the ignition.
6.2 Recording Stops or Fails
- Check if the Micro SD card is full. Format the card if necessary (back up important fileก่อนอื่น)
- Ensure you are using a Class 10 or higher Micro SD card. Lower class cards may not support continuous recording.
- The memory card may be faulty. Try replacing it with a new, compatible card.
- Ensure loop recording is enabled in the settings.
6.3 คุณภาพวิดีโอไม่ดี
- ทำความสะอาดเลนส์กล้องเพื่อขจัดสิ่งสกปรกหรือรอยเปื้อนต่างๆ
- โปรดตรวจสอบให้แน่ใจว่าได้ลอกฟิล์มป้องกันออกจากเลนส์แล้ว
- Check video resolution settings in the menu; ensure it is set to 1080P FHD for the front camera.
- Verify that the camera is securely mounted and not vibrating excessively.
7. ข้อมูลจำเพาะ
| Main Control Model | 3292 |
| เซ็นเซอร์รับภาพ | กค1054/0308 |
| แสดง | 2.0 inch Color Display |
| ความละเอียดวิดีโอ | Front: 1080P FHD; Interior/Rear: 480P |
| วีดีโอ File รูปแบบ | เอวีไอ |
| รูปแบบภาพถ่าย | JPG |
| การตรวจจับการเคลื่อนไหว | รองรับ |
| ฟังก์ชั่นการบันทึก | รองรับ |
| Parking Wake Up | รองรับ |
| เวลา Tag | รองรับ |
| การรองรับการ์ดหน่วยความจำ | Micro SD, up to 32GB (Class 10 or higher recommended) |
| ประเภทแบตเตอรี่ | แบตเตอรี่ลิเธียมโพลิเมอร์ 180mAh ในตัว |
| เทคโนโลยีการเชื่อมต่อ | ยูเอสบี |
| ขนาดแพ็คเกจ | 5.91 x 4.33 x 2.76 นิ้ว |
8. การรับประกันและการสนับสนุน
ข้อมูลการรับประกัน: โปรดดูเอกสารการซื้อหรือข้อมูลจากผู้ค้าปลีก website for specific warranty details and terms applicable to your Dpofirs Dash Cam.
การสนับสนุนลูกค้า: For technical assistance, troubleshooting not covered in this manual, or any other inquiries, please contact Dpofirs customer service through the retailer's platform or the official Dpofirs webเว็บไซต์.