1. บทนำ
This manual provides detailed instructions for the Senzooe ESP32-S3 Core Board N8R8. The ESP32-S3 is a low-power, highly integrated microcontroller with Wi-Fi and Bluetooth LE connectivity, designed for a wide range of applications, from low-power sensor networks to more demanding tasks like voice encoding, music streaming, and MP3 decoding. This core board facilitates easy development and prototyping with the ESP32-S3 chip.
2. ข้อมูลด้านความปลอดภัย
- แหล่งจ่ายไฟ: ตรวจสอบแหล่งจ่ายไฟ voltage is within the specified range (typically 3.3V or 5V via USB). Exceeding this can damage the board.
- การคายประจุไฟฟ้าสถิต (ESD): Handle the board with care to prevent ESD damage. Use an anti-static wrist strap or mat when possible.
- ไฟฟ้าลัดวงจร: Avoid short-circuiting pins or components on the board.
- สภาพแวดล้อมการทำงาน: Do not expose the board to extreme temperatures, humidity, or corrosive environments.
- การปรับเปลี่ยน: Unauthorized modifications to the board may void any potential warranty and could lead to malfunction or damage.
3. เนื้อหาบรรจุภัณฑ์
กรุณาตรวจสอบแพ็คเกจสำหรับรายการต่อไปนี้:
- Senzooe ESP32-S3 Core Board N8R8
Note: USB cables, breadboards, and other accessories are typically sold separately.
4. สินค้าหมดview
The Senzooe ESP32-S3 Core Board N8R8 integrates the ESP32-S3-WROOM-1 module, providing a compact and versatile platform for embedded development. It features multiple GPIO pins, two USB-C ports, reset and boot buttons, and an RGB LED.

รูปที่ 4.1 : ด้านหน้า View of the ESP32-S3 Core Board N8R8
This image displays the front side of the ESP32-S3 core board. Key components visible include the ESP32-S3-WROOM-1 module, two USB-C ports (one for power/data, one for USB-OTG), RST (Reset) and BOOT buttons, an RGB LED, and clearly labeled pin headers along both sides for easy access to GPIOs, power, and ground connections.

รูปที่ 4.2: ด้านหน้าทำมุม View of the ESP32-S3 Core Board N8R8
This image provides an angled perspective of the board's front, highlighting the layout of the components and the pin headers. The ESP32-S3-WROOM-1 module is prominently featured, along with the USB-C connectors and control buttons.
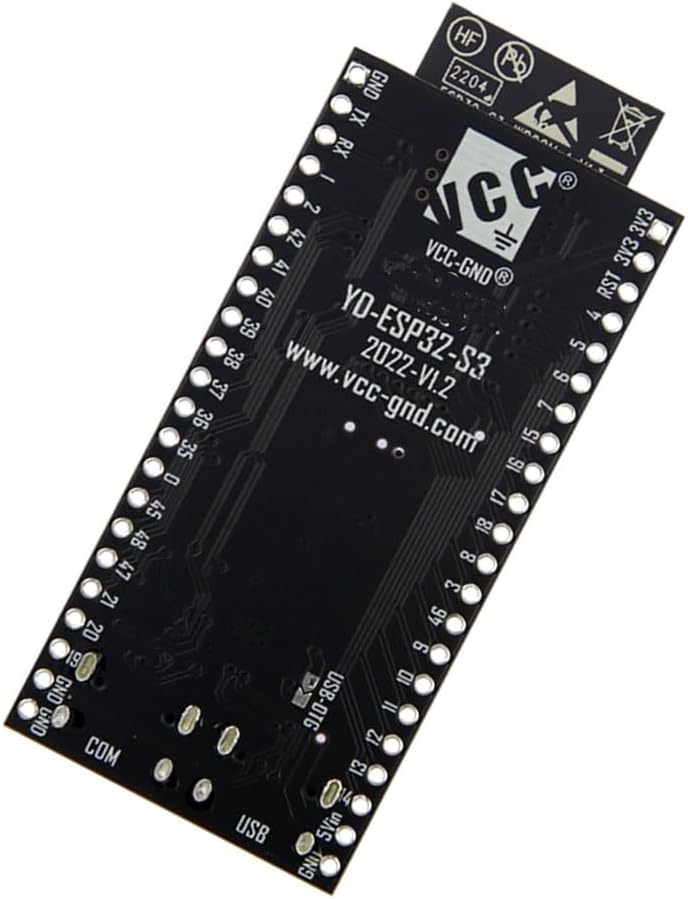
รูปที่ 4.3: ย้อนกลับ View of the ESP32-S3 Core Board N8R8
This image shows the reverse side of the ESP32-S3 core board. Visible markings include 'YD-ESP32-S3 2022-V1.2' and 'VCC-GND®', indicating the board's model and manufacturer/designer. The clean layout of the solder points for the pin headers is also apparent.
4.1 คุณสมบัติหลัก
- Integrated ESP32-S3-WROOM-1 module.
- Dual USB-C ports for power, data, and USB-OTG functionality.
- On-board RST (Reset) and BOOT buttons.
- RGB LED for status indication.
- Breadboard-friendly pinout with clearly labeled GPIOs.
- Wi-Fi and Bluetooth LE connectivity.
5. การตั้งค่า
5.1 การติดตั้งไดรเวอร์
Before connecting the board, ensure you have the necessary USB-to-UART bridge drivers installed on your computer. Most ESP32-S3 boards use a CH340 or CP210x chip for USB communication. Drivers can typically be found on the chip manufacturer's website (e.g., WCH for CH340, Silicon Labs for CP210x) or the official Espressif documentation.
- ดาวน์โหลดไดรเวอร์ที่เหมาะสมสำหรับระบบปฏิบัติการของคุณ
- ติดตั้งไดรเวอร์ตามคำแนะนำบนหน้าจอ
- รีสตาร์ทคอมพิวเตอร์ของคุณหากได้รับแจ้ง
5.2 การเชื่อมต่อบอร์ด
- Connect one end of a USB-C cable to the USB-to-UART port on the ESP32-S3 board (usually the one closer to the ESP32 module).
- เชื่อมต่อปลายอีกด้านหนึ่งของสาย USB-C เข้ากับพอร์ต USB ที่ว่างอยู่บนคอมพิวเตอร์ของคุณ
- The board should power on, and an LED (if present) may illuminate. Your computer should recognize the board as a serial port.
5.3 การตั้งค่าสภาพแวดล้อมการพัฒนา
The ESP32-S3 can be programmed using various development environments. Two common options are the Arduino IDE and ESP-IDF.
5.3.1 การตั้งค่า Arduino IDE
- ดาวน์โหลดและติดตั้ง Arduino IDE จาก Arduino อย่างเป็นทางการ webเว็บไซต์.
- เปิด Arduino IDE ไปที่ File > การตั้งค่า.
- In the 'Additional Boards Manager URLs' field, add:
https://raw.githubusercontent.com/espressif/arduino-esp32/gh-pages/package_esp32_index.json - ไปที่ เครื่องมือ > บอร์ด > ตัวจัดการบอร์ด.... ค้นหา 'esp32' and install the 'esp32 by Espressif Systems' package.
- หลังจากติดตั้งเสร็จแล้ว ให้ไปที่ เครื่องมือ > บอร์ด > ESP32 Arduino and select the appropriate ESP32-S3 board (e.g., 'ESP32S3 Dev Module').
- Select the correct COM port under เครื่องมือ > พอร์ต.
5.3.2 ESP-IDF Setup
For more advanced development, the Espressif IoT Development Framework (ESP-IDF) is recommended. Refer to the official Espressif documentation for detailed installation instructions for your operating system.
6. การดำเนินงานของคณะกรรมการ
6.1 Uploading Your First Program (Arduino IDE)
- เปิด Arduino IDE
- ไปที่ File > อดีตamples > 01.พื้นฐาน > กะพริบตา to open the classic LED blink exampเล.
- Modify the LED pin number in the sketch to match an available GPIO pin on your ESP32-S3 board, or use the on-board RGB LED if applicable (refer to board schematics for specific pin assignments).
- Ensure the correct board and port are selected under เครื่องมือ.
- Click the 'Upload' button (right arrow icon). The IDE will compile and upload the sketch to your board.
- During upload, you may need to press and hold the บู๊ท จากนั้นกดและปล่อยปุ่ม ร.ส.ท. กดปุ่ม และสุดท้ายปล่อยปุ่ม บู๊ท button to put the ESP32-S3 into download mode.
- Once uploaded, the LED should blink according to the program.
6.2 Using Wi-Fi and Bluetooth LE
The ESP32-S3 supports both 2.4 GHz Wi-Fi and Bluetooth LE. You can find numerous examples in the Arduino IDE (File > อดีตamples > ESP32) or ESP-IDF documentation to get started with network connectivity, including connecting to Wi-Fi networks, setting up a soft AP, or communicating via Bluetooth LE.
7. การบำรุงรักษา
- การทำความสะอาด: If necessary, gently clean the board with a soft, dry brush or compressed air to remove dust. Avoid using liquids or harsh chemicals.
- พื้นที่จัดเก็บ: ควรเก็บแผงวงจรไว้ในถุงป้องกันไฟฟ้าสถิตในที่แห้งและเย็นเมื่อไม่ได้ใช้งาน
- อัพเดตเฟิร์มแวร์: Regularly check for updates to the ESP32-S3 core in your chosen development environment (Arduino IDE, ESP-IDF) to benefit from bug fixes and new features.
8 การแก้ไขปัญหา
8.1 Board Not Detected
- ตรวจสอบสาย USB: Ensure the USB-C cable is functional and properly connected. Try a different cable.
- การติดตั้งไดร์เวอร์: Verify that the correct USB-to-UART drivers are installed (see Section 5.1).
- การเลือกพอร์ต: In your IDE, ensure the correct serial port is selected.
- การรีสตาร์ทคอมพิวเตอร์: Sometimes a computer restart can resolve port detection issues.
8.2 Upload Errors
- Incorrect Board/Port: Double-check that the correct ESP32-S3 board and serial port are selected in your IDE.
- โหมดบูต: Ensure the board is in download mode during upload. This often involves pressing and holding the BOOT button, then pressing and releasing RST, and finally releasing BOOT.
- แหล่งจ่ายไฟ: Insufficient power can cause upload failures. Ensure the board is powered adequately via USB.
- Corrupted Sketch: Try uploading a simple example sketch (e.g., Blink) to rule out issues with your code.
8.3 ปัญหาการเชื่อมต่อ Wi-Fi/Bluetooth
- เสาอากาศ: Ensure the integrated antenna on the ESP32-S3-WROOM-1 module is not obstructed.
- ตรรกะของโค้ด: Verify your code correctly initializes and uses the Wi-Fi or Bluetooth LE modules.
- พลัง: Wireless communication can be power-intensive. Ensure a stable power supply.
- การรบกวน: Minimize potential interference from other 2.4 GHz devices.
9. ข้อมูลจำเพาะ
| คุณสมบัติ | รายละเอียด |
|---|---|
| ชื่อรุ่น | อีพี32-S3 |
| โปรเซสเซอร์ | Espressif ESP32-S3 (Dual-core Xtensa LX7) |
| การเชื่อมต่อแบบไร้สาย | Wi-Fi (802.11 b/g/n), Bluetooth LE 5.0 |
| ความจุของหน่วยความจำ | 32 GB (as per product listing, typically refers to external flash) |
| เทคโนโลยีหน่วยความจำ RAM | DDR (likely refers to internal SRAM/PSRAM capabilities) |
| พอร์ต USB | 2 (USB-C, one for USB-to-UART, one for USB-OTG) |
| อุปกรณ์ที่รองรับ | เครื่องคอมพิวเตอร์ส่วนบุคคล |
| ผู้ผลิต | Senzooe |
| ASIN | B0CB8M2VSN |
| ยูพีซี | 755752649846 |
10. การรับประกันและการสนับสนุน
For warranty information and technical support, please refer to the seller or manufacturer's official channels. Keep your purchase receipt as proof of purchase. General support for ESP32-S3 development can be found through the extensive Espressif documentation, community forums, and online resources.