
การแนะนำ
This user manual provides comprehensive instructions for the installation, operation, and maintenance of your Cuifati ATX B75A Motherboard. Please read this manual thoroughly before proceeding with installation to ensure proper setup and optimal performance. This motherboard is designed for desktop systems, supporting LGA1155 processors and DDR3 memory.
สินค้าเกินview และคุณสมบัติที่สำคัญ
The Cuifati ATX B75A Motherboard offers a robust platform for your desktop computing needs. Key features include:
- High Definition Video Output: Equipped with VGA and HD Multimedia Interface ports for digital high-definition video output.
- การเชื่อมต่อที่หลากหลาย: Features 2 x DDR3 memory slots, 1 x SATA3.0, 3 x SATA2.0 hard disk interfaces, and a total of 10 USB interfaces (including USB 3.0).
- ความสามารถของเครือข่าย: Supports a 100M network card interface for reliable internet connectivity.
- การส่งพลังงานที่เสถียร: Utilizes multiphase power design for enhanced stability and efficiency.
- ติดตั้งง่าย: Constructed with premium printed circuit board material for durability and straightforward setup.
- รองรับ NVMe M.2: Includes an NVMe M.2 slot for high-speed storage solutions.
- PCIe 16X Slot: Provides a dedicated slot for graphics cards.

รูปที่ 1: จากบนลงล่าง view of the Cuifati ATX B75A Motherboard, showcasing the CPU socket, DDR3 memory slots, PCIe slot, and various ports.

รูปที่ 2: เกินview of the Cuifati B75A Motherboard highlighting key features such as 2xDDR3, 1xNVMe M.2, 1xPCIe 16X, 1xSATA3.0, 1xVGA, 1xWiFi M.2, 1xHDMI, and 3xSATA2.0.

รูปที่ 3: Diagram illustrating product features including Intel LGA 1155 socket, DDR3 memory support, WiFi M.2, PCIe 16X, SATA 3.0 and 2.0 ports, and NVMe M.2 slot.

รูปที่ 4: เมนบอร์ด view accompanied by icons representing solid state capacitance for stability, 100M network card, front USB 3.0 interface, and VGA/HD Multimedia Interface.
ข้อมูลจำเพาะทางเทคนิค
| คุณสมบัติ | รายละเอียด |
|---|---|
| ยี่ห้อ | กุยฟาติ |
| ชื่อรุ่น | Cuifatipg823zgbh9 |
| ซ็อคเก็ตซีพียู | แอลจีเอ 1155 |
| โปรเซสเซอร์ที่เข้ากันได้ | Intel Core 2 DUO (and other LGA 1155 compatible CPUs) |
| ประเภทชิปเซ็ต | อินเทล B75 เอ็กซ์เพรส |
| เทคโนโลยีหน่วยความจำ RAM | DDR3 |
| ความเร็วสัญญาณนาฬิกาหน่วยความจำ | สูงถึง 2400 MHz (OC) |
| ความจุหน่วยความจำ (สูงสุด) | 16GB |
| ขนาดสินค้า | 6.69 x 6.69 x 6.7 นิ้ว |
| น้ำหนักสินค้า | 1.1 ปอนด์ |
| เอาท์พุตวิดีโอ | VGA, HD Multimedia Interface |
| อินเทอร์เฟซการจัดเก็บข้อมูล | 1 x SATA3.0, 3 x SATA2.0, 1 x NVMe M.2 |
| ช่องเสียบขยาย | 1 x PCIe 16X |
| อินเทอร์เฟซ USB | Multiple USB 2.0 and USB 3.0 ports |
| เครือข่าย | 100M Ethernet |
| แพลตฟอร์ม | Windows 10 compatible |
คู่มือการติดตั้ง
Follow these steps to properly install your Cuifati ATX B75A Motherboard into your computer system.

รูปที่ 5: Detailed diagram highlighting key components and connectors on the motherboard, including CPU Slot, DDR3 Memory Slots, 24PIN CPU Power Supply, SATA ports, NVMe M.2, USB ports, HDMI, VGA, and front panel connectors. Refer to this diagram for component locations during installation.
1. การเตรียมพร้อม
- โปรดตรวจสอบให้แน่ใจว่าได้ถอดปลั๊กไฟออกจากเต้ารับแล้ว
- เตรียมอุปกรณ์ที่จำเป็น: ไขควงหัวฟิลิปส์, สายรัดข้อมือป้องกันไฟฟ้าสถิต (แนะนำ)
- Prepare your computer case by removing the side panel.
2. การติดตั้งซีพียู
- ค้นหาซ็อกเก็ต CPU LGA 1155 บนเมนบอร์ด (ดูรูปที่ 5)
- Gently lift the load plate lever and open the load plate.
- Carefully align your LGA 1155 processor with the socket, ensuring the gold triangle on the CPU matches the indicator on the socket. Do not force the CPU into the socket.
- ปิดแผ่นโหลดและยึดด้วยคันโยก
- ทาซิลิโคนระบายความร้อนลงบนซีพียู และติดตั้งพัดลมระบายความร้อนซีพียูตามคำแนะนำของผู้ผลิต
3. การติดตั้งหน่วยความจำ (RAM)
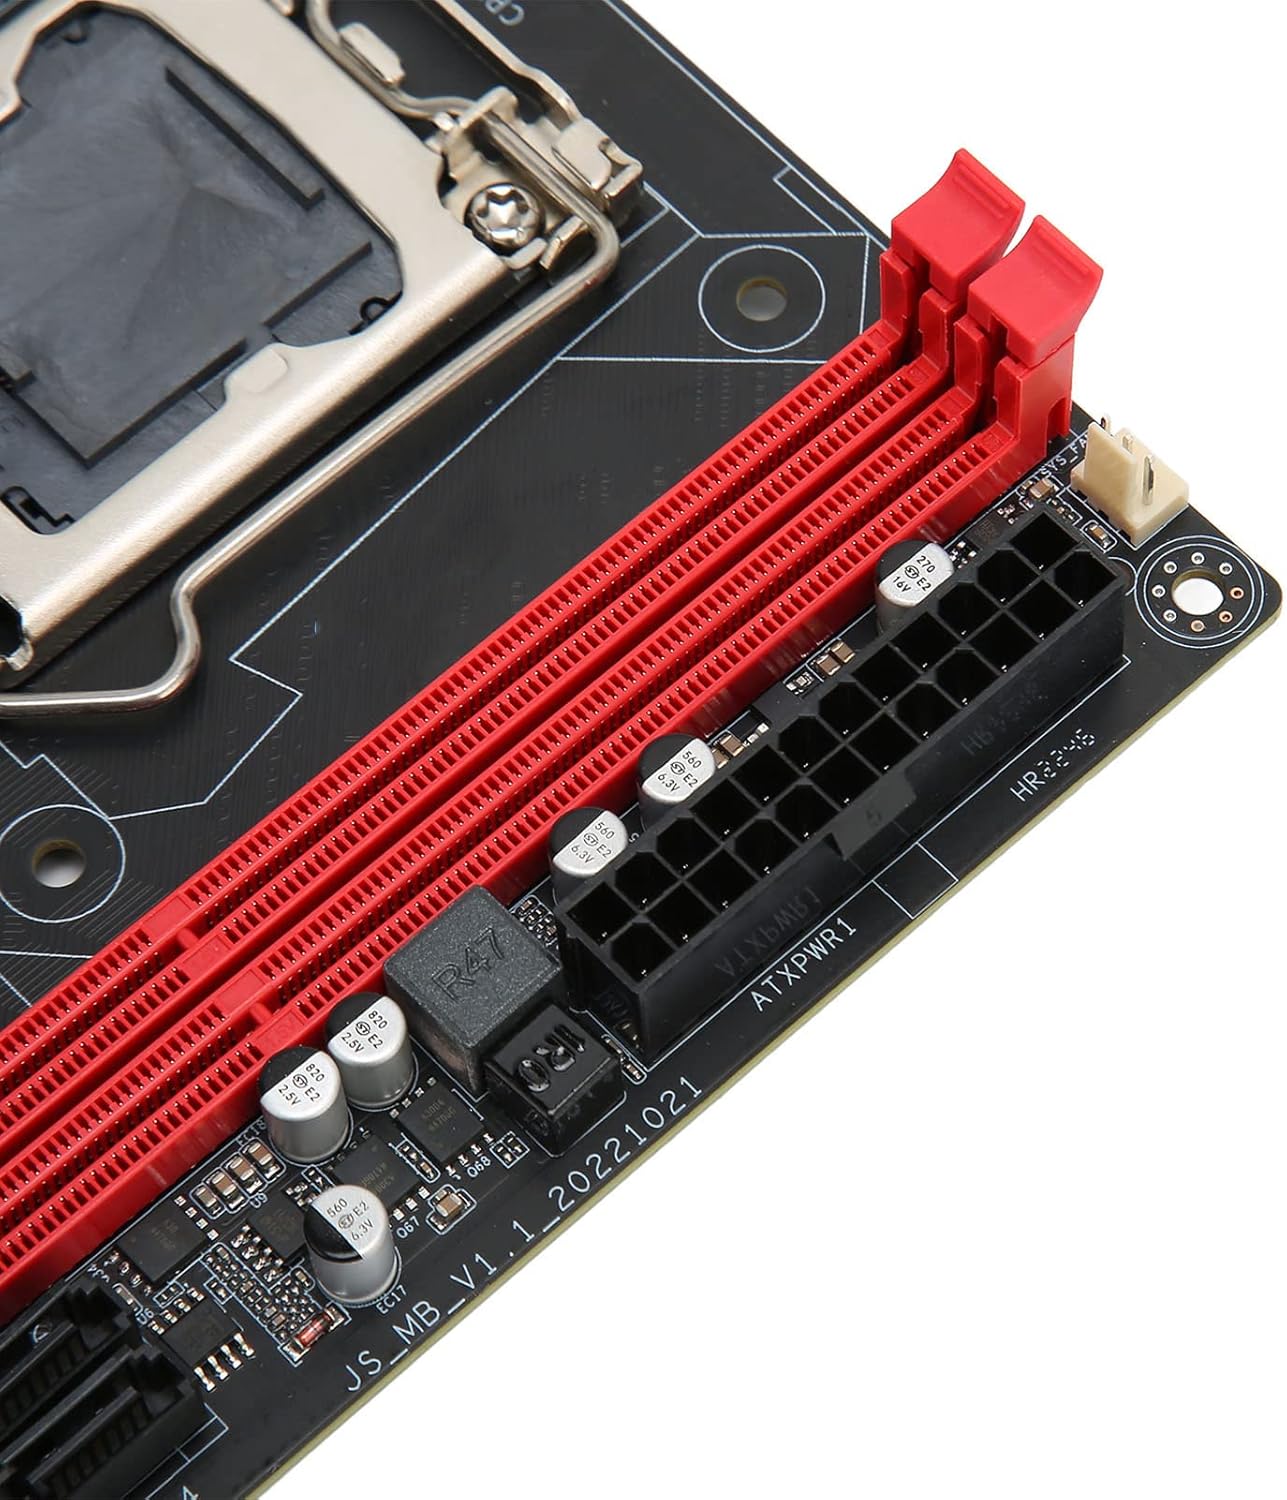
รูปที่ 6: ภาพระยะใกล้ view of the DDR3 memory slots and the 24-pin ATX power connector, essential for RAM and main power connections.
- Identify the DDR3 memory slots (refer to Figure 5 and Figure 6).
- เปิดคลิปที่ปลายทั้งสองด้านของช่องใส่หน่วยความจำ
- จัดตำแหน่งรอยบากบนโมดูลหน่วยความจำ DDR3 ให้ตรงกับร่องในช่องเสียบหน่วยความจำ
- กดปลายทั้งสองข้างของโมดูลหน่วยความจำให้แน่นจนกระทั่งคลิปล็อคเข้าที่
4. การติดตั้งเมนบอร์ดลงในเคส
- ติดตั้งแผ่นปิดพอร์ต I/O เข้ากับช่องเปิดด้านหลังของเคสคอมพิวเตอร์ของคุณ
- วางเมนบอร์ดลงในเคสอย่างระมัดระวัง โดยจัดตำแหน่งรูสกรูให้ตรงกับตัวรองรับ
- ยึดเมนบอร์ดด้วยสกรู อย่าขันแน่นเกินไป
5. การเชื่อมต่อแหล่งจ่ายไฟ
- Connect the 24-pin ATX power connector from your power supply to the 24PIN CPU Power Supply header on the motherboard (refer to Figure 5 and Figure 6).
- Connect the 4-pin or 8-pin CPU power connector (if applicable) to the 4PIN Power Supply header near the CPU socket.
6. การเชื่อมต่ออุปกรณ์จัดเก็บข้อมูล
- Connect your SATA storage devices (HDDs/SSDs) to the SATA3.0 (1 port) or SATA2.0 (3 ports) connectors on the motherboard using SATA data cables (refer to Figure 5).
- If using an NVMe M.2 SSD, insert it into the NVMe M.2 slot and secure it with the provided screw (refer to Figure 5).
7. การเชื่อมต่อแผงด้านหน้า
Connect the front panel cables (Power SW, Reset SW, Power LED, HDD LED, Front USB, Front Audio) to their respective headers on the motherboard. Refer to Figure 5 for the location of these headers.
- เพาเวอร์ SW: Connects to the power button on your case.
- รีเซ็ต SW: Connects to the reset button on your case.
- ไฟ LED: Connects to the power indicator light. Observe polarity.
- ไฟ LED แสดงสถานะฮาร์ดดิสก์: Connects to the hard drive activity indicator light. Observe polarity.
- ยูเอสบีด้านหน้า: Connects to the front USB ports on your case.
- เสียงด้านหน้า: Connects to the front audio jacks on your case.
8. Expansion Cards
If installing a dedicated graphics card or other PCIe expansion cards, insert them into the PCIe 16X slot and secure them with the case's retention mechanism (refer to Figure 5).
9. การตรวจสอบขั้นสุดท้าย

รูปที่ 7: ภาพระยะใกล้ view of the rear I/O panel, showing various ports including USB, Ethernet, VGA, and HD Multimedia Interface, where external devices will connect.
- ตรวจสอบการเชื่อมต่อทั้งหมดอีกครั้งเพื่อให้แน่ใจว่าปลอดภัย
- Ensure no loose screws or cables are obstructing fans or components.
- Close the computer case side panel.
คำแนะนำการใช้งาน
Once the motherboard and all components are correctly installed, you can proceed with operating your system.
1. เปิดเครื่องครั้งแรก
- Connect your monitor, keyboard, and mouse to the appropriate ports on the rear I/O panel (refer to Figure 7).
- Connect the power cable to your power supply and plug it into a wall outlet.
- กดปุ่มเปิด/ปิดบนเคสคอมพิวเตอร์ของคุณ
- The system should power on, and you should see output on your monitor.
2. การตั้งค่า BIOS/UEFI
Upon initial boot, you may need to enter the BIOS/UEFI setup to configure settings such as boot order, date/time, and enable specific features. Typically, you can access BIOS by pressing the เดล or F2 กดปุ่มซ้ำๆ ระหว่างการเริ่มต้นระบบ
3. การติดตั้งระบบปฏิบัติการ
Install your preferred operating system (e.g., Windows 10) from a bootable USB drive or DVD. Follow the on-screen instructions provided by the operating system installer.
4. การติดตั้งไดร์เวอร์
After installing the operating system, install the necessary drivers for the motherboard chipset, audio, network, and any dedicated graphics cards. These drivers are usually provided on a CD/DVD with your components or can be downloaded from the manufacturer's webเว็บไซต์
การซ่อมบำรุง
การบำรุงรักษาอย่างเหมาะสมจะช่วยให้เมนบอร์ดและระบบโดยรวมของคุณมีอายุการใช้งานยาวนานและทำงานได้อย่างเสถียร
- รักษาความสะอาด: Regularly clean the interior of your computer case to prevent dust buildup on components, especially heatsinks and fans. Use compressed air for this purpose.
- ตรวจสอบให้แน่ใจว่ามีการไหลเวียนของอากาศที่เหมาะสม: Make sure your computer case has adequate ventilation and that fans are operating correctly to prevent overheating.
- อัปเดตไดรเวอร์: Periodically check for and install the latest drivers for your motherboard chipset, graphics card, and other peripherals to ensure optimal performance and compatibility.
- อัปเดต BIOS/UEFI: Only update the BIOS/UEFI if necessary, and follow the manufacturer's instructions precisely. Incorrect BIOS updates can render your motherboard inoperable.
- หลีกเลี่ยงความเครียดทางร่างกาย: Handle the motherboard with care. Avoid bending or applying excessive force to components or connectors.
การแก้ไขปัญหา
หัวข้อนี้ให้แนวทางแก้ไขปัญหาทั่วไปที่คุณอาจพบเจอ
ไม่มีไฟเข้า / ระบบไม่เปิดใช้งาน
- ตรวจสอบการเชื่อมต่อพลังงาน: Ensure the 24-pin ATX power connector and the 4-pin/8-pin CPU power connector are securely seated on the motherboard.
- แหล่งจ่ายไฟ: Verify that the power supply is switched on and connected to a working power outlet. Test the power supply if possible.
- การเชื่อมต่อที่แผงด้านหน้า: Double-check the POWER SW header connection on the motherboard.
- ไฟฟ้าลัดวงจร: Remove the motherboard from the case and test it on a non-conductive surface (e.g., cardboard box) with only essential components (CPU, one RAM stick, CPU cooler, power supply). This helps rule out short circuits caused by the case.
ไม่มีเอาท์พุตการแสดงผล
- ตรวจสอบการเชื่อมต่อ: Ensure the monitor is properly connected to the VGA or HD Multimedia Interface port on the motherboard (or dedicated graphics card) and is powered on.
- แรม : Reseat the DDR3 memory modules. Try booting with only one RAM stick.
- การ์ดจอ : If using a dedicated graphics card, ensure it is properly seated in the PCIe 16X slot and has auxiliary power connected (if required).
- การตั้งค่า BIOS: If you have a dedicated graphics card, ensure the BIOS is configured to use it as the primary display output.
System Instability / Random Crashes
- ความร้อนสูงเกินไป: Check CPU and case temperatures. Ensure CPU cooler is properly installed and fans are working. Clean dust from heatsinks.
- ปัญหา RAM: เรียกใช้โปรแกรมตรวจสอบหน่วยความจำเพื่อตรวจสอบโมดูล RAM ที่มีปัญหา
- ปัญหาไดร์เวอร์: ตรวจสอบให้แน่ใจว่าไดรเวอร์ทั้งหมดได้รับการอัปเดตและติดตั้งอย่างถูกต้องแล้ว
- แหล่งจ่ายไฟ: An insufficient or failing power supply can cause instability.
Slow Performance / Lagging
- พื้นที่จัดเก็บ: Check the health of your storage drives (HDD/SSD). Ensure the operating system is installed on a fast drive (e.g., NVMe M.2 SSD).
- CPU/RAM Usage: Monitor CPU and RAM usage to identify resource-intensive applications.
- ไดรเวอร์: Outdated drivers can sometimes lead to performance issues.
- ระบบปฏิบัติการ: Ensure your operating system is optimized and free from malware.
การรับประกันและการสนับสนุน
For warranty information and technical support, please refer to the documentation provided with your purchase or visit the official Cuifati webไซต์นี้ โปรดเก็บหลักฐานการซื้อไว้เพื่อใช้ยืนยันการรับประกัน
For further assistance, you may contact Cuifati customer support through their official channels. Please have your product model number (Cuifatipg823zgbh9) and purchase details ready.