
Della 048-OPAC-6H
Della 10000 BTU Portable Air Conditioner User Manual
Model: 048-OPAC-6H | Brand: Della
1. ข้อมูลด้านความปลอดภัยที่สำคัญ
Please read this manual carefully before operating your portable air conditioner. Keep this manual for future reference. Always follow basic safety precautions to reduce the risk of fire, electric shock, or injury.
- ตรวจสอบให้แน่ใจว่าวางเครื่องไว้บนพื้นผิวที่เรียบและมั่นคงเพื่อป้องกันการพลิกคว่ำ
- อย่าใช้งานเครื่องด้วยสายไฟหรือปลั๊กที่ชำรุด
- ห้ามสอดนิ้วหรือวัตถุเข้าไปในช่องอากาศเข้าหรือออก
- เก็บเครื่องให้ห่างจากวัสดุไวไฟและเปลวไฟ
- ถอดปลั๊กเครื่องทุกครั้งก่อนทำความสะอาดหรือดำเนินการบำรุงรักษาใดๆ
- เครื่องใช้ไฟฟ้าตัวนี้ไม่ได้มีวัตถุประสงค์เพื่อให้บุคคล (รวมทั้งเด็ก) ที่มีความบกพร่องทางร่างกาย ทางประสาทสัมผัส หรือทางจิตใจ หรือขาดประสบการณ์และความรู้ ใช้งาน เว้นแต่จะมีการดูแลหรือคำแนะนำเกี่ยวกับการใช้เครื่องใช้ไฟฟ้าโดยบุคคลที่รับผิดชอบด้านความปลอดภัยของบุคคลดังกล่าว
2. สินค้าหมดview
The Della 10000 BTU Portable Air Conditioner is a versatile unit designed to provide cooling, heating, dehumidification, and fan functions for spaces up to 450 sq. ft. It features smart WiFi connectivity for convenient control via a mobile app, a remote control, and an intuitive soft-touch control panel.

Image: Della Portable Air Conditioner unit, remote control, and smartphone displaying the control app.
Key components include the main unit with integrated handle, exhaust hose, window installation kit, and remote control.

Image: Diagram showing the dimensions of the portable air conditioner: 12.2 inches (width) x 12.2 inches (depth) x 27.6 inches (height).
3. การตั้งค่า
3.1 การแกะกล่อง
Carefully remove the unit and all accessories from the packaging. Retain the original packaging for future storage or transport. Allow the unit to stand upright for at least 24 hours before initial use to allow the refrigerant to settle.
3.2 การจัดวาง
Place the air conditioner on a firm, level surface in a location that allows for proper air circulation. Ensure there is at least 20 inches (50 cm) of space from walls or other objects to allow for adequate airflow around the unit.
3.3 การติดตั้งชุดหน้าต่าง
The included window kit is designed for easy installation in both horizontal and vertical sliding windows. No drilling is required.

Image: Diagrams illustrating the installation of the window kit in both horizontal and vertical sliding windows, showing compatibility with window openings from 25.5 to 64.1 inches.
- Assemble the window slider kit by sliding the adjustable panels together to fit your window opening. The kit is compatible with window sizes from 25.5 to 64.1 inches.
- Secure the panels with the provided screws.
- Open the window and place the assembled window kit into the window frame. Extend the panels to fit snugly and close the window against the kit to secure it.
- Ensure the window kit is sealed properly to prevent air leakage. Use foam seals if necessary.
3.4 การเชื่อมต่อท่อร่วมไอเสีย
- Attach the exhaust hose connector to one end of the exhaust hose.
- ต่ออะแดปเตอร์ชุดหน้าต่างเข้ากับปลายอีกด้านหนึ่งของท่อไอเสีย
- Insert the exhaust hose connector into the exhaust outlet on the back of the air conditioner unit.
- Insert the window kit adapter into the opening on the window slider kit.
- ตรวจสอบให้แน่ใจว่าการเชื่อมต่อทั้งหมดแน่นหนาเพื่อป้องกันไม่ให้อากาศร้อนกลับเข้ามาในห้องอีก
3.5 การเชื่อมต่อสายไฟ
Plug the power cord into a grounded 115V/60Hz electrical outlet. Do not use extension cords or power strips.
4. คู่มือการใช้งาน
4.1 แผงควบคุม
The unit features an intuitive soft-touch control panel on the top of the unit.
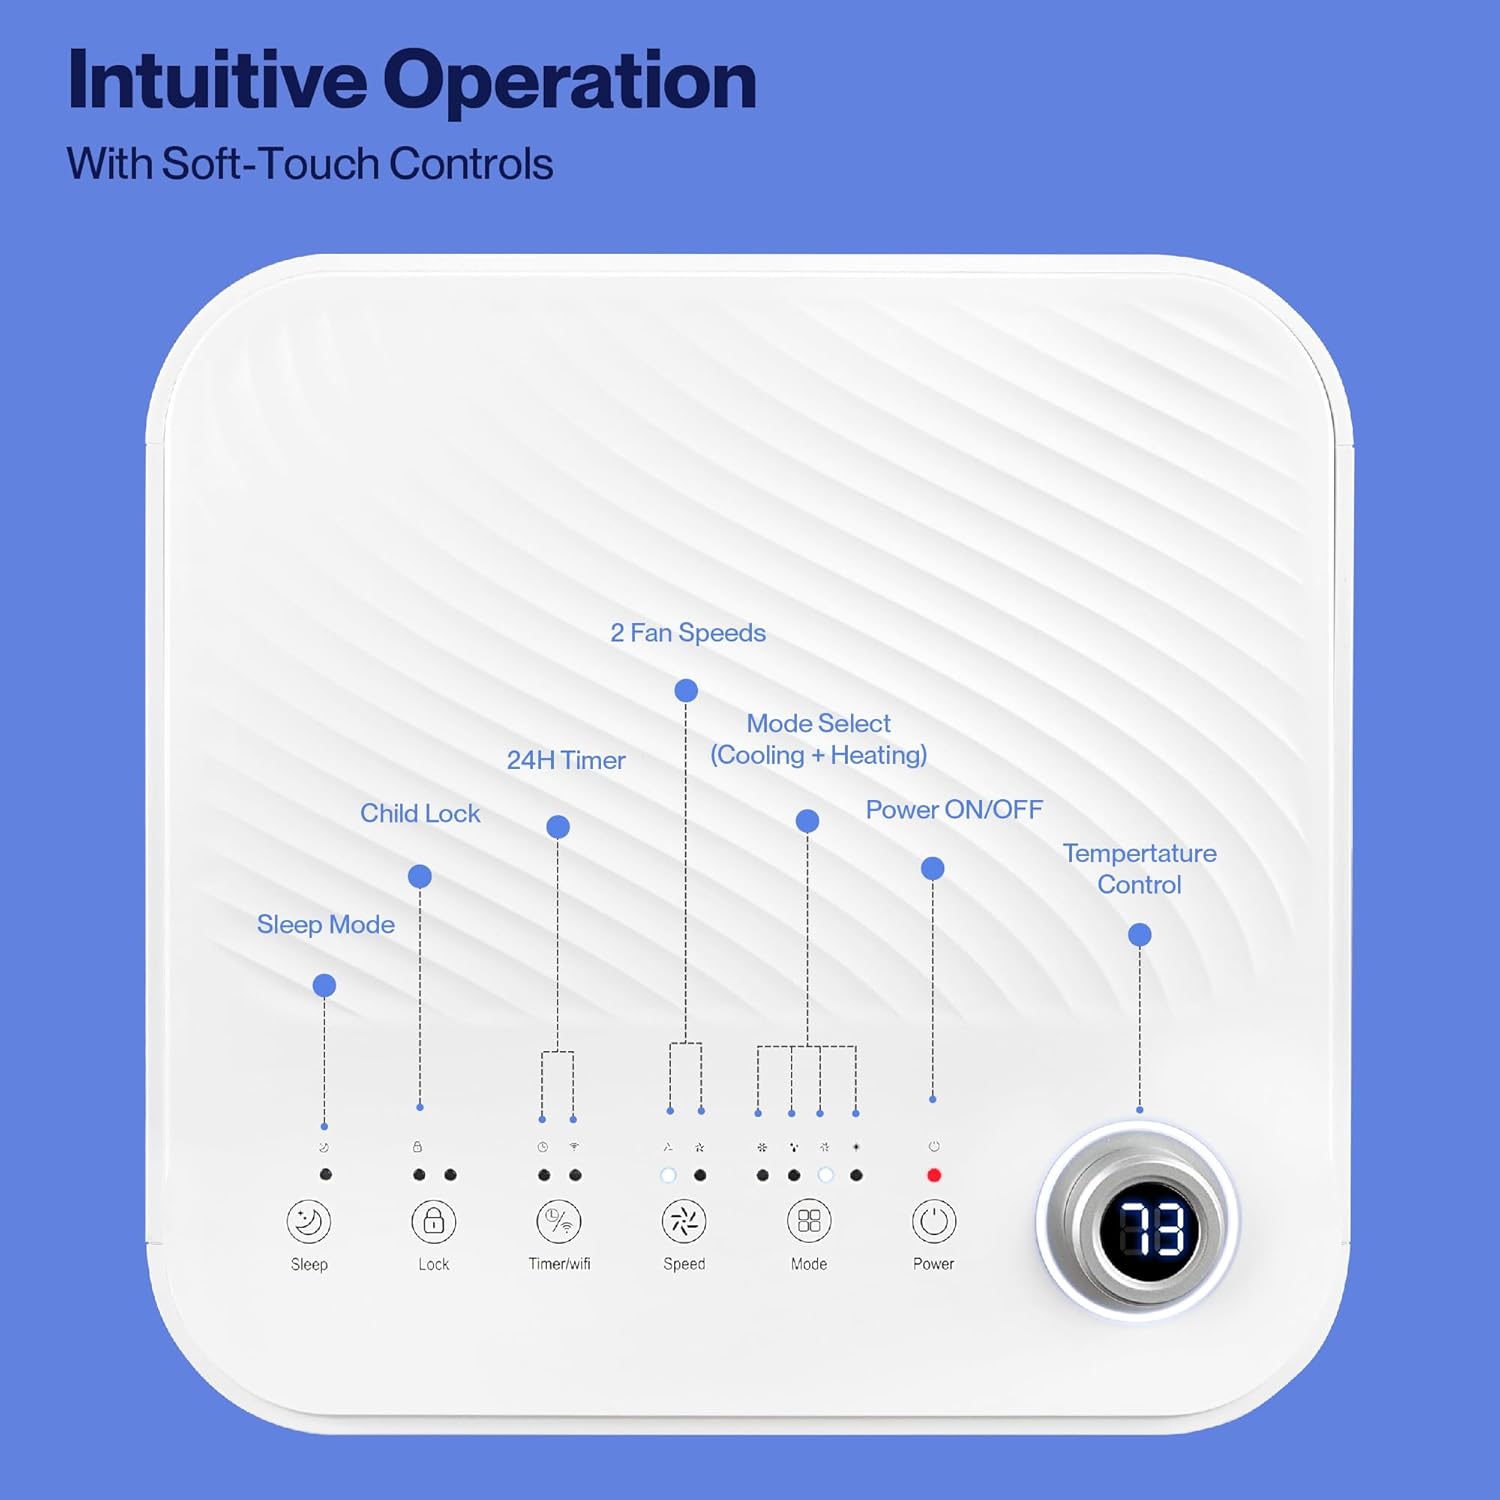
Image: Detailed diagram of the control panel with labels for each button: Sleep, Child Lock, Timer/WiFi, Fan Speed, Mode Select (Cooling + Heating), Power ON/OFF, and Temperature Control with digital display.
- เปิด/ปิดเครื่อง: กดเพื่อเปิดหรือปิดเครื่อง
- โหมดเลือก: Cycle through Cooling, Heating, Dehumidification, Ventilation (Fan), and Sleep modes.
- การควบคุมอุณหภูมิ: Use the up/down arrows to adjust the desired temperature.
- ความเร็วพัดลม: Select between 2 fan speeds (Low, High).
- ตัวจับเวลา: ตั้งเวลา 24 ชั่วโมงสำหรับการเปิด/ปิดอัตโนมัติ
- การล็อคเด็ก: เปิดใช้งานหรือปิดใช้งานฟังก์ชันล็อกสำหรับเด็ก
- โหมดสลีป: เปิดใช้งานโหมดสลีปเพื่อการทำงานที่เงียบกว่าและปรับอุณหภูมิอย่างค่อยเป็นค่อยไป
4.2 การควบคุมระยะไกล
The unit comes with a remote control for convenient operation from a distance. All functions available on the control panel can be accessed via the remote.
4.3 WiFi/Smart App Control
Control your Della Portable Air Conditioner from anywhere using the free DELLA+ app on your smartphone. The unit is compatible with Google Assistant and Amazon Alexa for voice control.

Image: A person relaxing on a couch, using a smartphone to control the air conditioner, with text indicating compatibility with Google Assistant and Amazon Alexa.
- Download the DELLA+ app from your smartphone's app store.
- ทำตามคำแนะนำในแอปเพื่อเชื่อมต่อเครื่องปรับอากาศของคุณกับเครือข่าย WiFi ในบ้าน
- Once connected, you can control modes, temperature, fan speed, and set schedules remotely.
The app also supports Smart Geo Location, allowing the unit to automatically turn on or off based on your proximity to home.

Image: A smartphone screen showing a map with a car icon and a notification indicating the AC unit automatically turned on due to Smart Geo Location.
5. การบำรุงรักษา
Regular maintenance ensures optimal performance and extends the lifespan of your unit. Always unplug the unit before cleaning.
5.1 การทำความสะอาดแผ่นกรองอากาศ
ควรทำความสะอาดตัวกรองอากาศทุกสองสัปดาห์หรือบ่อยกว่านั้น ขึ้นอยู่กับการใช้งานและคุณภาพอากาศ
- หาแผงกรองอากาศ (โดยปกติจะอยู่ด้านหลังหรือด้านข้างของเครื่อง)
- ถอดตัวกรองออก
- ล้างตัวกรองด้วยน้ำอุ่นผสมสบู่ ล้างให้สะอาดและปล่อยให้แห้งสนิทก่อนใส่กลับเข้าไปใหม่
5.2 การระบายน้ำ
The unit has a self-evaporating system, but in high humidity conditions, water may accumulate. The "Water-full indicator" will illuminate when the water tank needs draining.
- วางถาดหรือกระทะตื้นไว้ใต้ช่องระบายน้ำ (อยู่ที่ด้านหลังด้านล่างของเครื่อง)
- ถอดปลั๊กท่อระบายน้ำ
- Allow all accumulated water to drain out.
- ใส่ปลั๊กท่อระบายน้ำกลับเข้าที่อย่างแน่นหนา
5.3 พื้นที่จัดเก็บ
หากจัดเก็บเครื่องไว้เป็นเวลานาน:
- ระบายน้ำที่สะสมออกให้หมด
- ทำความสะอาดตัวกรองอากาศ
- เปิดเครื่องในโหมดพัดลมอย่างเดียวเป็นเวลาสองสามชั่วโมงเพื่อทำให้ภายในแห้ง
- ถอดปลั๊กสายไฟและม้วนให้เรียบร้อย
- เก็บเครื่องไว้ในที่เย็นและแห้ง โดยควรเก็บไว้ในบรรจุภัณฑ์เดิม
6 การแก้ไขปัญหา
โปรดดูหัวข้อนี้เพื่อดูปัญหาทั่วไปและวิธีแก้ไข
| ปัญหา | สาเหตุที่เป็นไปได้ | สารละลาย |
|---|---|---|
| เครื่องไม่เปิด | No power; Power cord unplugged; Circuit breaker tripped; Water tank full | ตรวจสอบเต้ารับไฟฟ้า เสียบสายไฟ รีเซ็ตเบรกเกอร์วงจร ระบายน้ำออกจากถังเก็บน้ำ |
| หน่วยไม่ระบายความร้อนอย่างมีประสิทธิภาพ | Air filter dirty; Exhaust hose not properly installed; Room too large; Doors/windows open; Temperature setting too high | Clean air filter; Ensure exhaust hose is sealed; Close doors/windows; Lower temperature setting |
| หน่วยมีเสียงดัง | Unit not on level surface; Air filter dirty; Obstruction in fan | Place unit on level surface; Clean air filter; Check for obstructions |
| การรั่วซึมของน้ำ | ปลั๊กท่อระบายน้ำหลวมหรือหายไป; หน่วยเอียง | ยึดปลั๊กท่อระบายน้ำให้แน่น ตรวจสอบให้แน่ใจว่าเครื่องอยู่ในระดับ |
| ปัญหาการเชื่อมต่อ WiFi | Incorrect WiFi password; Unit too far from router; Router issues | Verify password; Move unit closer to router; Restart router |
หากปัญหายังคงมีอยู่หลังจากลองวิธีแก้ไขเหล่านี้แล้ว โปรดติดต่อฝ่ายสนับสนุนลูกค้า
7. ข้อมูลจำเพาะ
| คุณสมบัติ | ข้อมูลจำเพาะ |
|---|---|
| หมายเลขรุ่น | 048-OPAC-6H |
| ความสามารถในการทำความเย็น | 10000 บีทียู |
| พื้นที่ให้บริการ | มากถึง 450 ตร.ว. ฟุต |
| ฟังก์ชั่น | Cooling, Heating, Dehumidifier, Fan, Sleep Mode |
| เล่มที่tage | 115 โวลต์ |
| ระดับเสียง | 54 เดซิเบล |
| สารทำความเย็น | อาร์ 410เอ |
| ขนาด (กว้าง x ยาว x สูง) | 12.2 x 12.2 x 27.6 นิ้ว |
| วัสดุ | พลาสติก ABS |
| คุณสมบัติพิเศษ | Portable, Dehumidifier, WiFi Enabled, Remote Control, Built-in Handle, 24-hour timer, Child Lock |
8. การรับประกันและการสนับสนุนลูกค้า
For warranty information or technical assistance, please refer to the warranty card included with your product or visit the official Della website. You may also contact Della customer support directly for further assistance with troubleshooting or parts replacement.
Ask a question about this manual
Ask about setup, troubleshooting, compatibility, parts, safety, or missing instructions. Manuals+ will review the question and use this page’s manual context to help answer it.