
1. บทนำ
This manual provides comprehensive instructions for the Vrabocry WR01RF Wireless 4-Zone RGBCCT Wall Mounted Smart Panel Remote. This device is designed to control compatible RGB, RGBW, and RGBCCT LED lighting systems wirelessly, offering flexible control over color, brightness, and saturation across up to four independent zones.

ภาพที่ 1.1: ด้านหน้า view of the Vrabocry WR01RF Smart Panel Remote, showing the touch-sensitive control surface with color sliders and zone buttons.
2. คุณสมบัติ
- Wireless 2.4GHz RF Transmission: Provides a control distance of up to 30 meters (98 feet), allowing for flexible installation without direct wiring to the lighting circuit.
- การควบคุม 4 โซน: Independently manage up to four groups of compatible LED lamps, strips, or controllers. Each zone can control numerous lighting units.
- RGBCCT Compatibility: Supports RGB (4-wire), RGBW (5-wire), and RGBCCT (6-wire) LED strip controllers, including models like C03RF, C04RF, C05RF, C03W, C04W, C05W, WB5, LM052, LM053, LM051, and various Mi-boxer/Mi-light series products (e.g., WL5, LS2, FUT039 series).
- Adjustable Lighting Parameters: Offers control over RGB color, color temperature (warm white to cool white), brightness, and saturation.
- Wall Mounted Design: Features a sleek, glass panel design for convenient wall installation.
- Magnetic Support: Allows for easy attachment and removal from its mounting base.
- 60-Second Delay OFF Function: Provides a convenient delay before turning off the lights.

Image 2.1: Packaging displaying key features and specifications of the WR01RF remote.
3. ข้อมูลจำเพาะ
| พารามิเตอร์ | ค่า |
|---|---|
| หมายเลขรุ่น | WR01RF |
| ฉบับทำงานtage | 3V (2*AAA Battery, ไม่รวมอยู่) |
| ความถี่ในการส่งสัญญาณ | 2.4กิกะเฮิรตซ์ |
| วิธีการปรับเปลี่ยน | GFSK |
| กำลังส่ง | 6dBm |
| พลังงานสแตนด์บาย | 20uA |
| ระยะควบคุม | 30 เมตร (98 ฟุต) |
| อุณหภูมิในการทำงาน | -20°C ถึง 60°C |
| ขนาด | 86 x 86 x 19 มม. (3.39 x 3.39 x 0.75 นิ้ว) |
| วัสดุ | กระจก |
4. การตั้งค่า
4.1. การติดตั้งแบตเตอรี่
- Gently remove the back cover of the remote panel.
- Insert two (2) AAA batteries into the battery compartment, ensuring correct polarity (+/-).
- ใส่ฝาหลังกลับคืนให้แน่น
Note: AAA batteries are not included in the package and must be purchased separately.
4.2. การติดตั้งบนผนัง
The WR01RF remote is designed for wall mounting. It typically comes with a mounting bracket that can be screwed to the wall. The remote panel then magnetically attaches to this bracket.
- Choose a suitable location on the wall, away from metal objects or high magnetic fields that could interfere with the 2.4GHz signal.
- Secure the mounting bracket (if provided) to the wall using appropriate screws.
- Align the remote panel with the mounted bracket and allow the magnets to secure it in place.
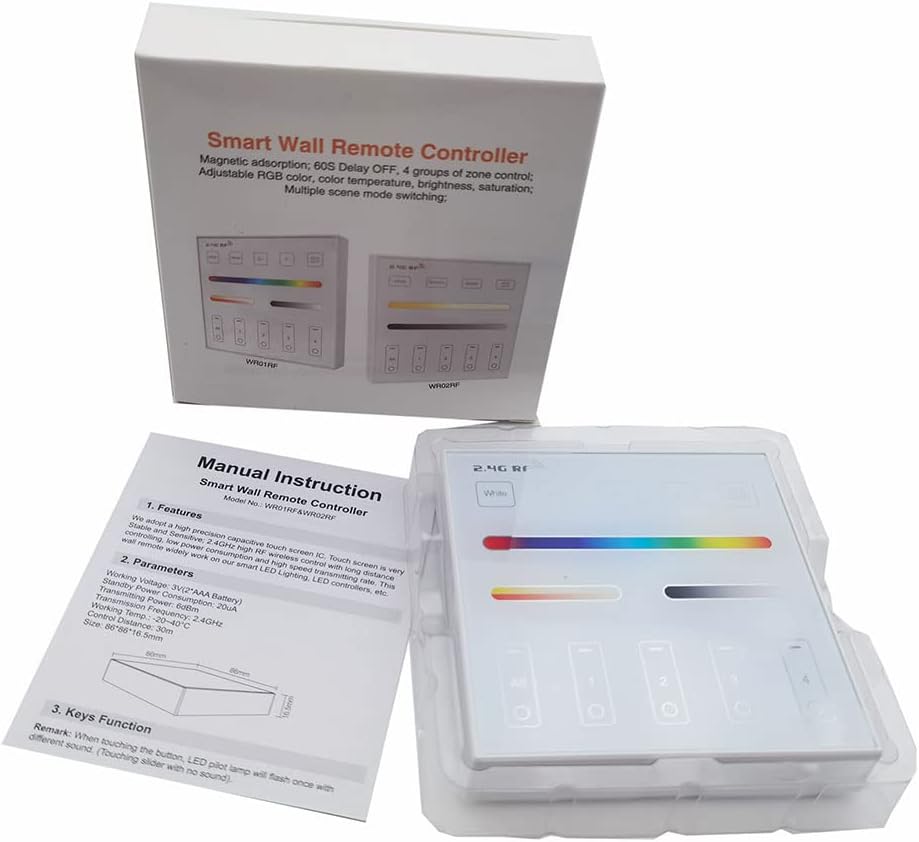
Image 4.1: The WR01RF remote packaging, showing the included manual and the device itself.
5. การดำเนินการ
The WR01RF remote features a touch-sensitive glass panel for intuitive control of your lighting system. The main control elements include:
- ปุ่มเปิด/ปิด: Typically located on the panel, used to turn the lights On/Off.
- Color Slider: A horizontal touch bar for selecting specific RGB colors.
- Color Temperature/Brightness Slider: Another horizontal touch bar for adjusting white light color temperature (warm to cool) and overall brightness.
- Zone Selection Buttons (1, 2, 3, 4, All): Allows you to select individual zones or all zones simultaneously for control.
- ปุ่มโหมด: Cycles through various pre-programmed lighting modes or effects.
- S+ / S- Buttons: ปรับความเร็วของโหมดแสงแบบไดนามิก
- 60S Delay OFF Button: Activates a 60-second delay before the lights turn off.
To operate, first select the desired zone(s) using the zone buttons. Then, use the sliders and other function buttons to adjust the lighting as needed. The touch panel is sensitive; a light touch is usually sufficient for input.
6. Linking and Unlinking with Controllers
The WR01RF remote must be linked to compatible LED controllers to function. Follow these steps carefully for linking and unlinking.
6.1. Linking Instructions
- Ensure the LED light or controller you wish to link is powered off.
- รออย่างน้อย 10 วินาที
- เปิดสวิตช์ไฟให้กับไฟ LED/ตัวควบคุม
- Within 3 seconds of the light turning on, short press any zone button ("I") on the WR01RF remote one (1) time.
- The connected light should blink three (3) times slowly, indicating successful linking.
Note: If the light does not blink slowly, the linking process failed. Power off the light/controller, wait 10 seconds, and repeat the steps.
6.2. Unlinking Instructions
- Ensure the LED light or controller you wish to unlink is powered off.
- รออย่างน้อย 10 วินาที
- เปิดสวิตช์ไฟให้กับไฟ LED/ตัวควบคุม
- Within 3 seconds of the light turning on, long press the specific zone button ("I") on the WR01RF remote that was used for linking.
- The connected light should blink ten (10) times quickly, indicating successful unlinking.
Note: If the light does not blink quickly, the unlinking process failed. Power off the light/controller, wait 10 seconds, and repeat the steps, ensuring you long-press the correct zone button.
7. การบำรุงรักษา
- การทำความสะอาด: ใช้ผ้าแห้งเนื้อนุ่มเช็ดทำความสะอาดแผงกระจก หลีกเลี่ยงน้ำยาทำความสะอาดที่มีฤทธิ์กัดกร่อนหรือสารละลายที่อาจทำให้พื้นผิวเสียหายได้
- การเปลี่ยนแบตเตอรี่: Replace AAA batteries when the remote's response becomes sluggish or inconsistent. Always use fresh batteries of the same type.
- พื้นที่จัดเก็บ: หากเก็บรีโมทไว้เป็นเวลานาน ควรนำแบตเตอรี่ออกเพื่อป้องกันการรั่วไหล
8 การแก้ไขปัญหา
- รีโมตไม่ตอบสนอง:
- ตรวจสอบว่าติดตั้งแบตเตอรี่อย่างถูกต้องและมีประจุเพียงพอ เปลี่ยนแบตเตอรี่หากจำเป็น
- Ensure the remote is within the 30-meter control distance of the receiver.
- Verify that the remote is linked to the correct controller/light (refer to Section 6).
- Lights not linking/unlinking:
- Strictly follow the timing (within 3 seconds) and button press instructions (short press for link, long press for unlink) as detailed in Section 6.
- Ensure the light/controller is powered off for at least 10 seconds before attempting to link/unlink.
- For unlinking, ensure you long-press the exact zone button that was used for the initial linking.
- ปัญหาการรบกวน:
- Avoid installing the remote or lighting fixtures near large metal objects or in areas with high magnetic fields, as this can negatively affect the control distance and signal reliability.
9. หมายเหตุสำคัญและความปลอดภัย
- Always check wiring connections of the LED controller and ensure the circuit is correct before applying power.
- Handle the glass panel with care during installation to prevent breakage.
- Do not use the lighting fixtures or remote in areas with strong electromagnetic interference.
- อุปกรณ์นี้ได้รับการออกแบบสำหรับใช้ภายในอาคารเท่านั้น