LightPix Labs FLASHQ-M20-MANUAL
คู่มือการใช้งาน FlashQ M20 Flash Flash User Manual
Model: FLASHQ-M20-MANUAL | Brand: LightPix Labs
1. บทนำ
The FlashQ M20 is a compact and versatile manual flash unit designed for photographers seeking portable and powerful lighting solutions. It features a robust metal body, a detachable radio transmitter for off-camera control, and an integrated LED video light. This manual provides detailed instructions for setup, operation, and maintenance of your FlashQ M20.
2. เนื้อหาบรรจุภัณฑ์
โปรดตรวจสอบว่ารายการทั้งหมดที่ระบุไว้ด้านล่างมีอยู่ในแพ็คเกจของคุณหรือไม่:
- 1 x FlashQ M20 main body
- 1 x FlashQ Transmitter (Manual Triggering, with built-in lithium battery)
- 1 x แพ็คเจลสี (6 สี)
- 1 x กระเป๋าป้องกัน
- 1 x สายชาร์จ USB (เอาต์พุต micro-USB สองช่อง)
- 1 x Protective cap for Transmitter’s hot shoe
- 1 x คู่มือผู้ใช้
หมายเหตุ: ไม่รวมแบตเตอรี่ AA ต้องซื้อแยกต่างหาก
3. ส่วนประกอบผลิตภัณฑ์
Familiarize yourself with the main components of your FlashQ M20 and its transmitter.

รูปที่ 3.1: ด้านหน้า view of the FlashQ M20 main body, showing the display screen, control buttons (Mode, Up, Down, Left, Right), Test button, and On/Off switch. The detachable transmitter is shown attached at the bottom.

รูปที่ 3.2: ด้านหน้า view of the FlashQ M20, highlighting the flash tube at the top and the integrated LED video light panel below it. The LightPix Labs branding is visible on the body.

รูปที่ 3.3: The FlashQ M20 main body positioned above its detached wireless transmitter. This illustrates the modular design, allowing for off-camera flash control.

รูปที่ 3.4: มุมเอียง view of the FlashQ M20, displaying the screen interface. The screen shows settings for the video light, including brightness percentage and color temperature (e.g., "VIDEO LIGHT 5000K 10%").
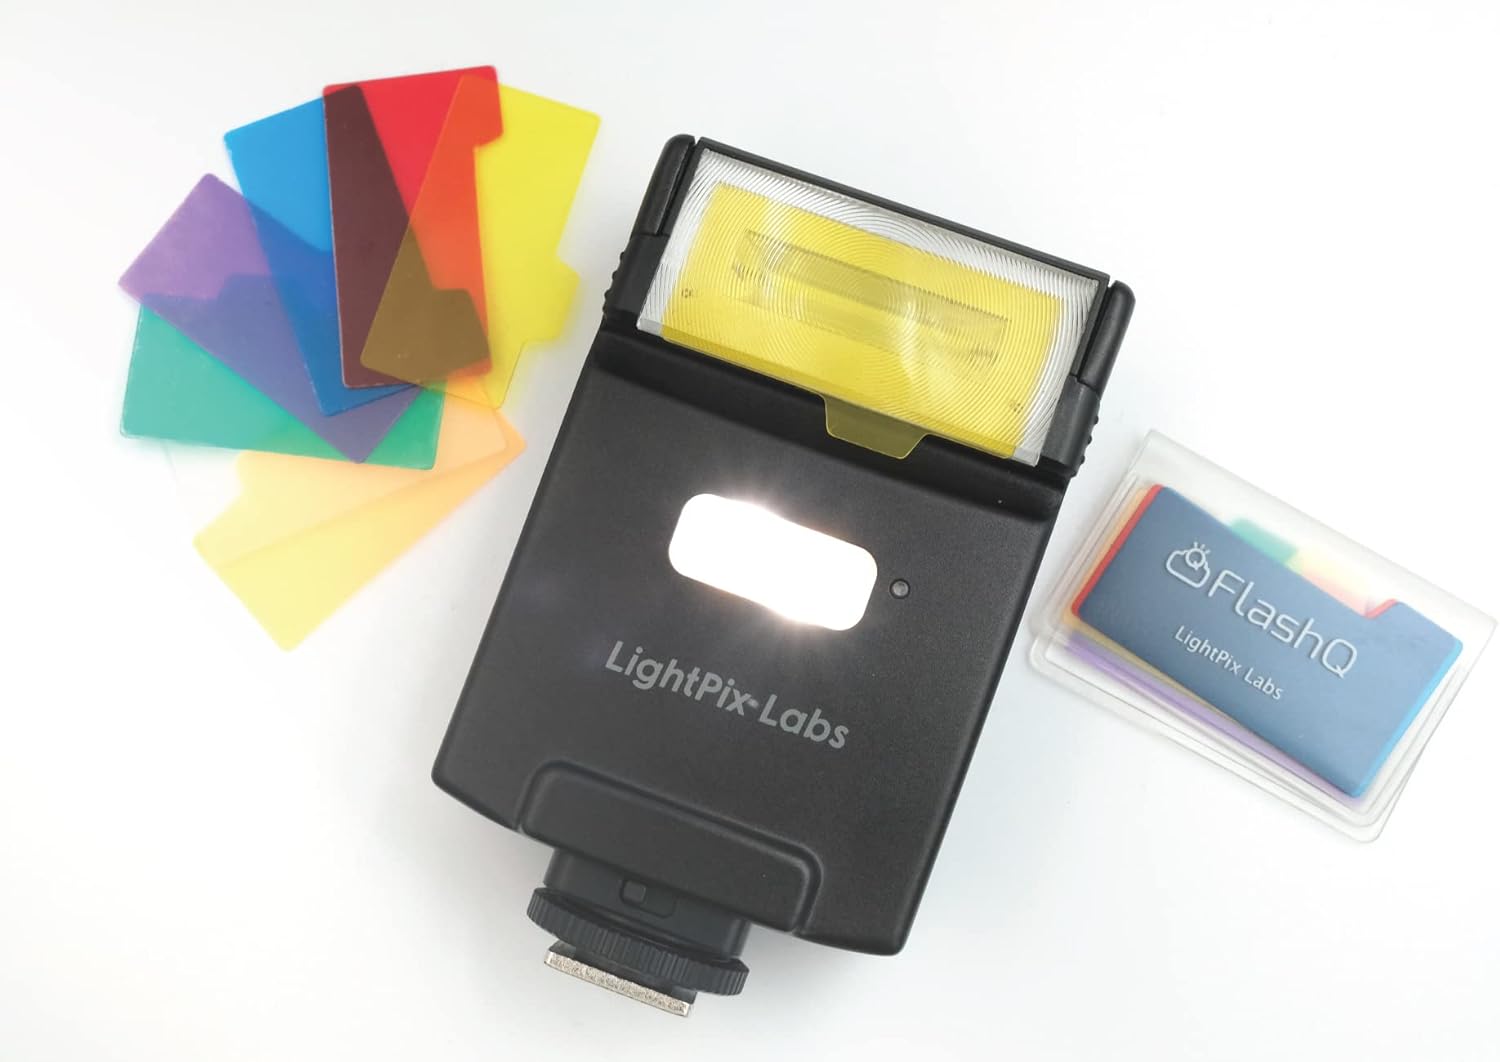
รูปที่ 3.5: The FlashQ M20 shown alongside its included pack of six color gels. These gels can be inserted into the flash head to modify the color of the light output.

รูปที่ 3.6: The FlashQ M20 main body and its detached transmitter held in a hand, providing a visual reference for their compact size and portability.
4. การตั้งค่า
4.1 Battery Installation (FlashQ M20 Main Body)
- Locate the battery compartment on the FlashQ M20 main body.
- เปิดฝาครอบช่อง
- Insert two AA-size alkaline or rechargeable Ni-MH batteries, ensuring correct polarity (+/-).
- ปิดฝาช่องใส่แบตเตอรี่ให้แน่น
4.2 Charging the FlashQ Transmitter
The FlashQ Transmitter has a built-in lithium battery.
- Connect the supplied USB charging cable to the micro-USB port on the transmitter.
- เชื่อมต่อปลายอีกด้านหนึ่งของสาย USB เข้ากับแหล่งพลังงาน USB (เช่น พอร์ต USB ของคอมพิวเตอร์ อะแดปเตอร์ติดผนัง USB)
- The charging indicator light will show the charging status. A full charge provides approximately 30 hours of operation and 120 days of standby time.
4.3 การติดตั้งบนกล้อง
The FlashQ M20 is compatible with most cameras featuring a standard ISO hot shoe, including Sony Multi Interface Shoe (MIS).
- Ensure both the camera and the FlashQ M20 are powered off.
- Slide the FlashQ M20's hot shoe foot into your camera's hot shoe mount until it clicks into place.
- Tighten the locking mechanism (if present) on the flash unit to secure it to the camera.
5. คู่มือการใช้งาน
5.1 เปิด/ปิดเครื่อง
Locate the ON/OFF switch on the side of the FlashQ M20 main body and slide it to the desired position.
5.2 Manual Flash Power Control
The FlashQ M20 offers manual flash power ratio control.
- กดปุ่ม โหมด button until the flash power setting is displayed on the screen.
- ใช้ Up และ ลง arrow buttons to adjust the power ratio from 1/1 (full power) to 1/64. Fine adjustments in 1/3 EV steps are available from 1/1 to 1/16.
- กดปุ่ม ทดสอบ button to fire a test flash at the current power setting.
5.3 LED Video Light Operation
The integrated LED video light can be used for continuous lighting.
- กดปุ่ม โหมด button until the LED video light settings are displayed.
- ใช้ Up และ ลง arrow buttons to adjust the brightness (Max. 60 lux output at 1 meter).
- ใช้ ซ้าย และ ขวา arrow buttons to adjust the color temperature from 3000K to 5500K.
5.4 Wireless Control (Off-Camera Flash)
The detachable transmitter enables wireless control of the FlashQ M20.
- Detach the transmitter from the FlashQ M20 main body by pressing the 'PUSH RELEASE' button.
- Mount the transmitter onto your camera's hot shoe.
- Ensure both the transmitter and the FlashQ M20 are powered on and set to the same wireless channel (if applicable, refer to the on-screen menu for channel settings).
- The transmitter will now wirelessly trigger the FlashQ M20 from up to 29 feet away using 2.4GHz low-power digital radio.
5.5 โหมดสเลฟแบบออปติคอล (S1/S2)
The FlashQ M20 supports S1 and S2 optical slave modes for triggering by another flash.
- โหมด S1: The FlashQ M20 will fire when it detects the first flash from a master flash. This is suitable for manual flash systems.
- โหมด S2: The FlashQ M20 will ignore the pre-flash (metering flash) from a master flash and fire on the main flash. This is suitable for TTL flash systems that emit a pre-flash.
วิธีเปิดใช้งาน: กดปุ่ม โหมด button until the optical slave mode is displayed, then use the arrow buttons to select S1 or S2.
5.6 Flash Head Tilting
The flash head can be tilted for bounce flash photography.
- The flash head can tilt up to 90 degrees.
- It features click-stops at 0°, 45°, 60°, 75°, and 90° for precise positioning.
6. การบำรุงรักษา
6.1 การทำความสะอาด
- Use a soft, dry cloth to clean the exterior of the flash unit.
- สำหรับรอยฝังแน่น ให้เช็ดออกเล็กน้อยamp สามารถใช้ผ้าชุบสบู่เหลวอ่อนๆ เช็ดทำความสะอาดได้ จากนั้นเช็ดตามด้วยผ้าแห้งอีกผืน
- Do not use strong detergents, solvents, or abrasive cleaners.
- Keep the flash tube and LED panel free of dust and fingerprints for optimal performance.
6.2 พื้นที่จัดเก็บ
- When not in use for extended periods, remove the AA batteries from the main body to prevent leakage.
- Store the FlashQ M20 and its accessories in the provided protective pouch in a cool, dry place, away from direct sunlight and extreme temperatures.
7 การแก้ไขปัญหา
| ปัญหา | สาเหตุที่เป็นไปได้ | สารละลาย |
|---|---|---|
| แฟลชไม่ทำงาน | Low or dead batteries; Incorrect mounting; Flash not powered on; Incorrect camera settings. | Replace or recharge batteries. Ensure flash is securely mounted and powered on. Check camera flash settings (e.g., external flash enabled). |
| LED video light does not turn on. | Low battery; Incorrect mode selected. | Recharge batteries. Press the MODE button to cycle to the LED video light setting. |
| การสั่งงานแบบไร้สายล้มเหลว | Transmitter not attached to camera; Flash and transmitter not paired/on same channel; Out of range. | Ensure transmitter is on camera hot shoe. Verify both units are powered on and set to the same wireless channel. Reduce distance between flash and transmitter (max 29ft). |
| การปล่อยแสงแฟลชไม่สม่ำเสมอ | Low battery power; Overheating. | Replace or recharge batteries. Allow the flash to cool down if used for rapid consecutive flashes. |
8. ข้อมูลจำเพาะทางเทคนิค
| คุณสมบัติ | ข้อมูลจำเพาะ |
|---|---|
| หมายเลขไกด์ | 66 ฟุต (ที่ ISO 100) |
| ช่วงความยาวโฟกัส | 32 มม. (ฟูลเฟรม) |
| กำลังแฟลชแบบแมนนวล | 1/1 to 1/64 (1/3 EV steps from 1/1 to 1/16) |
| เอาต์พุตไฟวิดีโอ LED | Max. 60 lux at 1 meter |
| อุณหภูมิสี LED | 3000K~5500K (adjustable, ±300K tolerance), CRI 90 |
| ช่วงการทำงานแบบไร้สาย | 29ft (2.4GHz low-power digital radio) |
| การเอียงหัวแฟลช | ปรับได้สูงสุดถึง 90° (มีจุดล็อกที่ 0°, 45°, 60°, 75°, 90°) |
| ฟังก์ชั่นอื่น ๆ | S1 / S2 สเลฟออปติคอล ไฟจำลอง (LED) |
| อายุการใช้งานแบตเตอรี่ของเครื่องส่งสัญญาณ | ใช้งาน 30 ชั่วโมง, สแตนด์บาย 120 วัน |
| M20 Main Body Batteries | แบตเตอรี่อัลคาไลน์ขนาด AA สองก้อน / แบตเตอรี่ Ni-MH แบบชาร์จได้ |
| Recycling Time (1/1 power) | 5 sec. (Ni-MH), 6 sec. (alkaline) |
| จำนวนแฟลช | 100 - 2000 flashes |
| LED Lighting Time | Approx. 1 hour (full power LED, Ni-MH batteries) |
| อุณหภูมิสีแฟลช | 5600K±200K (daylight) |
| ขนาด (พร้อมตัวส่งสัญญาณ) | 2.3(ก) x 4.0(ส) x 1.2(ล) นิ้ว |
| น้ำหนัก (ไม่รวมแบตเตอรี่) | 4.6ออนซ์ |
| การติดตั้งที่เข้ากันได้ | Fujifilm, Leica, Ricoh, Pentax, Sony, Canon, Nikon, Lumix, Four Thirds, Standard ISO hot shoe |
9. การรับประกันและการสนับสนุน
For information regarding warranty coverage, terms, and conditions, please refer to the warranty card included with your product or visit the official LightPix Labs website. For technical support, product inquiries, or service requests, please contact LightPix Labs customer support through their official channels.
Ask a question about this manual
Ask about setup, troubleshooting, compatibility, parts, safety, or missing instructions. Manuals+ will review the question and use this page’s manual context to help answer it.