
1. บทนำ
This manual provides detailed instructions for the installation, configuration, and maintenance of your Biostar B650MT AM5 Micro-ATX Motherboard. This motherboard is designed to support AMD Ryzen 7000 series processors, DDR5 memory, and high-speed PCIe 4.0 M.2 storage, offering a robust foundation for your computing needs.
2. ข้อมูลด้านความปลอดภัย
Please read and follow these safety guidelines carefully to prevent damage to the motherboard or injury to yourself:
- ควรตัดการเชื่อมต่อแหล่งจ่ายไฟออกจากเต้ารับที่ผนังทุกครั้งก่อนติดตั้งหรือถอดส่วนประกอบใดๆ
- ควรสวมสายรัดข้อมือป้องกันไฟฟ้าสถิต หรือสัมผัสวัตถุโลหะที่มีการต่อสายดินบ่อยๆ เพื่อระบายไฟฟ้าสถิตก่อนที่จะจับต้องเมนบอร์ดหรือส่วนประกอบอื่นๆ
- จับที่ขอบของเมนบอร์ดเพื่อหลีกเลี่ยงการสัมผัสชิ้นส่วนที่บอบบาง
- ตรวจสอบให้แน่ใจว่ามีการระบายอากาศที่เหมาะสมภายในเคสพีซีของคุณเพื่อป้องกันความร้อนสูงเกินไป
- เก็บเมนบอร์ดให้ห่างจากความชื้นและอุณหภูมิที่สูงหรือต่ำเกินไป
3. เนื้อหาบรรจุภัณฑ์
ตรวจสอบว่ามีรายการทั้งหมดอยู่ในแพ็คเกจเมนบอร์ดของคุณ:
- Biostar B650MT Motherboard
- คู่มือแนะนำ
- ดีวีดีไดร์ฟเวอร์
- I/O Protector (I/O Shield)
- สาย SATA 2 เส้น
4. สินค้าหมดview
The Biostar B650MT is a Micro-ATX motherboard designed for the latest AMD Ryzen 7000 series processors. It features two DDR5 memory slots supporting up to 96GB, a PCIe 4.0 x16 slot for graphics cards, and a PCIe 4.0 M.2 slot for high-speed NVMe SSDs. The board also includes comprehensive connectivity with USB 3.2 Gen1, USB 2.0, Gigabit LAN, HDMI, and DisplayPort outputs.
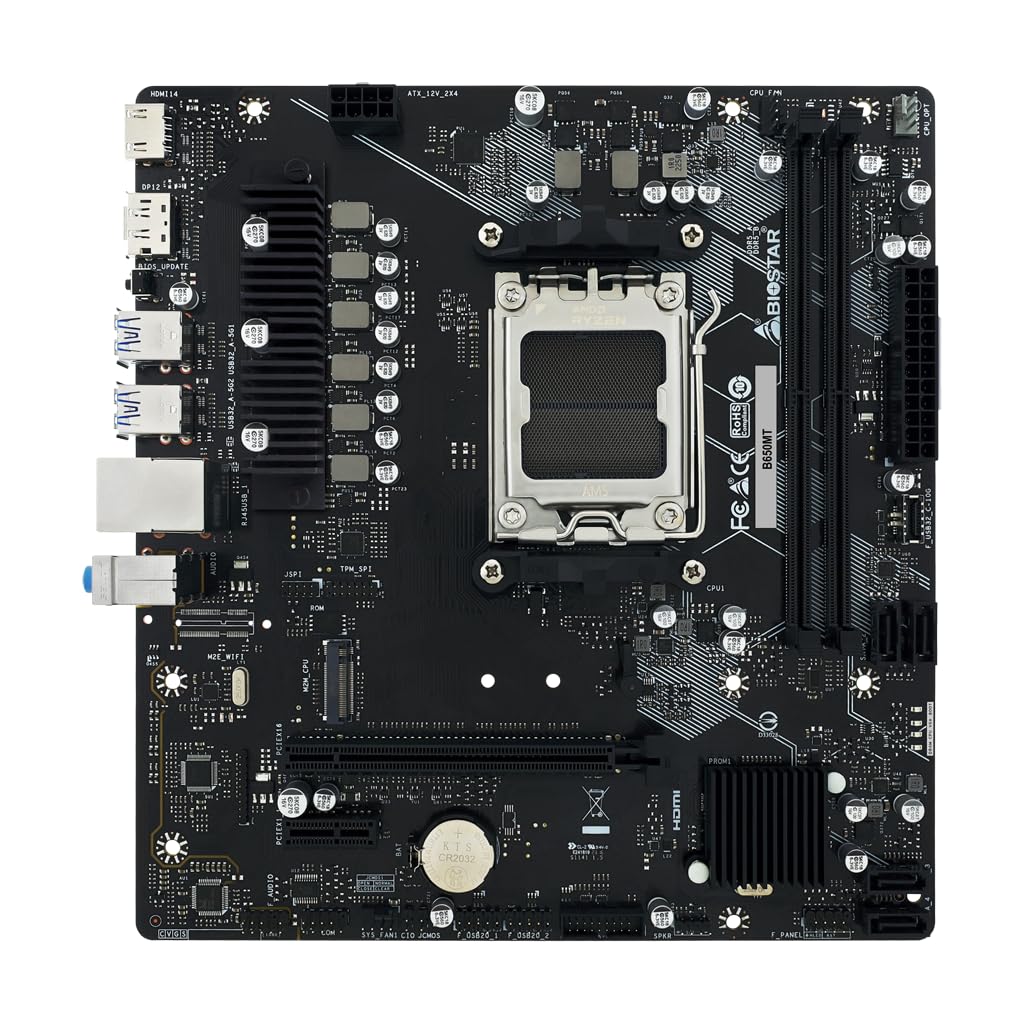
รูปที่ 4.1: จากบนลงล่าง view of the Biostar B650MT motherboard, showing the AM5 CPU socket, DDR5 RAM slots, PCIe slots, and various headers.
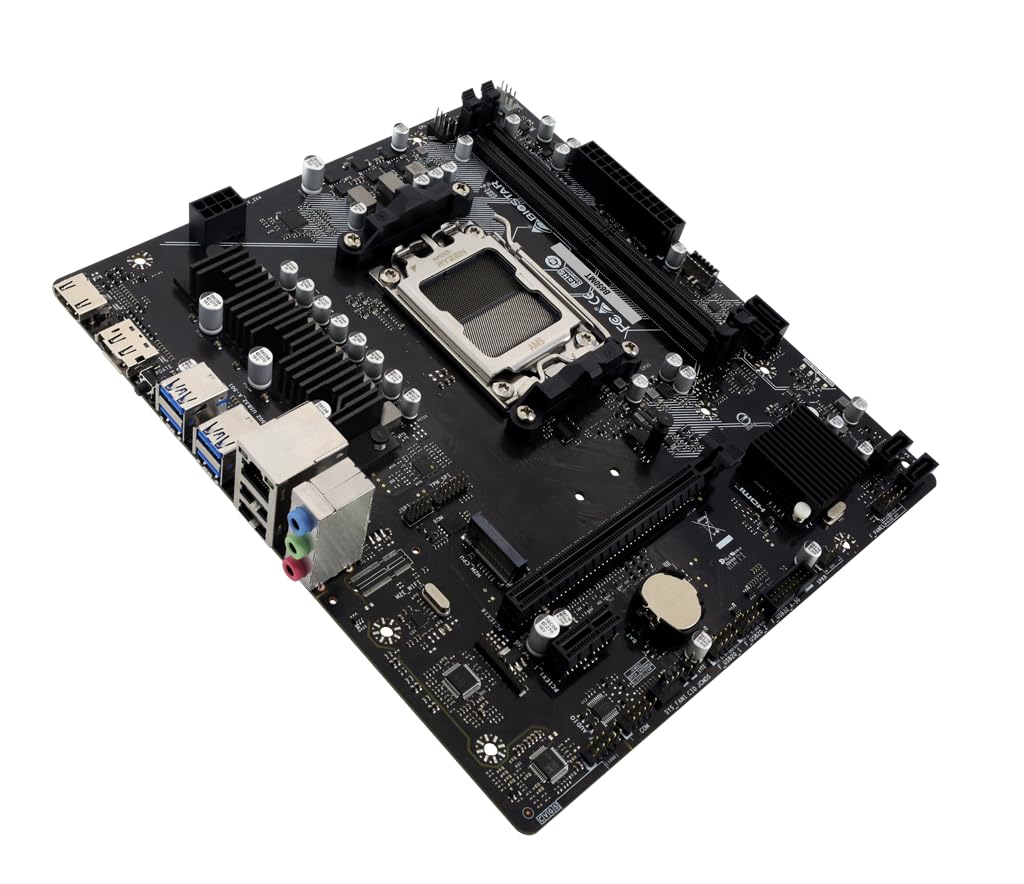
รูปที่ 4.2: มุม view of the Biostar B650MT motherboard, highlighting the heatsinks, I/O ports, and overall layout.

รูปที่ 4.3: ระยะใกล้ view of the rear I/O ports, including HDMI, DisplayPort, USB 3.2 Gen1, USB 2.0, Gigabit LAN, and audio jacks.
5. การตั้งค่าและการติดตั้ง
ทำตามขั้นตอนต่อไปนี้เพื่อติดตั้งเมนบอร์ดและส่วนประกอบที่จำเป็น:
5.1 การติดตั้งซีพียู
- Open the CPU socket lever on the AM5 socket.
- จัดตำแหน่งเครื่องหมายรูปสามเหลี่ยมบนซีพียูให้ตรงกับเครื่องหมายบนซ็อกเก็ตอย่างระมัดระวัง
- วาง CPU ลงในซ็อกเก็ตอย่างเบามือโดยไม่ต้องออกแรง
- ปิดก้านซ็อกเก็ตเพื่อยึดซีพียู
- ติดตั้งตัวระบายความร้อน CPU ตามคำแนะนำของผู้ผลิต
5.2 การติดตั้งหน่วยความจำ (RAM)
- คลายคลิปที่ปลายทั้งสองด้านของช่องเสียบหน่วยความจำ DDR5
- จัดตำแหน่งรอยบากบนโมดูลหน่วยความจำ DDR5 ให้ตรงกับร่องในช่องเสียบ
- กดปลายทั้งสองข้างของโมดูลหน่วยความจำให้แน่นจนกระทั่งคลิปล็อคเข้าที่
การติดตั้ง 5.3 M.2 SSD
- Locate the M.2 Socket (M2M_CPU) on the motherboard.
- ถอดสกรู M.2 และตัวยึดออก
- ใส่ M.2 SSD เข้าไปในช่องโดยทำมุม 30 องศา
- Gently push the SSD down and secure it with the screw.
5.4 การติดตั้งไดรฟ์ SATA
- Connect one end of a SATA cable to a SATA III connector on the motherboard.
- Connect the other end of the SATA cable to your SATA hard drive or SSD.
- เชื่อมต่อสายไฟ SATA จากแหล่งจ่ายไฟเข้ากับฮาร์ดไดรฟ์
5.5 การต่อสายไฟ
- เชื่อมต่อขั้วต่อไฟ ATX 24 พินจากแหล่งจ่ายไฟของคุณเข้ากับซ็อกเก็ตไฟ 24 พินบนเมนบอร์ด
- Connect the 8-pin ATX 12V power connector from your power supply to the 8-pin CPU power socket.
5.6 Front Panel and Other Connectors
- Connect the front panel headers (Power LED, HDD LED, Power Switch, Reset Switch) to the corresponding pins on the motherboard. Refer to the motherboard's quick guide for pin assignments.
- Connect USB 2.0 and USB 3.2 (Gen1) headers for front panel USB ports.
- Connect the front audio header.
- Connect CPU fan, system fan, and CPU water cooling (CPU_OPT) connectors.
6. คู่มือการใช้งาน
6.1 การบูตครั้งแรก
After assembling all components and connecting peripherals, power on your system. The system should display the BIOS/UEFI splash screen.
6.2 การเข้าถึง BIOS/UEFI
ในการเข้าสู่ยูทิลิตี้การตั้งค่า BIOS/UEFI ให้กดปุ่ม เดล key repeatedly during the initial boot sequence. The BIOS/UEFI allows you to configure system settings, boot order, and monitor hardware status.
6.3 การติดตั้งระบบปฏิบัติการ
Insert your Windows 10 (64-bit) or Windows 11 (64-bit) installation media (USB drive or DVD) and set it as the primary boot device in the BIOS/UEFI. Follow the on-screen instructions to install your operating system.
7. การบำรุงรักษา
7.1 การทำความสะอาด
Regularly clean your PC case and motherboard to prevent dust buildup, which can lead to overheating. Use compressed air to gently remove dust from components and heatsinks. Ensure the system is powered off and unplugged before cleaning.
7.2 อัพเดตไบออส
Biostar may release BIOS updates to improve system stability, compatibility, or add new features. Visit the official Biostar website for the latest BIOS versions and update instructions. The motherboard features a BIOS Update Button on the rear I/O for convenient updates.
8 การแก้ไขปัญหา
หากคุณพบปัญหา โปรดดูขั้นตอนการแก้ไขปัญหาทั่วไปต่อไปนี้:
- ไม่มีไฟฟ้า: ตรวจสอบให้แน่ใจว่าสายไฟทั้งหมด (24-pin ATX, 8-pin CPU) เชื่อมต่อแน่นหนาดีแล้ว ตรวจสอบหน่วยจ่ายไฟ (PSU) และเต้ารับที่ผนังด้วย
- ไม่มีจอแสดงผล: Verify that your monitor is connected to the correct video output (HDMI or DisplayPort) on the motherboard or discrete graphics card. Reseat the RAM modules and graphics card.
- ระบบไม่สามารถบูตได้: Check all component connections. Try booting with only essential components (CPU, one RAM stick, graphics card if no integrated graphics). Clear CMOS by shorting the Clear CMOS Header or removing the CMOS battery for a few minutes.
- ข้อผิดพลาดของระบบปฏิบัติการ: Ensure all drivers are installed correctly. Reinstall the operating system if necessary.
9. ข้อมูลจำเพาะ
| คุณสมบัติ | ข้อมูลจำเพาะ |
|---|---|
| ความเข้ากันได้ของ CPU | AMD Ryzen 7000 series processors (AM5 Socket) |
| หน่วยความจำ | 2 x DDR5 DIMM slots, Dual Channel, up to 96GB. Supports DDR5 4800/ 5200/ 5400(OC)/ 5600(OC)/ 6000+(OC) MHz. Each slot supports 8/16/24/32/48GB modules. |
| วิดีโอแบบบูรณาการ | Supports DX12, HDCP. 1x HDMI Port (HDMI 1.4), 1x DisplayPort (DP 1.2). HDMI 4K compatible. |
| เครือข่าย | Realtek RTL8111H 10/100/1000 Mb/s Gigabit LAN. Half/Full duplex capability. |
| พื้นที่จัดเก็บ | 1 x M.2 (Key M) Socket (M2M_CPU) for Type 2242/2260/2280 SSD modules, supports PCIe 4.0x4 (64Gb/s) NVMe SSD. 4 x SATA III Connectors (6Gb/s), supports AHCI & RAID 0, 1, 10. |
| ช่องเสียบขยาย | 1 x PCIe 4.0 x16 Slot (x16 or x8/x8 mode). 1 x PCIe 3.0 x1 Slot. |
| พอร์ต I/O ด้านหลัง | 1x BIOS Update Button, 1x HDMI Port, 1x DisplayPort, 4x USB 3.2 (Gen1) Type-A Ports, 2x USB 2.0 Type-A Ports, 1x Giga LAN Port, 3x Audio Jacks. |
| ช่องต่อ I / O ภายใน | 4x SATA III Connectors, 2x USB 2.0 Headers (supports 4 USB 2.0 ports), 1x USB 3.2 (Gen1) Header (supports 2 USB 3.2 Gen1 ports), 1x USB 3.2 (Gen1) Type-C Header, 1x 8-Pin Power Connector, 1x 24-Pin Power Connector, 1x CPU Fan Connector, 1x System Fan Connector, 1x CPU Water Cooling Connector (CPU_OPT), 1x Front Panel Header, 1x Front Audio Header, 1x Internal Stereo Speaker Header, 1x Clear CMOS Header, 1x TPM Header. |
| การรองรับระบบปฏิบัติการ | Windows 10 (64-bit), Windows 11 (64-bit). |
| ขนาด | Micro ATX Form Factor (221mm x 235mm). |
10. การรับประกันและการสนับสนุน
The Biostar B650MT Motherboard comes with a manufacturer's warranty. Please refer to the warranty card included in your package or visit the official Biostar website for detailed warranty terms and conditions. For technical support, driver downloads, and further assistance, please visit the Biostar support page or contact their customer service.