
1. บทนำ
This manual provides essential information for the proper installation, configuration, and operation of your Teltonika RUT951 4G LTE Router. The RUT951 is a robust industrial cellular router designed for professional applications, offering reliable internet connectivity via 4G LTE, Wi-Fi, and Ethernet. It features dual-SIM support for network redundancy and is powered by RutOS, providing advanced customization and security features.
2. สินค้าหมดview
2.1 คุณสมบัติหลัก
- Dual-SIM 4G LTE cellular connectivity for reliable network access.
- Integrated Wi-Fi (802.11b/g/n) for local wireless networking.
- Four Ethernet interfaces (3x LAN, 1x WAN) for wired connections.
- Powered by RutOS for advanced customization, automation, and security.
- Robust design suitable for various IoT and industrial scenarios.
2.2 เนื้อหาบรรจุภัณฑ์
The standard package for the Teltonika RUT951 router typically includes:
- Teltonika RUT951 Router Unit
- อะแดปเตอร์แปลงไฟ
- 2 x Mobile Antennas (SMA)
- 2 x Wi-Fi Antennas (RP-SMA)
- สายเคเบิลอีเทอร์เน็ต
- คู่มือเริ่มต้นอย่างรวดเร็ว
2.3 Router Layout
Familiarize yourself with the router's ports, indicators, and slots.
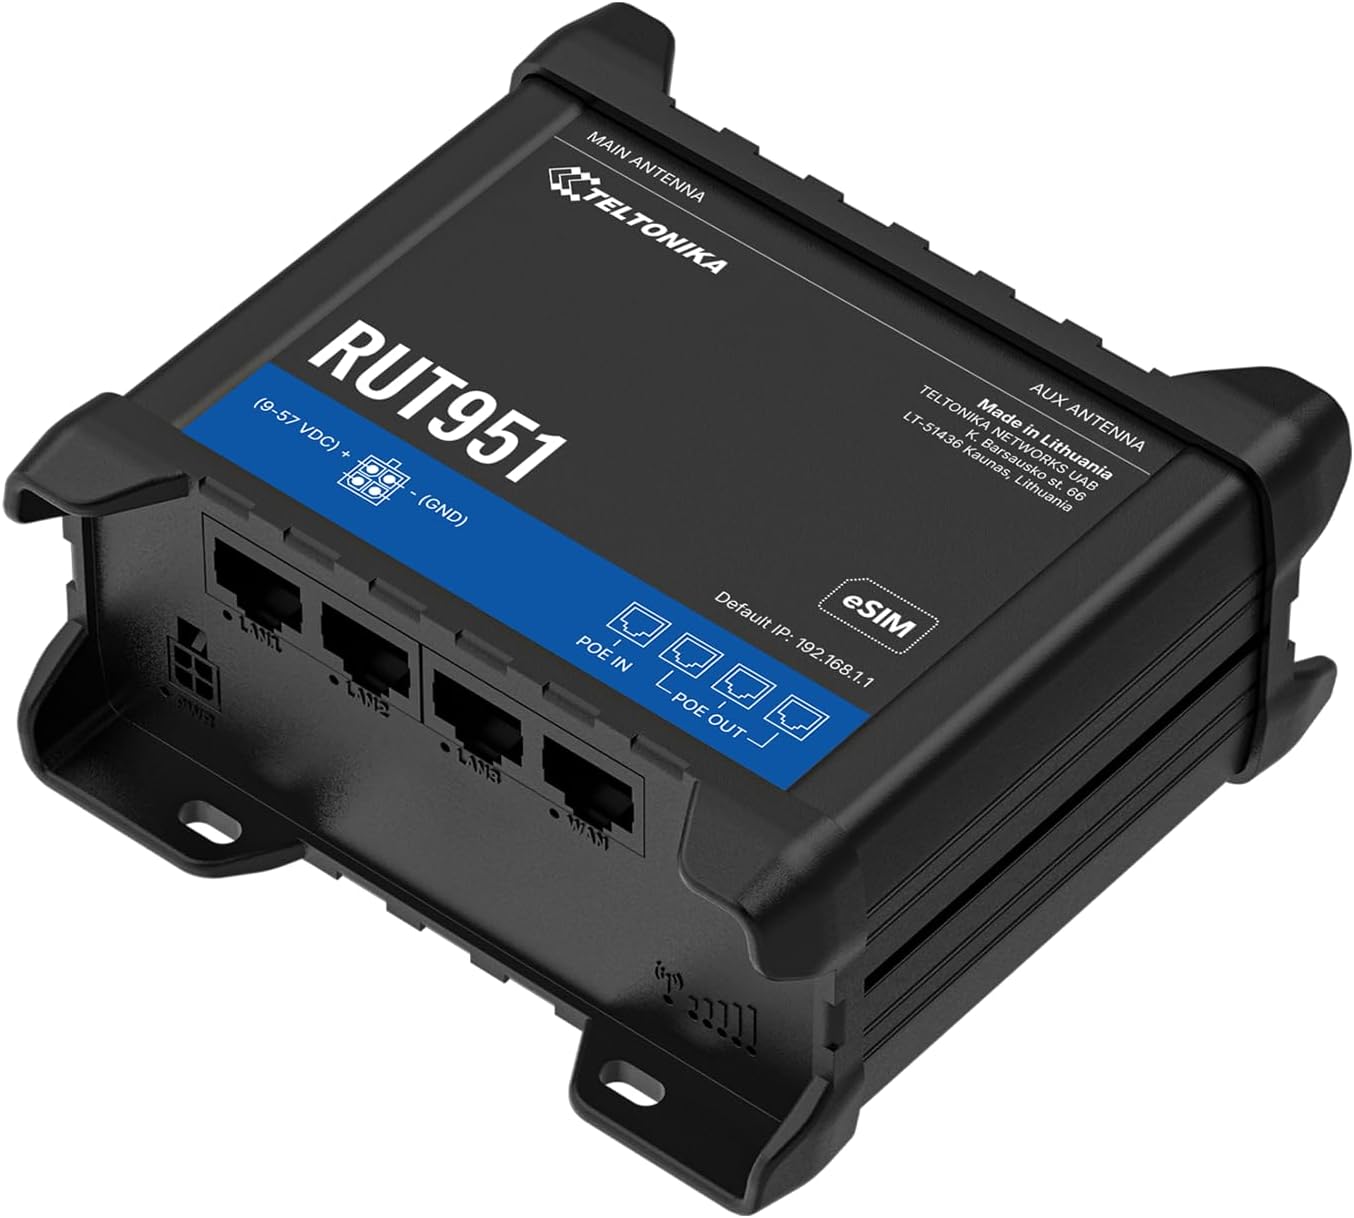
รูปที่ 1: ด้านหน้า view of the Teltonika RUT951 router, showing the model name and general design.

รูปที่ 2: Detailed diagram illustrating the various ports and indicators on the Teltonika RUT951 router, including mobile and Wi-Fi antenna connectors, SIM slots, Ethernet ports, power socket, and LED indicators.
- Mobile AUX Antenna Connector (SMA female): For secondary mobile antenna.
- Mobile MAIN Antenna Connector (SMA female): For primary mobile antenna.
- SIM1 / SIM2 Slots: สำหรับใส่ซิมการ์ดโทรศัพท์มือถือ
- ปุ่มรีเซ็ต: To restore factory settings or reboot.
- Wi-Fi Antenna Connectors (RP-SMA female): For Wi-Fi antennas.
- ปลั๊กไฟ: สำหรับการเชื่อมต่ออะแดปเตอร์ไฟฟ้า
- พอร์ตแลนอีเทอร์เน็ต: For connecting local network devices.
- พอร์ตอีเธอร์เน็ต WAN: For connecting to an external network (e.g., fiber modem).
- ไฟ LED แสดงระดับความแรงสัญญาณมือถือ: ระบุความแรงของสัญญาณโทรศัพท์มือถือ
- Mobile Connection Status LED: Indicates cellular connection status.
- ไฟ LED LAN: Indicate activity on LAN ports.
- WAN LED: แสดงกิจกรรมบนพอร์ต WAN
3. คำแนะนำในการตั้งค่า
3.1 การติดตั้งซิมการ์ด
- Locate the SIM card slots (SIM1 and SIM2) on the top panel of the router.
- Using a SIM ejector tool or a paperclip, gently press the small button next to the SIM slot to open it.
- Insert your activated Mini-SIM card(s) into the slot(s) with the gold contacts facing down and the notched corner oriented correctly.
- Push the SIM tray back into the router until it clicks into place.

รูปที่ 3: สูงสุด view of the RUT951, highlighting the SIM card slots and antenna connectors.
3.2 การเชื่อมต่อเสาอากาศ
- Screw the two mobile antennas onto the SMA connectors labeled 'MOBILE' (MAIN and AUX) on the top panel.
- Screw the two Wi-Fi antennas onto the RP-SMA connectors labeled 'WIFI' on the top panel.
- Ensure all antennas are securely tightened for optimal signal reception.
3.3 การเชื่อมต่อสายไฟ
- Connect the provided power adapter to the power socket on the router.
- เสียบปลายอีกด้านหนึ่งของอะแดปเตอร์จ่ายไฟเข้ากับเต้ารับไฟฟ้าที่เหมาะสม
- The router will power on automatically. Observe the power LED indicator.

รูปที่ 4: ด้านล่าง view of the RUT951, showing the Ethernet ports and power input.
3.4 การเชื่อมต่ออีเทอร์เน็ต
To connect a device directly to the router:
- Connect one end of an Ethernet cable to any of the LAN ports (LAN1, LAN2, LAN3) on the router.
- Connect the other end of the Ethernet cable to your computer or network device.
- If you are using the router as a WAN gateway, connect your external modem (e.g., fiber modem) to the WAN port.
4. คู่มือการใช้งาน
4.1 การเข้าถึงเบื้องต้น WebUI
- Ensure your computer is connected to the router via Ethernet or Wi-Fi. The default Wi-Fi SSID and password can be found on the router's label.
- เปิด web เบราว์เซอร์และป้อนที่อยู่ IP เริ่มต้น: 192.168.1.1
- ระบบจะขอให้คุณป้อนข้อมูลประจำตัวสำหรับการเข้าสู่ระบบ ชื่อผู้ใช้เริ่มต้นคือ แอดมิน. The default password is also แอดมิน (or as specified on the router's label).
- Upon first login, you will be guided through a setup wizard to change the default password and configure basic settings.
4.2 การกำหนดค่าเครือข่าย
After initial login, you can configure various network settings through the Webยูไอ:
- การตั้งค่า WAN: Configure your cellular (4G LTE) connection, including APN settings, or set up the Ethernet WAN port.
- การตั้งค่าแลน: Manage the local network IP address range and DHCP server.
- การตั้งค่า Wi-Fi: Change Wi-Fi SSID, password, security protocols, and channel settings.
- สองซิม: Configure failover or load balancing between the two SIM cards for continuous connectivity.
- วีพีเอ็น: Set up various VPN protocols for secure remote access.
5. การบำรุงรักษา
การอัปเดตเฟิร์มแวร์ 5.1 รายการ
Regularly updating the router's firmware is crucial for security, performance, and new features. Firmware updates can be performed via the WebUI under the 'System' or 'Firmware' section. Always download firmware from the official Teltonika Networks webเว็บไซต์.
5.2 รีเซ็ตเป็นค่าโรงงาน
If you encounter persistent issues or forget your login credentials, you can perform a factory reset:
- With the router powered on, locate the RESET button (refer to Figure 2).
- Press and hold the RESET button for approximately 10 seconds until all LEDs flash.
- ปล่อยปุ่ม เราเตอร์จะรีบูตด้วยการตั้งค่าเริ่มต้นจากโรงงาน
6 การแก้ไขปัญหา
- ไม่มีการเชื่อมต่ออินเทอร์เน็ต:
- ตรวจสอบการใส่ซิมการ์ดและการเปิดใช้งาน
- ตรวจสอบการตั้งค่า APN ใน WebUI
- Ensure mobile antennas are securely connected.
- ตรวจสอบความแรงของสัญญาณโทรศัพท์มือถือด้วยไฟ LED
- Wi-Fi ไม่ทำงาน:
- ตรวจสอบให้แน่ใจว่าได้เปิดใช้งาน Wi-Fi แล้ว WebUI
- Check Wi-Fi antenna connections.
- Verify Wi-Fi SSID and password.
- ไม่สามารถเข้าถึง Webยูไอ:
- Ensure your device is connected to the router (Ethernet or Wi-Fi).
- ตรวจสอบการตั้งค่า IP ของคอมพิวเตอร์ของคุณ (ควรตั้งค่าให้รับ IP โดยอัตโนมัติ)
- ลองล้างแคชเบราว์เซอร์ของคุณหรือใช้เบราว์เซอร์อื่น
- Perform a factory reset if you suspect incorrect IP configuration or forgotten password.
7. ข้อมูลจำเพาะ
| คุณสมบัติ | ข้อมูลจำเพาะ |
|---|---|
| ยี่ห้อ | เทลโทนิก้า |
| ชื่อรุ่น | รท951 |
| เทคโนโลยีการเชื่อมต่อ | Wi-Fi, 4G LTE, 3G, 2G |
| มาตรฐานการสื่อสารไร้สาย | 802.11b, 802.11g, 802.11n |
| ระดับย่านความถี่ | ดูอัลแบนด์ |
| จำนวนพอร์ต | 4 (3x LAN, 1x WAN) |
| แบนด์วิดท์พอร์ต LAN | 100 เมกะบิตต่อวินาที |
| อัตราการถ่ายโอนข้อมูล | 150 Megabits Per Second (Max Upstream) |
| ระบบปฏิบัติการ | RutOS |
| น้ำหนักสินค้า | 287 กรัม |
| เล่มที่tage | 30 โวลต์ |
| โปรโตคอลความปลอดภัย | WPS (and others via RutOS) |
| ความครอบคลุม | Dual SIM network redundancy |
8. ข้อมูลด้านความปลอดภัย
- ใช้เฉพาะอะแดปเตอร์จ่ายไฟที่มาพร้อมกับอุปกรณ์เท่านั้น
- อย่าให้เครื่องสัมผัสกับน้ำ ความชื้น หรืออุณหภูมิที่สูงหรือต่ำเกินไป
- หลีกเลี่ยงการวางอุปกรณ์ใกล้แหล่งความร้อนหรือแสงแดดโดยตรง
- ตรวจสอบให้แน่ใจว่ามีการระบายอากาศที่เหมาะสมเพื่อป้องกันภาวะความร้อนมากเกินไป
- Do not attempt to open or modify the device. This will void the warranty.
- กำจัดอุปกรณ์และอุปกรณ์เสริมอย่างถูกวิธีตามระเบียบข้อบังคับท้องถิ่น
9. การรับประกันและการสนับสนุน
The Teltonika RUT951 router comes with a standard manufacturer's warranty. For detailed warranty terms and conditions, please refer to the documentation included with your product or visit the official Teltonika Networks website. For technical support, firmware downloads, and additional resources, please visit the Teltonika Networks support portal or contact your vendor.