
FILTA 85a29cbe-3f12-4058-8cbc-233936e4c5c7
Filta Smart Lock Instruction Manual
Model: 85a29cbe-3f12-4058-8cbc-233936e4c5c7
การแนะนำ
The Filta Smart Lock offers advanced security and convenience for your home or business. This keyless entry deadbolt provides multiple intuitive unlocking options, including password, traditional key, and IC card capabilities. Designed for ease of use and robust security, it ensures reliable access control without the need for Wi-Fi or application connections, storing all data locally for enhanced privacy and stability.

Figure 1: Filta Smart Lock, a keyless entry deadbolt with a sleek black finish, installed on a white door.
สิ่งที่รวมอยู่
โปรดตรวจสอบให้แน่ใจว่ามีอุปกรณ์ครบทุกชิ้นก่อนเริ่มการติดตั้ง

Figure 2: All components of the Filta Smart Lock laid out, including the smart lock unit, interior assembly, deadbolt latch, strike plate, keys, and various screws.
- Exterior Smart Lock Unit with Keypad and Fingerprint Sensor
- Interior Assembly (Back Panel)
- สลัก Deadbolt
- แผ่นปิดประตูและกล่องปิดประตู
- แผ่นยึด
- Installation Screws (various sizes)
- คีย์ทางกายภาพ (2)
- IC Cards (if applicable, not explicitly mentioned but implied by "IC card unlocking")
- คู่มือผู้ใช้ / แม่แบบการติดตั้ง
ข้อมูลจำเพาะ
| คุณสมบัติ | รายละเอียด |
|---|---|
| ยี่ห้อ | FILTA |
| หมายเลขรุ่น | 85a29cbe-3f12-4058-8cbc-233936e4c5c7 |
| ประเภทล็อค | ระบบไบโอเมตริกซ์, แป้นพิมพ์ |
| วัสดุ | สังกะสี |
| สี | สีดำ |
| แหล่งพลังงาน | แบตเตอรี่ AA 4 ก้อน (ไม่รวม) |
| การเชื่อมต่อ | No Wi-Fi or App connection required (local data storage) |
| ความเข้ากันได้ของความหนาของประตู | 1 5/16" ~ 2" (33mm - 50mm) |
| Bore Hole Diameter | 2 1/8 นิ้ว (54 มม.) |
| Bore Hole Backset | 2 3/8" or 2 3/4" (60mm or 70mm) |
| คะแนนสภาพอากาศ | IP54 (operates well from -22°F to 158°F) |
| ความจุรหัสผู้ใช้ | มากถึง 250 รหัสผู้ใช้ |
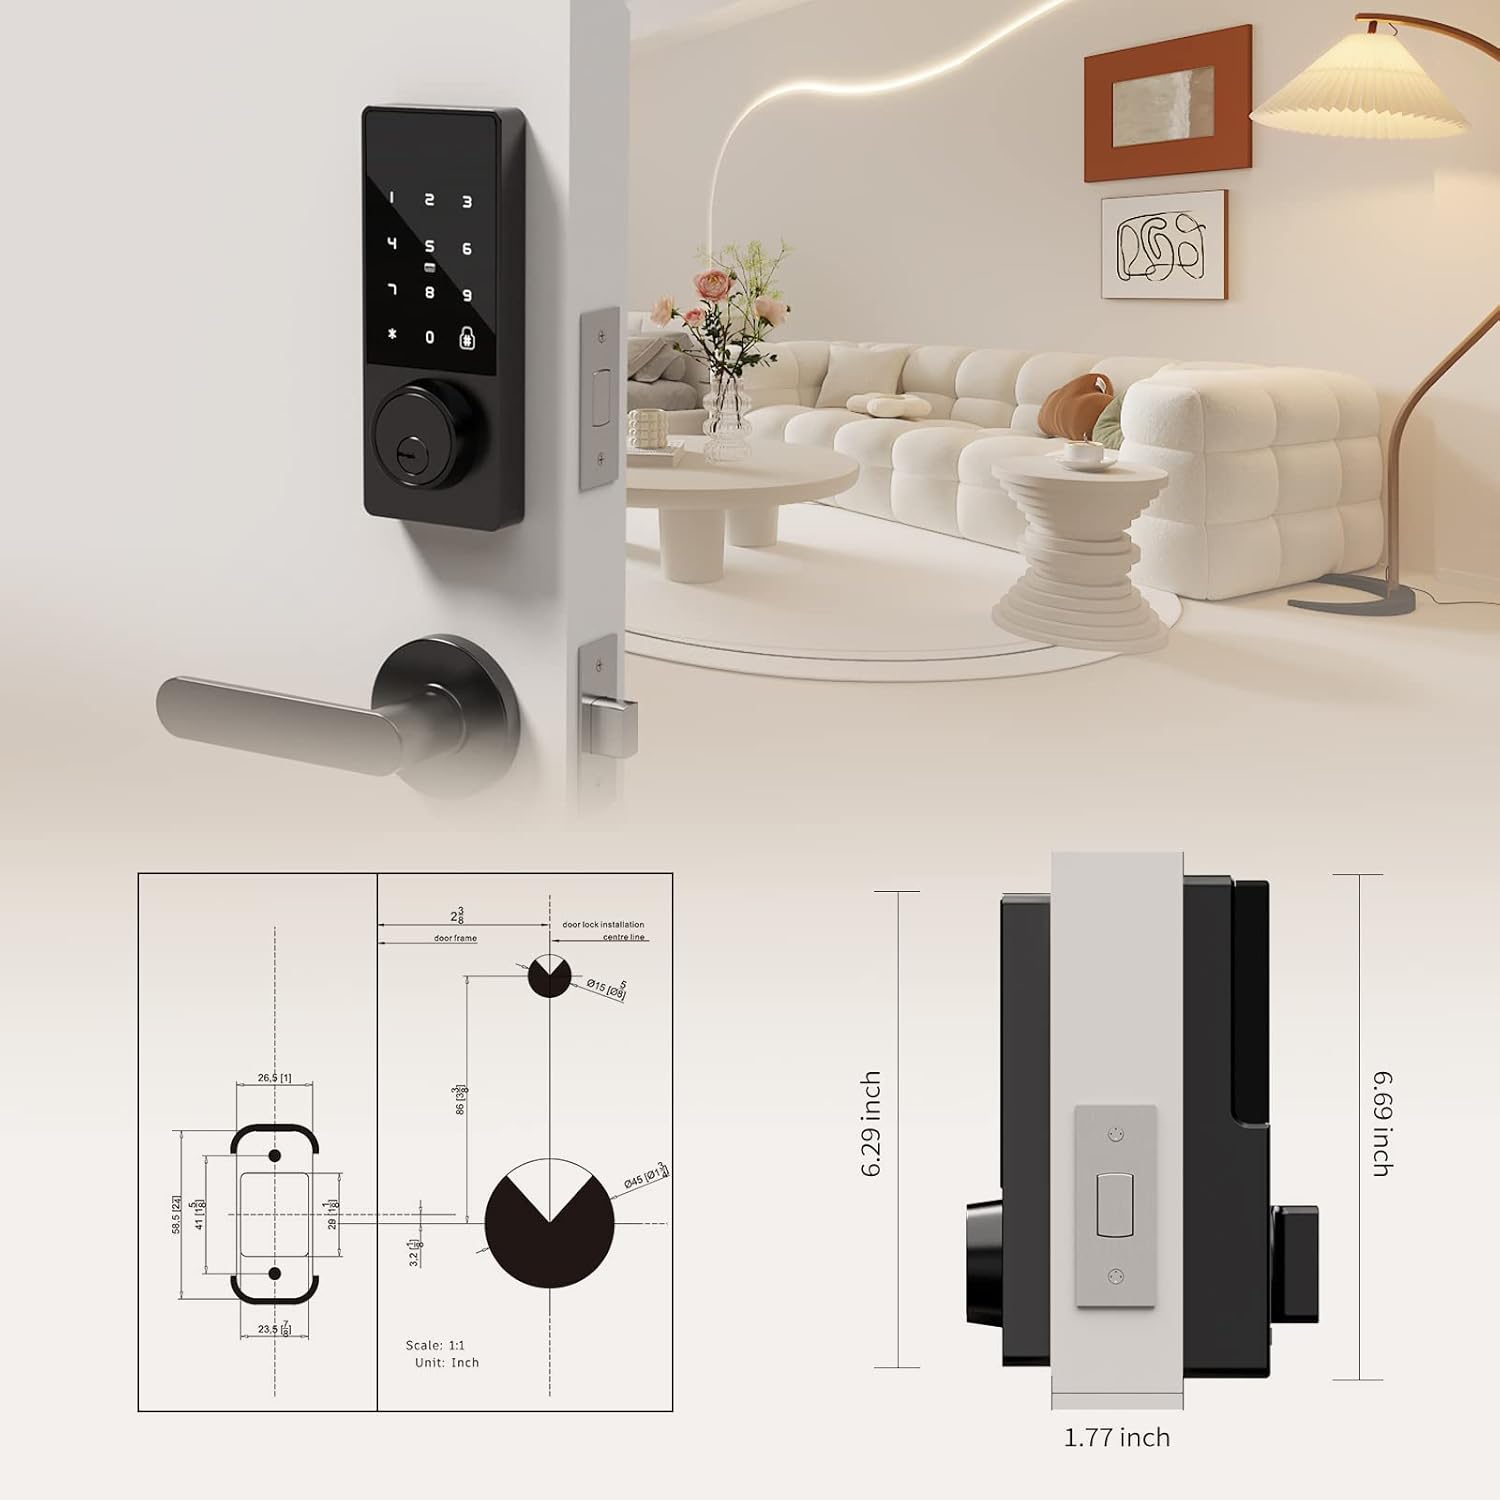
Figure 3: Detailed diagram illustrating the compatible door thickness, bore hole diameter, and backset measurements for proper installation.

Figure 4: Infographic highlighting the lock's durability, including keypad life test, face plate impact test, screw pull test, salt spray test, appearance pressure resistance, humidity resistance, and IP54 weatherproof rating.
การติดตั้งและการตั้งค่า
Installation is straightforward and typically requires only a screwdriver. Ensure your door meets the specifications listed above.
ขั้นตอนการติดตั้ง:
- เตรียมประตู: Ensure the door's bore hole and backset measurements are compatible with the lock. The deadbolt latch is adjustable for both 2 3/8" (60mm) and 2 3/4" (70mm) backsets.
- ติดตั้งกลอนประตู: Slide the deadbolt latch into the door edge. Secure it with the provided screws. Ensure the latch is centered and operates smoothly.
- Install the Exterior Unit: Slide the lock spindle and wire connector from the exterior unit through the deadbolt mechanism and the door hole.
- ติดตั้งแผ่นยึด: Thread the wire connector through the mounting plate. Secure the mounting plate to the door using the provided screws.
- Connect Wiring and Install Interior Unit: Connect the wire connector from the exterior unit to the wire connector port on the interior assembly. Carefully tuck excess wire into the door.
- Secure the Interior Unit: Align the interior unit with the mounting plate and secure it with the remaining screws.
- ติดตั้งแบตเตอรี่: Open the battery compartment on the interior unit. Insert 4 AA alkaline batteries (not included), ensuring correct polarity. Secure the battery box cover.
- ทดสอบการล็อค: Before closing the door, test the lock's functionality using a physical key and by entering a default or test code (refer to operating instructions for initial setup). Ensure the deadbolt extends and retracts smoothly.

Figure 5: Illustration of the simple installation process, highlighting that only a screwdriver is needed.
คู่มือวิดีโอการติดตั้ง:
Video 1: A comprehensive guide demonstrating the installation process and function display of the Filta Smart Lock. This video covers checking components, adjusting the deadbolt, securing the bolt and mounting plate, connecting wires, installing the interior unit, and inserting batteries.
คำแนะนำการใช้งาน
The Filta Smart Lock offers multiple ways to unlock your door.
1. Unlocking with Passcode:
- แตะแป้นพิมพ์เพื่อเปิดใช้งาน
- Enter your 6-10 digit user passcode.
- กดปุ่ม '#' เพื่อยืนยัน
- ล็อคจะปลดล็อค
ฟังก์ชันป้องกันการแอบมอง: You can enter random digits before or after your actual passcode to prevent others from guessing your code. For example, XXX + Passcode + XXX + #.
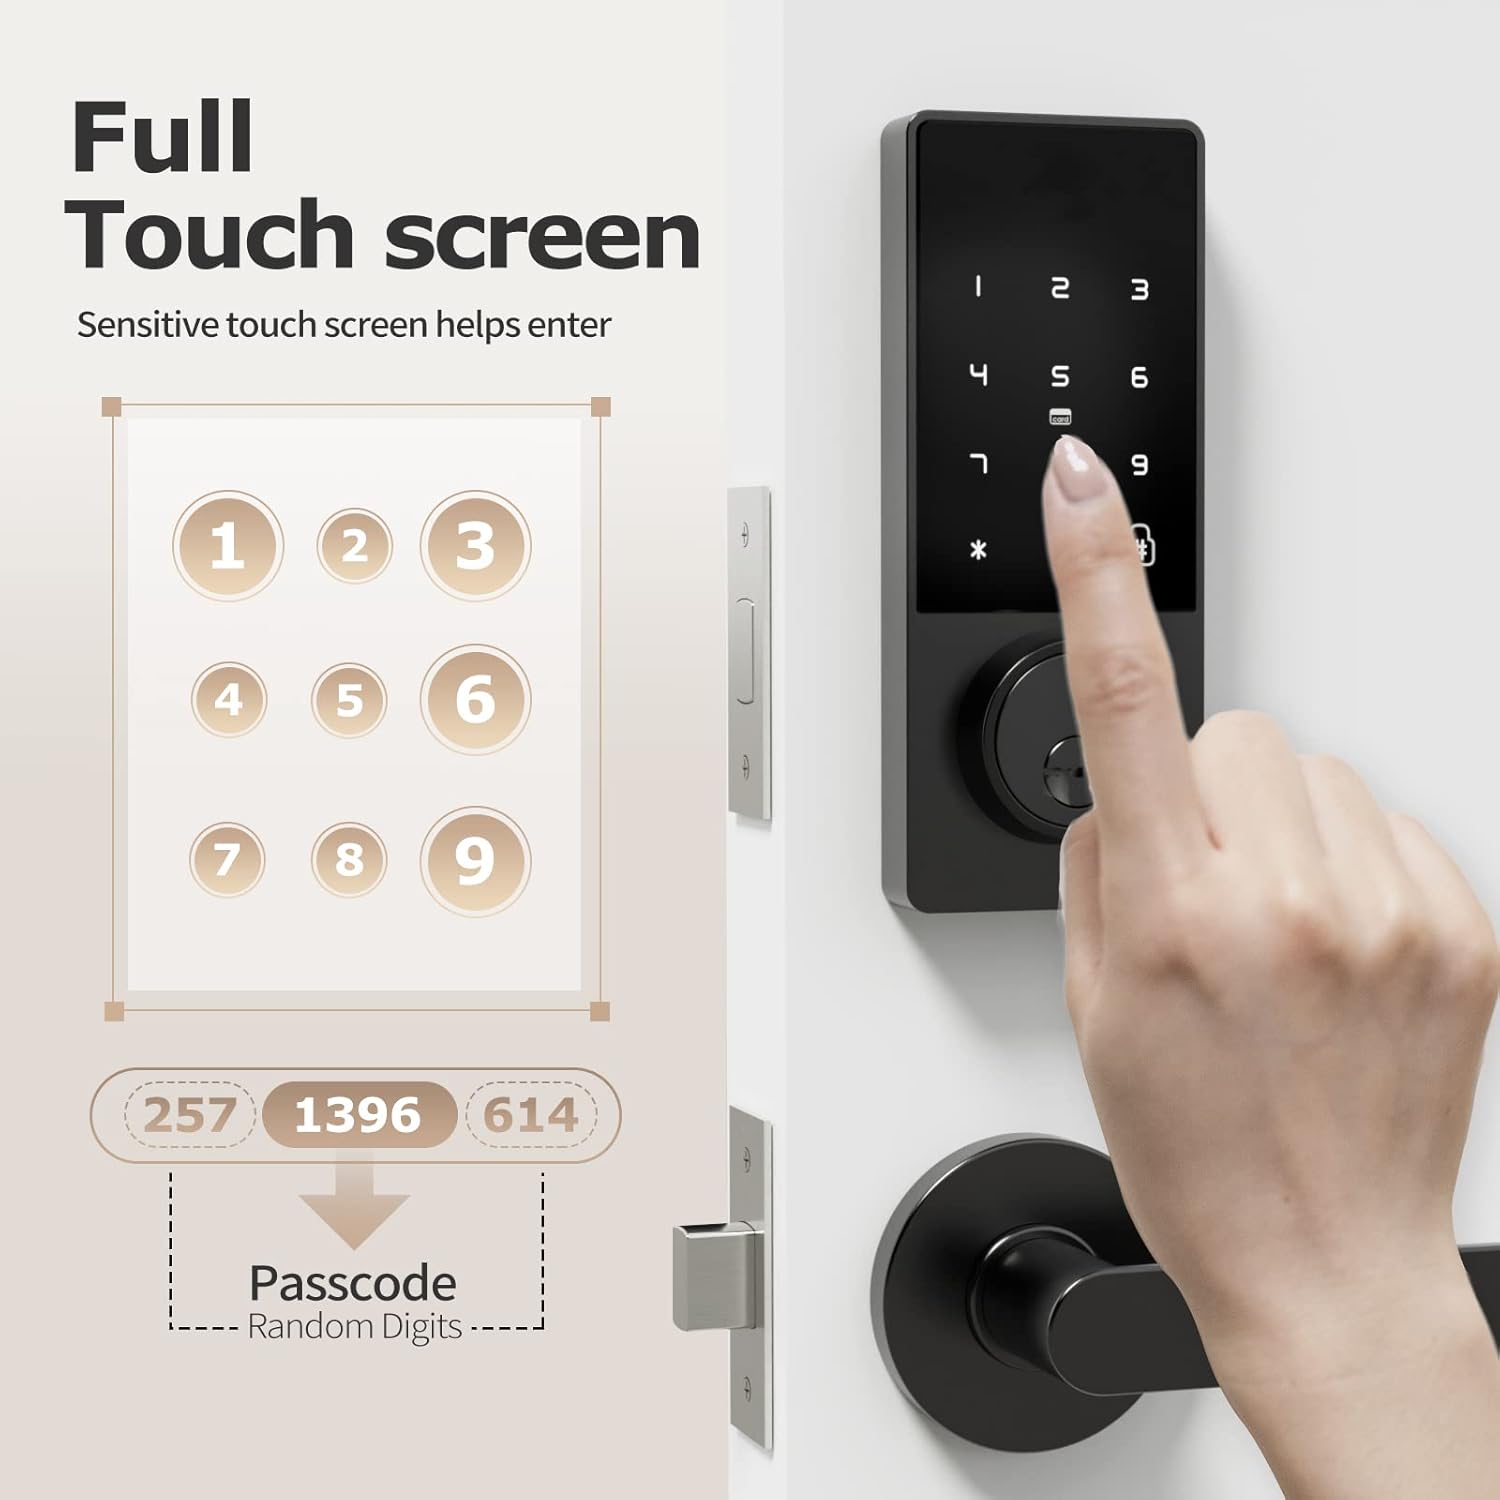
Figure 6: A hand interacting with the full touchscreen keypad, demonstrating the entry of a passcode with random digits for enhanced security.
2. Unlocking with IC Card:
- Present the registered IC card to the card reader area on the lock.
- The lock will unlock automatically.

Figure 7: A hand holding an IC card near the smart lock, illustrating the NFC unlocking method.
3. Unlocking with Physical Key:
- Insert the physical key into the keyhole located at the bottom of the exterior unit.
- หมุนกุญแจเพื่อปลดล็อกกลอนประตู
4. Unlocking with Fingerprint (if applicable):
While the product title mentions "Biometric Door Locks," the feature bullets and images do not explicitly detail a fingerprint sensor or its operation. If your model includes a fingerprint sensor, please refer to the specific instructions provided with your product for fingerprint registration and usage.

Figure 8: A person interacting with the top part of the smart lock, which may contain a fingerprint sensor for quick and efficient unlocking.
Adding Fingerprints and Passwords:
Refer to the video guide (Video 1) for detailed instructions on how to add fingerprints and passwords to the lock. The video demonstrates pressing '2' then '#' to initiate the process for adding new credentials.
Changing Normally Open Mode:
Refer to the video guide (Video 1) for detailed instructions on how to change the normally open mode. The video demonstrates pressing '3' then '#' to adjust this setting.
การเปลี่ยนภาษา:
Refer to the video guide (Video 1) for detailed instructions on how to change the language settings. The video demonstrates pressing '4' then '#' to access language options.
การซ่อมบำรุง
- การเปลี่ยนแบตเตอรี่: The lock requires 4 AA batteries. Replace them when the low battery reminder activates. Use high-quality alkaline batteries for optimal performance and longevity.
- การทำความสะอาด: Wipe the lock's exterior with a soft, dry cloth. Avoid using abrasive cleaners or solvents that could damage the finish or electronic components.
- การตรวจสอบปกติ: Periodically check all screws and connections to ensure they are secure. Ensure the deadbolt operates smoothly without obstruction.

Figure 9: The battery compartment of the smart lock, indicating the use of 4 AA alkaline batteries for approximately 6 months of battery life.
การแก้ไขปัญหา
| ปัญหา | สารละลาย |
|---|---|
| ล็อคไม่ตอบสนอง | Check battery levels and replace if necessary. Ensure the wire connector is securely plugged in. |
| รหัสผ่านใช้งานไม่ได้ | Ensure you are entering the correct passcode. Try re-registering the passcode. Check if the lock is in "normally open" mode. |
| Deadbolt not extending/retracting. | Check for obstructions in the door frame or strike plate. Ensure the deadbolt latch is properly aligned and installed. Verify the lock core is properly installed (refer to installation video). |
| IC card not recognized. | Ensure the IC card is properly registered. Try presenting the card directly to the reader area. |
| เตือนแบตเตอรี่ต่ำ | เปลี่ยนแบตเตอรี่ AA ทั้ง 4 ก้อนทันที |
การรับประกันและการสนับสนุน
FILTA offers a comprehensive guarantee for your peace of mind:
- แลกเปลี่ยนฟรี: ภายใน 60 วันหลังการซื้อ
- การรับประกันสินค้า : 1 year product warranty from the date of purchase.
- การสนับสนุนลูกค้า: การสนับสนุนลูกค้าตลอดชีพ
For any questions, technical assistance, or warranty claims, please contact FILTA customer support through the retailer's platform or visit the official FILTA store on Amazon: FILTA Store.
Ask a question about this manual
Ask about setup, troubleshooting, compatibility, parts, safety, or missing instructions. Manuals+ will review the question and use this page’s manual context to help answer it.