
การแนะนำ
This manual provides detailed instructions for the installation, operation, and maintenance of your UNITOPSCI Android 13 Car Stereo Radio. Designed specifically for Honda Odyssey models from 2005 to 2010, this 10.1-inch touch screen unit integrates advanced features such as Bluetooth, GPS navigation, Mirror Link, and backup camera support to enhance your driving experience. Please read this manual thoroughly before use to ensure proper functionality and safety.

Figure 1: UNITOPSCI Android 13 Car Stereo Radio with accessories.
ข้อมูลด้านความปลอดภัย
- แนะนำการติดตั้งอย่างมืออาชีพ: Due to the complexity of vehicle electrical systems, professional installation is highly recommended to prevent damage to the unit or your vehicle.
- แหล่งจ่ายไฟ: ตรวจสอบให้แน่ใจว่าอุปกรณ์เชื่อมต่อกับแหล่งจ่ายไฟ DC 12V ที่มีกราวด์ลบ โวลท์ไม่ถูกต้องtagและอาจทำให้เกิดความเสียหายได้
- การเดินสายไฟ: Do not modify or cut the wiring harness. Refer to the wiring diagram for correct connections.
- อุณหภูมิในการทำงาน: The unit is designed to operate within a temperature range of -40℃ to 80℃.
- ความปลอดภัยในการขับขี่: ห้ามใช้งานเครื่องหรือ view videos that may distract you while driving. Always prioritize road safety.
- การระบายอากาศ : ตรวจสอบให้แน่ใจว่ามีการระบายอากาศเพียงพอรอบๆ เครื่องเพื่อป้องกันความร้อนสูงเกินไป
เนื้อหาแพ็คเกจ
ตรวจสอบว่ารายการทั้งหมดที่ระบุไว้ด้านล่างนี้รวมอยู่ในแพ็คเกจของคุณ:
- 1 x Android Car Stereo (pre-installed with trim)
- 1 x กล้องสำรอง
- สายไฟ 1 เส้น
- เสาอากาศ GPS 1 เส้น
- 1 x สายอินพุตกล้อง
- สายอินพุตและเอาต์พุต RCA 1 เส้น
- สายเคเบิล 2 x USB
- 1 x คู่มือการใช้งาน
- 1 x ชุดเครื่องมือติดตั้ง
- 1 x ไมโครโฟนภายนอก
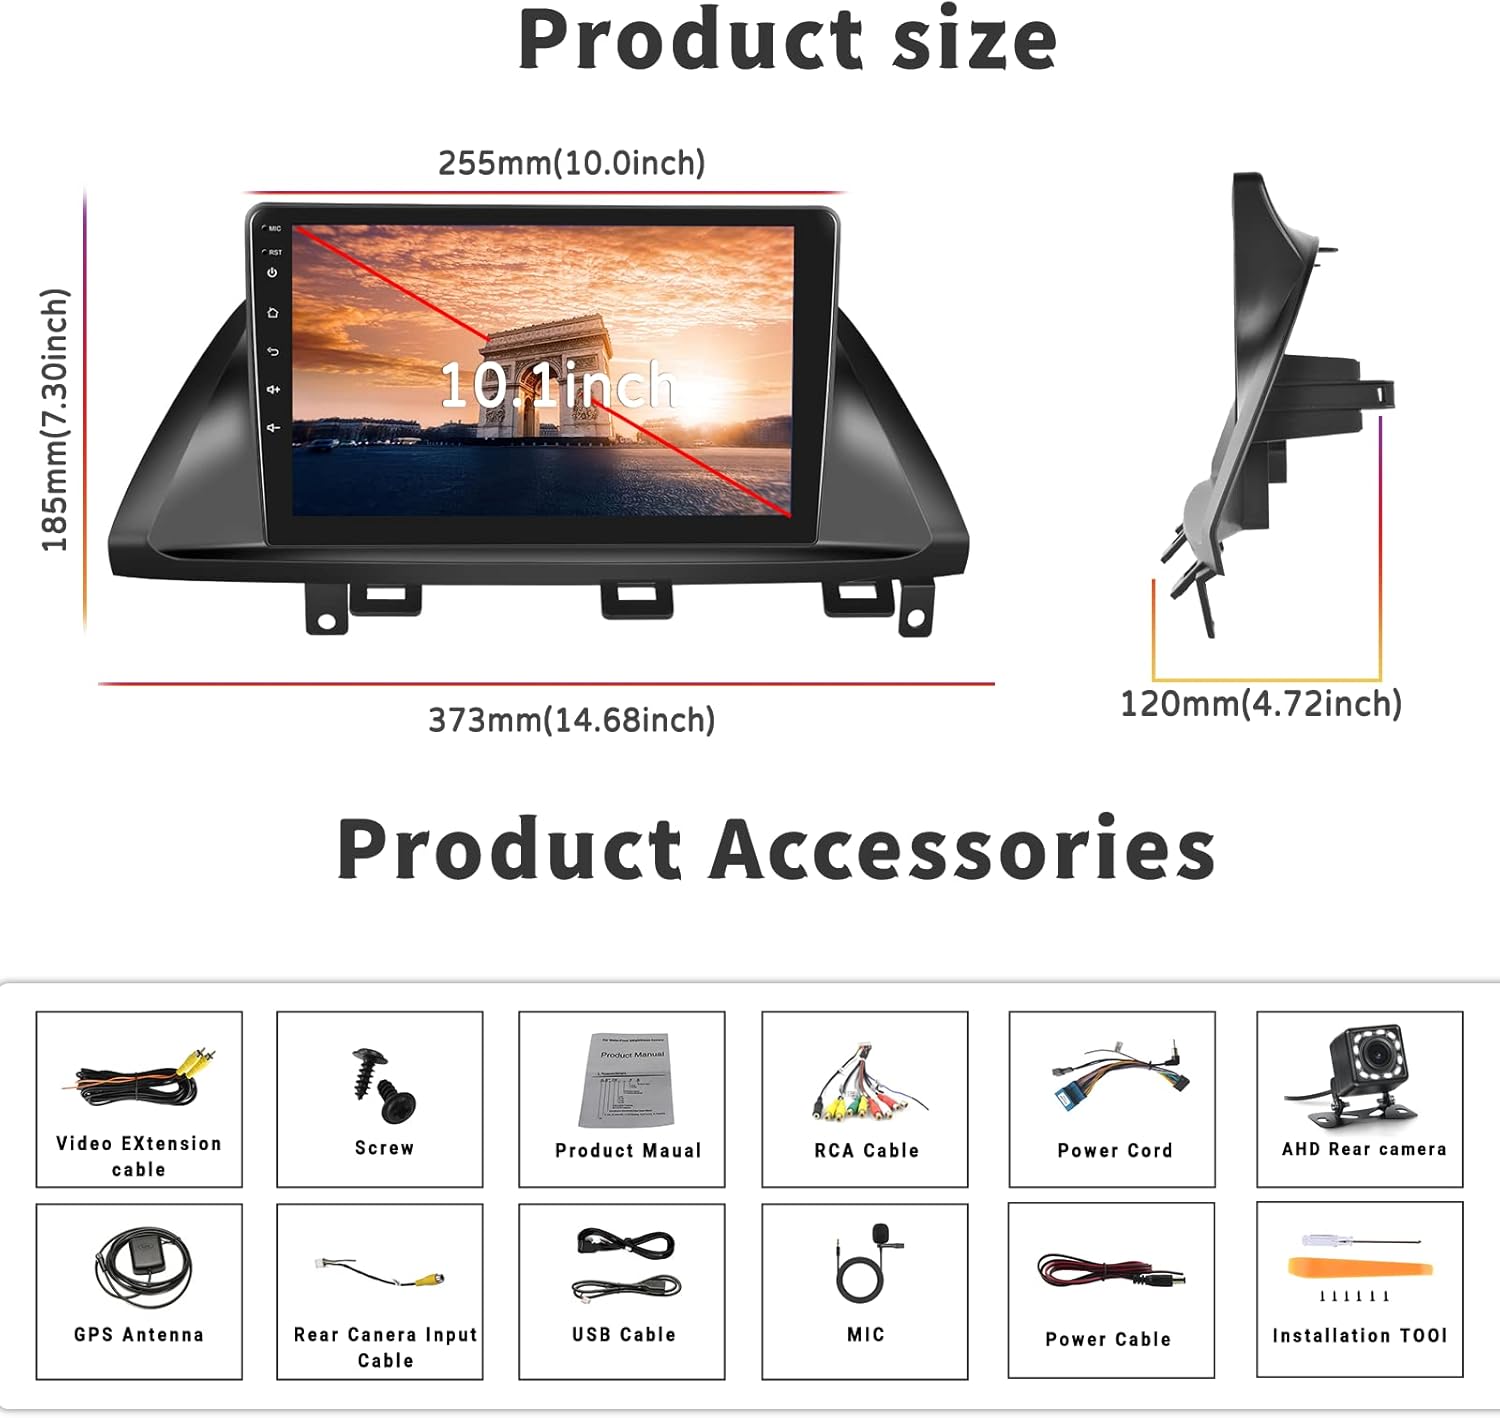
รูปที่ 2: ขนาดผลิตภัณฑ์และอุปกรณ์เสริมที่รวมอยู่
การติดตั้งและการตั้งค่า
ความเข้ากันได้
This car stereo is designed for Honda Odyssey models from 2005 to 2010. It is compatible with vehicles that have an original car radio with a DVD player. It is ไม่เข้ากัน with original car radios that have a factory screen or GPS. In such cases, an additional wire harness may be required. Please verify your car's center console size and wire harness details before installation.

Figure 3: Car compatibility and wiring harness details.
Wiring Diagram for Backup Camera
Proper connection of the backup camera is crucial for its automatic activation. Follow these steps:
- การเชื่อมต่อสายไฟ: Connect the red wire of the backup camera's power cable to the positive reversing light, and the black wire to the negative reversing light.
- การเชื่อมต่อสายเคเบิล RCA: Insert the yellow RCA cable from the camera into the 'CAM-IN' (yellow) port on the back of the radio unit.
- สายทริกเกอร์ย้อนกลับ: Ensure the 'reverse (+)' wire connection (typically a pink wire on the power wire harness labeled 'back') is securely connected to the positive wire of the reversing light. This enables the unit to automatically display the rear view image when the vehicle is in reverse.
หมายเหตุ 1: The short red wires next to the RCA port do not require connection in this wiring setup.
หมายเหตุ 2: When the device is in parking mode (displaying the rear view), other functions will temporarily pause.

รูปที่ 4: ด้านหลัง view แผนภาพการต่อสายกล้อง
ขั้นตอนการติดตั้งทั่วไป
While specific steps may vary by vehicle, the general installation process involves:
- ถอดแบตเตอรี่: ก่อนเริ่มดำเนินการ ให้ถอดขั้วลบของแบตเตอรี่รถยนต์ออกเพื่อป้องกันไฟฟ้าลัดวงจร
- ถอดหน่วยเก่าออก: Carefully remove the existing car stereo and trim.
- การเชื่อมต่อสายไฟ: Connect the new stereo's power harness, speaker wires, antenna, and other necessary cables according to the provided wiring diagram.
- ติดตั้งเสาอากาศ GPS: ติดตั้งเสาอากาศ GPS ในตำแหน่งที่มีสัญญาณชัดเจน view โดยทั่วไปจะติดตั้งไว้บนแผงหน้าปัดหรือใต้กระจกหน้ารถ
- ติดตั้งกล้องสำรอง: Route the backup camera cable from the rear of the vehicle to the head unit, connecting it as described in the wiring section.
- ทดสอบการเชื่อมต่อ: Before fully securing the unit, reconnect the battery and perform a quick test of all functions (power, audio, radio, GPS, camera, etc.).
- หน่วยรักษาความปลอดภัย: Once tested, carefully slide the new stereo into the dash opening and secure it with screws. Reinstall the trim.
- การตรวจสอบขั้นสุดท้าย: Perform a comprehensive test of all features to ensure proper operation.
คำแนะนำการใช้งาน
Bluetooth & FM/RDS Radio Function
The unit features built-in Bluetooth 4.2 and an FM/RDS radio. The integrated microphone supports hands-free calling, Bluetooth music streaming, and automatic phone book download. The FM radio includes 18 preset stations for news, music, and weather broadcasts. You can also adjust sound settings with the EQ balance function and connect to a subwoofer.

Figure 5: Bluetooth and FM Radio interface.
ระบบนำทาง GPS และ WiFi
The head unit comes with preloaded offline maps and supports both online and offline navigation. With a WiFi connection, you can access online maps and download additional maps as needed. To download maps, connect to WiFi, open the 'Here We Go' app, click the 'folder' icon, select 'download maps', and choose the appropriate region. WiFi connectivity also allows you to surf the internet and download various applications.

รูปที่ 6: คุณสมบัติการนำทางด้วย GPS และ WiFi
Mirror Link for Android and iOS Phones
The unit supports mirror link functionality for both Android and iOS mobile phones. For iOS devices, it supports one-way projection via WiFi. For Android phones, it supports two-way connection via WiFi or the original USB phone cable, allowing you to control your phone's apps directly from the 10.1-inch screen. This feature is convenient for displaying videos or navigation maps from your phone. Note: Not compatible with Samsung phones for two-way control.

รูปที่ 7: ฟังก์ชันการเชื่อมโยงมิเรอร์
อินพุตกล้องสำรอง
A backup camera is included with the unit. When the vehicle is shifted into reverse gear, the screen will automatically switch to display the reversing image, providing a clear view of the area behind your car. The camera features waterproof design, night vision, and a 170° wide-angle view เพื่อความปลอดภัยที่เพิ่มขึ้น

Figure 8: Backup Camera Input display.
Video Output & Split Screen
The unit supports video output, allowing you to share entertainment with a backseat monitor. Additionally, the split-screen function enables you to display two applications side-by-side simultaneously, such as navigation and music playback, for improved multitasking.

Figure 9: Video Output and Split Screen functionality.
ระบบควบคุมพวงมาลัย (SWC)
The unit supports steering wheel control functions, allowing you to manage various features directly from your vehicle's steering wheel buttons. Please note that a steering wheel controller may need to be ordered separately if your vehicle does not have compatible controls or if the existing system works with a CANbus (this unit does not support CANbus). Refer to the unit's settings to map your steering wheel buttons.
การซ่อมบำรุง
- การทำความสะอาดหน้าจอ: ใช้ผ้านุ่มไม่เป็นขุยเช็ดหน้าจอสัมผัสเบาๆ สำหรับรอยเปื้อนฝังแน่น ให้เช็ดเบาๆampชุบผ้าด้วยน้ำหรือน้ำยาทำความสะอาดหน้าจอที่ออกแบบมาสำหรับอุปกรณ์อิเล็กทรอนิกส์ หลีกเลี่ยงสารเคมีรุนแรงหรือวัสดุที่มีฤทธิ์กัดกร่อน
- การทำความสะอาดทั่วไป: รักษาตัวเครื่องและบริเวณโดยรอบให้ปราศจากฝุ่นและสิ่งสกปรก ใช้แปรงขนนุ่มหรือลมเป่าทำความสะอาดช่องระบายอากาศและพอร์ตต่างๆ
- การอัปเดตซอฟต์แวร์: Periodically check for software updates from the manufacturer's official channels to ensure optimal performance and access to new features.
- หลีกเลี่ยงอุณหภูมิที่สูงหรือต่ำเกินไป: While the unit is designed for a wide temperature range, prolonged exposure to extreme heat or cold can affect its lifespan.
การแก้ไขปัญหา
ส่วนนี้จะกล่าวถึงปัญหาทั่วไปที่คุณอาจพบเจอ หากปัญหายังคงอยู่ โปรดติดต่อฝ่ายบริการลูกค้า
| ปัญหา | สาเหตุที่เป็นไปได้ | สารละลาย |
|---|---|---|
| เครื่องไม่เปิด | สายไฟไม่ถูกต้อง ฟิวส์ขาด การเชื่อมต่อหลวม | Check power cable connections (red and yellow wires); Inspect vehicle's fuse box; Ensure all harnesses are securely plugged in. |
| ไม่มีเสียงออกจากลำโพง | สายลำโพงต่อไม่ถูกต้อง ระดับเสียงต่ำเกินไป ฟังก์ชันปิดเสียงทำงานอยู่ | Verify speaker wire connections; Increase volume; Check if unit is muted. |
| สัญญาณ GPS อ่อนหรือไม่สามารถใช้งานได้ | เสาอากาศ GPS ติดตั้งไม่ถูกต้องหรือมีสิ่งกีดขวาง | Ensure GPS antenna is mounted in a clear, unobstructed location; Check antenna connection to the unit. |
| กล้องสำรองไม่แสดงผล | Incorrect camera wiring; 'Reverse' trigger wire not connected. | Review the 'Wiring Diagram for Backup Camera' section; Ensure the camera's power and RCA cables are correctly connected, and the 'reverse' trigger wire is properly linked to the vehicle's reversing light positive. If the camera has an LED light, check if it illuminates when reverse is engaged. |
| ไม่สามารถเชื่อมต่อ Mirror Link ได้ | Incorrect connection method; Incompatible phone model; App issues. | For iOS, use WiFi only. For Android, try both WiFi and USB (original phone cable). Ensure your phone is not a Samsung model (known compatibility issue). Restart both phone and head unit. |
| Unit lags or freezes. | Too many apps running; Low memory. | Close unnecessary applications; Restart the unit. |
ข้อมูลจำเพาะ
| คุณสมบัติ | ข้อมูลจำเพาะ |
|---|---|
| ระบบ | แอนดรอยด์ 13.0 |
| ชิปเซ็ต | 8227L-สาธิต |
| ขนาดหน้าจอ | 10.1 นิ้ว |
| ความละเอียดหน้าจอ | 1024 x 600 |
| หน่วยความจำ (RAM+ROM) | แรม 1GB + รอม 32GB |
| ลิงค์มิเรอร์ | Android/iOS (Android two-way, iOS one-way) |
| Video Output/WiFi | รองรับ |
| วงวิทยุ | FM |
| ชิปวิทยุ | เอ็นเอ็กซ์พี6851 |
| พลัง Ampชิปลิฟายเออร์ | เอซี7315 |
| กำลังขับ | 4*45วัตต์ |
| อุณหภูมิในการทำงาน | -40℃ ถึง 80℃ |
| ระบบควบคุมพวงมาลัย | Supported (controller may be separate) |
| เวอร์ชันบลูทูธ | 4.2 |
| แผนที่ | แผนที่ออฟไลน์ในตัว |
| อินเทอร์เฟซ USB | USB คู่ |
| รองรับรูปแบบเสียง | APE/FLAC/WAV/MP3/WMA ฯลฯ |
| รองรับรูปแบบวิดีโอ | MKV/RMVB/AVI/MP4/MDV ฯลฯ |
| รองรับรูปแบบภาพ | PNG/JPEG/JPG/GIF/WBMP/BNP ฯลฯ |
| ขนาดสินค้า | 0.39 x 0.39 x 0.39 นิ้ว |
| น้ำหนักสินค้า | 3.27 ปอนด์ |
การรับประกันและการสนับสนุน
UNITOPSCI is committed to providing high-quality products and satisfactory services. We offer the following support:
- Replacement Availability: Replacements are available within 24 months of purchase.
- ตอบสนองอย่างรวดเร็ว: คาดว่าจะได้รับการตอบกลับข้อสงสัยภายใน 16 ชั่วโมง
- การสนับสนุนหลังการขายตลอดอายุการใช้งาน: We provide lifetime after-sales consultation and technical support.
- นโยบายการคืนสินค้า: Enjoy a 60-day no-worry return period.
For any questions, technical assistance, or warranty claims, please contact us directly via email:
อีเมล: UNITOPSCI@126.com

Figure 10: UNITOPSCI Customer Support Information.