1. บทนำ
Thank you for choosing the Generic TA8131 Digital Light Meter. This device is designed for precise measurement of illumination (lux/Fc) in various environments. Its split design allows for flexible sensor placement, making it ideal for photography, environmental testing, and general light measurement applications. Please read this manual thoroughly before operation to ensure safe and correct use.
2. คุณสมบัติของผลิตภัณฑ์
- Mini lux meter with stable, safe, and reliable measurement.
- Wide measurement range of 0-100,000 lux with automatic/manual range shift.
- Measuring unit is switchable: Lux or Fc.
- MAX / MIN / Data Hold functions for enhanced accuracy.
- LCD display with backlight for easy operation in low-light conditions.
- Data recording capacity for up to 50 measurement data sets.
3. ข้อมูลด้านความปลอดภัย
To ensure safe operation and to obtain the best performance from the meter, please observe the following safety precautions:
- Do not operate the meter in environments with explosive gas, vapor, or dust.
- Avoid exposing the meter to direct sunlight, high temperatures, or high humidity.
- Keep the meter dry. Do not immerse it in water or other liquids.
- Remove batteries if the meter will not be used for an extended period to prevent leakage.
- Clean the meter with a soft, dry cloth. Do not use abrasive cleaners or solvents.
- Do not attempt to modify or disassemble the meter. Refer all servicing to qualified personnel.
4. เนื้อหาบรรจุภัณฑ์
เมื่อแกะกล่องแล้ว โปรดตรวจสอบว่าสินค้าทั้งหมดที่ระบุไว้ด้านล่างมีอยู่ครบถ้วนและไม่ได้รับความเสียหาย:
- 1 x Digital Light Meter (Main Unit)
- 1 x ถุงป้องกัน
- 1 x คู่มือผู้ใช้
5. อุปกรณ์โอเวอร์view
The TA8131 Digital Light Meter consists of a main display unit and a separate photoreceptor sensor connected by a coiled cable. This split design allows for flexible positioning of the sensor to accurately measure light without obstructing the display.

รูปที่ 5.1: ด้านหลัง view of the main unit and the photoreceptor sensor. The main unit shows a battery compartment and a serial number label. The sensor has a coiled cable for extension.
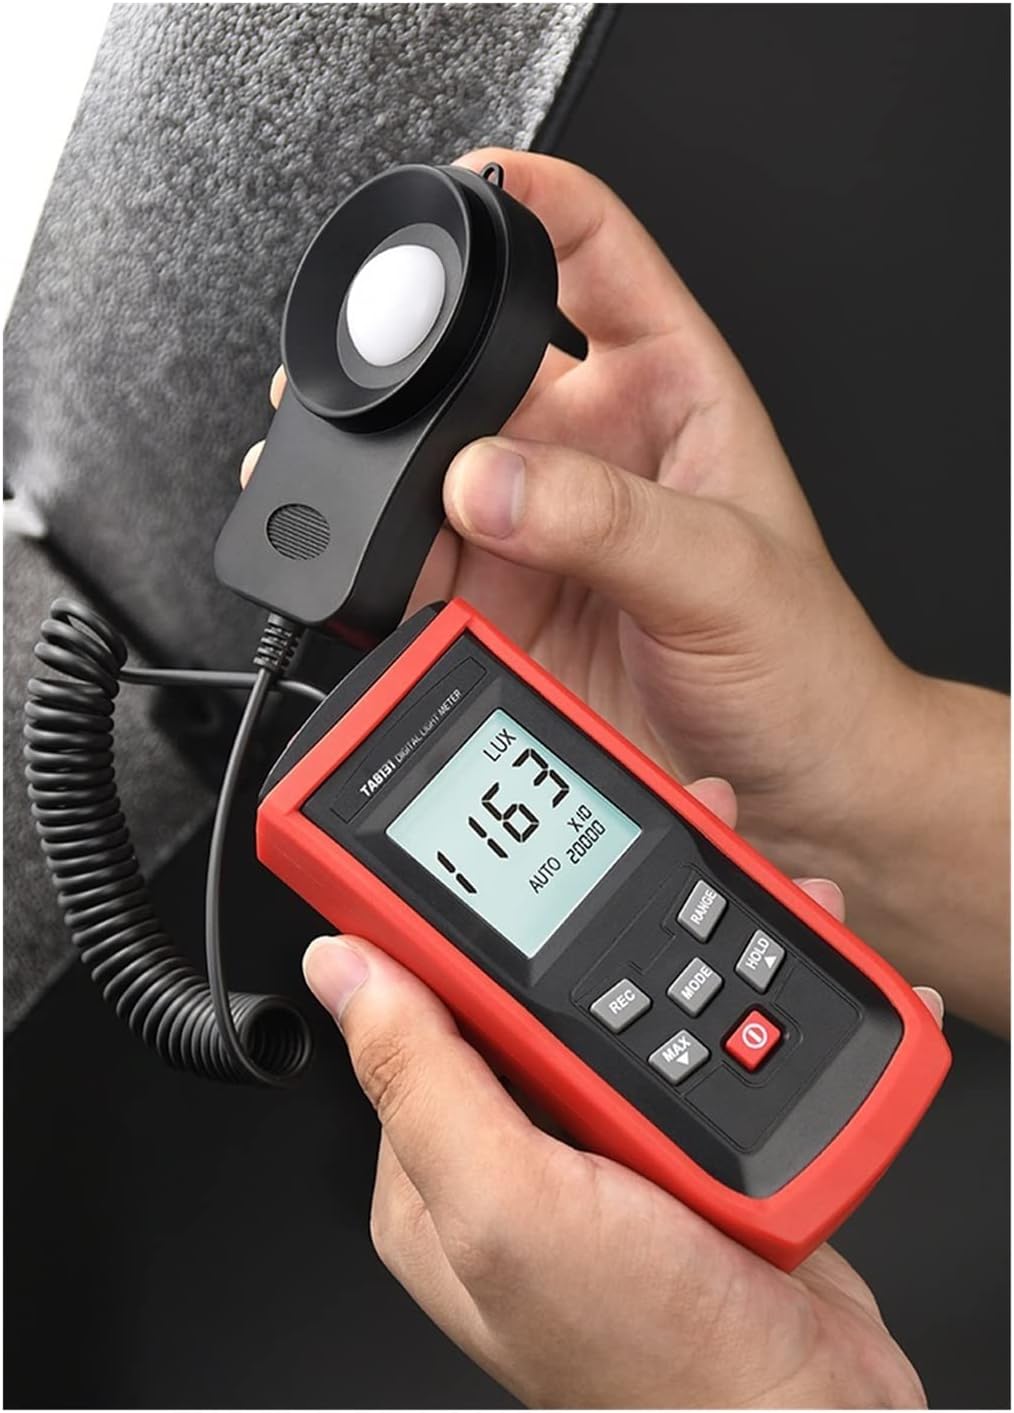
รูปที่ 5.2 : ด้านหน้า view of the TA8131 in use. The main unit features an LCD display showing a light reading of '163 LUX' and control buttons for various functions. The separate sensor is held nearby.
5.1 หน่วยหลัก
- จอแสดงผล LCD: Shows measurement readings, units (Lux/Fc), and function indicators (MAX, MIN, HOLD, AUTO, RANGE).
- ปุ่มควบคุม:
- POWER (Red button): เปิดหรือปิดมิเตอร์
- เส้นทาง: Switches between Lux and Fc units.
- พิสัย: Toggles between automatic and manual measurement ranges.
- ถือ: หยุดการอ่านค่าปัจจุบันบนจอแสดงผล
- สูงสุด/นาที: Displays the maximum or minimum recorded value.
- บันทึก: Activates data recording mode.
5.2 Photoreceptor Sensor
The sensor contains a photodiode with an additional filter, designed to meet CIE Photopic Spectral Response standards. It is connected to the main unit via a coiled cable that can extend up to 1300mm (51.18 inches) for flexible measurement positioning.

Figure 5.3: The extended cable of the photoreceptor sensor, demonstrating its reach for versatile light measurement.
6. การตั้งค่า
6.1 การติดตั้งแบตเตอรี่
- หาฝาปิดช่องใส่แบตเตอรี่ที่ด้านหลังของตัวเครื่องหลัก
- เลื่อนฝาเปิดออก
- ใส่แบตเตอรี่ AAA สอง (2) ก้อน โดยสังเกตขั้วที่ถูกต้อง (+/-) ตามที่ระบุไว้ภายในช่องใส่แบตเตอรี่
- ใส่ฝาปิดช่องใส่แบตเตอรี่กลับเข้าที่อย่างแน่นหนา
Note: Batteries are not included in the package. Please use fresh AAA alkaline batteries for optimal performance.
6.2 การเชื่อมต่อเซ็นเซอร์
The photoreceptor sensor is permanently connected to the main unit via a coiled cable. No additional connection steps are required. Ensure the cable is not excessively stretched or kinked during use to prevent damage.
7. คู่มือการใช้งาน
7.1 เปิด/ปิดเครื่อง
กดปุ่มสีแดง พลัง กดปุ่มเพื่อเปิดมิเตอร์ กดปุ่มค้างไว้ พลัง กดปุ่มอีกครั้งเพื่อปิดมิเตอร์
7.2 การวัดผล
- Turn on the meter. The LCD will display the current light intensity.
- Position the photoreceptor sensor at the location where you wish to measure light. Ensure the sensor's dome is facing the light source.
- อ่านค่าการวัดจากหน้าจอ LCD
7.3 Unit Selection (Lux/Fc)
กดปุ่ม โหมด button to switch between Lux and Foot-candle (Fc) units. The selected unit will be displayed on the LCD.
7.4 Range Selection (Auto/Manual)
The meter defaults to automatic range selection. To switch to manual range, press the ประเภท button. Repeatedly pressing ประเภท will cycle through available manual ranges (e.g., 200, 2000, 20000, 100000 Lux). To return to auto-ranging, press and hold the ประเภท button until "AUTO" appears on the display.
7.5 ฟังก์ชั่นการเก็บข้อมูล
กดปุ่ม ถือ button to freeze the current reading on the display. The "HOLD" indicator will appear. Press ถือ again to release the data hold function and resume live measurements.
7.6 การวัดค่าสูงสุด/ต่ำสุด
กดปุ่ม สูงสุด/ต่ำสุด button to display the maximum recorded light intensity since the meter was turned on. Press it again to display the minimum recorded light intensity. A third press will return to live measurement. The "MAX" or "MIN" indicator will be shown on the display.

Figure 7.1: The meter displaying the minimum recorded value in auto-range mode.
7.7 การบันทึกข้อมูล
The meter can store up to 50 sets of measurement data.
- กดปุ่ม บันทึก button to enter data recording mode. The "REC" indicator will appear.
- ทุกครั้งที่คุณกด บันทึก, the current measurement will be saved. The display may briefly show the record number.
- To exit recording mode, press and hold the บันทึก ปุ่ม.

Figure 7.2: The meter's capability to store up to 50 data sets.

Figure 7.3: Illustration of the automatic data recording feature, showing multiple readings being stored.
8. การบำรุงรักษา
8.1 การทำความสะอาด
เช็ดทำความสะอาดมิเตอร์asing and sensor with a soft, dry cloth. Do not use abrasive materials, solvents, or harsh chemicals, as these may damage the plastic components or the sensor's optical surface.
8.2 การเปลี่ยนแบตเตอรี่
When the low battery indicator appears on the LCD, replace the batteries promptly to ensure accurate readings. Refer to Section 6.1 for battery installation instructions.
8.3 พื้นที่จัดเก็บ
If the meter is not used for an extended period, remove the batteries to prevent leakage. Store the meter in its protective bag in a cool, dry place, away from direct sunlight and extreme temperatures.
9 การแก้ไขปัญหา
- หน้าจอแสดงผลไม่ทำงาน / มิเตอร์ไม่เปิดใช้งาน:
- ตรวจสอบว่าได้ติดตั้งแบตเตอรี่อย่างถูกต้องและตรงขั้วหรือไม่
- เปลี่ยนด้วยแบตเตอรี่ AAA ใหม่
- การอ่านค่าที่ไม่ถูกต้อง:
- Ensure the sensor's dome is clean and unobstructed.
- Verify the correct unit (Lux/Fc) is selected.
- Check if the meter is in the appropriate measurement range (Auto or Manual).
- Avoid measuring in rapidly changing light conditions if stable readings are required.
- "OL" or Overload Display:
- The measured light intensity exceeds the current range. Switch to a higher manual range or enable auto-ranging.
10. ข้อมูลจำเพาะ

Figure 10.1: Detailed product specifications for the TA8131 model.
| พารามิเตอร์ | Specification (TA8131) |
|---|---|
| แบบอย่าง | TA8131 (Split model) |
| ช่วงการวัด | 200Lux, 2000Lux, 20000Lux, 100000Lux (20/200/2000/10000 Fc) |
| ปณิธาน | 0.1Lux (for 200Lux range); 1Lux (for other ranges) |
| ความแม่นยำ | ±3% rdg ± 10dgts (<10,000 lux) ±4% rdg ± 10dgts (>10,000 lux) |
| ความแม่นยำรวม | For C.I.E Standard Lighting A (2856K) |
| Sampลิงอัตรา | 2 ครั้ง / วินาที |
| ความสามารถในการทำซ้ำ | ±2% |
| การเลือกช่วง | Automatic / Manual measurement |
| การบันทึกข้อมูล | 50 measurement data sets (delayed recording function) |
| การตอบสนองสเปกตรัม | Meets CIE Photopic |
| ตัวรับแสง | Photodiode with additional filter lens |
| การเลือกหน่วย | Lux / Fc |
| ฟังก์ชันการเก็บรักษาข้อมูล | Yes (HOLD) |
| บันทึกสูงสุด/ต่ำสุด | ใช่ |
| จอแสดงผล LCD | Max Display 1999 (4-digit LCD display) |
| ขนาดจอ LCD | 35*32มม. |
| แบตเตอรี่ | 2 x AAA (ไม่รวม) |
| ขนาดผลิตภัณฑ์ (หน่วยหลัก) | 125*55*30มม. |
| ขนาดเซนเซอร์ | 87*55*20มม. |
| น้ำหนัก | ประมาณ 180กรัม |
11. การรับประกันและการสนับสนุน
This product is covered by the standard manufacturer's warranty. For warranty claims, technical support, or service inquiries, please contact the retailer or manufacturer directly. Please retain your purchase receipt as proof of purchase.
