
การแนะนำ
This manual provides detailed instructions for the safe installation, operation, and maintenance of your Maxxima 4-inch 5 CCT Ultra Thin Recessed LED Downlight. Please read all instructions carefully before installation and retain this manual for future reference.
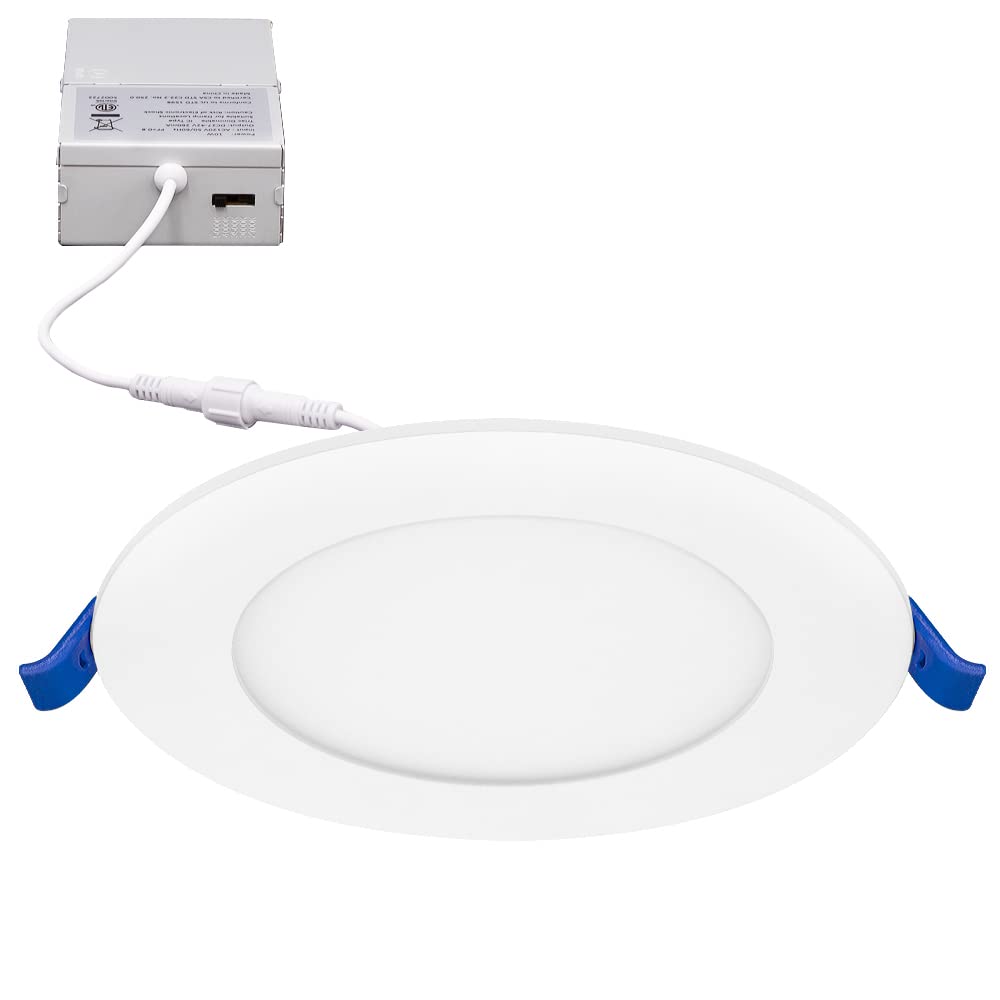
ภาพ: ด้านหน้า view of the Maxxima 4-inch 5 CCT Ultra Thin Recessed LED Downlight.
ข้อมูลด้านความปลอดภัย
เพื่อลดความเสี่ยงจากอัคคีภัย ไฟฟ้าช็อต หรือการบาดเจ็บ โปรดปฏิบัติตามข้อควรระวังด้านความปลอดภัยดังต่อไปนี้:
- ควรปิดสวิตช์ไฟที่ตัวตัดวงจรทุกครั้งก่อนเริ่มการติดตั้งหรือการบำรุงรักษาใดๆ
- ตรวจสอบให้แน่ใจว่าการเชื่อมต่อทางไฟฟ้าทั้งหมดเป็นไปตามข้อกำหนดและกฎหมายท้องถิ่น รวมถึงมาตรฐานรหัสไฟฟ้าแห่งชาติ (NEC) ด้วย
- หากคุณไม่แน่ใจเกี่ยวกับการเดินสายไฟ โปรดปรึกษาช่างไฟฟ้าที่มีคุณสมบัติเหมาะสม
- ห้ามติดตั้งในสถานที่ที่อุณหภูมิในการทำงานเกินอุณหภูมิที่กำหนดของอุปกรณ์
- โคมไฟนี้เหมาะสำหรับamp locations and is IC Rated, meaning it is safe for direct contact with insulation.
- ห้ามดัดแปลงอุปกรณ์หรือนำไปใช้เพื่อวัตถุประสงค์อื่นนอกเหนือจากที่กำหนดไว้
เนื้อหาแพ็คเกจ
ตรวจสอบว่าส่วนประกอบทั้งหมดมีอยู่ก่อนเริ่มการติดตั้ง:
- 1 x Maxxima 4 in. 5 CCT Ultra Thin Recessed LED Downlight
- 1 x Junction Box (J-Box) with integrated power supply
- ฮาร์ดแวร์สำหรับติดตั้ง
ข้อมูลจำเพาะ
| คุณสมบัติ | ข้อมูลจำเพาะ |
|---|---|
| หมายเลขรุ่น | MRL-S40905 |
| ขนาด | 4 นิ้ว |
| วัดtage | 10W (เทียบเท่าหลอดไส้ 60W) |
| เอาท์พุตของลูเมน | 750 ลูเมน |
| อุณหภูมิสี (CCT) | เลือกได้: 2700K, 3000K, 3500K, 4000K, 5000K |
| เล่มที่tage | 120VAC |
| หรี่แสงได้ | Yes (20% - 100% with compatible LED dimmer) |
| ซีอาร์ไอ | 82 |
| วัสดุ | อลูมิเนียม |
| ประเภทการติดตั้ง | ติดตั้งแบบฝังเรียบ ไม่มีกล่อง |
| การรับรอง | IC Rated, ETL Listed |
| ขนาดกล่องต่อสาย | สูง 1.4 นิ้ว x กว้าง 2.7 นิ้ว x ลึก 4.11 นิ้ว |
| ขนาดการแข่งขัน | 4.8” Diameter x 0.87” Thickness |
การติดตั้งและการตั้งค่า
ปฏิบัติตามขั้นตอนเหล่านี้เพื่อการติดตั้งที่ถูกต้อง:
- ปิดเครื่อง: ก่อนเริ่มงานไฟฟ้าใดๆ โปรดตรวจสอบให้แน่ใจว่าได้ปิดสวิตช์ตัดไฟที่จ่ายไปยังบริเวณที่จะติดตั้งแล้ว
- เตรียมช่องเปิดฝ้าเพดาน: Cut a 4-inch diameter hole in the ceiling at the desired location. Ensure there are no obstructions such as joists or pipes.
- การเชื่อมต่อสายไฟ: Open the junction box cover. Connect the supply wires to the wires inside the junction box using the provided wire nuts:
- Connect the black wire from the supply to the black wire of the J-Box.
- Connect the white wire from the supply to the white wire of the J-Box.
- Connect the ground wire from the supply to the green wire of the J-Box.
- เลือกอุณหภูมิสี (CCT): Before inserting the light into the ceiling, locate the CCT selection switch on the side of the junction box. Choose your desired color temperature (2700K, 3000K, 3500K, 4000K, or 5000K) by sliding the switch.
- ติดตั้งกล่องเชื่อมต่อ: Place the wired junction box into the ceiling opening.
- ติดตั้งดาวน์ไลท์: Connect the downlight to the junction box via the male/female connector. Push the spring clips on the sides of the downlight upwards and insert the fixture into the ceiling hole. The clips will automatically secure the light in place.
- คืนค่าพลัง: เปิดไฟที่เบรกเกอร์อีกครั้ง

Image: The LED downlight connected to its junction box.

ภาพ: ระยะใกล้ view of the CCT selection switch located on the side of the junction box.

ภาพ: ด้านข้าง view of the downlight showing the tension spring clips used for installation.
คำแนะนำการใช้งาน
การเลือกอุณหภูมิสี
The Maxxima 4-inch LED Downlight features 5 CCT (Correlated Color Temperature) options, allowing you to customize the light output to your preference. The selection switch is located on the side of the junction box.
- 2700K: Soft White (Warm, inviting light)
- 3000K: Warm White (Slightly brighter, still warm)
- 3500K: Bright White (Neutral, balanced light)
- 4000K: Neutral White (Cooler, more energetic light)
- 5000K: Daylight (Brightest, closest to natural daylight)
To change the CCT, you must access the junction box. It is recommended to select your preferred CCT before final installation into the ceiling. If changing after installation, ensure power is off before accessing the J-Box.

Image: Visual representation of the five selectable color temperatures.
ฟังก์ชั่นลดแสง
This LED downlight is dimmable from 20% to 100% when used with a compatible LED dimmer switch. Ensure your dimmer switch is rated for LED lighting to prevent flickering or damage to the fixture.
การซ่อมบำรุง
ไฟดาวน์ไลท์ LED Maxxima ต้องการการบำรุงรักษาเพียงเล็กน้อย
- การทำความสะอาด: ตรวจสอบให้แน่ใจว่าปิดเครื่องก่อนทำความสะอาด เช็ดอุปกรณ์ด้วยผ้านุ่ม แห้ง หรือผ้านุ่มๆ เช็ดเบาๆamp ใช้ผ้าเช็ดทำความสะอาดเท่านั้น ห้ามใช้สารทำความสะอาดที่มีฤทธิ์กัดกร่อนหรือตัวทำละลาย เพราะอาจทำให้พื้นผิวหรือชิ้นส่วนอิเล็กทรอนิกส์เสียหายได้
- ไม่มีชิ้นส่วนที่ผู้ใช้สามารถซ่อมบำรุงได้: แหล่งกำเนิดแสง LED เป็นแบบติดตั้งภายในและไม่สามารถถอดเปลี่ยนได้ ห้ามพยายามเปิดหรือซ่อมแซมโคมไฟ
การแก้ไขปัญหา
If you encounter issues with your downlight, refer to the following table:
| ปัญหา | สาเหตุที่เป็นไปได้ | สารละลาย |
|---|---|---|
| ไฟไม่ติด | ไม่มีแหล่งจ่ายไฟ การเชื่อมต่อสายไฟหลวม สวิตช์หรือเบรกเกอร์วงจรชำรุด | Check circuit breaker and wall switch. Ensure all wiring connections are secure. Test with a known working fixture or consult an electrician. |
| ไฟกะพริบหรือหรี่ลงอย่างผิดปกติ | สวิตซ์หรี่ไฟเข้ากันไม่ได้ สายไฟหลวม | ตรวจสอบให้แน่ใจว่าได้ใช้เครื่องหรี่ไฟ LED ที่รองรับ ตรวจสอบการเชื่อมต่อสายไฟ |
| อุณหภูมิสีไม่ถูกต้อง | สวิตช์ CCT ตั้งค่าไม่ถูกต้อง | Turn off power, access the junction box, and adjust the CCT selection switch to the desired setting. |
การรับประกัน
This Maxxima LED Downlight is covered by a รับประกัน 3 ปี from the date of purchase. This warranty covers defects in materials and workmanship under normal use. For warranty claims or further details, please contact Maxxima customer support.
การสนับสนุนลูกค้า
For technical assistance, troubleshooting, or warranty inquiries, please contact Maxxima customer support. Refer to the product packaging or the official Maxxima webเว็บไซต์สำหรับข้อมูลการติดต่อปัจจุบัน
Please have your model number (MRL-S40905) and date of purchase available when contacting support.