
1. บทนำ
This manual provides essential information for the safe and efficient operation of your TechniSat DIGITRADIO 370 IR. Please read these instructions carefully before using the device and retain them for future reference.
2. คำแนะนำด้านความปลอดภัย
- อย่าวางอุปกรณ์ไว้ในที่ที่มีฝนหรือความชื้น เพื่อป้องกันไฟไหม้หรือไฟฟ้าช็อต
- Do not block ventilation openings. Ensure adequate space around the device for proper airflow.
- ใช้เฉพาะอะแดปเตอร์แปลงไฟที่ให้มากับเครื่องเท่านั้น
- ควรหลีกเลี่ยงการวางอุปกรณ์ไว้ใกล้แหล่งความร้อน เช่น เครื่องทำความร้อน ช่องระบายความร้อน เตา หรืออุปกรณ์อื่นๆ (รวมถึง) ampเครื่องให้ความร้อน) ที่ผลิตความร้อน
- ปกป้องสายไฟไม่ให้ถูกเหยียบหรือถูกหนีบ โดยเฉพาะที่ปลั๊ก เต้ารับไฟฟ้า และจุดที่สายไฟออกจากเครื่อง
- ถอดปลั๊กอุปกรณ์นี้ในระหว่างพายุฝนฟ้าคะนองหรือเมื่อไม่ได้ใช้งานเป็นเวลานาน
- แจ้งบริการทั้งหมดให้ช่างที่ผ่านการรับรองทราบ จำเป็นต้องให้บริการเมื่ออุปกรณ์ได้รับความเสียหายในลักษณะใดก็ตาม เช่น สายไฟหรือปลั๊กชำรุด ของเหลวหกหรือมีวัตถุตกลงไปในอุปกรณ์ อุปกรณ์โดนฝนหรือความชื้น ไม่สามารถทำงานได้ตามปกติ หรือตกหล่น
3. เนื้อหาบรรจุภัณฑ์
ตรวจสอบว่ามีรายการทั้งหมดอยู่ในแพ็คเกจ:
- TechniSat DIGITRADIO 370 IR (Black)
- รีโมทคอนโทรล
- อะแดปเตอร์แปลงไฟ
- คู่มือการใช้งาน (เอกสารนี้)
4. การควบคุมและการเชื่อมต่อ

รูปที่ 4.1: แผงด้านหน้าด้านบนview
The image above displays the front panel of the DIGITRADIO 370 IR, featuring the central display, volume and tuning/OK rotary knobs, and various control buttons such as Power, Mode, Preset, Scan, and Back.
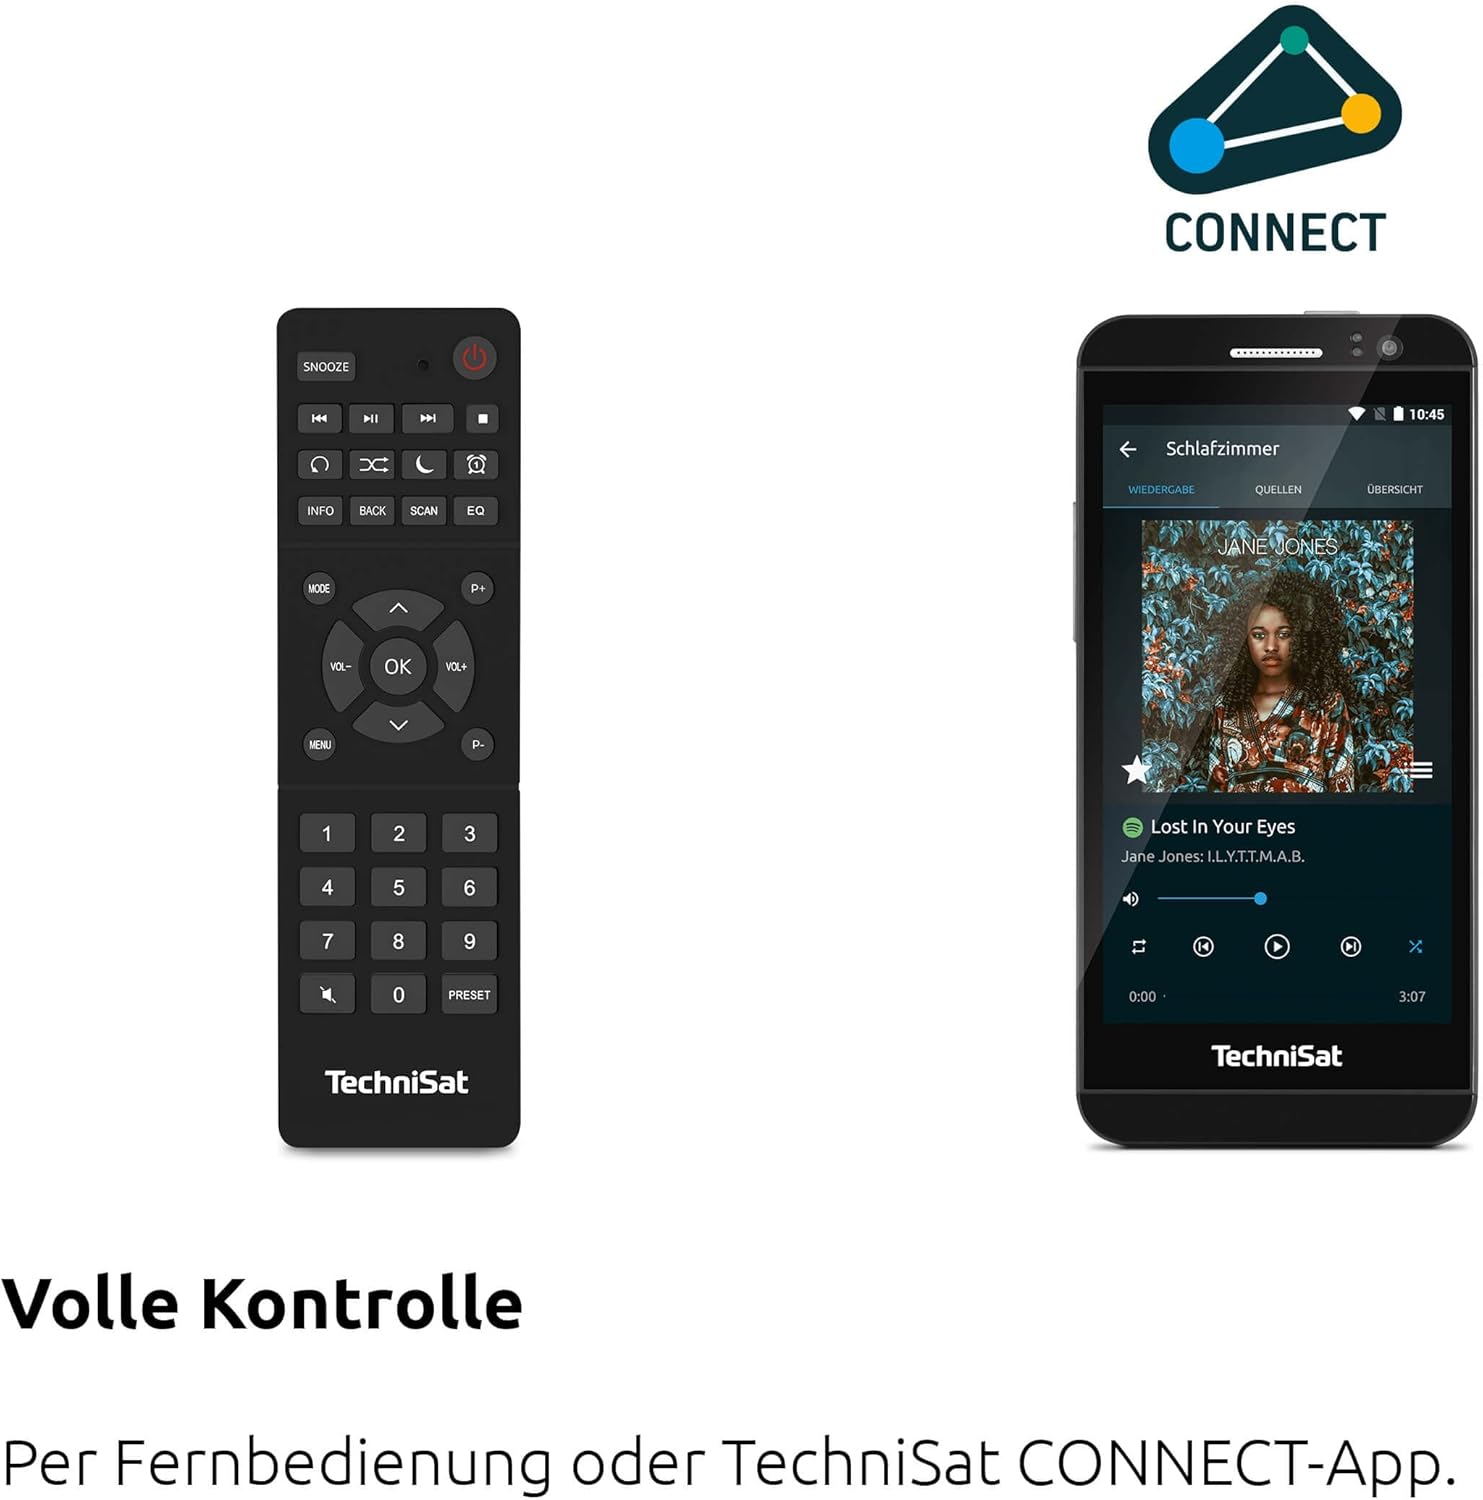
รูปที่ 4.2: รีโมทคอนโทรลและอินเทอร์เฟซแอปพลิเคชัน
This image shows the included remote control with buttons for power, snooze, mode, info, scan, EQ, preset numbers, volume, and navigation. It also illustrates the TechniSat CONNECT app interface on a smartphone, providing an alternative control method.
แผงควบคุมด้านหน้า:
- ปุ่มเปิด/ปิด: เปิด/ปิดอุปกรณ์
- ปุ่มโหมด: Switches between DAB+, FM, Internet Radio, Bluetooth, AUX, and USB modes.
- ปุ่มพรีเซ็ต: เข้าถึงการตั้งค่าสถานีวิทยุที่บันทึกไว้
- ปุ่มปรับระดับเสียง: ปรับระดับเอาต์พุตเสียง
- ปุ่มปรับจูน/ตกลง: นำทางเมนูและยืนยันการเลือก
- ปุ่มสแกน: Initiates station scanning in radio modes.
- ปุ่มย้อนกลับ: กลับไปยังเมนูหรือหน้าจอก่อนหน้า
- แสดง: 2.4-inch TFT color display for information and menu navigation.
การเชื่อมต่อแผงด้านหลัง:
- กำลังไฟเข้า: เชื่อมต่ออะแดปเตอร์จ่ายไฟที่ให้มา
- ช่องต่อสัญญาณเข้า: แจ็คขนาด 3.5 มม. สำหรับเชื่อมต่ออุปกรณ์เสียงภายนอก
- แจ็คหูฟัง: แจ็ค 3.5 มม. เพื่อการฟังส่วนตัว
- พอร์ต USB: For MP3 playback from USB drives and charging external devices.
5. การตั้งค่า
5.1 การเพิ่มพลังเริ่มต้น
- Place the DIGITRADIO 370 IR on a stable, flat surface.
- Extend the telescopic antenna for optimal DAB+ and FM reception.
- Connect the power adapter to the DC IN port on the rear of the radio and then to a wall outlet.
- Press the Power button on the front panel or remote control to turn on the device.
- ทำตามคำแนะนำบนหน้าจอสำหรับการตั้งค่าเริ่มต้น รวมถึงการเลือกภาษาและการกำหนดค่าเครือข่าย
5.2 Network Configuration (WLAN)
To access Internet Radio and app control, the device must be connected to a Wi-Fi network.
- Navigate to the 'Settings' menu using the Tuning/OK knob.
- Select 'Network' and then 'Wi-Fi Setup'.
- The radio will scan for available networks. Select your desired network from the list.
- Enter the Wi-Fi password using the on-screen keyboard and the Tuning/OK knob.
- ยืนยันการเชื่อมต่อ เมื่อเชื่อมต่อแล้ว ไอคอน Wi-Fi จะปรากฏบนหน้าจอ
6. คู่มือการใช้งาน

Figure 6.1: Radio Diversity
This image highlights the multiple radio reception options available: DAB+ Digital Radio, Internet Radio via WLAN, and UKW/FM analog radio.
วิทยุ 6.1 DAB+
- Press the 'Mode' button until 'DAB+' is selected.
- The radio will automatically scan for available DAB+ stations during the first use. To initiate a scan manually, press the 'Scan' button.
- Use the Tuning/OK knob to scroll through the list of available stations. Press the knob to select a station.
- To save a station as a preset, press and hold the 'Preset' button, then select a preset number and confirm.
6.2 วิทยุ FM
- Press the 'Mode' button until 'FM' is selected.
- Press the 'Scan' button to automatically search for and store FM stations.
- Alternatively, use the Tuning/OK knob to manually tune to a frequency.
- To save a station as a preset, press and hold the 'Preset' button, then select a preset number and confirm.
6.3 วิทยุอินเทอร์เน็ต
ตรวจสอบให้แน่ใจว่าวิทยุเชื่อมต่อกับเครือข่าย Wi-Fi แล้ว (ดูหัวข้อ 5.2)
- Press the 'Mode' button until 'Internet Radio' is selected.
- You can browse stations by location, genre, or search for specific stations.
- Use the Tuning/OK knob to navigate and select stations.
- To save a station as a preset, press and hold the 'Preset' button, then select a preset number and confirm.
6.4 การสตรีมเสียงบลูทูธ

Figure 6.2: Bluetooth Audio Streaming
This image demonstrates a smartphone wirelessly streaming music to the radio via Bluetooth, indicating the device's capability for wireless music enjoyment.
- Press the 'Mode' button until 'Bluetooth' is selected. The radio will enter pairing mode.
- บนสมาร์ทโฟนหรืออุปกรณ์บลูทูธอื่นๆ ของคุณ ให้เปิดใช้งานบลูทูธและค้นหาอุปกรณ์ที่ใช้งานได้
- Select 'DIGITRADIO 370 IR' from the list to pair.
- เมื่อจับคู่เสร็จแล้ว คุณสามารถเล่นเสียงจากอุปกรณ์ของคุณผ่านทางวิทยุได้
6.5 การเล่นและการชาร์จผ่าน USB

Figure 6.3: USB Playback and Charging Function
This image illustrates the dual functionality of the USB port: connecting USB storage devices for MP3 playback and using the port to charge compatible devices like smartphones.
- ใส่แฟลชไดรฟ์ USB ที่มี MP3 fileเสียบสายเข้ากับพอร์ต USB ด้านหลังวิทยุ
- Press the 'Mode' button until 'USB' is selected.
- Use the Tuning/OK knob to navigate through folders and select tracks for playback.
- The USB port can also be used to charge compatible smartphones and other devices. Connect your device's charging cable to the USB port.
6.6 การชาร์จแบบไร้สาย

Figure 6.4: Wireless Charging Function
This image shows a hand placing a smartphone on the top surface of the radio, demonstrating the wireless charging capability for compatible smartphones.
The DIGITRADIO 370 IR features a wireless charging surface on its top panel.
- Ensure your smartphone or device supports Qi wireless charging.
- Place your compatible device centrally on the designated wireless charging area on top of the radio.
- The device should indicate that charging has begun.
6.7 Alarm Clock, Sleep Timer, and Snooze
The radio includes an alarm clock, sleep timer, and snooze function.
- นาฬิกาปลุก: Set up to two independent alarms with customizable sources (buzzer, DAB+, FM, Internet Radio) and volume. Access via the 'Settings' menu.
- เวลานอน: Allows the radio to turn off automatically after a set period (e.g., 15, 30, 60 minutes). Access via the 'Settings' menu.
- ปิดเสียงเตือนชั่วคราว: When an alarm sounds, press the 'Snooze' button on the remote control to temporarily pause the alarm.
6.8 App Control (UNDOK App)
The DIGITRADIO 370 IR can be controlled via the UNDOK app on your smartphone or tablet.
- Download the 'UNDOK' app from your device's app store.
- Ensure your smartphone/tablet and the radio are connected to the same Wi-Fi network.
- Open the UNDOK app; it should automatically detect your DIGITRADIO 370 IR.
- You can now control all major functions of the radio, including mode selection, station tuning, volume, and presets, directly from the app.
7. การบำรุงรักษา
7.1 การทำความสะอาด
- ถอดปลั๊กอุปกรณ์ออกจากเต้าเสียบทุกครั้งก่อนทำความสะอาด
- ใช้ผ้าแห้งนุ่มเช็ดพื้นผิวภายนอก
- Do not use liquid cleaners, aerosol cleaners, or strong chemical solvents, as these may damage the finish.
7.2 พื้นที่จัดเก็บ
If storing the device for an extended period, unplug it from the power source and store it in a cool, dry place, away from direct sunlight and extreme temperatures.
8 การแก้ไขปัญหา
| ปัญหา | สาเหตุที่เป็นไปได้ | สารละลาย |
|---|---|---|
| ไม่มีไฟฟ้า | สายไฟไม่ได้เชื่อมต่อ เต้ารับไฟฟ้าชำรุด | ตรวจสอบการเชื่อมต่อสายไฟ ลองใช้ปลั๊กไฟอื่นดู |
| ไม่มีเสียง | ระดับเสียงต่ำเกินไป; เปิดใช้งานโหมดปิดเสียง; เลือกแหล่งสัญญาณไม่ถูกต้อง | Increase volume; Check if mute is active; Select the correct input source (DAB+, FM, Internet, Bluetooth, USB, AUX). |
| การรับสัญญาณวิทยุไม่ดี (DAB+/FM) | เสาอากาศไม่ได้ยืดออก; สัญญาณอ่อน; สัญญาณรบกวน | Fully extend the telescopic antenna; Reposition the radio; Avoid placing near other electronic devices. |
| วิทยุอินเทอร์เน็ตใช้งานไม่ได้ | No Wi-Fi connection; Incorrect Wi-Fi password; Router issue | Check Wi-Fi connection in settings; Re-enter Wi-Fi password; Restart your Wi-Fi router. |
| การจับคู่บลูทูธล้มเหลว | Radio not in pairing mode; Device too far; Bluetooth off on source device | Ensure radio is in Bluetooth mode; Move devices closer; Enable Bluetooth on your source device. |
| การชาร์จแบบไร้สายไม่ทำงาน | Device not Qi-compatible; Device not placed correctly; Phone case too thick | Verify device supports Qi charging; Adjust device position on charging pad; Remove thick phone cases. |
9. ข้อมูลจำเพาะ
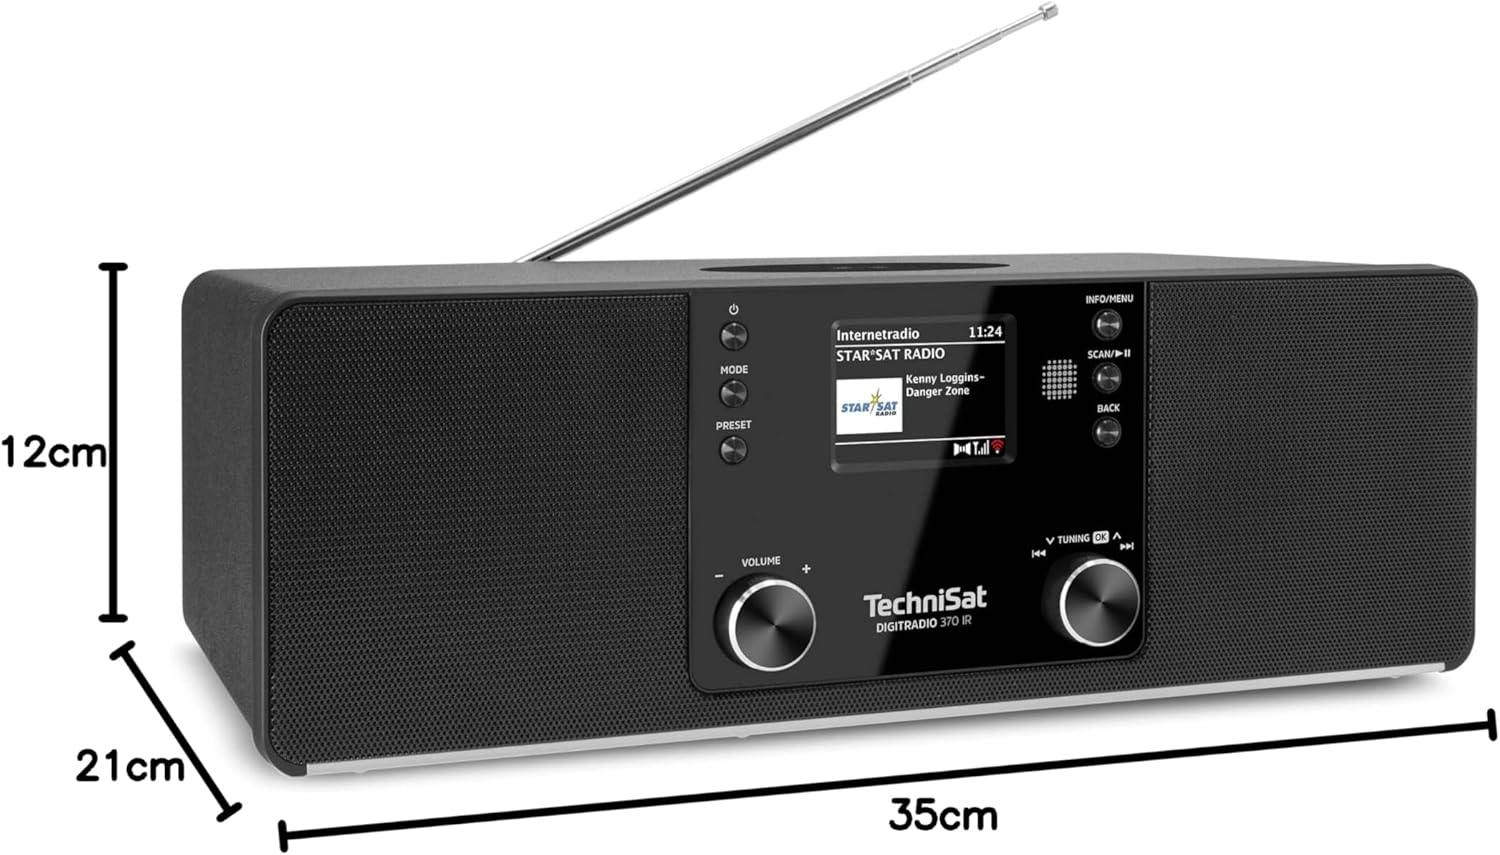
รูปที่ 9.1: ขนาดผลิตภัณฑ์
This image provides a visual representation of the radio's dimensions: 35 cm (length), 12 cm (height), and 21 cm (depth).
| คุณสมบัติ | รายละเอียด |
|---|---|
| หมายเลขรุ่น | 0000/3971 |
| ยี่ห้อ | เทคนิแซท |
| รองรับคลื่นวิทยุ | วิทยุ DAB+, FM, วิทยุอินเทอร์เน็ต |
| เทคโนโลยีการเชื่อมต่อ | Bluetooth, USB, Wireless-Charging, WLAN (2.4 GHz & 5 GHz) |
| คุณสมบัติพิเศษ | Wireless Charging, Bluetooth Audio Streaming, USB Playback & Charging, Alarm Clock, Sleep Timer, Snooze, App Control (UNDOK) |
| โหมดเอาต์พุตเสียง | สเตอริโอ |
| กำลังขับของลำโพง | 2 x 5 Watts RMS (10 Watts total) |
| ประเภทจอภาพ | จอแอลซีดีสี TFT ขนาด 2.4 นิ้ว |
| แหล่งพลังงาน | Electric Cord (230 Volts, 60 Hz) |
| ขนาด (กว้าง x ยาว x สูง) | 35 x 21 x 12 ซม. |
| น้ำหนัก | 2.7 กิโลกรัม |
| วัสดุที่ใช้ทำตัวเรือน | ไม้ |
| อุปกรณ์ที่รองรับ | Smartphone, MP3 player, tablet, laptop, headphones |
| อินเทอร์เฟซ | 3.5 mm Audio (AUX-IN), USB 2.0, 3.5 mm Headphone |
10. การรับประกันและการสนับสนุน
10.1 ข้อมูลการรับประกัน
This product comes with a 2-year warranty (Gewährleistung) from the date of purchase. Please retain your proof of purchase for any warranty claims. The warranty covers manufacturing defects and malfunctions under normal use. It does not cover damage caused by misuse, accidents, unauthorized modifications, or normal wear and tear.
10.2 การสนับสนุนลูกค้า
For technical assistance, troubleshooting beyond this manual, or warranty inquiries, please contact TechniSat customer support. Refer to the TechniSat official webไซต์สำหรับรายละเอียดการติดต่อที่เฉพาะเจาะจงสำหรับภูมิภาคของคุณ
แหล่งข้อมูลออนไลน์: เยี่ยมชมเว็บไซต์อย่างเป็นทางการของ TechniSat website for updated manuals, FAQs, and support information.