1. บทนำ
This manual provides essential information for the safe and efficient use of your Konka 32 Inch HD Standard TV, model KE32MS314. Please read these instructions thoroughly before operating the television and retain them for future reference.
2. ข้อมูลด้านความปลอดภัย
- แหล่งจ่ายไฟ: ตรวจสอบให้แน่ใจว่าทีวีเชื่อมต่อกับแหล่งจ่ายไฟ AC 100-240V, 50/60Hz แล้ว
- การระบายอากาศ : อย่าปิดกั้นช่องระบายอากาศ ควรเว้นพื้นที่รอบทีวีให้เพียงพอเพื่อให้อากาศถ่ายเทได้สะดวก
- น้ำและความชื้น: อย่าให้ทีวีโดนฝนหรือความชื้น อย่าวางสิ่งของที่บรรจุของเหลว เช่น แจกัน บนทีวี
- แหล่งความร้อน: ควรวางโทรทัศน์ให้ห่างจากแหล่งความร้อน เช่น เครื่องทำความร้อน ช่องระบายความร้อน เตา หรืออุปกรณ์อื่นๆ (รวมถึง) ampเครื่องให้ความร้อน) ที่ผลิตความร้อน
- การทำความสะอาด: ถอดปลั๊กทีวีออกจากเต้ารับที่ผนังก่อนทำความสะอาด ใช้ผ้านุ่มและแห้ง ห้ามใช้น้ำยาทำความสะอาดชนิดน้ำหรือสเปรย์ทำความสะอาด
- ฟ้าผ่า: ถอดปลั๊กทีวีในระหว่างที่มีพายุฝนฟ้าคะนองหรือเมื่อไม่ได้ใช้งานเป็นเวลานาน
- การบริการ: อย่าพยายามให้บริการผลิตภัณฑ์นี้ด้วยตนเอง ส่งต่อการบริการทั้งหมดไปยังช่างบริการที่ผ่านการรับรอง
3. เนื้อหาบรรจุภัณฑ์
ตรวจสอบว่ามีรายการทั้งหมดอยู่ในแพ็คเกจ:
- Konka KE32MS314 32-Inch HD LED TV
- รีโมทคอนโทรล
- สายไฟ
- คู่มือการใช้งาน (เอกสารนี้)
- Desktop Stand (if included)
4. การตั้งค่า
4.1 การแกะกล่อง
Carefully remove the TV and all accessories from the packaging. Keep the packaging materials for future transport or storage.
4.2 การติดตั้งขาตั้ง (ทางเลือก)
If you are using the desktop stand, attach it securely to the bottom of the TV using the provided screws. Ensure the stand is stable before placing the TV on a flat surface.
4.3 การติดตั้งบนผนัง (ทางเลือก)
If you plan to wall-mount the TV, refer to the instructions provided with your wall-mount bracket. Ensure the bracket is compatible with the TV's VESA mounting pattern and is installed by qualified personnel.
4.4 การเชื่อมต่ออุปกรณ์
The TV offers various connection ports for external devices. Refer to the image below for port identification and connect your devices accordingly.
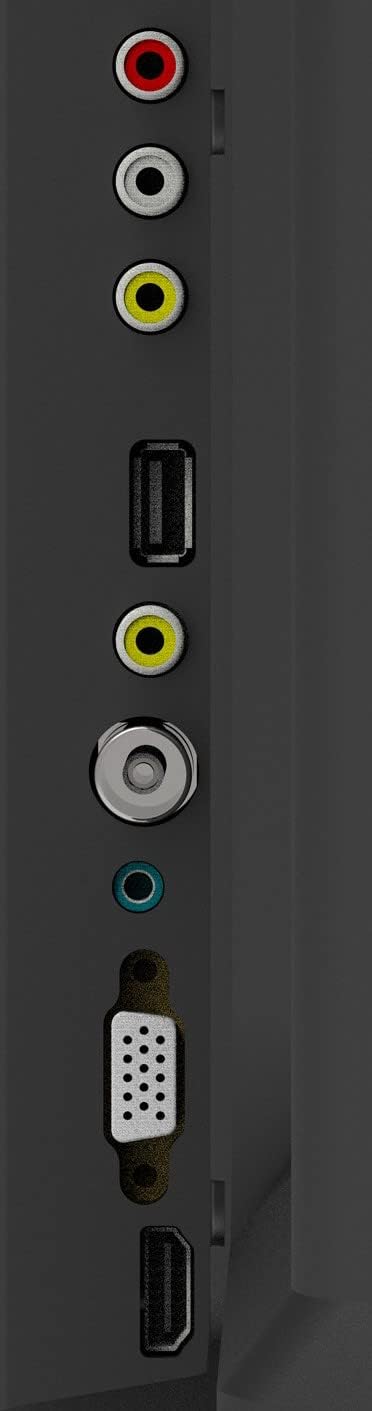
Figure 1: TV Connection Ports
- อินพุตเสาอากาศ: Connect your aerial or cable TV signal to this port.
- ช่องต่อ HDMI (2): Connect devices such as Blu-ray players, game consoles, or set-top boxes. One HDMI input supports Audio Return Channel (ARC).
- อินพุต VGA: เชื่อมต่อคอมพิวเตอร์เพื่อใช้เป็นจอภาพ
- Mini Component / AV Input: Connect older devices using component (YPbPr) or composite (AV) cables.
- USB Inputs (2): เชื่อมต่ออุปกรณ์จัดเก็บข้อมูล USB สำหรับการเล่นสื่อ
- แจ็คหูฟัง: เชื่อมต่อหูฟังเพื่อการฟังแบบส่วนตัว
5. ปฏิบัติการ
5.1 การควบคุมระยะไกล
The included remote control allows you to operate all functions of your TV. Insert two AAA batteries (not included) into the battery compartment, ensuring correct polarity.

รูปที่ 2: เค้าโครงรีโมทคอนโทรล
- พลัง: เปิดหรือปิดทีวี
- อินพุต: Selects the input source (HDMI, AV, VGA, etc.).
- ปุ่มตัวเลข (0-9): เลือกช่องรายการได้โดยตรง
- ฉบับ +/-: ปรับระดับเสียง
- PROG +/-: เปลี่ยนช่อง
- เมนู: เข้าสู่เมนูหลัก
- ปุ่มนำทาง (ขึ้น/ลง/ซ้าย/ขวา): นำทางผ่านตัวเลือกเมนู
- เข้า: ยืนยันการเลือก
- EXIT: ออกจากเมนูหรือฟังก์ชันปัจจุบัน
- ข้อมูล: แสดงข้อมูลช่องสัญญาณ
- ใบ้: ปิดเสียงหรือเปิดเสียง
5.2 การตั้งค่าเริ่มต้น
Upon first power-on, the TV will guide you through an initial setup process. This typically includes selecting your language, country, and performing an automatic channel scan for available broadcasts.
5.3 ฟังก์ชั่นพื้นฐาน
- เปิด/ปิดเครื่อง: Press the POWER button on the remote or the TV's control panel.
- การเลือกแหล่งสัญญาณเข้า: Press the INPUT button repeatedly to cycle through available input sources, or use the menu to select.
- การปรับระดับเสียง: ใช้ปุ่มปรับระดับเสียง +/-
- การเลือกช่อง: Use the PROG +/- buttons or the number buttons.
5.4 การนำทางเมนู
Press the MENU button to access the main menu. Use the navigation buttons to move between options and ENTER to select. Adjust settings such as picture mode, sound mode, and channel settings. Press EXIT to close the menu.
5.5 โหมดเสียง
The TV features 5 audio modes to optimize sound for different content types:
- มาตรฐาน
- ดนตรี
- ภาพยนตร์
- กีฬา
- User (customizable settings)
6. การบำรุงรักษา
6.1 การทำความสะอาดหน้าจอ
เช็ดหน้าจอเบาๆ ด้วยผ้านุ่มที่ไม่เป็นขุย สำหรับรอยฝังแน่น ให้เช็ดเบาๆampen the cloth with water or a specialized screen cleaner (ensure it's safe for LED screens) and wipe gently. Do not apply pressure or use abrasive materials.
6.2 การทำความสะอาดตู้
Wipe the TV cabinet with a soft, dry cloth. Avoid using strong detergents or solvents, as they may damage the finish.
7 การแก้ไขปัญหา
หากคุณประสบปัญหาเกี่ยวกับทีวี โปรดดูปัญหาทั่วไปและวิธีแก้ไขต่อไปนี้:
| ปัญหา | วิธีแก้ปัญหาที่เป็นไปได้ |
|---|---|
| ไม่มีไฟฟ้า | ตรวจสอบว่าสายไฟเสียบเข้ากับทีวีและเต้ารับที่ผนังอย่างแน่นหนาหรือไม่ ตรวจสอบให้แน่ใจว่าเต้ารับใช้งานได้ |
| ไม่มีภาพแต่มีเสียง | ตรวจสอบว่าเลือกแหล่งสัญญาณเข้าที่ถูกต้อง ตรวจสอบการเชื่อมต่อสายเคเบิลกับอุปกรณ์ภายนอก |
| ไม่มีเสียงแต่มีภาพ | Check the volume level and ensure the TV is not muted. Verify audio settings in the menu. |
| รีโมตคอนโทรลไม่ทำงาน | เปลี่ยนแบตเตอรี่ ตรวจสอบให้แน่ใจว่าไม่มีสิ่งกีดขวางระหว่างรีโมทและเซ็นเซอร์อินฟราเรดของทีวี |
| คุณภาพของภาพไม่ดี | Check antenna connection or source device cables. Adjust picture settings in the TV menu. |
8. ข้อมูลจำเพาะ
Detailed specifications for the Konka KE32MS314 TV:
| คุณสมบัติ | รายละเอียด |
|---|---|
| หมายเลขรุ่น | KE32MS314 |
| ขนาดหน้าจอ | 32 นิ้ว |
| เทคโนโลยีการแสดงผล | นำ |
| ปณิธาน | 720p (เอชดี) |
| อัตราการรีเฟรช | 60 เฮิรตซ์ |
| Viewอิงแองเกิล | 178 องศา |
| ระบบเสียง | 2 x 8W Stereophonic |
| โหมดเสียง | Standard, Music, Movie, Sport, User |
| การเชื่อมต่อ | 2 HDMI (including ARC), 2 USB, VGA, Mini Component/AV, Antenna Input, Headphone Jack, Ethernet |
| คุณสมบัติพิเศษ | Flat Display, D3 Image Noise Reduction, Automatic Volume Level Maintenance |
| บริการอินเทอร์เน็ตที่รองรับ | YouTube |
| ขนาดสินค้า (รวมขาตั้ง) | 73.2W x 20.7D x 47.9H cm (approx.) |
| น้ำหนักผลิตภัณฑ์ | 4.5 กก. |
9. การรับประกันและการสนับสนุน
For warranty information and technical support, please refer to the warranty card included with your product or contact Konka customer service. Keep your purchase receipt as proof of purchase for warranty claims.